mybatis源码-解析配置文件(四)之配置文件Mapper解析
在 mybatis源码-解析配置文件(三)之配置文件Configuration解析 中, 讲解了 Configuration 是如何解析的。
其中, mappers作为configuration节点的一部分配置, 在本文章中, 我们讲解解析mappers节点, 即 xxxMapper.xml 文件的解析。
1 解析入口
在解析 mybatis-config.xml 时, 会进行解析 xxxMapper.xml 的文件。
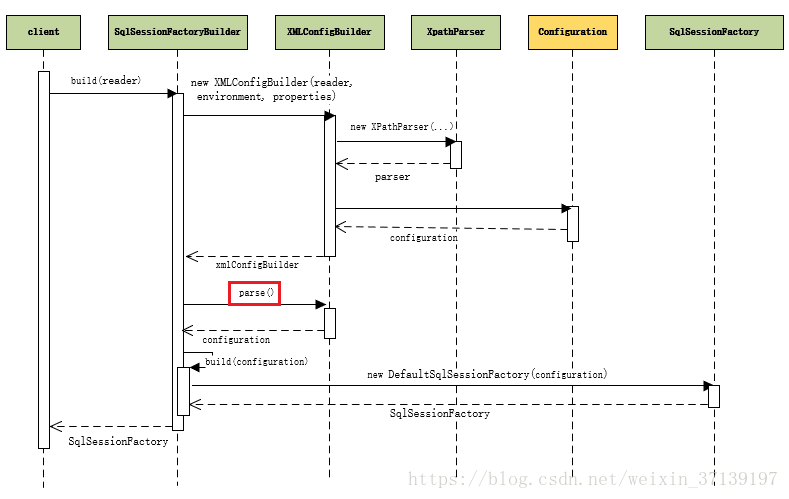
在图示流程的 XMLConfigBuilder.parse() 函数中, 该函数内部, 在解析 mappers 节点时, 会调用 mapperElement(root.evalNode("mappers"))。
private void mapperElement(XNode parent) throws Exception {

    if (parent != null) {

      // 遍历其子节点

      for (XNode child : parent.getChildren()) {

        // 如果配置的是包(packege)

        if ("package".equals(child.getName())) {

          String mapperPackage = child.getStringAttribute("name");

          configuration.addMappers(mapperPackage);

        } else {

          // 如果配置的是类(有三种情况 resource / class / url)

          String resource = child.getStringAttribute("resource");

          String url = child.getStringAttribute("url");

          String mapperClass = child.getStringAttribute("class");

          // 配置一:使用 resource 类路径

          if (resource != null && url == null && mapperClass == null) {

            ErrorContext.instance().resource(resource);

            InputStream inputStream = Resources.getResourceAsStream(resource);

            // 创建 XMLMapperBuilder 对象

            XMLMapperBuilder mapperParser = new XMLMapperBuilder(inputStream, configuration, resource, configuration.getSqlFragments());

            // 解析 xxxMapper.xml

            mapperParser.parse();

            // 配置二: 使用 url 绝对路径

          } else if (resource == null && url != null && mapperClass == null) {

            ErrorContext.instance().resource(url);

            InputStream inputStream = Resources.getUrlAsStream(url);

            // 创建 XMLMapperBuilder 对象

            XMLMapperBuilder mapperParser = new XMLMapperBuilder(inputStream, configuration, url, configuration.getSqlFragments());

            // 解析 xxxMapper.xml

            mapperParser.parse();

            // 配置三: 使用 class 类名

          } else if (resource == null && url == null && mapperClass != null) {

            // 通过反射创建对象

            Class<?> mapperInterface = Resources.classForName(mapperClass);

            // 添加

            configuration.addMapper(mapperInterface);

          } else {

            throw new BuilderException("A mapper element may only specify a url, resource or class, but not more than one.");

          }

        }

      }

    }

}
从以上源码中可以发现, 配置时, 一种是通过包的方式, 一种是通过指定文件的方式。
但不管是怎么配置, 最后的找落点都是 xxxMapper.xml 文件的解析。
2 解析
包扫描时, 会加载指定包下的文件, 最终会调用
private void loadXmlResource() {

    // 判断是否已经加载过

    if (!configuration.isResourceLoaded("namespace:" + type.getName())) {

      String xmlResource = type.getName().replace('.', '/') + ".xml";

      InputStream inputStream = null;

      try {

        inputStream = Resources.getResourceAsStream(type.getClassLoader(), xmlResource);

      } catch (IOException e) {

        // ignore, resource is not required

      }

      if (inputStream != null) {

        XMLMapperBuilder xmlParser = new XMLMapperBuilder(inputStream, assistant.getConfiguration(), xmlResource, configuration.getSqlFragments(), type.getName());

        // 解析

        xmlParser.parse();

      }

    }

}
因此, 不管是包扫描还是文件扫描, 最终都经历一下 xmlParser.parse() 解析过程。
2.1 解析流程
解析 xxxMapper.xml 文件的是下面这个函数,解析 mapper 节点。
  public void parse() {

    // 判断是否已经加载过

    if (!configuration.isResourceLoaded(resource)) {

      // 解析 <mapper> 节点

      configurationElement(parser.evalNode("/mapper"));

      // 标记一下,已经加载过了

      configuration.addLoadedResource(resource);

      // 绑定映射器到namespace

      bindMapperForNamespace();

    }

    // 处理 configurationElement 中解析失败的<resultMap>

    parsePendingResultMaps();

    // 处理configurationElement 中解析失败的<cache-ref>

    parsePendingCacheRefs();

    // 处理 configurationElement 中解析失败的 SQL 语句

    parsePendingStatements();

  }
大致流程:
- 解析调用
configurationElement()函数来解析各个节点 - 标记传入的文件已经解析了
- 绑定文件到相应的 namespace, 所以 namespace 需要是唯一的
- 处理解析失败的节点
2.2 解析各个节点
  private void configurationElement(XNode context) {

    try {

      // 获取namespace属性, 其代表者这个文档的标识

      String namespace = context.getStringAttribute("namespace");

      if (namespace == null || namespace.equals("")) {

        throw new BuilderException("Mapper's namespace cannot be empty");

      }

      builderAssistant.setCurrentNamespace(namespace);

      // 解析 <cache-ref> 节点

      cacheRefElement(context.evalNode("cache-ref"));

      // 解析 <cache> 节点

      cacheElement(context.evalNode("cache"));

      // 解析 </mapper/parameterMap> 节点

      parameterMapElement(context.evalNodes("/mapper/parameterMap"));

      // 解析 </mapper/resultMap> 节点

      resultMapElements(context.evalNodes("/mapper/resultMap"));

      // 解析 </mapper/sql> 节点

      sqlElement(context.evalNodes("/mapper/sql"));

      // 解析 select|insert|update|delet 节点

      buildStatementFromContext(context.evalNodes("select|insert|update|delete"));

    } catch (Exception e) {

      throw new BuilderException("Error parsing Mapper XML. Cause: " + e, e);

    }

  }
为了避免篇幅太长, 在此就不深入讲解各个解析过程, 后续会开专门的章节。
一起学 mybatis
你想不想来学习 mybatis? 学习其使用和源码呢?那么, 在博客园关注我吧!!
我自己打算把这个源码系列更新完毕, 同时会更新相应的注释。快去 star 吧!!
mybatis源码-解析配置文件(四)之配置文件Mapper解析的更多相关文章
- Mybatis源码详解系列(三)--从Mapper接口开始看Mybatis的执行逻辑
简介 Mybatis 是一个持久层框架,它对 JDBC 进行了高级封装,使我们的代码中不会出现任何的 JDBC 代码,另外,它还通过 xml 或注解的方式将 sql 从 DAO/Repository ...
- mybatis源码分析(二)------------配置文件的解析
这篇文章中,我们将讲解配置文件中 properties,typeAliases,settings和environments这些节点的解析过程. 一 properties的解析 private void ...
- mybatis源码学习(四):动态SQL的解析
之前的一片文章中我们已经了解了MappedStatement中有一个SqlSource字段,而SqlSource又有一个getBoundSql方法来获得BoundSql对象.而BoundSql中的sq ...
- mybatis源码分析(四)---------------代理对象的生成
在mybatis两种开发方式这边文章中,我们提到了Mapper动态代理开发这种方式,现在抛出一个问题:通过sqlSession.getMapper(XXXMapper.class)来获取代理对象的过程 ...
- MyBatis源码分析(四):SQL执行过程分析
一.获取Mapper接口的代理 根据上一节,Mybatis初始化之后,利用sqlSession(defaultSqlSession)的getMapper方法获取Mapper接口 1 @Override ...
- mybatis 源码分析(四)一二级缓存分析
本篇博客主要讲了 mybatis 一二级缓存的构成,以及一些容易出错地方的示例分析: 一.mybatis 缓存体系 mybatis 的一二级缓存体系大致如下: 首先当一二级缓存同时开启的时候,首先命中 ...
- Mybatis源码解读-配置加载和Mapper的生成
问题 Mybatis四大对象的创建顺序? Mybatis插件的执行顺序? 工程创建 环境:Mybatis(3.5.9) mybatis-demo,参考官方文档 简单示例 这里只放出main方法的示例, ...
- mybatis源码探索笔记-3(使用代理mapper执行方法)
前言 前面两章我们构建了SqlSessionFactory,并通过SqlSessionFactory创建了我们需要的SqlSession,并通过这个SqlSession获取了我们需要的代理mapper ...
- mybatis源码学习(一):Mapper的绑定
在mybatis中,我们可以像下面这样通过声明对应的接口来绑定XML中的mapper,这样可以让我们尽早的发现XML的错误. 定义XML: <?xml version="1.0&quo ...
- 【mybatis源码学习】与spring整合Mapper接口执行原理
一.重要的接口 org.mybatis.spring.mapper.MapperFactoryBean MapperScannerConfigurer会向spring中注册该bean,一个mapper ...
随机推荐
- React Refs
React Refs React 支持一种非常特殊的属性 Ref ,你可以用来绑定到 render() 输出的任何组件上. 这个特殊的属性允许你引用 render() 返回的相应的支撑实例( back ...
- Asp.net MVC通过自定义特性实现Action日志记录
一.自定义特性 /// <summary> /// 描述特性 /// </summary> [AttributeUsage(AttributeTargets.Method)] ...
- Kali Linux 初始化配置:Apache2 /SSH /FTP
Kali Linux是基于Debian的Linux发行版, 设计用于数字取证操作系统.Kali Linux预装了许多渗透测试软件,包括nmap .Wireshark .John the Ripper, ...
- RBAC权限管理系统数据模型
懒得多写了,懂的看建表脚本就懂了... -- ---------------------------- -- Table structure for ucb_user -- ------------- ...
- C#从入门到精通视频教程(2009年最新)- 视频列表
http://www.jz97.net/index.php/playlist/view/182/page/2 C#从入门到精通视频教程(2009年最新)- 视频列表
- 添加xmlns:android="http://schemas.android.com/apk/res/android"的意思
http://www.cnblogs.com/lovely/archive/2013/01/17/2865192.html xmlns:android="http://schemas.and ...
- 数据挖掘十大算法--K-均值聚类算法
一.相异度计算 在正式讨论聚类前,我们要先弄清楚一个问题:怎样定量计算两个可比較元素间的相异度.用通俗的话说.相异度就是两个东西区别有多大.比如人类与章鱼的相异度明显大于人类与黑猩猩的相异度,这是能 ...
- laravel orm进行增删改查
https://laravelacademy.org/post/9699.html 建议用DB门面直接操作数据库,因为ORM性能低.数据查询上面,ORM不会比DB差的,就比如with,是用了sql最基 ...
- kafka监控kafka-eagle 容器化配置
由于kafka.zk 集群已经部署在k8s中, kafka的服务名 kafka-hs, zk的服务名为:zk-cs ,对kafka进行监控,所以需要把监控部署到k8s中,选择使用kafka-eagl ...
- 单节点etcd配置
$ cat /etc/etcd/etcd.conf ETCD_DATA_DIR="/var/lib/etcd/default.etcd" #监听URL,用于与其他节点通讯 ETCD ...