
Mybatis源码解读-配置加载和Mapper的生成
问题
- Mybatis四大对象的创建顺序?
- Mybatis插件的执行顺序?
工程创建
环境:Mybatis(3.5.9)
简单示例
这里只放出main方法的示例,其余类请看demo工程。
public static void main(String[] args) throws Exception {

    // 配置文件路径

    String resource = "mybatis-config.xml";

    InputStream inputStream = Resources.getResourceAsStream(resource);

    // 1.读取配置,创建SqlSessionFactory

    SqlSessionFactory sqlSessionFactory = new SqlSessionFactoryBuilder().build(inputStream);

    // 2.通过工厂获取SqlSession

    SqlSession session = sqlSessionFactory.openSession();

    try {

        // 3.获取mapper代理对象

        StudentMapper mapper = session.getMapper(StudentMapper.class);

        // 4.执行查询,此处才真正连接数据库

        System.out.println(mapper.selectByName("张三"));

    } finally {

        // 5.关闭连接

        session.close();

    }

}
Mapper的创建
我们使用Mybatis操作数据库,主要是通过mapper对象(在hibernate中叫dao对象)。
那么,我们不按顺序从读取配置初始化开始讲,直接看看mapper对象是如何获取与执行的。
获取mapper
// StudentMapper mapper = session.getMapper(StudentMapper.class);

DefaultSqlSession.getMapper(Class<T> type)  -->

Configuration.getMapper(Class<T> type, SqlSession sqlSession) -->

MapperRegistry.getMapper(Class<T> type, SqlSession sqlSession) -->

MapperProxyFactory.newInstance(SqlSession sqlSession) -->

MapperProxyFactory.newInstance(MapperProxy<T> mapperProxy)
咱们来看看MapperProxyFactory.newInstance(MapperProxy mapperProxy)的实现
protected T newInstance(MapperProxy<T> mapperProxy) {

  // 可以转换成这样,返回的是StudentMapper的代理对象

  // final MapperProxy<T> mapperProxy = new MapperProxy<>(sqlSession, StudentMapper.class, methodCache);

  // Proxy.newProxyInstance(StudentMapper.class.getClassLoader(), new Class[] { StudentMapper.class }, mapperProxy);

  return (T) Proxy.newProxyInstance(mapperInterface.getClassLoader(), new Class[] { mapperInterface }, mapperProxy);

}
也就是说,实际返回的是
MapperProxy对象,StudentMapper被代理了。执行mapper的方法
已知mapper对象被代理了,那么执行mapper的所有方法,都会先经过
MapperProxy的invoke方法public Object invoke(Object proxy, Method method, Object[] args) throws Throwable {
try {
// 如果执行的是Object的方法,则直接执行,不继续处理mybatis的逻辑
if (Object.class.equals(method.getDeclaringClass())) {
// 举例,如果执行的是mapper.toString(),则进入此判断
return method.invoke(this, args);
} else {
// cachedInvoker(method):创建MapperMethodInvoker并缓存起来
return cachedInvoker(method).invoke(proxy, method, args, sqlSession);
}
} catch (Throwable t) {
throw ExceptionUtil.unwrapThrowable(t);
}
}
cachedInvoker(method)返回的是
PlainMethodInvoker,继续进去看看// PlainMethodInvoker的方法
public Object invoke(Object proxy, Method method, Object[] args, SqlSession sqlSession) throws Throwable {
return mapperMethod.execute(sqlSession, args);
} // MapperMethod#execute(SqlSession sqlSession, Object[] args)
public Object execute(SqlSession sqlSession, Object[] args) {
Object result;
switch (command.getType()) {
case INSERT: {
......
break;
}
case UPDATE: {
......
break;
}
case DELETE: {
......
break;
}
case SELECT:
......
break;
case FLUSH:
result = sqlSession.flushStatements();
break;
default:
throw new BindingException("Unknown execution method for: " + command.getName());
}
......
return result;
}
终于,看到了熟悉insert、update关键字,这里就是具体解析执行sql,并返回结果的逻辑。咱们先略过。回去看看是如何加载配置以及生成SqlSession的。
SqlSessionFactory
SqlSessionFactory的生成过程如下
public SqlSessionFactory build(InputStream inputStream) {

  return build(inputStream, null, null);

}

public SqlSessionFactory build(InputStream inputStream, String environment, Properties properties) {

  try {

    // xml配置解析类

    XMLConfigBuilder parser = new XMLConfigBuilder(inputStream, environment, properties);

    // build方法返回DefaultSqlSessionFactory

    // 主要看parser.parse()

    return build(parser.parse());

  } catch (Exception e) {

    throw ExceptionFactory.wrapException("Error building SqlSession.", e);

  } finally {

    // 异常上下文对象,线程内共享

    ErrorContext.instance().reset();

    try {

      inputStream.close();

    } catch (IOException e) {

      // Intentionally ignore. Prefer previous error.

    }

  }

}

public SqlSessionFactory build(Configuration config) {

  return new DefaultSqlSessionFactory(config);

}
下面来看看parser.parse()方法
// XMLConfigBuilder#parse()

public Configuration parse() {

  if (parsed) {

    throw new BuilderException("Each XMLConfigBuilder can only be used once.");

  }

  parsed = true;

  // parser.evalNode("/configuration"):获取configuration节点

  // 例如:<configuration> xxx </configuration>

  // parseConfiguration才是重点

  parseConfiguration(parser.evalNode("/configuration"));

  return configuration;

}

// 这是重点

private void parseConfiguration(XNode root) {

  try {

    propertiesElement(root.evalNode("properties"));

    Properties settings = settingsAsProperties(root.evalNode("settings"));

    loadCustomVfs(settings);

    loadCustomLogImpl(settings);

    typeAliasesElement(root.evalNode("typeAliases"));

    pluginElement(root.evalNode("plugins"));

    objectFactoryElement(root.evalNode("objectFactory"));

    objectWrapperFactoryElement(root.evalNode("objectWrapperFactory"));

    reflectorFactoryElement(root.evalNode("reflectorFactory"));

    settingsElement(settings);

    // 环境配置

    environmentsElement(root.evalNode("environments"));

    databaseIdProviderElement(root.evalNode("databaseIdProvider"));

    typeHandlerElement(root.evalNode("typeHandlers"));

    // 映射器配置

    mapperElement(root.evalNode("mappers"));

  } catch (Exception e) {

    throw new BuilderException("Error parsing SQL Mapper Configuration. Cause: " + e, e);

  }

}
详细XML的配置请参考官网:mybatis – MyBatis 3 | 配置
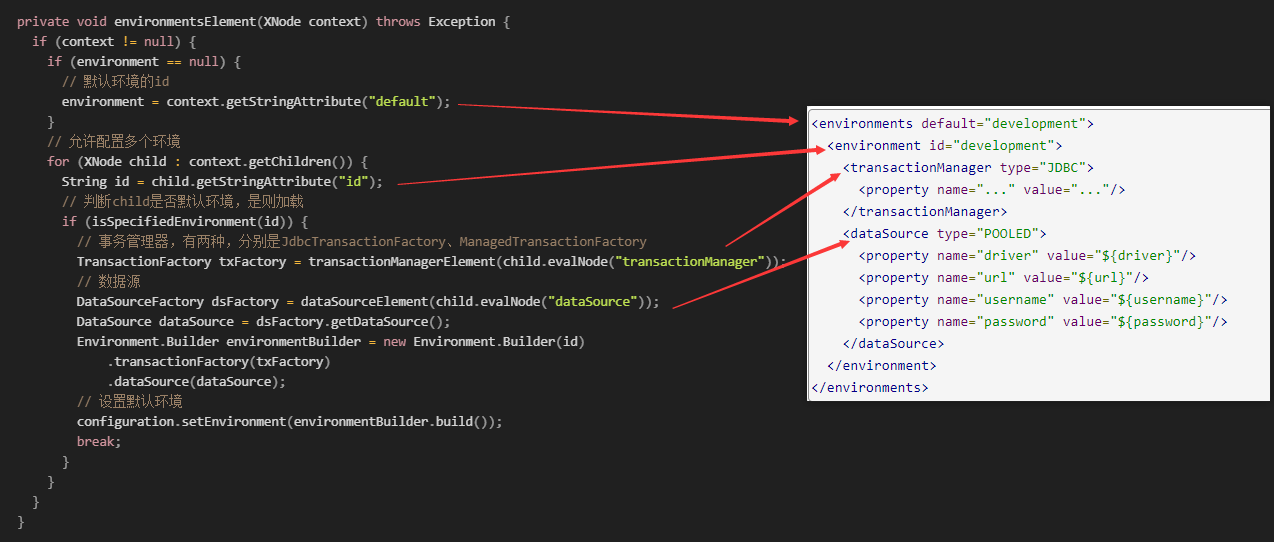
这里,咱们只讲环境配置,其他的篇幅有限,请自行查看源码。
SqlSession
接下来看看SqlSession的创建
// DefaultSqlSessionFactory#openSession() -->

// DefaultSqlSessionFactory#openSessionFromDataSource(configuration.getDefaultExecutorType(), null, false)

private SqlSession openSessionFromDataSource(ExecutorType execType, TransactionIsolationLevel level, boolean autoCommit) {

  Transaction tx = null;

  try {

    // 默认环境

    final Environment environment = configuration.getEnvironment();

    // 事务工厂

    final TransactionFactory transactionFactory = getTransactionFactoryFromEnvironment(environment);

    // 上面那两个对象,在创建SqlSessionFactory时,就已经创建好了

    // 通过事务工厂创建事务

    tx = transactionFactory.newTransaction(environment.getDataSource(), level, autoCommit);

    // 创建mybatis四大对象之一的Executor

    final Executor executor = configuration.newExecutor(tx, execType);

    return new DefaultSqlSession(configuration, executor, autoCommit);

  } catch (Exception e) {

    closeTransaction(tx); // may have fetched a connection so lets call close()

    throw ExceptionFactory.wrapException("Error opening session.  Cause: " + e, e);

  } finally {

    ErrorContext.instance().reset();

  }

}
看看四大对象之一Executor的创建
// Configuration#newExecutor(Transaction transaction, ExecutorType executorType)

public Executor newExecutor(Transaction transaction, ExecutorType executorType) {

  // 判断需要创建的执行器的类型

  executorType = executorType == null ? defaultExecutorType : executorType;

  executorType = executorType == null ? ExecutorType.SIMPLE : executorType;

  Executor executor;

  if (ExecutorType.BATCH == executorType) {

    // 批处理执行器

    executor = new BatchExecutor(this, transaction);

  } else if (ExecutorType.REUSE == executorType) {

    // 重用执行器

    executor = new ReuseExecutor(this, transaction);

  } else {

    // 简单处理器(默认)

    executor = new SimpleExecutor(this, transaction);

  }

  // 是否启用二级缓存(二级缓存默认启用)

  if (cacheEnabled) {

    // 此处使用的是装饰器模式,对executor进行二次包装

    executor = new CachingExecutor(executor);

  }

  // 这块是mybatis的插件处理,用代理的方式,以后再开文章讲

  executor = (Executor) interceptorChain.pluginAll(executor);

  return executor;

}
Mapper的执行
Mapper的创建一节,讲到mapper执行会被代理。
下面就以StudentMapper为例,讲讲mapper的执行。
public interface StudentMapper {

    List<Student> selectByName(@Param("name") String name);

}
当执行selectByName时候,进入到MapperMethod#execute(SqlSession sqlSession, Object[] args)方法。
public Object execute(SqlSession sqlSession, Object[] args) {

  Object result;

  switch (command.getType()) {

    ......

    // 忽略insert、update、delete的逻辑,直接看select

    case SELECT:

      // 如果返回null或者设置了自定义的结果处理器

      if (method.returnsVoid() && method.hasResultHandler()) {

        executeWithResultHandler(sqlSession, args);

        result = null;

      // 如果返回集合或者数组,我们的查询会进到这里,因为selectByName返回值是List

      // 这是入口

      } else if (method.returnsMany()) {

        result = executeForMany(sqlSession, args);

      // 如果返回map

      } else if (method.returnsMap()) {

        result = executeForMap(sqlSession, args);

      // 这个没用过,不会

      } else if (method.returnsCursor()) {

        result = executeForCursor(sqlSession, args);

      } else {

        // 默认返回单个对象

        Object param = method.convertArgsToSqlCommandParam(args);

        result = sqlSession.selectOne(command.getName(), param);

        if (method.returnsOptional()

            && (result == null || !method.getReturnType().equals(result.getClass()))) {

          result = Optional.ofNullable(result);

        }

      }

      break;

    case FLUSH:

      result = sqlSession.flushStatements();

      break;

    default:

      throw new BindingException("Unknown execution method for: " + command.getName());

  }

  if (result == null && method.getReturnType().isPrimitive() && !method.returnsVoid()) {

    throw new BindingException("Mapper method '" + command.getName()

        + " attempted to return null from a method with a primitive return type (" + method.getReturnType() + ").");

  }

  return result;

}
继续看executeForMany方法
private <E> Object executeForMany(SqlSession sqlSession, Object[] args) {

  List<E> result;

  // 参数转换,如果参数有注解,则会转成map,且可使用param1, param2

  // 例如:@Param("name")会转成  {"name":xxx, "param1": xxx}

  Object param = method.convertArgsToSqlCommandParam(args);

  // 是否分页

  if (method.hasRowBounds()) {

    RowBounds rowBounds = method.extractRowBounds(args);

    result = sqlSession.selectList(command.getName(), param, rowBounds);

  } else {

    // 这是入口

    result = sqlSession.selectList(command.getName(), param);

  }

  // 如果result不能强转成方法的返回值(在此例子中getReturnType就是List<Studet>)

  if (!method.getReturnType().isAssignableFrom(result.getClass())) {

    if (method.getReturnType().isArray()) {

      return convertToArray(result);

    } else {

      return convertToDeclaredCollection(sqlSession.getConfiguration(), result);

    }

  }

  return result;

}
继续看,因为案例中没用到分页,所以执行的是sqlSession.selectList(command.getName(), param);
// DefaultSqlSession#selectList(String statement, Object parameter) -->

// DefaultSqlSession#selectList(String statement, Object parameter, RowBounds rowBounds) -->

// DefaultSqlSession#selectList(String statement, Object parameter, RowBounds rowBounds, ResultHandler handler) -->

private <E> List<E> selectList(String statement, Object parameter, RowBounds rowBounds, ResultHandler handler) {

  try {

    // MapperStatement在前面解析xml时,就已经创建了

    // 忘了就看看创建SqlSessionFactory时是如何解析xml文件的mappers节点的

    MappedStatement ms = configuration.getMappedStatement(statement);

    // 执行器执行查询方法

    return executor.query(ms, wrapCollection(parameter), rowBounds, handler);

  } catch (Exception e) {

    throw ExceptionFactory.wrapException("Error querying database.  Cause: " + e, e);

  } finally {

    ErrorContext.instance().reset();

  }

}
继续看,executor.query方法,Mybatis-PageHelper插件就是通过拦截query方法,插入分页参数的。
// CachingExecutor

public <E> List<E> query(MappedStatement ms, Object parameterObject, RowBounds rowBounds, ResultHandler resultHandler) throws SQLException {

  // 对sql进行预处理

    BoundSql boundSql = ms.getBoundSql(parameterObject);

  // 创建一级缓存的key

  CacheKey key = createCacheKey(ms, parameterObject, rowBounds, boundSql);

  // 这是入口

  return query(ms, parameterObject, rowBounds, resultHandler, key, boundSql);

}

public <E> List<E> query(MappedStatement ms, Object parameterObject, RowBounds rowBounds, ResultHandler resultHandler, CacheKey key, BoundSql boundSql)

      throws SQLException {

  Cache cache = ms.getCache();

  // 有缓存的逻辑

  if (cache != null) {

    flushCacheIfRequired(ms);

    if (ms.isUseCache() && resultHandler == null) {

      ensureNoOutParams(ms, boundSql);

      @SuppressWarnings("unchecked")

      List<E> list = (List<E>) tcm.getObject(cache, key);

      if (list == null) {

        list = delegate.query(ms, parameterObject, rowBounds, resultHandler, key, boundSql);

        tcm.putObject(cache, key, list); // issue #578 and #116

      }

      return list;

    }

  }

  // delegate是SimpleExecutor

  // 这是入口

  return delegate.query(ms, parameterObject, rowBounds, resultHandler, key, boundSql);

}

// BaseExecutor

public <E> List<E> query(MappedStatement ms, Object parameter, RowBounds rowBounds, ResultHandler resultHandler, CacheKey key, BoundSql boundSql) throws SQLException {

  ErrorContext.instance().resource(ms.getResource()).activity("executing a query").object(ms.getId());

  if (closed) {

    throw new ExecutorException("Executor was closed.");

  }

  // 是否要清除缓存,默认设置是如果非select方法,都会清除缓存。

  if (queryStack == 0 && ms.isFlushCacheRequired()) {

    clearLocalCache();

  }

  List<E> list;

  try {

    queryStack++;

    // 从一级缓存提取数据

    list = resultHandler == null ? (List<E>) localCache.getObject(key) : null;

    if (list != null) {

      handleLocallyCachedOutputParameters(ms, key, parameter, boundSql);

    } else {

      // 从数据库查询数据

      // 这是入口

      list = queryFromDatabase(ms, parameter, rowBounds, resultHandler, key, boundSql);

    }

  } finally {

    queryStack--;

  }

  if (queryStack == 0) {

    // 懒加载相关

    for (DeferredLoad deferredLoad : deferredLoads) {

      deferredLoad.load();

    }

    // issue #601

    deferredLoads.clear();

    if (configuration.getLocalCacheScope() == LocalCacheScope.STATEMENT) {

      // issue #482

      clearLocalCache();

    }

  }

  return list;

}

private <E> List<E> queryFromDatabase(MappedStatement ms, Object parameter, RowBounds rowBounds, ResultHandler resultHandler, CacheKey key, BoundSql boundSql) throws SQLException {

  List<E> list;

  localCache.putObject(key, EXECUTION_PLACEHOLDER);

  try {

    // 这是入口

    list = doQuery(ms, parameter, rowBounds, resultHandler, boundSql);

  } finally {

    localCache.removeObject(key);

  }

  // 结果放入一级缓存

  localCache.putObject(key, list);

  if (ms.getStatementType() == StatementType.CALLABLE) {

    localOutputParameterCache.putObject(key, parameter);

  }

  return list;

}
下面,重点来了,准备了这么久,终于要查询数据库了
// SimpleExecutor

public <E> List<E> doQuery(MappedStatement ms, Object parameter, RowBounds rowBounds, ResultHandler resultHandler, BoundSql boundSql) throws SQLException {

  Statement stmt = null;

  try {

    Configuration configuration = ms.getConfiguration();

    // 重点又来了,mybatis四大对象的3个,在这里创建

    // 按顺序是:ParameterHandler、ParameterHandler、StatementHandler

    // 又一个装饰器模式,实际创建的是PreparedStatementHandler(默认),但是使用RoutingStatementHandler又包了一层

    StatementHandler handler = configuration.newStatementHandler(wrapper, ms, parameter, rowBounds, resultHandler, boundSql);

    // 创建jdbc的statement对象,直到这里,才会真正获取数据库连接

        stmt = prepareStatement(handler, ms.getStatementLog());

    // 执行查询,并使用resultHandler处理结果

    return handler.query(stmt, resultHandler);

  } finally {

    closeStatement(stmt);

  }

}
答案
- 创建顺序为:Executor、ParameterHandler、ParameterHandler、StatementHandler
- 插件的执行顺序,如果都命中同一个方法,那么顺序为,越晚注册的插件,越先执行(因为代理)
Mybatis源码解读-配置加载和Mapper的生成的更多相关文章
- Mybatis源码解读-SpringBoot中配置加载和Mapper的生成
本文mybatis-spring-boot探讨在springboot工程中mybatis相关对象的注册与加载. 建议先了解mybatis在spring中的使用和springboot自动装载机制,再看此 ...
- Mybatis源码解析(二) —— 加载 Configuration
Mybatis源码解析(二) -- 加载 Configuration 正如上文所看到的 Configuration 对象保存了所有Mybatis的配置信息,也就是说mybatis-config. ...
- MyBatis 源码篇-资源加载
本章主要描述 MyBatis 资源加载模块中的 ClassLoaderWrapper 类和 Java 加载配置文件的三种方式. ClassLoaderWrapper 上一章的案例,使用 org.apa ...
- mybatis源码分析--如何加载配置及初始化
简介 Mybatis 是一个持久层框架,它对 JDBC 进行了高级封装,使我们的代码中不会出现任何的 JDBC 代码,另外,它还通过 xml 或注解的方式将 sql 从 DAO/Repository ...
- 精尽Spring Boot源码分析 - 配置加载
该系列文章是笔者在学习 Spring Boot 过程中总结下来的,里面涉及到相关源码,可能对读者不太友好,请结合我的源码注释 Spring Boot 源码分析 GitHub 地址 进行阅读 Sprin ...
- springboot集成mybatis源码分析-启动加载mybatis过程(二)
1.springboot项目最核心的就是自动加载配置,该功能则依赖的是一个注解@SpringBootApplication中的@EnableAutoConfiguration 2.EnableAuto ...
- Prism 源码解读3-Modules加载
介绍 在软件开发过程中,总想组件式的开发方式,各个组件之间最好互不影响,独立测试.Prism的Modules很好的满足了这一点. 这个架构图很好了讲解了Prism的Modules的概念 Prism支持 ...
- Mybatis源码解读-插件
插件允许对Mybatis的四大对象(Executor.ParameterHandler.ResultSetHandler.StatementHandler)进行拦截 问题 Mybatis插件的注册顺序 ...
- MyBatis源码解读之延迟加载
1. 目的 本文主要解读MyBatis 延迟加载实现原理 2. 延迟加载如何使用 Setting 参数配置 设置参数 描述 有效值 默认值 lazyLoadingEnabled 延迟加载的全局开关.当 ...
随机推荐
- Blazor和Vue对比学习(基础1.7):传递UI片断,slot和RenderFragment
组件开发模式,带来了复用.灵活.性能等优势,但也增加了组件之间数据传递的繁杂.不像传统的页面开发模式,一个ViewModel搞定整个页面数据. 组件之间的数据传递,是学习组件开发,必须要攻克的难关.这 ...
- TinyMCE简介
TinyMCE是一款开源.易用.UI时新的富文本编辑器. 插件丰富,自带插件基本满足要求 可扩展性强,可自定义功能 界面好看,符合现代审美 提供经典.内联.沉浸无干扰三种模式 官网:https://w ...
- 559. Maximum Depth of N-ary Tree - LeetCode
Question 559. Maximum Depth of N-ary Tree Solution 题目大意:N叉树求最大深度 思路:用递归做,树的深度 = 1 + 子树最大深度 Java实现: / ...
- MySQL8小时问题
一.问题 获取MySQL连接,8小时内无请求自动断开连接. 二.解决 2.1 分析 MySQL服务器默认的"wait_timeout"是28800秒即8小时,意味着如果一个连接的空 ...
- linux篇-rpm包安装mysql数据库
3.1上传以下两个rpm包到服务器上 MySQL-server-5.6.27-1.el6.x86_64.rpm MySQL-client-5.6.27-1.el6.x86_64.rpm 3.2卸载一个 ...
- 直观比较 popcount 的效率差异
问题 求 \(\sum\limits_{i=1}^{3\times 10^8} popcount(i)\) . 仅考虑在暴力做法下的效率. 枚举位 __builtin_popcount #includ ...
- C++:小包包的玩具
小包包的玩具 时间限制 : 1.000 sec 内存限制 : 128 MB 题目描述: 小包包最讨厌的是整理他自己的玩具,为此,他制造了一个伟大的发明:玩具传送门!利用这个传送门,他可以 ...
- 实验一:在FW上配置静态路由实现互通
实验:在FW上配置静态路由实现互通 网络拓扑图 一.配置步骤 1.配置IP地址 R1: FW: ISP: 2.配置路由 ①在R2上面配置静态路由 ②在ISP上面配置静态路由 3.在FW上配 ...
- Colab教程(超级详细版)及Colab Pro/Colab Pro+使用评测
在下半年选修了机器学习的关键课程Machine learning and deep learning,但由于Macbook Pro显卡不支持cuda,因此无法使用GPU来训练网络.教授推荐使用Goog ...
- ShardingSphere 异构迁移最佳实践:将3.5亿量级的顾客系统 RTO 减少60倍
Apache ShardingSphere 助力当当 3.5 亿用户量级顾客系统重构,由 PHP+SQL Server 技术栈无缝转型为 Java+ShardingSphere+MySQL,性能.可用 ...