Nginx (安装+ 配置域名+ 访问认证 +发布文件)
一、Nginx介绍:
Nginx是一款高性能的HTTP和反向代理服务器,能够选择高效的epoll(linux2.6内核)、kqueue(freebsd)、eventport(solaris10)作为网络I/O模型,能够支持高达50000个并发连接数的响应,而内存、CPU等系统资源消耗却非常低、运行非常稳定。
2008年12月:Nginx市场占有量为3354329、占有率为1.80%
1、选择Nginx的理由
- 1 支持高并发连接
通过top命令可以查看系统负载和CPU使用率,由于apache采用的是select网络I/O模型,处理大量连续的读写很低效
- 内存消耗少
在服务器3W并发连接下,开启10个Nginx进程消耗150MB内存(15MB*10),开启64个php-cgi进程消耗128MB内存(20MB*64),共消耗不到2GB内存,可以使用webbench做压力测试,运行依旧很快。
- 成本低廉
购买F5 BIG-IP、NetScaler等负载均衡交换机需要几十万RMB,而开源Nginx替代这些商业设备。
- 其他理由
网络配置简单,对比apache就知道了,支持rewrite重写规则,能够根据域名、URL的不同、将HTTP请求分到不同的后端服务器群组,内置的健康检查功能
节省带宽,支持GZIP压缩,可以添加浏览器本地缓存的Header头,支持热部署,能够在不间断服务的情况下、对软件版本进行升级
结论:Nginx在反向代理、rewrite规则、稳定性、静态文件处理、内存消耗等方面都表现出很强的优势。
安装环境
[root@ ~]# uname -a

Linux 10.0.0.10 2.6.-.el6.x86_64 # SMP Thu Jul  :: UTC  x86_64 x86_64 x86_64 GNU/Linux
[root@ ~]# cat /etc/redhat-release

CentOS release 6.7 (Final)
关闭防火墙,非正式环境可以关闭防火墙,便于学习调试Nginx服务。等掌握防火墙技术再开启
[root@ ~]# /etc/init.d/iptables stop

iptables: Setting chains to policy ACCEPT: filter          [  OK  ]

iptables: Flushing firewall rules:                         [  OK  ]

iptables: Unloading modules:                               [  OK  ]
关闭SElinux
[root@ ~]# setenforce

[root@ ~]#
yum 安装nginx—1.10
[root@10 ~]# wget http://mirrors.neusoft.edu.cn/epel/6/x86_64/epel-release-6-8.noarch.rpm
--2017-07-31 14:43:09-- http://mirrors.neusoft.edu.cn/epel/6/x86_64/epel-release-6-8.noarch.rpm
Resolving mirrors.neusoft.edu.cn... 219.216.128.25, 2001:da8:a0c4:200::ec43:7f59
Connecting to mirrors.neusoft.edu.cn|219.216.128.25|:80... connected.
HTTP request sent, awaiting response... 200 OK
Length: 14540 (14K) [application/x-redhat-package-manager]
Saving to: “epel-release-6-8.noarch.rpm”
100%[==================================================================================>] 14,540 28.8K/s in 0.5s
2017-07-31 14:43:11 (28.8 KB/s) - “epel-release-6-8.noarch.rpm” saved [14540/14540]
[root@10 ~]# yum install -y epel-release-6-8.noarch.rpm
Installed:
epel-release.noarch 0:6-8
Complete!
[root@10 ~]# yum install -y nginx
Dependency Installed:
GeoIP.x86_64 0:1.6.5-1.el6 GeoIP-GeoLite-data.noarch 0:2017.01-1.el6
GeoIP-GeoLite-data-extra.noarch 0:2017.01-1.el6 gd.x86_64 0:2.0.35-11.el6
geoipupdate.x86_64 0:2.2.1-2.el6 libXpm.x86_64 0:3.5.10-2.el6
nginx-all-modules.noarch 0:1.10.2-1.el6 nginx-filesystem.noarch 0:1.10.2-1.el6
nginx-mod-http-geoip.x86_64 0:1.10.2-1.el6 nginx-mod-http-image-filter.x86_64 0:1.10.2-1.el6
nginx-mod-http-perl.x86_64 0:1.10.2-1.el6 nginx-mod-http-xslt-filter.x86_64 0:1.10.2-1.el6
nginx-mod-mail.x86_64 0:1.10.2-1.el6 nginx-mod-stream.x86_64 0:1.10.2-1.el6
Complete!
安装完成
启动Nginx
[root@ ~]# /etc/init.d/nginx start

Starting nginx:                                            [  OK  ]
查看Nginx服务对应的端口是否启动成功
[root@ ~]# lsof -i :

COMMAND   PID  USER   FD   TYPE DEVICE SIZE/OFF NODE NAME

nginx     root    6u  IPv4        0t0  TCP *:http (LISTEN)

nginx     root    7u  IPv6        0t0  TCP *:http (LISTEN)

nginx    nginx    6u  IPv4        0t0  TCP *:http (LISTEN)

nginx    nginx    7u  IPv6        0t0  TCP *:http (LISTEN)
也可以通过 netstat -lnt | grep 80 查看
[root@ ~]# netstat -lnt | grep

tcp               0.0.0.0:                  0.0.0.0:*                   LISTEN

tcp               :::                    :::*                        LISTEN

tcp               :::                       :::*                        LISTEN
查看Nginx启动的实际效果
打开浏览器输入 http://10.0.0.12(安装Nginx服务器的IP地址),让后回车,如果显示
Welcome to nginx on EPEL!
表示Nginx已经启动成功
部署一个Web站点
Nginx 的默认站点目录在 /usr/share/nginx/html/下,如果要部署王者业务数据,只需把开发好的程序全部放到 /usr/share/nginx/html/目录下面即可
进入/usr/share/nginx/html/目录下
[root@10 ~]# cd /usr/share/nginx/html/
[root@10 html]# ll
total 20
-rw-r--r--. 1 root root 3652 Oct 31 2016 404.html
-rw-r--r--. 1 root root 3695 Oct 31 2016 50x.html
-rw-r--r--. 1 root root 3698 Oct 31 2016 index.html
-rw-r--r--. 1 root root 368 Oct 31 2016 nginx-logo.png
-rw-r--r--. 1 root root 2811 Oct 31 2016 poweredby.png
删掉Nginx默认的首页index.html(原始内容为 Welcome to nginx on EPEL)
[root@ html]# rm -f index.html
然后新建立一个index.html
[root@ html]# vim index.html
加入以下内容
<html>

<head><title>wanglan,s Nginx server blog .</title></head>

<body>

Hi, I am wanglan

</body>

</html>
打开浏览器输入http://10.0.0.12 让后回车,应该可以看到以下内容
Hi, I am wanglan
Nginx配置文件:nginx.conf
1. 配置基于域名的 nginx.conf 虚拟机主机
nginx.conf 文件默认在/etc/nginx 目录下
进入到nginx目录中
[root@10 ~]# cd /etc/nginx/
去掉所有的默认注释行空行,生成新文件nginx.conf
[root@ nginx]# egrep -v "#|^$" nginx.conf.default >nginx.conf
进入nginx.conf 文件
[root@ ~]# vim /etc/nginx/nginx.conf
更改前
worker_processes  ;

events {

    worker_connections  ;

}

http {

    include       mime.types;

    default_type  application/octet-stream;

    sendfile        on;

    keepalive_timeout  ;

    server {

        listen       ;

        server_name  localhost;

        location / {

            root   html;  域名访问的目录

            index  index.html index.htm;

        }

        error_page        /50x.html;

        location = /50x.html {

            root   html;

        }

    }

}
更改后
worker_processes  ;

events {

    worker_connections  ;

}

http {

    include       mime.types;

    default_type  application/octet-stream;

    sendfile        on;

    keepalive_timeout  ;

    server {

        listen       ;

        server_name  www.wanglan.com;

        location / {

            root   html/www;

            index  index.html index.htm;

        }

        error_page        /50x.html;

        location = /50x.html {

            root   html;

        }

    }

}
上面配置了一个基于www.wanglan.com 域名的站点,这里省略了一切无关的配置参数,虚拟机的关键部分在server{}标签大括号里的内容
2.创建域名对应的站点目录及文件
进入到 html 目录
[root@ ~]# cd /usr/share/nginx/html/
创建对应的目录
[root@ html]# mkdir www
进入目录创建 index.html 文件
[root@ html]# vim index.html
写入内容
www.wanglan10.com
查看index.html
[root@ nginx]# cat index.html

www.wanglan.com
3.检查语法并从新加载
先检查修改过的Nginx配置文件语法是否正确
[root@10 nginx]# nginx -t
nginx: the configuration file /etc/nginx/nginx.conf syntax is ok
nginx: configuration file /etc/nginx/nginx.conf test is successful
出现 “syntax is ok” 及 “successful” ,说明语法正确,如果有问题则需要调整配置,直到语法检查正确为止
平滑重启Nginx,即重新加载配置文件
[root@ nginx]# nginx -s reload
再检查Nginx重新加载后的情况,例如进程和端口是否OK
[root@10 nginx]# ps -ef|grep nginx
root 52257 1 0 15:10 ? 00:00:00 nginx: master process /usr/sbin/nginx -c /etc/nginx/nginx.conf
nginx 52397 52257 0 17:19 ? 00:00:00 nginx: worker process
root 52404 2134 0 17:22 pts/1 00:00:00 grep nginx
[root@ nginx]# netstat -lntp|grep

tcp               0.0.0.0:                  0.0.0.0:*                   LISTEN      /nginx

tcp               :::                    :::*                        LISTEN      /rpc.statd
在Windows客户端测试域名站点配置的访问结果
在客户端做hosts解析
win+ R 键,在运行窗口输入 %systemroot%\system32\drivers\etc\hosts ,选择记事本打开
添加所配置的机器的IP和域名,如下
10.0.0.10 www.wanglan.com
通过浏览器访问域名,查看访问结果

Nginx 虚拟机的别名设置
虚拟主机别名:虚拟主机设置除了主域名外的一个或多个域名名字,这样就能实现用户访问的多个域名对应同一个虚拟主机网站的功能
提示:仅在nginx.conf 文件中的server_name 所在的行尾增加另一个域名即可,例如增加wanglan.com 域名
worker_processes  ;

events {

    worker_connections  ;

}

http {

    include       mime.types;

    default_type  application/octet-stream;

    sendfile        on;

    keepalive_timeout  ;

    server {

        listen       ;

        server_name  www.wanglan.com wanglan.com;

        location / {

            root   html/www;

            index  index.html index.htm;

        }

        error_page        /50x.html;

        location = /50x.html {

            root   html;

        }

    }

}
重新加载配置并测试访问结果
[root@ nginx]# nginx -t

[root@ nginx]# nginx -s reload
在Windows客户端做hosts解析后,测试访问结果,如与原域名访问结果一样表示成功
Nginx访问认证
配置nginx.conf 文件
worker_processes  ;

events {

    worker_connections  ;

}

http {

    include       mime.types;

    default_type  application/octet-stream;

    sendfile        on;

    keepalive_timeout  ;

    server {

        listen       ;

        server_name  localhost;

        location / {

            root   html;

            index  index.html index.htm;

            auth_basic           "NginxStatus";

            auth_basic_user_file /usr/share/nginx/htpasswd;

         }

        error_page        /50x.html;

        location = /50x.html {

            root   html;

        }

    }

}
查看是否安装htpasswd
没有安装
[root@10 ~]# /usr/bin/htpasswd
-bash: /usr/bin/htpasswd: No such file or directory
安装htpasswd
yum -y install httpd
安装以后
[root@ ~]# which htpasswd

/usr/bin/htpasswd
创建账号与密码(路径直接复制)
root@ nginx]# htpasswd -c /usr/share/nginx/htpasswd wanglan
查看htpasswd文件内容
[root@ nginx]# cat /usr/share/nginx/htpasswd

wanglan:mLjtscIQMmq7I
检查nginx.conf 文件是否有错误,并平滑重启
[root@ nginx]# nginx -t

 nginx: the configuration file /etc/nginx/nginx.conf syntax is ok

 nginx: configuration file /etc/nginx/nginx.conf test is successful

[root@ nginx]# nginx -s reload
修改htpasswd文件权限
[root@10 nginx ~]# chmod /usr/share/nginx/htpasswd
修改htpasswd文件的用户组
[root@ ~]# chown nginx.nginx /usr/share/nginx/htpasswd
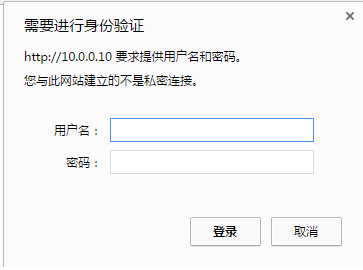
通过域名或IP访问
Nginx (安装+ 配置域名+ 访问认证 +发布文件)的更多相关文章
- nginx安装配置域名转发
1.安装pcre 1.[root@localhost home]# tar zxvf pcre-8.10.tar.gz //解压缩 2.[root@localhost home]# cd pcre-8 ...
- nginx安装,配置,并可以放静态文件教程
简单介绍一下:nginx是一个高性能的HTTP和反向代理的服务器.能有处理最高5,0000的并发量,是新兴的一个代理服务器.中国大陆使用nginx网站用户有:百度.京东.新浪.网易.腾讯.淘宝等. 安 ...
- centos nginx server_name 配置域名访问规则
今天配置Server_name时,希望禁用一些域名,应为这些域名我想让通过另外一个Server配置 server_name "~^((\w*[^w]{1}\w*)|w{1,2})\.hell ...
- Nginx安装配置(转)
Nginx 安装配置 Nginx("engine x")是一款是由俄罗斯的程序设计师Igor Sysoev所开发高性能的 Web和 反向代理 服务器,也是一个 IMAP/POP3/ ...
- Nginx 安装 配置 使用
Nginx 安装 配置 使用 基本的HTTP服务器特性 处理静态文件,索引文件以及自动索引:打开文件描述符缓存(缓存元数据和文件描述符,下一次可以直接从内存找到数据或者文件的位置): 使用缓存加速反向 ...
- Nginx安装配置|Nginx反向代理|Nginx支持HTTPS|Nginx重定向
Nginx安装配置 可以直接看到最下面的HTTPS. Nginx安装 我的系统如下: No LSB modules are available. Distributor ID: Ubuntu Desc ...
- nginx安装配置_runoob_阅读笔记_20190917
Nginx 安装配置_runoob菜鸟教程 Nginx 安装配置 Nginx("engine x")是一款是由俄罗斯的程序设计师Igor Sysoev所开发高性能的 Web和 反向 ...
- Nginx安装配置PHP(FastCGI)环境的教程
这篇是Nginx安装配置PHP(FastCGI)环境的教程.Nginx不支持对外部程序的直接调用或者解析,所有的外部程序(包括PHP)必须通过FastCGI接口来调用. 一.什么是 FastCGI F ...
- VMware Linux 下 Nginx 安装配置 - Tomcat 配置 (二)
准备工作 相关浏览: VMware Linux 下 Nginx 安装配置 (一) 1. 选在 /usr/local/ 下创建 softs 文件夹,通过 ftp 命令 把 apache-tomcat-7 ...
随机推荐
- Python自定义排序
比如自定义了一个class,并且实例化了这个类的很多个实例,并且组成一个数组.这个数组要排序,是通过这个class的某个字段来排序的.怎么排序呢? 有两种做法: 第一种是定义__cmp__( )方法: ...
- SQLServer索引及统计信息
索引除了提高性能,还能维护数据库. 索引是一种存储结构,主要以B-Tree形式存储信息. B-Tree的定义: 1.每个节点最多只有m个节点(m>=2) 2.除了根节点和叶子节点外的每个节点上最 ...
- 微信小程序 this和that详解及简单实例
微信小程序中,在wx.request({});方法调用成功或者失败之后,有时候会需要获取页面初始化数据data的情况,这个时候,如果使用,this.data来获取,会出现获取不到的情况,调试页面也会报 ...
- C#连接Oracle错误:OCIEnvCreate 失败,返回代码为 -1
处理某些数据需要从Oracle里读取数据 因为数据不多,简单方便直接用 System.Data.OracleClient 添加引用,写sql语句一气呵成,运行立刻报错 从没见过这错误啊… 上网搜索之… ...
- Vs2015 本地git获取的代码目录文件修改后,启动提示error:Unable to start program “C:\Program Files\dotnet\dotnet.exe” 已解决.
http://stackoverflow.com/questions/39938453/unable-to-start-program-c-program-files-dotnet-dotnet-ex ...
- ionic 3 安卓手机获取经纬度坐标
现在有个需求:每隔一段时间需向后台服务器返回当前用户的经纬度坐标. ionic 官方提供的有定位插件cordova-plugin-geolocation,兼容ios和android版本,网上查资料说最 ...
- 选择结构switch
1.选择结构switch switch 条件语句也是一种很常用的选择语句,它和if条件语句不同,它只能针对某个表达式的值作出判断,从而决定程序执行哪一段代码.例如,在程序中使用数字1~7来表示星期一到 ...
- bzoj 5099: [POI2018]Pionek
题解: 还是比较简单的一道题 考虑现在有一个向量,当且仅当下一个向量与它夹角<90度这个向量的模长才会增加 接下来怎么做呢 如果我们去枚举初始向量,向量方向会随着新增向量而变化 随着不断顺时针的 ...
- Linux LVM动态扩容
引用自: https://blog.csdn.net/u012439646/article/details/73380197 xfs_growfs /dev/centos/root 一.首先安 ...
- HDU2732 Leapin' Lizards 网络流 最大流 SAP
原文链接http://www.cnblogs.com/zhouzhendong/p/8362002.html 题目传送门 - HDU2732 题意概括 给你一个网格,网格上的一些位置上有一只蜥蜴,所有 ...