使用UIVisualEffectView创建毛玻璃效果
UIVisuaEffectView :继承自UIView,可以看成是专门用于处理毛玻璃效果的视图,只要我们将这个特殊的View添加到其他视图(eg. ImageView )上面,被该UIVisuaEffectView遮盖的部分看起来就有了毛玻璃效果。使用UIVisuaEffectView有一点需要特别注意,不要在UIVisuaEffectView实例化View上面直接添加subViews,应该将需要添加的子视图添加到其contentView上。同时,尽量避免将UIVisualEffectView对象的alpha值设置为小于1.0的值,因为创建半透明的视图会导致系统在离屏渲染时去对UIVisualEffectView对象及所有的相关的子视图做混合操作,比较消耗性能。
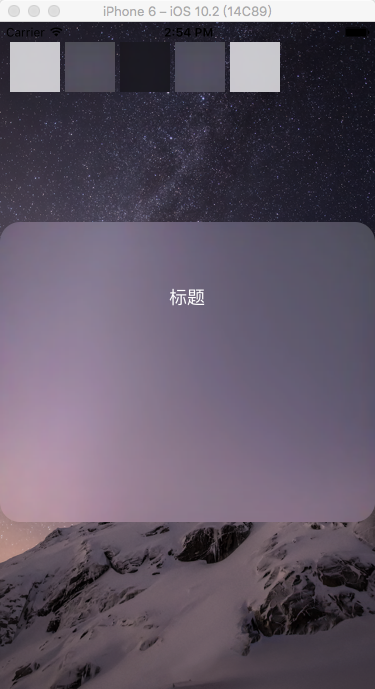
效果截图:
实现代码:
ViewController.h
#import <UIKit/UIKit.h>

@interface ViewController : UIViewController

@property (nonatomic, strong) UIImageView *imageView;

@property (nonatomic, strong) UIVisualEffectView *effectView;

@property (nonatomic, strong) UIVisualEffect *effect;

@end
ViewController.m
#import "ViewController.h"

static int blurTag = ;

@interface ViewController ()

@end

@implementation ViewController

- (void)viewDidLoad {

    [super viewDidLoad];

    // Do any additional setup after loading the view, typically from a nib.

    //添加ImageView

    self.imageView = [[UIImageView alloc] initWithFrame:[[UIScreen mainScreen] bounds]];

    [self.imageView setImage:[[UIImage alloc] initWithContentsOfFile:[[NSBundle mainBundle] pathForResource:@"" ofType:@"png"]]];

    [self.view addSubview:self.imageView];

    //显示所有可用的模糊效果

    CGFloat startX = ;

    CGFloat startY = ;

    CGFloat startW = ;

    CGFloat startH = ;

    {//UIBlurEffectStyleExtraLight

        UIVisualEffect *effect = [UIBlurEffect effectWithStyle:UIBlurEffectStyleExtraLight];

        UIVisualEffectView *effectView = [[UIVisualEffectView alloc] initWithEffect:effect];

        [effectView setFrame:CGRectMake(startX, startY, startW, startH)];

        effectView.tag = blurTag;

        [self.view addSubview:effectView];

        UITapGestureRecognizer *gesture = [[UITapGestureRecognizer alloc] initWithTarget:self action:@selector(tapAction:)];

        effectView.userInteractionEnabled = YES;

        [effectView addGestureRecognizer:gesture];

    }

    {//UIBlurEffectStyleLight

        UIVisualEffect *effect = [UIBlurEffect effectWithStyle:UIBlurEffectStyleLight];

        UIVisualEffectView *effectView = [[UIVisualEffectView alloc] initWithEffect:effect];

        [effectView setFrame:CGRectMake(startX + (startW + ), startY, startW, startH)];

        effectView.tag = blurTag + ;

        [self.view addSubview:effectView];

        UITapGestureRecognizer *gesture = [[UITapGestureRecognizer alloc] initWithTarget:self action:@selector(tapAction:)];

        effectView.userInteractionEnabled = YES;

        [effectView addGestureRecognizer:gesture];

    }

    {//UIBlurEffectStyleDark

        UIVisualEffect *effect = [UIBlurEffect effectWithStyle:UIBlurEffectStyleDark];

        UIVisualEffectView *effectView = [[UIVisualEffectView alloc] initWithEffect:effect];

        [effectView setFrame:CGRectMake(startX + (startW + )*, startY, startW, startH)];

        effectView.tag = blurTag + ;

        [self.view addSubview:effectView];

        UITapGestureRecognizer *gesture = [[UITapGestureRecognizer alloc] initWithTarget:self action:@selector(tapAction:)];

        effectView.userInteractionEnabled = YES;

        [effectView addGestureRecognizer:gesture];

    }

//    {//UIBlurEffectStyleExtraDark

//        UIVisualEffect *effect = [UIBlurEffect effectWithStyle:UIBlurEffectStyleExtraDark];

//        UIVisualEffectView *effectView = [[UIVisualEffectView alloc] initWithEffect:effect];

//        [effectView setFrame:CGRectMake(startX + (startW + 5)*3, startY, startW, startH)];

//        [self.view addSubview:effectView];

//    }

    {//UIBlurEffectStyleRegular

        UIVisualEffect *effect = [UIBlurEffect effectWithStyle:UIBlurEffectStyleRegular];

        UIVisualEffectView *effectView = [[UIVisualEffectView alloc] initWithEffect:effect];

        [effectView setFrame:CGRectMake(startX + (startW + )*, startY, startW, startH)];

        effectView.tag = blurTag + ;

        [self.view addSubview:effectView];

        UITapGestureRecognizer *gesture = [[UITapGestureRecognizer alloc] initWithTarget:self action:@selector(tapAction:)];

        effectView.userInteractionEnabled = YES;

        [effectView addGestureRecognizer:gesture];

    }

    {//UIBlurEffectStyleProminent

        UIVisualEffect *effect = [UIBlurEffect effectWithStyle:UIBlurEffectStyleProminent];

        UIVisualEffectView *effectView = [[UIVisualEffectView alloc] initWithEffect:effect];

        [effectView setFrame:CGRectMake(startX + (startW + )*, startY, startW, startH)];

        effectView.tag = blurTag + ;

        [self.view addSubview:effectView];

        UITapGestureRecognizer *gesture = [[UITapGestureRecognizer alloc] initWithTarget:self action:@selector(tapAction:)];

        effectView.userInteractionEnabled = YES;

        [effectView addGestureRecognizer:gesture];

    }

    //添加UIVisualEffectView

    self.effect = [UIBlurEffect effectWithStyle:UIBlurEffectStyleExtraLight ];

    self.effectView = [[UIVisualEffectView alloc] initWithEffect:self.effect];

    self.effectView.layer.cornerRadius = ;

    self.effectView.layer.masksToBounds = YES;

    [self.effectView setFrame:CGRectMake(, , , )];

    [self.view addSubview:self.effectView];

    UIButton *btn = [[UIButton alloc] initWithFrame:CGRectMake(, , , )];

    [btn setTitle:@"标题" forState:UIControlStateNormal];

    [self.effectView.contentView addSubview:btn];

}

- (void)tapAction:(UITapGestureRecognizer *)gesture{

    NSInteger tag = gesture.view.tag - blurTag;

    switch (tag) {

        case :

            [self.effectView setEffect:[UIBlurEffect effectWithStyle:UIBlurEffectStyleExtraLight]];

            break;

        case :

            [self.effectView setEffect:[UIBlurEffect effectWithStyle:UIBlurEffectStyleLight]];

            break;

        case :

            [self.effectView setEffect:[UIBlurEffect effectWithStyle:UIBlurEffectStyleDark]];

            break;

        case :

            [self.effectView setEffect:[UIBlurEffect effectWithStyle:UIBlurEffectStyleRegular]];

            break;

        case :

            [self.effectView setEffect:[UIBlurEffect effectWithStyle:UIBlurEffectStyleProminent]];

            break;

        default:

            break;

    }

}

- (void)didReceiveMemoryWarning {

    [super didReceiveMemoryWarning];

    // Dispose of any resources that can be recreated.

}

@end
参考链接:
http://www.jianshu.com/p/d115836ed3fa
使用UIVisualEffectView创建毛玻璃效果的更多相关文章
- Swift 之模糊效果(毛玻璃效果,虚化效果)的实现
前言: 之前项目中有用到过Objective-C的的模糊效果,感觉很是不错,而且iOS8之后官方SDK也直接提供了可以实现毛玻璃效果的三个类:UIBlurEffect.UIVibrancyEffect ...
- iOS 实现毛玻璃效果
话说苹果在iOS7.0之后,很多系统界面都使用了毛玻璃效果,增加了界面的美观性,比如下图的通知中心界面; 但是其iOS7.0的SDK并没有提供给开发者实现毛玻璃效果的API,所以很多人都是通过一些别人 ...
- iOS 实现简单的毛玻璃效果
最近在整理导航栏的渐隐渐现效果,整理过程中偶然学会了图片的毛玻璃效果实现,很简单,不多说了,先上图看看效果对比, 这是原图, 这是加了效果后的,创建图片的代码就不上了,下面看下添加效果的代码: // ...
- iOS开发探索-高斯模糊&毛玻璃效果
iOS开发中有的时候需要将图片设置模糊,来实现特定的效果获取更好的用户体验, iOS7之后半透明模糊效果得到大范围使用的比较大,现在也可以看到很多应用局部用到了图片模糊效果,可以通过高斯模糊和毛玻璃效 ...
- iOS 毛玻璃效果的实现方法
iOS开发中有的时候需要将图片设置模糊,来实现特定的效果获取更好的用户体验, iOS7之后半透明模糊效果得到大范围使用的比较大,现在也可以看到很多应用局部用到了图片模糊效果,可以通过高斯模糊和毛玻璃效 ...
- iOS模糊效果(毛玻璃效果)的实现
前一段时间项目中用到毛玻璃效果,那时对UIBlurEffect类和 UIVisualEffectView这两个类做了一部分了解.但当时并没有去特别的深入研究,直到项目做完后,才静下心来好好研究了一番. ...
- iOS开发小技巧--实现毛玻璃效果的方法
一.美工出图 二.第三方框架 -- DRNRealTimeBlur,框架继承自UIView.使用方法:创建UIView直接继承自框架的View,就有了毛玻璃效果 三.CoreImage -- 图片加高 ...
- iOS_自定义毛玻璃效果
http://www.2cto.com/kf/201408/329969.html 最终效果图: 关键代码: UIImage分类代码 ? 1 2 3 4 5 6 7 8 9 10 11 12 13 1 ...
- iOS_自己定义毛玻璃效果
终于效果图: 关键代码: UIImage分类代码 // // UIImage+BlurGlass.h // 帅哥_团购 // // Created by beyond on 14-8-30. // C ...
随机推荐
- java开发知识体系
- Computer Transformation(简单数学题+大数)
H - Computer Transformation Time Limit:1000MS Memory Limit:32768KB 64bit IO Format:%I64d &am ...
- centos7 使用 maven
http://www.cnblogs.com/jackluo/archive/2013/02/06/2901816.html
- Android Studio实现代码混淆
1,在build.grandle添加,其中规则写在proguard-rules.pro中,也可以自定义一个文件,将其代替,比如eclipse常用的 proguard-project.txt: bui ...
- python基础13 ---函数模块3(正则表达式)
正则表达式 一.正则表达式的本质 1.正则表达式的本质(或 RE)是一种小型的.高度专业化的编程语言,(在Python中)它内嵌在Python中,并通过 re 模块实现.正则表达式模式被编译成一系列的 ...
- python基础6 ----python函数
python函数 一.函数的参数 1.函数的参数从调用的角度来讲可以分为形式参数和实际参数,也可叫形参和实参. 形参:变量只有在被调用时才分配内存单元,在调用结束时,即刻释放所分配的内存单元. ...
- Python基础(1)_python介绍、简单运算符
Python执行一个程序分为三个阶段 阶段一:先启动python解释器 阶段二:python解释器把硬盘中的文件读入到内存中 阶段三:python解释器解释执行刚刚读入内存的代码 二.编程语言的分类: ...
- 简单做出HTML5翻页效果文字特效
之前在网上看到一款比较有新意的HTML5文字特效,文字效果是当鼠标滑过是出现翻开折叠的效果,类似书本翻页.于是我兴致勃勃的点开源码看了一下,发现其实实现也挺简单的,主要利用了CSS3的transfor ...
- [原创]java WEB学习笔记25:MVC案例完整实践(part 6)---新增操作的设计与实现
本博客为原创:综合 尚硅谷(http://www.atguigu.com)的系统教程(深表感谢)和 网络上的现有资源(博客,文档,图书等),资源的出处我会标明 本博客的目的:①总结自己的学习过程,相当 ...
- 运行vo总结
这是基于之前的vo类做的.vo类总结.note参数文件的直接设置在config目录下,比如是default.yaml文件,里面会定义dataset_dir,cmera类的fx,fy,cx,cy,Vis ...