keras框架的CNN手写数字识别MNIST
参考:林大贵.TensorFlow+Keras深度学习人工智能实践应用[M].北京:清华大学出版社,2018.
首先在命令行中写入 activate tensorflow和jupyter notebook,运行如下代码。当然,事先准备好MNIST数据集。
# coding: utf-8 # In[4]: from keras.datasets import mnist
from keras.utils import np_utils
import numpy as np
np.random.seed(10) # In[5]: (x_train,y_train),(x_test,y_test)=mnist.load_data() # In[6]: x_train4d = x_train.reshape(x_train.shape[0],28,28,1).astype('float32')
x_test4d = x_test.reshape(x_test.shape[0],28,28,1).astype('float32') # In[7]: x_train4d_normalize = x_train4d/255
x_test4d_normalize = x_test4d/255 # In[8]: y_train_oneHot = np_utils.to_categorical(y_train)
y_test_oneHot = np_utils.to_categorical(y_test) # In[9]: from keras.models import Sequential
from keras.layers import Dense,Dropout,Flatten,Conv2D,MaxPooling2D # In[10]: model = Sequential() # In[11]: model.add(Conv2D(filters = 16,
kernel_size = (5,5),
padding = 'same',
input_shape = (28,28,1),
activation = ('relu')
)) # In[12]: model.add(MaxPooling2D(pool_size=(2,2))) # In[13]: model.add(Conv2D(filters = 36,
kernel_size = (5,5),
padding = 'same',
activation = 'relu')) # In[14]: model.add(MaxPooling2D(pool_size=(2,2))) # In[15]: model.add(Dropout(0,255)) # In[16]: model.add(Flatten()) # In[17]: model.add(Dense(128,activation = 'relu')) # In[18]: model.add(Dropout(0.5)) # In[19]: model.add(Dense(10,activation = 'sigmoid')) # In[20]: print(model.summary()) # In[21]: model.compile(loss='categorical_crossentropy',
optimizer = 'adam',
metrics = ['accuracy']) # In[22]: train_history = model.fit(x = x_train4d_normalize,
y = y_train_oneHot,
validation_split = 0.2,
epochs = 10,
batch_size = 300,
verbose = 2) # In[23]: import matplotlib.pyplot as plt
def show_train_history(train_history,train,validation):
plt.plot(train_history.history[train])
plt.plot(train_history.history[validation])
plt.title('Train_History')
plt.ylabel(train)
plt.xlabel('Epoch')
plt.legend(['train','validation'], loc = 'upper left')
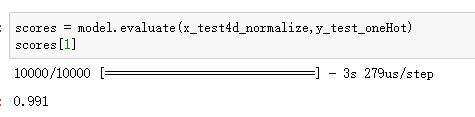
plt.show() # In[24]: show_train_history(train_history,'acc','val_acc') # In[25]: show_train_history(train_history,'loss','val_loss') # In[26]: scores = model.evaluate(x_test4d_normalize,y_test_oneHot)
scores[1] # In[27]: def plot_image_labels_prediction(images,labels,prediction,idx,num=10):
fig = plt.gcf()
fig.set_size_inches(12,24)
if num>50 : num = 50
for i in range(0,num):
ax = plt.subplot(10,5,1+i)
ax.imshow(images[idx],cmap='binary')
title = "lable="+str(labels[idx])
if len(prediction)>0:
title+=",predict="+str(prediction[idx])
ax.set_title(title,fontsize=10)
ax.set_xticks([]);ax.set_yticks([])
idx+=1
plt.show() # In[28]: prediction = model.predict_classes(x_test4d_normalize) # In[29]: plot_image_labels_prediction(x_test,
y_test,
prediction,
0,
50) # In[30]: import pandas as pd # In[31]: pd.crosstab(y_test,
prediction,
rownames=['label'],
colnames=['predict']) # In[ ]:
卷积神经网络简介:https://www.cnblogs.com/bai2018/p/10413889.html
产生如下神经网络:
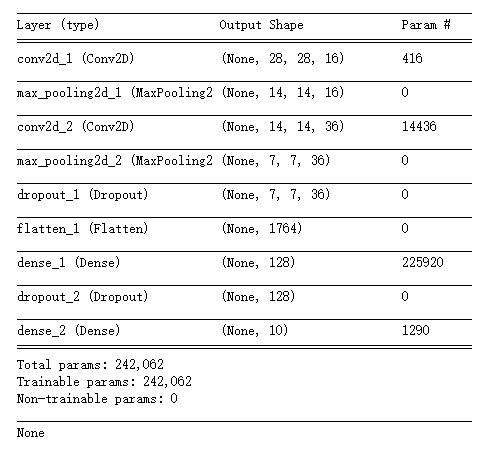
其中加入的dropout层用于避免过度拟合。在每次迭代时,随机舍弃一部分的训练样本。
训练效果较好。
林大贵.TensorFlow+Keras深度学习人工智能实践应用[M].北京:清华大学出版社,2018.
keras框架的CNN手写数字识别MNIST的更多相关文章
- keras框架的MLP手写数字识别MNIST,梳理?
keras框架的MLP手写数字识别MNIST 代码: # coding: utf-8 # In[1]: import numpy as np import pandas as pd from kera ...
- TensorFlow 之 手写数字识别MNIST
官方文档: MNIST For ML Beginners - https://www.tensorflow.org/get_started/mnist/beginners Deep MNIST for ...
- Keras cnn 手写数字识别示例
#基于mnist数据集的手写数字识别 #构造了cnn网络拟合识别函数,前两层为卷积层,第三层为池化层,第四层为Flatten层,最后两层为全连接层 #基于Keras 2.1.1 Tensorflow ...
- CNN 手写数字识别
1. 知识点准备 在了解 CNN 网络神经之前有两个概念要理解,第一是二维图像上卷积的概念,第二是 pooling 的概念. a. 卷积 关于卷积的概念和细节可以参考这里,卷积运算有两个非常重要特性, ...
- 卷积神经网络CNN 手写数字识别
1. 知识点准备 在了解 CNN 网络神经之前有两个概念要理解,第一是二维图像上卷积的概念,第二是 pooling 的概念. a. 卷积 关于卷积的概念和细节可以参考这里,卷积运算有两个非常重要特性, ...
- kaggle 实战 (2): CNN 手写数字识别
文章目录 Tensorflow 官方示例 CNN 提交结果 Tensorflow 官方示例 import tensorflow as tf mnist = tf.keras.datasets.mnis ...
- pytorch CNN 手写数字识别
一个被放弃的入门级的例子终于被我实现了,虽然还不太完美,但还是想记录下 1.预处理 相比较从库里下载数据集(关键是经常失败,格式也看不懂),更喜欢直接拿图片,从网上找了半天,最后从CSDN上下载了一个 ...
- keras基于卷积网络手写数字识别
import time import keras from keras.utils import np_utils start = time.time() (x_train, y_train), (x ...
- Tensorflow手写数字识别---MNIST
MNIST数据集:包含数字0-9的灰度图, 图片size为28x28.训练样本:55000,测试样本:10000,验证集:5000
随机推荐
- Codeforces Beta Round #40 (Div. 2)
Codeforces Beta Round #40 (Div. 2) http://codeforces.com/contest/41 A #include<bits/stdc++.h> ...
- @RequestMapping使用须知
----------------------siwuxie095 @RequestMapping 使用须知 使用 @RequestMapping 注解映射请求路径 即 你可以使用 @RequestMa ...
- robotium—只有apk文件的测试
把ppt的内容总结一下,并把问题说明一下: 把基本步骤搞出来,用notepad的程序吧,直接安装apk,就当做是不知道源码就好啦! 直接用自己的手机上就行啦!! 一.重签名: 步骤: 1.直接运行re ...
- Django具体操作(四)
自定义模板语法的标签 首先在django的项目中创建app并且在settings中添加了APP的名称. 在app添加templatetags模块(名字是固定的,也就是说,必须要这样) 如图如何自定义呢 ...
- echarts横向柱状图如果想打开网址
代码: var data = eval(data); var xList = new Array(); var yList = new Array(); var urlList = new Array ...
- java 基础之--java动态代理
1.抽象角色:声明真实对象与代理对象的共同接口: 2.代理角色:相当于中介的作用,bridge,内部包含对真实角色的reference,在执行真实操作对象时,附加其他操作,相当于对真实角色的封装: 3 ...
- 流(Stream)、文件(File)和IO
读取控制台输入 Java 的控制台输入由 System.in 完成. 为了获得一个绑定到控制台的字符流,你可以把 System.in 包装在一个 BufferedReader 对象中来创建一个字符流. ...
- webpack(一) 安装使用
(一)webpack的安装 webpack是基于node.js,因此需要安装node.js. 安装好node.js 后,全局安装webpack,命令如下 npm install webpack -g ...
- CALL transaction 的用法-传内表
使用memory (这个方法和第二种方式的区别是可以传输复选框的值) data: wfbomcom type rc29n. move-corresponding bom_key to wfbomc ...
- Find Amir CodeForces 805C
http://codeforces.com/contest/805/problem/C 题意:有n个学校,学校的编号是从1到n,从学校i到学校j的花费是(i+j)%(n+1),让你求遍历完所有学校的最 ...