简单了解一下 Swagger
一、Swagger
1、什么是 Swagger ?
Swagger 是一个规范和完整的框架,用于生成、描述、调用以及可视化的 Restful 风格的 Web 服务。
简单的理解:是一款 REST API 文档生成工具,生成在线的接口文档,方便接口测试。
2、为什么使用 Swagger?
前后端分离开发时,为了方便前后端接口调用规范,需要提供一个接口文档,但是维护这个接口文档是一个及其繁琐的事情,可能一不小心就忘记更新该文档从而导致前后端接口调用失败。
Swagger 就是为了解决这个问题而出现的(在线接口文档),其在接口方法上定义注解,并根据注解形成一个 html 页面,每次接口修改,这个 html 页面就会发生相应的改变,从而保证了接口文档的正确性。通过该 html 页面,可以很方便、清楚的知道这个接口的功能,并测试。
3、SpringBoot 整合 Swagger?
(1)Step1:
导入依赖 jar 包。
<!-- https://mvnrepository.com/artifact/io.springfox/springfox-swagger2 -->

<dependency>

    <groupId>io.springfox</groupId>

    <artifactId>springfox-swagger2</artifactId>

    <version>2.9.2</version>

</dependency>

<!-- https://mvnrepository.com/artifact/io.springfox/springfox-swagger-ui -->

<dependency>

    <groupId>io.springfox</groupId>

    <artifactId>springfox-swagger-ui</artifactId>

    <version>2.9.2</version>

</dependency>
(2)Step2:
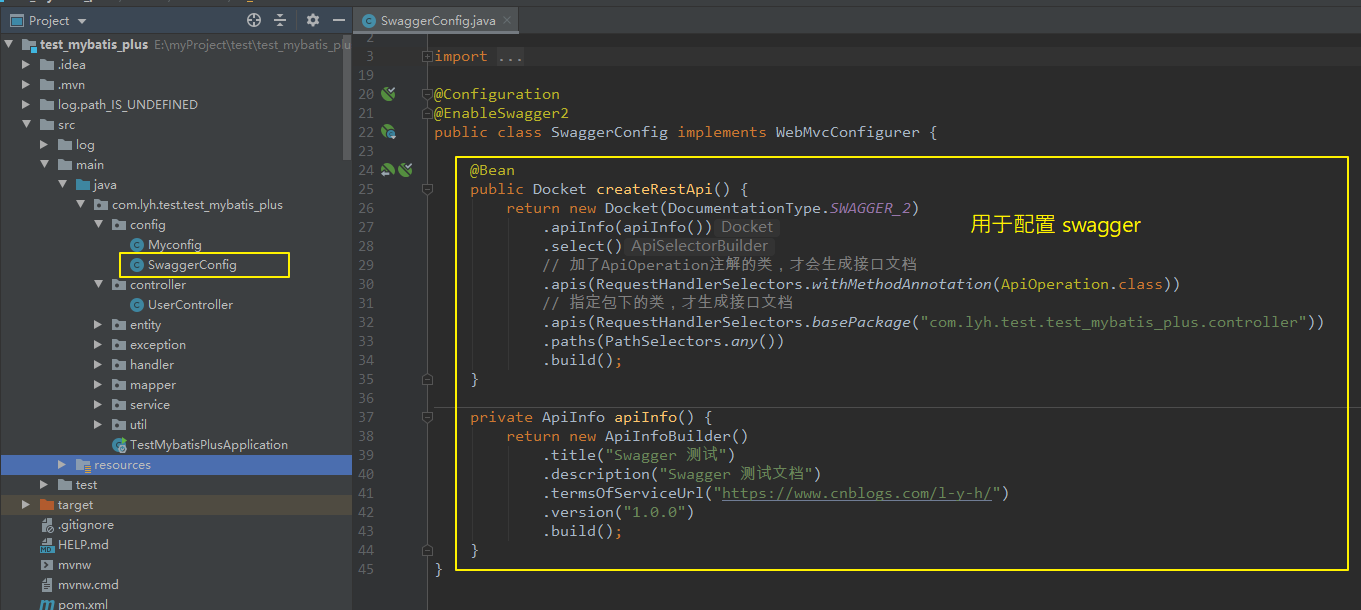
配置 swagger 插件。
编写一个配置类,实现 WebMvcConfigurer 接口(可以不实现该接口),用于配置 Swagger 相关信息。
@EnableSwagger2 用于开启 Swagger。
package com.lyh.test.test_mybatis_plus.config;

import io.swagger.annotations.ApiOperation;

import org.springframework.context.annotation.Bean;

import org.springframework.context.annotation.Configuration;

import org.springframework.web.servlet.config.annotation.WebMvcConfigurer;

import springfox.documentation.builders.ApiInfoBuilder;

import springfox.documentation.builders.PathSelectors;

import springfox.documentation.builders.RequestHandlerSelectors;

import springfox.documentation.service.ApiInfo;

import springfox.documentation.spi.DocumentationType;

import springfox.documentation.spring.web.plugins.Docket;

import springfox.documentation.swagger2.annotations.EnableSwagger2;

@Configuration

@EnableSwagger2

public class SwaggerConfig implements WebMvcConfigurer {

    @Bean

    public Docket createRestApi() {

        return new Docket(DocumentationType.SWAGGER_2)

            .apiInfo(apiInfo())

            .select()

            // 加了ApiOperation注解的类,才会生成接口文档

            .apis(RequestHandlerSelectors.withMethodAnnotation(ApiOperation.class))

            // 指定包下的类,才生成接口文档

            .apis(RequestHandlerSelectors.basePackage("com.lyh.test.test_mybatis_plus.controller"))

            .paths(PathSelectors.any())

            .build();

    }

    private ApiInfo apiInfo() {

        return new ApiInfoBuilder()

            .title("Swagger 测试")

            .description("Swagger 测试文档")

            .termsOfServiceUrl("https://www.cnblogs.com/l-y-h/")

            .version("1.0.0")

            .build();

    }

}
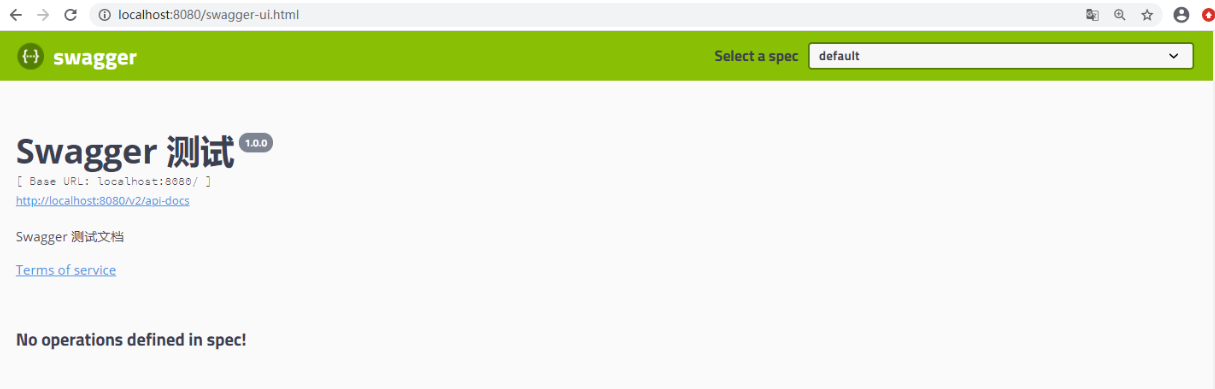
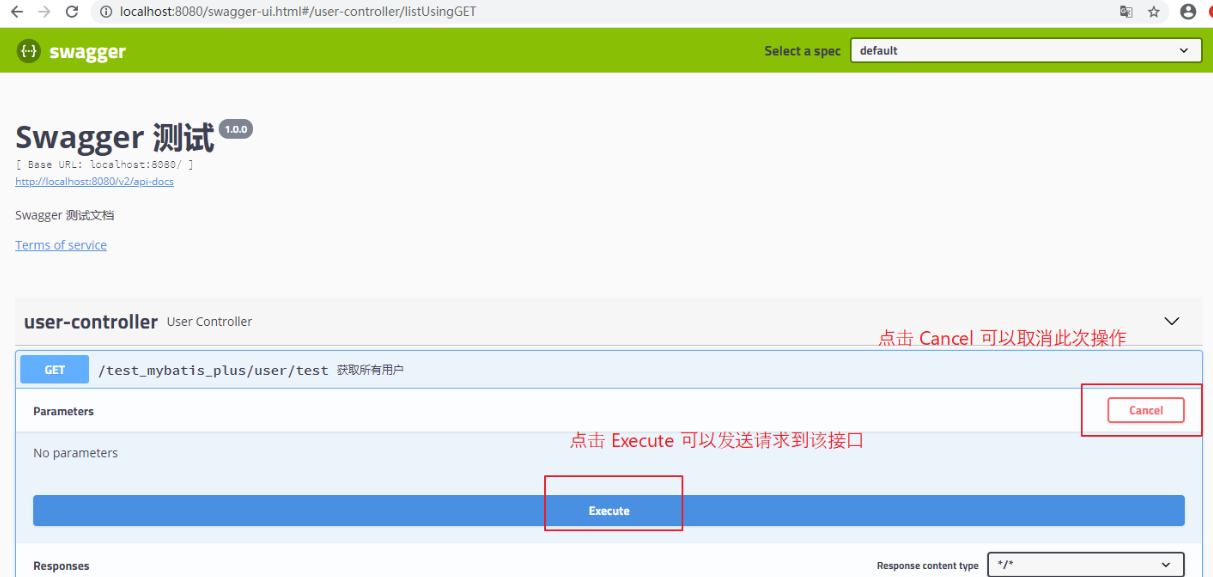
(3)启动服务,并访问 swagger-ui.html 页面。
访问 http://localhost:8080/swagger-ui.html,显示如下,能够进入在线接口文档页面,由于并没有在方法上添加注解,所以接口方法都没有显示。
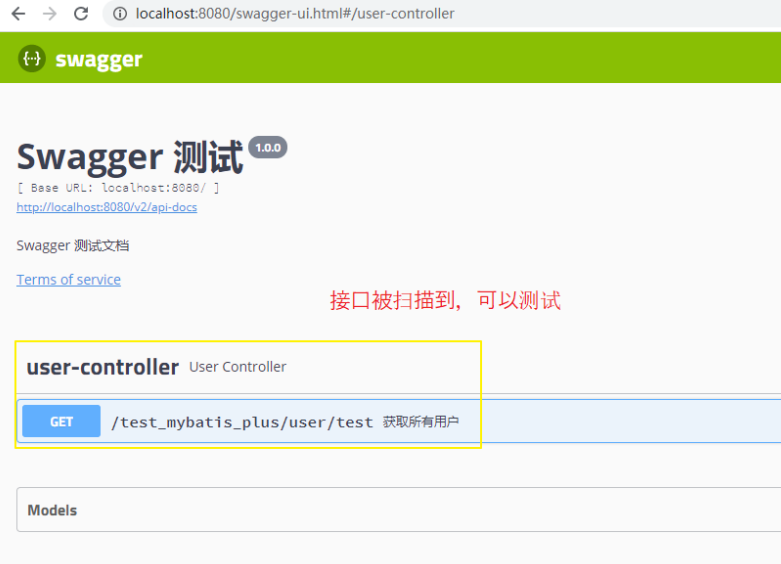
(4)给接口方法添加相关注解。
由于配置了 @ApiOperation 注解标注的方法才能被扫描到,所以在方法上添加该注解。
@RestController
@RequestMapping("/test_mybatis_plus/user")
public class UserController {
@Autowired
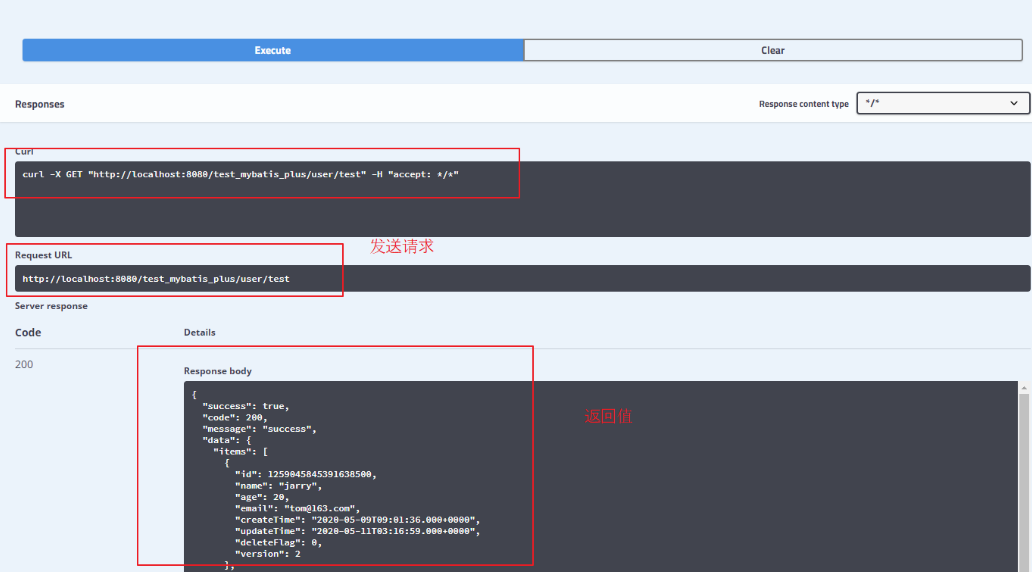
private UserService userService; @ApiOperation("获取所有用户")
@GetMapping("/test")
public Result list() {
return Result.ok().data("items", userService.list());
}
}

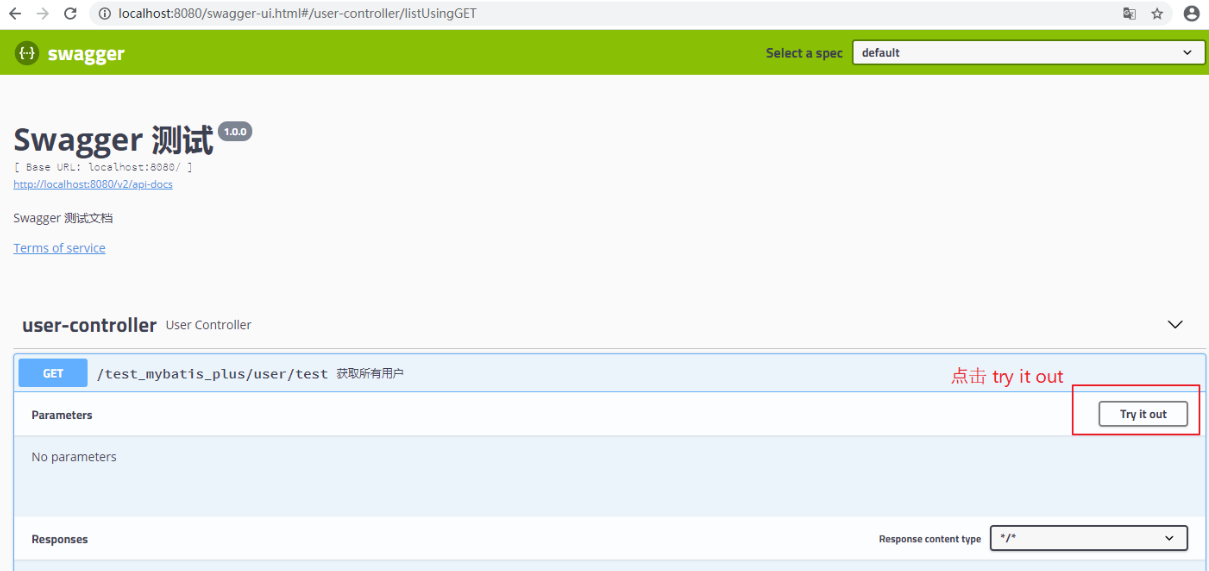
(5)重启服务,再次访问 swagger-ui.html 页面。
二、Swagger 注解、配置
1、Swagger 常用注解
(1)常用注解
swagger 通过注解去实现接口文档,这些注解可以标注接口名,请求方法,参数,返回信息等。
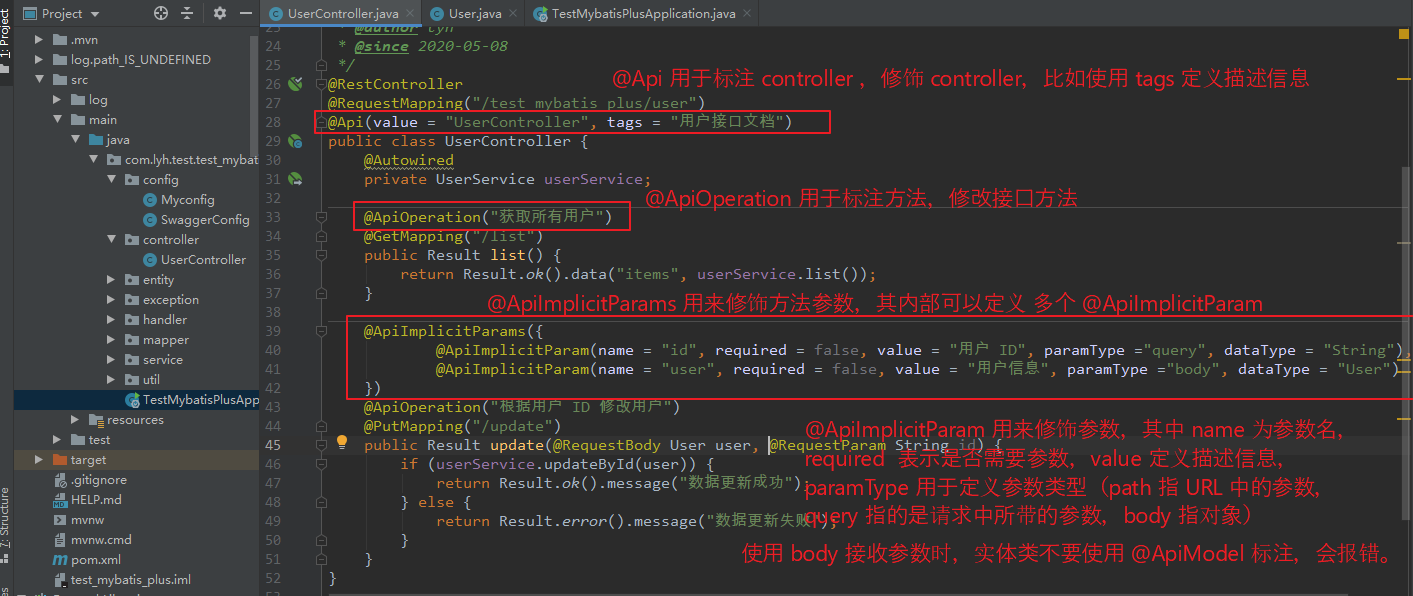
@Api                标注在 controller 类上,用于修饰 controller

@ApiOperation       标注在接口方法上,用于修饰 接口方法

@ApiParam           标注在接口参数上,用于修饰 参数

@ApiImplicitParam   标注在接口参数上,用于修饰 一个请求参数

@ApiImplicitParams   标注在接口参数上,用于修饰 多个请求参数(@ApiImplicitParam)

@ApiIgnore          标注在方法、参数上,表示忽略该方法、参数

@ApiModel           标注在实体类上,用来修饰实体类

@ApiModelProperty   标注在实体类的属性上,用于修饰实体类的属性。
(2)@Api @ApiOperation @ApiImplicitParam @ApiImplicitParams 举例:
import com.lyh.test.test_mybatis_plus.entity.User;
import com.lyh.test.test_mybatis_plus.service.UserService;
import com.lyh.test.test_mybatis_plus.util.Result;
import io.swagger.annotations.Api;
import io.swagger.annotations.ApiImplicitParam;
import io.swagger.annotations.ApiImplicitParams;
import io.swagger.annotations.ApiOperation;
import org.springframework.beans.factory.annotation.Autowired;
import org.springframework.web.bind.annotation.*; /**
* <p>
* 前端控制器
* </p>
*
* @author lyh
* @since 2020-05-08
*/
@RestController
@RequestMapping("/test_mybatis_plus/user")
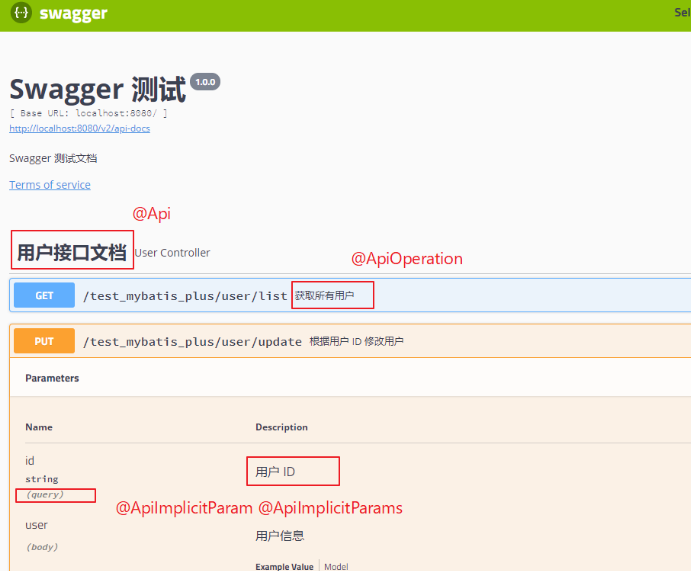
@Api(value = "UserController", tags = "用户接口文档")
public class UserController {
@Autowired
private UserService userService; @ApiOperation("获取所有用户")
@GetMapping("/list")
public Result list() {
return Result.ok().data("items", userService.list());
} // paramType ="query" 对应 @RequestParam
// paramType ="path" 对应 @PathVariable
// paramType ="body" 对应 @RequestBody 不经常用
// paramType ="header" 对应 @RequestHeader
@ApiImplicitParams({
@ApiImplicitParam(name = "id", required = false, value = "用户 ID", paramType ="query", dataType = "Long"),
@ApiImplicitParam(name = "user", required = false, value = "用户信息", paramType ="body", dataType = "User")
})
@ApiOperation("新增用户")
@PutMapping("/update")
public Result update(@RequestBody User user, @RequestParam(required = false) Long id) {
System.out.println("==================");
System.out.println(id);
if (userService.save(user)) {
return Result.ok().message("数据更新成功");
} else {
return Result.error().message("数据更新失败");
}
}
}
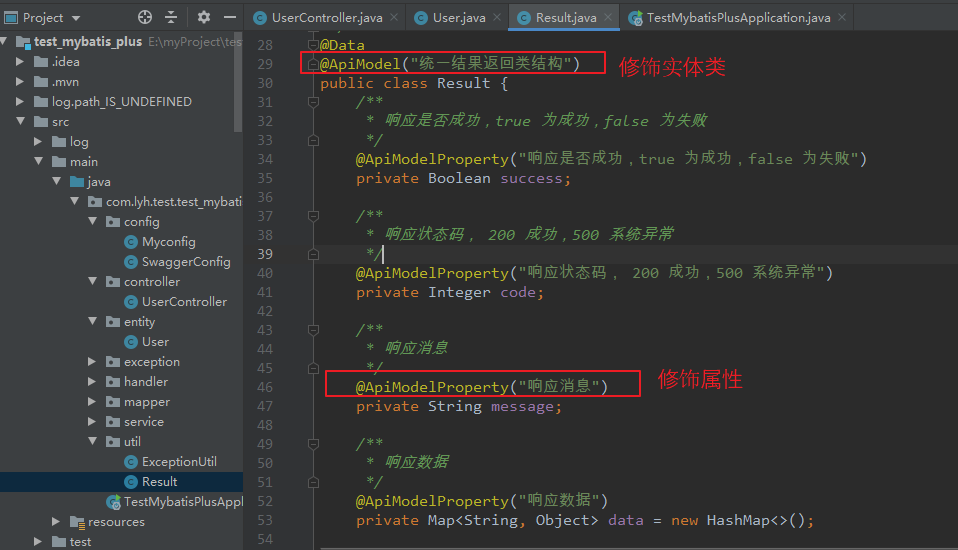
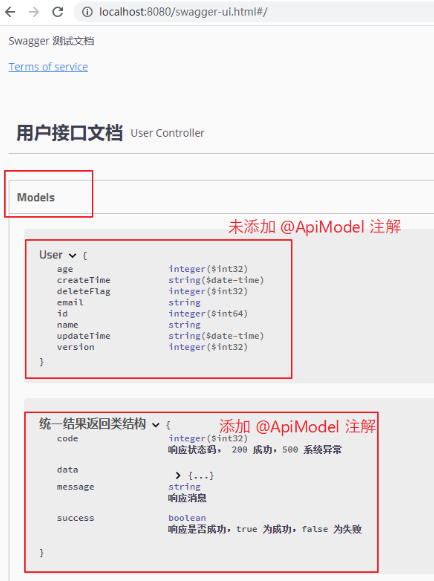
(3)@ApiModel 、@ApiModelProperty 举例
@Data

@ApiModel("统一结果返回类结构")

public class Result {

    /**

     * 响应是否成功,true 为成功,false 为失败

     */

    @ApiModelProperty("响应是否成功,true 为成功,false 为失败")

    private Boolean success;

    /**

     * 响应状态码, 200 成功,500 系统异常

     */

    @ApiModelProperty("响应状态码, 200 成功,500 系统异常")

    private Integer code;

    /**

     * 响应消息

     */

    @ApiModelProperty("响应消息")

    private String message;

    /**

     * 响应数据

     */

    @ApiModelProperty("响应数据")

    private Map<String, Object> data = new HashMap<>();

}
2、Swagger 配置
(1)简介
上面简单了解了下 swagger 常用注解,此处简单介绍一下 swagger 的配置类。
(2)配置类举例
根据项目情况修改 apiInfo、apis、paths 等信息。
其中:
apiInfo 用于定义 接口文档的基本信息。
apis 用于定义 接口扫描规则。
paths 用于定义 路径过滤规则。
@Configuration

@EnableSwagger2

public class SwaggerConfig implements WebMvcConfigurer {

    @Bean

    public Docket createRestApi() {

        return new Docket(DocumentationType.SWAGGER_2)

            .apiInfo(apiInfo())

            .select()

            // 加了ApiOperation注解的类,才会生成接口文档

            .apis(RequestHandlerSelectors.withMethodAnnotation(ApiOperation.class))

            // 指定包下的类,才生成接口文档

            .apis(RequestHandlerSelectors.basePackage("com.lyh.test.test_mybatis_plus.controller"))

            .paths(PathSelectors.any())

            .build();

    }

    private ApiInfo apiInfo() {

        return new ApiInfoBuilder()

            .title("Swagger 测试")

            .description("Swagger 测试文档")

            .termsOfServiceUrl("https://www.cnblogs.com/l-y-h/")

            .version("1.0.0")

            .build();

    }

}
(3)分析
Step1:简单了解一下注解。
@EnableSwagger2 注解用于开启 swagger。
@Bean 注解标注 createRestApi 方法用于实例 Docket 对象(文档插件)并交给 Spring 容器进行管理。
Step2:简单了解一下 apiInfo。
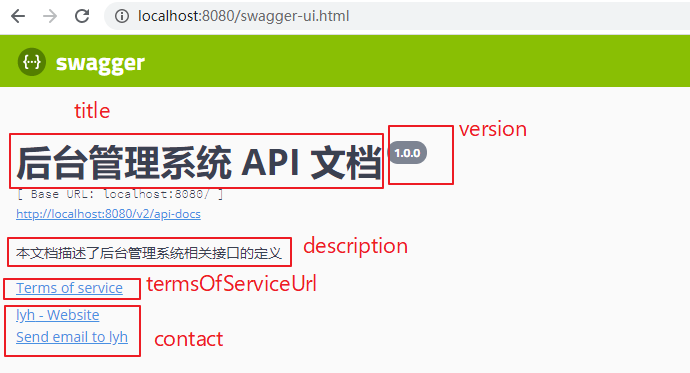
该方法用于定义 API 文档的基本信息。
【属性简单介绍:】

    title                  标题,默认为 Api Documentation

    version                版本,默认为 1.0

    description            描述信息,默认为 Api Documentation

    termsOfServiceUrl      服务地址,默认为 urn:tos

    license                许可证,默认为 Apache 2.0

    licenseUrl             许可证地址,默认为 http://www.apache.org/licenses/LICENSE-2.0

    contact                定义作者信息

【举例:】

private ApiInfo apiInfo() {

    return new ApiInfoBuilder()

        .title("后台管理系统 API 文档")

        .description("本文档描述了后台管理系统相关接口的定义")

        .termsOfServiceUrl("https://www.cnblogs.com/l-y-h/")

        .version("1.0.0")

        .contact(new Contact("lyh", "https://www.cnblogs.com/l-y-h/", "13865561381@163.com"))

        .build();

}
Step3:简单了解一下 Docket
Docket 实现了 DocumentationPlugin 接口,即文档插件。
Docket 常用方法介绍。
【Docket 常用方法:】
apiInfo() 用于定义接口文档的基本信息。
enabled() 用于定义 swagger 是否使用。
select() 实例化一个 ApiSelectorBuilder,调用其 build 方法返回一个 Docket 对象。 【ApiSelectorBuilder 常用方法:】
apis() 用于定义接口扫描方式(可以使用 RequestHandlerSelectors 指定扫描规则)
paths() 用于过滤路径(可以使用 PathSelectors 去指定过滤规则)。
build() 返回一个 Docket 对象
注:
RequestHandlerSelectors 常用方法:
any() 扫描全部
none() 全部不扫描
withMethodAnnotation() 根据方法上的注解扫描
withClassAnnotation() 根据类上的注解扫描
basePackage() 指定要扫描的包 PathSelectors 常用方法:
any() 全部通过
none() 全部不通过
regex() 根据正则表达式匹配是否通过 【举例:】 @Configuration
@EnableSwagger2
public class SwaggerConfig implements WebMvcConfigurer {
@Value("${spring.profiles.active:#{null}}")
private String env; @Bean
public Docket createRestApi() {
return new Docket(DocumentationType.SWAGGER_2)
.apiInfo(apiInfo())
// 指定是否开启 swagger(如下,生产环境时不执行 swagger)
.enable("prod".equals(env) ? false : true)
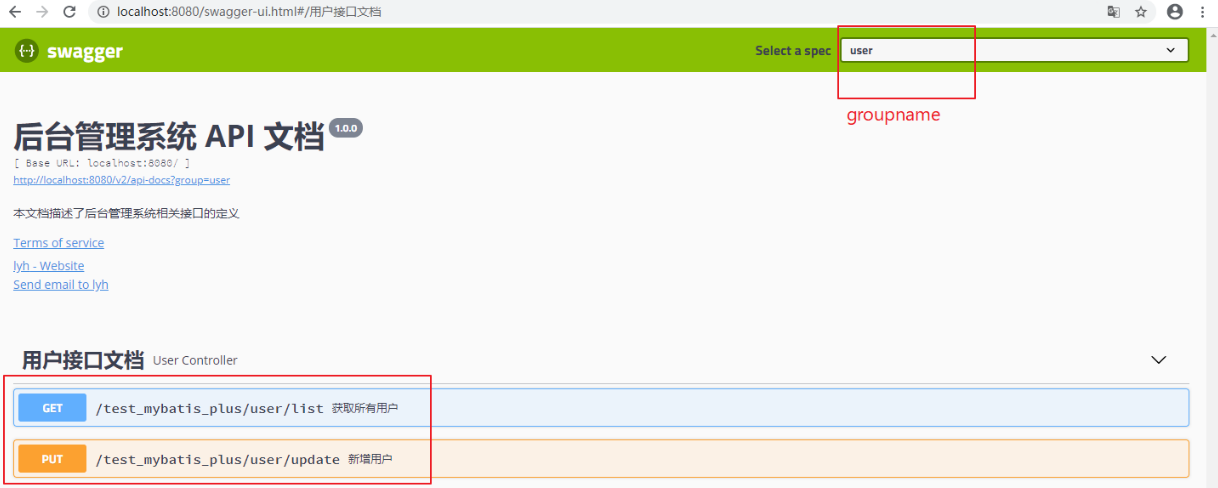
// 指定分组名
.groupName("user")
.select()
// 加了ApiOperation注解的类,才会生成接口文档
.apis(RequestHandlerSelectors.withMethodAnnotation(ApiOperation.class))
// 指定包下的类,才生成接口文档
.apis(RequestHandlerSelectors.basePackage("com.lyh.test.test_mybatis_plus.controller"))
// 不过滤接口
.paths(PathSelectors.any())
.build();
}
}
简单了解一下 Swagger的更多相关文章
- 浅析如何在Nancy中使用Swagger生成API文档
前言 上一篇博客介绍了使用Nancy框架内部的方法来创建了一个简单到不能再简单的Document.但是还有许许多多的不足. 为了能稍微完善一下这个Document,这篇引用了当前流行的Swagger, ...
- .Net Core---- WebApi生成Swagger接口文档
1. Swagger是什么? Swagger 是一个规范和完整的框架,用于生成.描述.调用和可视化 RESTful 风格的 Web 服务.总体目标是使客户端和文件系统作为服务器以同样的速度来更新.文件 ...
- SpringBoot整合Swagger测试api构建
@Author:SimpleWu 什么是Swagger? Swagger是什么:THE WORLD'S MOST POPULAR API TOOLING 根据官网的介绍: Swagger Inspec ...
- ASP.NET Core WebApi使用Swagger生成api说明文档
1. Swagger是什么? Swagger 是一个规范和完整的框架,用于生成.描述.调用和可视化 RESTful 风格的 Web 服务.总体目标是使客户端和文件系统作为服务器以同样的速度来更新.文件 ...
- 接口文档神器Swagger(下篇)
本文来自网易云社区 作者:李哲 二.Swagger-springmvc原理解析 上面介绍了如何将springmvc和springboot与swagger结合,通过简单配置生成接口文档,以及介绍了swa ...
- Spring Boot + Swagger
前言: 在互联网公司, 微服务的使用者一般分为两种, 客户端和其他后端项目(包括关联微服务),不管是那方对外提供文档 让别人理解接口 都是必不可少的.传统项目中一般使用wiki或者文档, 修改繁琐,调 ...
- 接口文档管理工具-Postman、Swagger、RAP(转载)
接口文档管理工具-Postman.Swagger.RAP 转自:http://www.51testing.com/html/10/n-3715910.html 在项目开发测试中,接口文档是贯穿始终的. ...
- 玩转 SpringBoot 2 快速整合 | 丝袜哥(Swagger)
概述 首先让我引用 Swagger 官方的介绍: Design is the foundation of your API development. Swagger makes API design ...
- 如何使用Swagger为.NET Core 3.0应用添加JWT授权说明文档
简介 本教程采用WHY-WHAT-HOW黄金圈思维模式编写,黄金圈法则强调的是从WHY为什么学,到WHAT学到什么,再到HOW如何学.从模糊到清晰的学习模式.大家的时间都很宝贵,我们做事前先想清楚为什 ...
随机推荐
- [寒假学习]ps知识
小学就开始学了,还是要感谢当时年轻不懂事到处研究怎么画画哈哈哈哈,不过到现在有点忘,寒假在家禁足也无聊,寻思着重拾画笔来着,复习一下,冲! 为了防止看完就忘用博客记录一下小笔记 1. 一些快捷键的 ...
- 00-04.kaliLinux-手动配置IP地址
在KaliLinux中手动配置网卡 用vim打开网卡的配置文件,配置各个网卡信息 root@kali:~# cd /etc/network root@kali:/etc/network# ------ ...
- ffmpeg m3u8生成 剪辑及格式转换
使用 ffmpeg 工具, 生成 m3u8 文件 ffmpeg -re -i 03.ts -c copy -f hls -hls_base_url /Users/admin/Downloads/dow ...
- python中的类型
python中的类型分为四种 1.整形 2.浮点型 3.字符串 4.对象(除了前三种,其他的都是对象) 比如函数也是对象 def fun(): print(123) type(fun) // < ...
- Node.js 学习笔记(二)
express是nodejs的一个轻量级框架. express的功能很简单, 功能依赖中间件. 安装:在你的项目文件价里打开cmd窗口,在里面使用npm工具(就是在cmd里输入 npm install ...
- C++值元编程
--永远不要在OJ上使用值元编程,过于简单的没有优势,能有优势的编译错误. 背景 2019年10月,我在学习算法.有一道作业题,输入规模很小,可以用打表法解决.具体方案有以下三种: 运行时预处理,生成 ...
- git&github&Jenkins完成可持续集成
1.安装git :想要安装Git首先要下载Git的安装包程序. Git安装包下载地址:https://git-scm.com/downloads/ 2.双击下载git安装包进入安装界面, 点击下一步, ...
- numpy.stack和numpy.concatenate的区别
在使用numpy进行矩阵运算的时候踩到的坑,原因是不能正确区分numpy.concatenate和numpy.stack在功能上的差异. 先说numpy.concatenate,直接看文档: nump ...
- Pikachu的暴力破解演示-----基于表单的暴力破解
1 首先打开XAMMP与burpsuite 2 打开游览器输入127.0.0.1:88进入pikachu,(由于我的端口有80改成88所以输入127.0.0.1:88要是没有更改80只需要输入127. ...
- 重学 Java 设计模式:实战代理模式「模拟mybatis-spring中定义DAO接口,使用代理类方式操作数据库原理实现场景」
作者:小傅哥 博客:https://bugstack.cn 沉淀.分享.成长,让自己和他人都能有所收获! 一.前言 难以跨越的瓶颈期,把你拿捏滴死死的! 编程开发学习过程中遇到的瓶颈期,往往是由于看不 ...