RabbitMQ 消息模式
消息模式实例
视频教程:https://ke.qq.com/course/304104
编写代码前,最好先添加好用户并设置virtual hosts
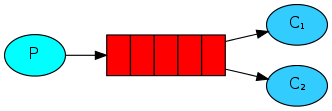
一、简单模式

1.导入jar包
    <dependency>

      <groupId>com.rabbitmq</groupId>

      <artifactId>amqp-client</artifactId>

      <version>4.5.0</version>

    </dependency>
2.创建连接
import com.idelan.rabbitmq.utils.ConnectionUtil;

import com.rabbitmq.client.Channel;

import com.rabbitmq.client.Connection;

public class Sender {

    private final static String QUEUE = "testhello"; //队列名字

    public static void main(String[] args) throws Exception{

        //获取连接

        Connection connection = ConnectionUtil.getConnection();

        //创建通道

        Channel channel = connection.createChannel();

        //声明队列,如果队列存在则什么都不做,如果队列不存在才创建

        //参数一: 队列的名字

        //参数二: 是否持久化队列,我们的队列模式是在内存中的,如果rabbit重启会丢失,如果我们设置为true 则会保存到erlng自带的数据库中,重启会重新获取

        //参数三: 是否排外,有两个作用,第一个当我们的链接关闭后是否会自动删除队列,作用二,是否私有当前队列,如果私有了,其他通道不可以访问当前队列,如果为true 一般适合一个队列消费者的时候

        //参数四: 是否自动删除

        //参数五 我们的一些其他的参数

        channel.queueDeclare(QUEUE, false, false, false, null);

        //发送内容

        channel.basicPublish("", QUEUE, null, "hello world".getBytes());

        //关闭连接

        channel.close();

        connection.close();

    }

}
3.消费者
import com.idelan.rabbitmq.utils.ConnectionUtil;

import com.rabbitmq.client.Channel;

import com.rabbitmq.client.Connection;

import com.rabbitmq.client.QueueingConsumer;

public class Receiver {

    private final static String QUEUE = "testhello"; //队列名字

    public static void main(String[] args) throws Exception{

        Connection connection = ConnectionUtil.getConnection();

        Channel channel = connection.createChannel();

        channel.queueDeclare(QUEUE, false, false, false, null);

        QueueingConsumer consumer = new QueueingConsumer(channel);

        //接收消息,参数二 是自动确认

        channel.basicConsume(QUEUE, true, consumer);

       while (true) {

            //获取消息   如果没有消息会等待,有的话就获取执行然后销毁,是一次性的

            QueueingConsumer.Delivery delivery = consumer.nextDelivery();

            String message = new String(delivery.getBody());

            System.out.println("message:"+message);

       }

    }

}
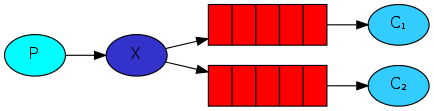
二、工作模式
1.生产者
import com.idelan.rabbitmq.utils.ConnectionUtil;

import com.rabbitmq.client.Channel;

import com.rabbitmq.client.Connection;

public class Sender {

    private final static String QUEUE = "testwork"; //队列名字

    public static void main(String[] args) throws Exception{

        //获取连接

        Connection connection = ConnectionUtil.getConnection();

        //创建通道

        Channel channel = connection.createChannel();

        //声明队列,如果队列存在则什么都不做,如果队列不存在才创建

        //参数一: 队列的名字

        //参数二: 是否持久化队列,我们的队列模式是在内存中的,如果rabbit重启会丢失,如果我们设置为true 则会保存到erlng自带的数据库中,重启会重新获取

        //参数三: 是否排外,有两个作用,第一个当我们的链接关闭后是否会自动删除队列,作用二,是否私有当前队列,如果私有了,其他通道不可以访问当前队列,如果为true 一般适合一个队列消费者的时候

        //参数四: 是否自动删除

        //参数五 我们的一些其他的参数

        channel.queueDeclare(QUEUE, false, false, false, null);

        for (int i = 0; i < 20; i++){

            //发送内容

            channel.basicPublish("", QUEUE, null, ("hello world "+i).getBytes());

        }

        //关闭连接

        channel.close();

        connection.close();

    }

}
2.消费者1
import com.idelan.rabbitmq.utils.ConnectionUtil;

import com.rabbitmq.client.*;

import java.io.IOException;

public class Receiver1 {

    private final static String QUEUE = "testwork"; //队列名字

    public static void main(String[] args) throws Exception{

        Connection connection = ConnectionUtil.getConnection();

        final Channel channel = connection.createChannel();

        channel.queueDeclare(QUEUE, false, false, false, null);

        //告诉服务器,在我没有确认当前消息完成之前,不要给我发新消息

        channel.basicQos(1);

        DefaultConsumer consumer = new DefaultConsumer(channel) {

            @Override

            public void handleDelivery(String consumerTag, Envelope envelope, AMQP.BasicProperties properties, byte[] body) throws IOException {

                try {

                    Thread.sleep(100);

                } catch (InterruptedException e) {

                    e.printStackTrace();

                }

                //当我们收到消息的时候调用

                System.out.println("消费者1 收到的消息内容是:" + new String(body));

                //确认 参数2,false为确认收到消息,true 为拒绝接收

                channel.basicAck(envelope.getDeliveryTag(), false);

            }

        };

        //注册消费者,参数2 收到确认,代表我们收到消息后需要手动告诉服务器,我们收到消息了

        channel.basicConsume(QUEUE, false, consumer);

    }

}
3.消费者2
import com.idelan.rabbitmq.utils.ConnectionUtil;

import com.rabbitmq.client.*;

import java.io.IOException;

public class Receiver2 {

    private final static String QUEUE = "testwork"; //队列名字

    public static void main(String[] args) throws Exception{

        Connection connection = ConnectionUtil.getConnection();

        final Channel channel = connection.createChannel();

        channel.queueDeclare(QUEUE, false, false, false, null);

        //告诉服务器,在我没有确认当前消息完成之前,不要给我发新消息

        channel.basicQos(1);

        DefaultConsumer consumer = new DefaultConsumer(channel) {

            @Override

            public void handleDelivery(String consumerTag, Envelope envelope, AMQP.BasicProperties properties, byte[] body) throws IOException {

                //当我们收到消息的时候调用

                System.out.println("消费者2 收到的消息内容是:" + new String(body));

                //确认 参数2,false为确认收到消息,true 为拒绝接收

                channel.basicAck(envelope.getDeliveryTag(), false);

            }

        };

        //注册消费者,参数2 收到确认,代表我们收到消息后需要手动告诉服务器,我们收到消息了

        channel.basicConsume(QUEUE, false, consumer);

    }

}
三、发布订阅模式
1.生产者
import com.idelan.rabbitmq.utils.ConnectionUtil;

import com.rabbitmq.client.Channel;

import com.rabbitmq.client.Connection;

public class Sender {

    private final static String EXCHANGE_NAME = "testexchange"; //定义交换机名字

    public static void main(String[] args) throws Exception{

       Connection connection = ConnectionUtil.getConnection();

       Channel channel = connection.createChannel();

       //声明交换机

        channel.exchangeDeclare(EXCHANGE_NAME, "fanout");//定义一个交换机,类型是fanout

        //发布订阅模式,因为消息是先发布到交换机中,而交换机是没有保存功能的,所以如果没有消费者,消息则会丢失

        channel.basicPublish(EXCHANGE_NAME, "", null, "发布订阅模式的消息".getBytes());

        channel.close();

        connection.close();

    }

}
2.消费者1
import com.idelan.rabbitmq.utils.ConnectionUtil;

import com.rabbitmq.client.*;

import java.io.IOException;

public class Receiver1 {

    private final static String EXCHANGE_NAME = "testexchange"; //定义交换机名字

    public static void main(String[] args) throws Exception{

        Connection connection = ConnectionUtil.getConnection();

        final Channel channel = connection.createChannel();

        channel.queueDeclare("testpubQueue1", false, false, false, null);

        //绑定队列到交换机

        channel.queueBind("testpubQueue1", EXCHANGE_NAME, "");

        channel.basicQos(1);

        DefaultConsumer consumer = new DefaultConsumer(channel) {

            @Override

            public void handleDelivery(String consumerTag, Envelope envelope, AMQP.BasicProperties properties, byte[] body) throws IOException {

                System.out.println("消费者1:"+new String(body));

                channel.basicAck(envelope.getDeliveryTag(),false);

            }

        };

        channel.basicConsume("testpubQueue1", false, consumer);

    }

}
3.消费者2
import com.idelan.rabbitmq.utils.ConnectionUtil;

import com.rabbitmq.client.*;

import java.io.IOException;

public class Receiver2 {

    private final static String EXCHANGE_NAME = "testexchange"; //定义交换机名字

    public static void main(String[] args) throws Exception{

        Connection connection = ConnectionUtil.getConnection();

        final Channel channel = connection.createChannel();

        channel.queueDeclare("testpubQueue2", false, false, false, null);

        //绑定队列到交换机

        channel.queueBind("testpubQueue2", EXCHANGE_NAME, "");

        channel.basicQos(1);

        DefaultConsumer consumer = new DefaultConsumer(channel) {

            @Override

            public void handleDelivery(String consumerTag, Envelope envelope, AMQP.BasicProperties properties, byte[] body) throws IOException {

                System.out.println("消费者2:"+new String(body));

                channel.basicAck(envelope.getDeliveryTag(),false);

            }

        };

        channel.basicConsume("testpubQueue2", false, consumer);

    }

}
四、路由模式

1.生产者
import com.idelan.rabbitmq.utils.ConnectionUtil;

import com.rabbitmq.client.Channel;

import com.rabbitmq.client.Connection;

public class Sender {

    private final static String EXCHANGE_NAME = "testexroute"; //定义交换机名字

    public static void main(String[] args) throws Exception{

       Connection connection = ConnectionUtil.getConnection();

       Channel channel = connection.createChannel();

       //声明交换机

        channel.exchangeDeclare(EXCHANGE_NAME, "direct");//定义一个路由格式的交换机

        //发布订阅模式,因为消息是先发布到交换机中,而交换机是没有保存功能的,所以如果没有消费者,消息则会丢失

        // routingKey 为key1

        channel.basicPublish(EXCHANGE_NAME, "key3", null, "路由模式的消息".getBytes());

        channel.close();

        connection.close();

    }

}
2.消费者1
import com.idelan.rabbitmq.utils.ConnectionUtil;

import com.rabbitmq.client.*;

import java.io.IOException;

public class Receiver1 {

    private final static String EXCHANGE_NAME = "testexroute"; //定义交换机名字

    public static void main(String[] args) throws Exception{

        Connection connection = ConnectionUtil.getConnection();

        final Channel channel = connection.createChannel();

        channel.queueDeclare("testRouteQueue1", false, false, false, null);

        //绑定队列到交换机

        //参数3标记,绑定到交换机的时候会指定一个标记,只有和它一样的标记的消息才会被当前消费者接收到

        channel.queueBind("testRouteQueue1", EXCHANGE_NAME, "key1");

        //如果需要绑定多个标记 在执行一次即可

        channel.queueBind("testRouteQueue1", EXCHANGE_NAME, "key3");

        channel.basicQos(1);

        DefaultConsumer consumer = new DefaultConsumer(channel) {

            @Override

            public void handleDelivery(String consumerTag, Envelope envelope, AMQP.BasicProperties properties, byte[] body) throws IOException {

                System.out.println("消费者1:"+new String(body));

                channel.basicAck(envelope.getDeliveryTag(),false);

            }

        };

        channel.basicConsume("testRouteQueue1", false, consumer);

    }

}
3.消费者2
import com.idelan.rabbitmq.utils.ConnectionUtil;

import com.rabbitmq.client.*;

import java.io.IOException;

public class Receiver2 {

    private final static String EXCHANGE_NAME = "testexroute"; //定义交换机名字

    public static void main(String[] args) throws Exception{

        Connection connection = ConnectionUtil.getConnection();

        final Channel channel = connection.createChannel();

        channel.queueDeclare("testRouteQueue2", false, false, false, null);

         //绑定队列到交换机

        //参数3标记,绑定到交换机的时候会指定一个标记,只有和它一样的标记的消息才会被当前消费者接收到

        channel.queueBind("testRouteQueue2", EXCHANGE_NAME, "key1");

        //如果需要绑定多个标记 在执行一次即可

        channel.queueBind("testRouteQueue2", EXCHANGE_NAME, "key2");

        channel.basicQos(1);

        DefaultConsumer consumer = new DefaultConsumer(channel) {

            @Override

            public void handleDelivery(String consumerTag, Envelope envelope, AMQP.BasicProperties properties, byte[] body) throws IOException {

                System.out.println("消费者2:"+new String(body));

                channel.basicAck(envelope.getDeliveryTag(),false);

            }

        };

        channel.basicConsume("testRouteQueue2", false, consumer);

    }

}
五、主题模式
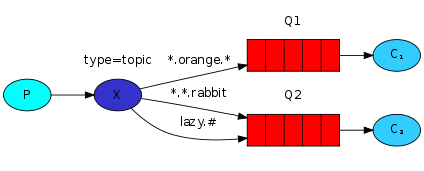
1.生产者
import com.idelan.rabbitmq.utils.ConnectionUtil;

import com.rabbitmq.client.Channel;

import com.rabbitmq.client.Connection;

public class Sender {

    private final static String EXCHANGE_NAME = "testexchangetopic"; //定义交换机名字

    public static void main(String[] args) throws Exception{

       Connection connection = ConnectionUtil.getConnection();

       Channel channel = connection.createChannel();

       //声明交换机

        channel.exchangeDeclare(EXCHANGE_NAME, "topic");//定义一个topic 格式的交换机

        //发布订阅模式,因为消息是先发布到交换机中,而交换机是没有保存功能的,所以如果没有消费者,消息则会丢失

        // routingKey 为key1

        // * 只能匹配一个字符 # 可以匹配多个字符

        channel.basicPublish(EXCHANGE_NAME, "abc.1.3", null, "topic模式的消息".getBytes());

        channel.close();

        connection.close();

    }

}
2.消费者1
import com.idelan.rabbitmq.utils.ConnectionUtil;

import com.rabbitmq.client.*;

import java.io.IOException;

public class Receiver1 {

    private final static String EXCHANGE_NAME = "testexchangetopic"; //定义交换机名字

    public static void main(String[] args) throws Exception{

        Connection connection = ConnectionUtil.getConnection();

        final Channel channel = connection.createChannel();

        channel.queueDeclare("testTopicQueue1", false, false, false, null);

        //绑定队列到交换机

        //参数3标记,绑定到交换机的时候会指定一个标记,只有和它一样的标记的消息才会被当前消费者接收到

        channel.queueBind("testTopicQueue1", EXCHANGE_NAME, "key.*");

        //如果需要绑定多个标记 在执行一次即可

        channel.queueBind("testTopicQueue1", EXCHANGE_NAME, "abc.#");

        channel.basicQos(1);

        DefaultConsumer consumer = new DefaultConsumer(channel) {

            @Override

            public void handleDelivery(String consumerTag, Envelope envelope, AMQP.BasicProperties properties, byte[] body) throws IOException {

                System.out.println("消费者1:"+new String(body));

                channel.basicAck(envelope.getDeliveryTag(),false);

            }

        };

        channel.basicConsume("testTopicQueue1", false, consumer);

    }

}
3.消费者2
import com.idelan.rabbitmq.utils.ConnectionUtil;

import com.rabbitmq.client.*;

import java.io.IOException;

public class Receiver2 {

    private final static String EXCHANGE_NAME = "testexchangetopic"; //定义交换机名字

    public static void main(String[] args) throws Exception{

        Connection connection = ConnectionUtil.getConnection();

        final Channel channel = connection.createChannel();

        channel.queueDeclare("testTopicQueue2", false, false, false, null);

         //绑定队列到交换机

        //参数3标记,绑定到交换机的时候会指定一个标记,只有和它一样的标记的消息才会被当前消费者接收到

        channel.queueBind("testTopicQueue2", EXCHANGE_NAME, "key.#");

        //如果需要绑定多个标记 在执行一次即可

        channel.queueBind("testTopicQueue2", EXCHANGE_NAME, "abc.*");

        channel.basicQos(1);

        DefaultConsumer consumer = new DefaultConsumer(channel) {

            @Override

            public void handleDelivery(String consumerTag, Envelope envelope, AMQP.BasicProperties properties, byte[] body) throws IOException {

                System.out.println("消费者2:"+new String(body));

                channel.basicAck(envelope.getDeliveryTag(),false);

            }

        };

        channel.basicConsume("testTopicQueue2", false, consumer);

    }

}
RabbitMQ 消息模式的更多相关文章
- RabbitMQ消息队列(八)-通过Topic主题模式分发消息(.Net Core版)
前两章我们讲了RabbitMQ的direct模式和fanout模式,本章介绍topic主题模式的应用.如果对direct模式下通过routingkey来匹配消息的模式已经有一定了解那fanout也很好 ...
- (九)RabbitMQ消息队列-通过Headers模式分发消息
原文:(九)RabbitMQ消息队列-通过Headers模式分发消息 Headers类型的exchange使用的比较少,以至于官方文档貌似都没提到,它是忽略routingKey的一种路由方式.是使用H ...
- (八)RabbitMQ消息队列-通过Topic主题模式分发消息
原文:(八)RabbitMQ消息队列-通过Topic主题模式分发消息 前两章我们讲了RabbitMQ的direct模式和fanout模式,本章介绍topic主题模式的应用.如果对direct模式下通过 ...
- (七)RabbitMQ消息队列-通过fanout模式将消息推送到多个Queue中
原文:(七)RabbitMQ消息队列-通过fanout模式将消息推送到多个Queue中 前面第六章我们使用的是direct直连模式来进行消息投递和分发.本章将介绍如何使用fanout模式将消息推送到多 ...
- RabbitMQ之消息模式(下)
目的: RabbitMQ之消息模式(上):https://www.cnblogs.com/huangting/p/11994539.html 消费端限流 消息的ACK与重回队列 TTL消息 死信队列 ...
- RabbitMQ之消息模式简单易懂,超详细分享~~~
前言 上一篇对RabbitMQ的流程和相关的理论进行初步的概述,如果小伙伴之前对消息队列不是很了解,那么在看理论时会有些困惑,这里以消息模式为切入点,结合理论细节和代码实践的方式一起来学习. 正文 常 ...
- Rabbitmq -Publish_Subscribe模式- python编码实现
what is Exchanges ?? Let's quickly go over what we covered in the previous tutorials: A producer is ...
- (转)RabbitMQ消息队列(九):Publisher的消息确认机制
在前面的文章中提到了queue和consumer之间的消息确认机制:通过设置ack.那么Publisher能不到知道他post的Message有没有到达queue,甚至更近一步,是否被某个Consum ...
- (转)RabbitMQ消息队列(四):分发到多Consumer(Publish/Subscribe)
上篇文章中,我们把每个Message都是deliver到某个Consumer.在这篇文章中,我们将会将同一个Message deliver到多个Consumer中.这个模式也被成为 "pub ...
随机推荐
- Invert Binary Tree(easy)
1.直接把递归把左右子树翻转即可 AC代码: /** * Definition for a binary tree node. * struct TreeNode { * int val; * Tre ...
- 网站爬取-案例三:今日头条抓取(ajax抓取JS数据)
今日头条这类的网站制作,从数据形式,CSS样式都是通过数据接口的样式来决定的,所以它的抓取方法和其他网页的抓取方法不太一样,对它的抓取需要抓取后台传来的JSON数据,先来看一下今日头条的源码结构:我们 ...
- JSON — Java与JSON数据互转
转换时Bean所要求的: 被转换的Bean必需是public的. Bean被转换的属性一定要有对应的get方法,且一定要是public的. Bean中不能用引用自身的this的属性,否则运行时出现et ...
- [LC] 221. Maximal Square
Given a 2D binary matrix filled with 0's and 1's, find the largest square containing only 1's and re ...
- absorb|state|
ADJ-GRADED 极感兴趣的:专心的:全神贯注的If you are absorbed in something or someone, you are very interested in th ...
- 位移&二进制转换&原码&反码&补码
<< 左移 按二进制形式把所有的数字向左移动对应的位数,高位移出(舍弃),低位的空位补零. 格式 需要移位的数字 << 移位的次数 计算过程 1. 按二进制形式把所有的数字向左 ...
- 公式化学习requests(第二卷)
请求浏览器分为两种一种是不需要用户登录验证直接请求 另一种是需要用户登陆验证请求,现在说一下利用COOKIE实现,COOKIE在前端开发时有很多的作用,要熟练使用, 直接上代码了: 第一步:访问页面, ...
- win7电脑磁盘文件以分组方式展现解决方案
问题: win7电脑磁盘文件以分组方式展现,具体如下: 解决: 右键磁盘空白处-->分组依据-->选择无:图解如下:
- Spring Boot中application.properties和application.yml文件
application.properties和application.yml文件可以放在一下四个位置: 外置,在相对于应用程序运行目录的/congfig子目录里. 外置,在应用程序运行的目录里 内置, ...
- linux增加history时间戳
增加环境变量到/etc/profile export HISTTIMEFORMAT="%Y-%m-%d %H:%M:%S " export HISTSIZE=9999