python图像处理常用方法
在线标注网站
https://gitlab.com/vgg/via
http://www.robots.ox.ac.uk/~vgg/software/via/via.html
数组与图像互转
from matplotlib import image

image.imsave('/xxx/%d.jpg'%d,  array, cmap='gray')   #数组转灰度图,jpg为三个通道数值一样

arr = image.imread("")
灰度图增强对比度
from PIL import Image

from PIL import ImageEnhance

img = Image.open('/xxx/xx.jpg')

img.show()

enh_con = ImageEnhance.Contrast(img)

contrast = 1.5  #增强的倍数

img_contrasted = enh_con.enhance(contrast)

img_contrasted.show()
处理标注网站的csv文件
import csv

import json

import numpy as np

def readcsv(filename):

    list1 = []

    with open(filename)as f:

       csv_reader = csv.reader(f)

       for row in csv_reader:

            x,y,w,h = readjson(row[5])

            list1.append([row[0], x, y, w, h])

    arr = np.array(list1)

    return arr

def readjson(jsonstr):

    jsontemp = json.loads(jsonstr)

    x,y,w,h = jsontemp["x"], jsontemp["y"], jsontemp["width"], jsontemp["height"]

    return x,y,w,h

if __name__ == '__main__':

    arr = readcsv('./ann/ann_test.csv')

    print(arr)
图像resize,等比缩放,旁边加黑边:
import cv2

import numpy as np

from glob import glob

import os

def training_transform(height, width, output_height, output_width):

  # https://docs.opencv.org/2.4/doc/tutorials/imgproc/imgtrans/warp_affine/warp_affine.html

  height_scale, width_scale = output_height / height, output_width / width

  scale = min(height_scale, width_scale)

  resize_height, resize_width = round(height * scale), round(width * scale)

  pad_top = (output_height - resize_height) // 2

  pad_left = (output_width - resize_width) // 2

  A = np.float32([[scale, 0.0], [0.0, scale]])

  B = np.float32([[pad_left], [pad_top]])

  M = np.hstack([A, B])

  return M, output_height, output_width

def testing_transform(height, width, max_stride):

  h_pad, w_pad = round(height / max_stride + 0.51) * max_stride, round(width / max_stride + 0.51) * max_stride

  pad_left = (w_pad - width) // 2

  pad_top = (h_pad - height) // 2

  A = np.eye(2, dtype='float32')

  B = np.float32([[pad_left], [pad_top]])

  M = np.hstack([A, B])

  return M, h_pad, w_pad

def invert_transform(M):

  # T = A @ x + B => x = A_inv @ (T - B) = A_inv @ T + (-A_inv @ B)

  A_inv = np.float32([[1. / M[0, 0], 0.0], [0.0, 1. / M[1, 1]]])

  B_inv = -A_inv @ M[:, 2:3]

  M_inv = np.hstack([A_inv, B_inv])

  return M_inv

def affine_transform_coords(coords, M):

  A, B = M[:2, :2], M[:2, 2:3]

  transformed_coords = A @ coords + B

  return transformed_coords

class LetterboxTransformer:

  def __init__(self, height=None, width=None, mode='training', max_stride=128):

    """Resize the input images. For `mode='training'` the resolution is fixed to `height` x `width`.

       The resolution is changed but the aspect ratio is kept.

       In `mode='testing'` the input is padded to the next bigger multiple of `max_stride` of the network.

       The orginal resolutions is thus kept."""

    self.height = height

    self.width = width

    self.mode = mode

    self.max_stride = max_stride

    self.M = None

    self.M_inv = None

  def __call__(self, image):

    h, w = image.shape[:2]

    if self.mode == 'training':

      M, h_out, w_out = training_transform(h, w, self.height, self.width)

    elif self.mode == 'testing':

      M, h_out, w_out = testing_transform(h, w, self.max_stride)

    # https://answers.opencv.org/question/33516/cv2warpaffine-results-in-an-image-shifted-by-05-pixel

    # This is different from `cv2.resize(image, (resize_width, resize_height))` & pad

    letterbox = cv2.warpAffine(image, M, (w_out, h_out))

    self.M = M

    self.M_inv = invert_transform(M)

    return letterbox

  def correct_box(self, x1, y1, x2, y2):

    coords = np.float32([[x1, x2], [y1, y2]])

    coords = affine_transform_coords(coords, self.M_inv)

    x1, y1, x2, y2 = coords[0, 0], coords[1, 0], coords[0, 1], coords[1, 1]

    return x1, y1, x2, y2

  def correct_coords(self, coords):

    coords = affine_transform_coords(coords, self.M_inv)

    return coords
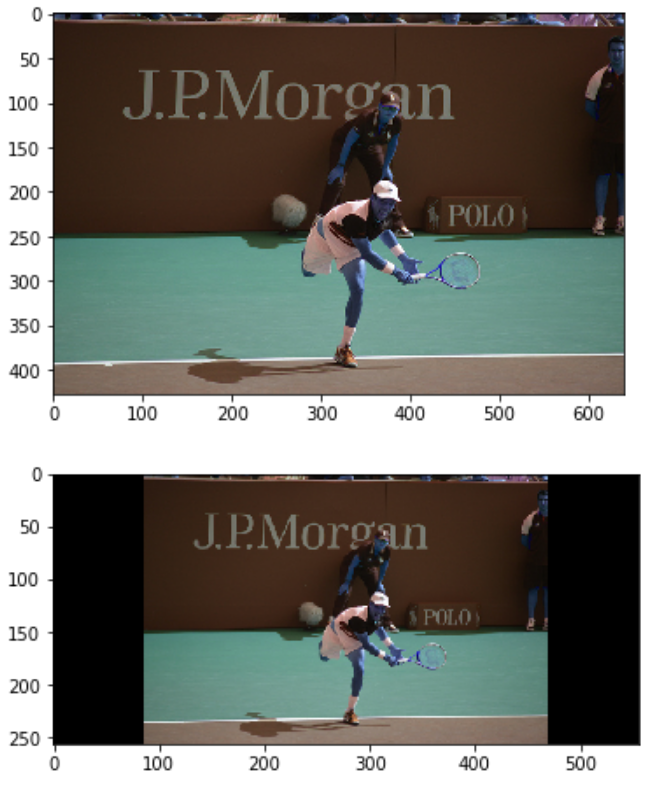
#查看效果

from matplotlib import pyplot as plt

from matplotlib import image

fn = '/home/hxybs/centerNet/Centernet-Tensorflow2/data/val2017/000000000885.jpg'

letterbox_transformer = LetterboxTransformer(256, 556)

img = cv2.imread(fn)

pimg = letterbox_transformer(img)

plt.figure()

plt.imshow(img)

plt.figure()

plt.imshow(pimg)

plt.show()
效果:
计算图片数据集的均值方差
保证所有的图片都是统一尺寸
import os

from PIL import Image

import matplotlib.pyplot as plt

import numpy as np

from imageio import imread

filepath = r'/home/xxx/images'  # 数据集目录

pathDir = os.listdir(filepath)

R_channel = 0

G_channel = 0

B_channel = 0

for idx in range(len(pathDir)):

    filename = pathDir[idx]

    img = imread(os.path.join(filepath, filename)) / 255.0

    R_channel = R_channel + np.sum(img[:, :, 0])

    G_channel = G_channel + np.sum(img[:, :, 1])

    B_channel = B_channel + np.sum(img[:, :, 2])

num = len(pathDir) * 512 * 512  # 这里(512,512)是每幅图片的大小,所有图片尺寸都一样

R_mean = R_channel / num

G_mean = G_channel / num

B_mean = B_channel / num

R_channel = 0

G_channel = 0

B_channel = 0

for idx in range(len(pathDir)):

    filename = pathDir[idx]

    img = imread(os.path.join(filepath, filename)) / 255.0

    R_channel = R_channel + np.sum((img[:, :, 0] - R_mean) ** 2)

    G_channel = G_channel + np.sum((img[:, :, 1] - G_mean) ** 2)

    B_channel = B_channel + np.sum((img[:, :, 2] - B_mean) ** 2)

R_var = np.sqrt(R_channel / num)

G_var = np.sqrt(G_channel / num)

B_var = np.sqrt(B_channel / num)

print("R_mean is %f, G_mean is %f, B_mean is %f" % (R_mean, G_mean, B_mean))

print("R_var is %f, G_var is %f, B_var is %f" % (R_var, G_var, B_var))
python图像处理常用方法的更多相关文章
- Python图像处理库:Pillow 初级教程
Python图像处理库:Pillow 初级教程 2014-09-14 翻译 http://pillow.readthedocs.org/en/latest/handbook/tutorial.html ...
- Python图像处理之验证码识别
在上一篇博客Python图像处理之图片文字识别(OCR)中我们介绍了在Python中如何利用Tesseract软件来识别图片中的英文与中文,本文将具体介绍如何在Python中利用Tesseract ...
- 【python图像处理】图像的缩放、旋转与翻转
[python图像处理]图像的缩放.旋转与翻转 图像的几何变换,如缩放.旋转和翻转等,在图像处理中扮演着重要的角色,python中的Image类分别提供了这些操作的接口函数,下面进行逐一介绍. 1.图 ...
- Python图像处理库(1)
转自:http://www.ituring.com.cn/tupubarticle/2024 第 1 章 基本的图像操作和处理 本章讲解操作和处理图像的基础知识,将通过大量示例介绍处理图像所需的 Py ...
- Python图像处理库:PIL中Image,ImageDraw等基本模块介绍
Python图像处理库:PIL中Image,ImageDraw等基本模块介绍 标签: 图像处理PILPYTHON 2016-08-19 10:58 461人阅读 评论(0) 收藏 举报 分类: 其他 ...
- Python图像处理库PIL中图像格式转换(一)
在数字图像处理中,针对不同的图像格式有其特定的处理算法. 所以,在做图像处理之前,我们须要考虑清楚自己要基于哪种格式的图像进行算法设计及事实上现.本文基于这个需求.使用python中的图像处理库PIL ...
- python 图像处理中二值化方法归纳总结
python图像处理二值化方法 1. opencv 简单阈值 cv2.threshold 2. opencv 自适应阈值 cv2.adaptiveThreshold 3. Otsu's 二值化 例子: ...
- python图像处理:一福变五福
快过年了,各种互联网产品都出来撒红包.某宝一年一度的“集五福活动”更是成为每年的必备活动之一. 虽然到最后每人大概也就分个两块钱,但作为一个全民话题,大多数人还是愿意凑凑热闹. 毕竟对于如今生活在大城 ...
- Python 图像处理 OpenCV (2):像素处理与 Numpy 操作以及 Matplotlib 显示图像
前文传送门: 「Python 图像处理 OpenCV (1):入门」 普通操作 1. 读取像素 读取像素可以通过行坐标和列坐标来进行访问,灰度图像直接返回灰度值,彩色图像则返回B.G.R三个分量. 需 ...
随机推荐
- 项目版本回退后出现java compiler level does not match the version of the installed java project facet错误的解决
今天项目出问题了,采取了项目版本回退的方法解决了代码不能够下拉和上送的问题以后,出现如下错误,项目是微服务的,更新相关的依赖项目,仍得不到解决,检查mapper.xml文件亦没问题.然后在控制台那块发 ...
- jq监听
$(window).resize(function () {//风电月表格自适应高度 var handHeight =$(".tree-handler").height() $(& ...
- cf 187B.AlgoRace
floyd...太神奇了(不会floyd(大雾)) 貌似floyd的外层k是保证最短路从起点逐渐向外扩展(而不是乱搞233) 所以在处理f[i][j]=min(f[i][j],f[i][k]+f[k] ...
- mysql+MHA高可用 (一主双从)
1.准备三台服务器 10.0.0.12 10.0.0.13 10.0.0.14 2.在三台服务器上执行操作 时间同步 [root@ c7m01 ~]# echo "*/5* * * * /u ...
- python虚拟环境配置(下)
前言 嘿,各位小伙伴们,晚上好呀,新年快乐,注意预防流感哈,就不要出去浪了,万一中奖了,嗯...,还是当个宅男,宅男无敌,哈哈哈, 过年了,村都被封了,哎,出都出不去,想着干点啥,就把以前没完善的继续 ...
- php添加openssl扩展
很多时候都会用到openssl组件,下面就介绍一下linux下php安装openssl扩展: 安 装openssl组件,一般php安装目录中都有许多扩展组件的安装包,当然也包括openssl,例如我的 ...
- SQL left join、rignt join、inner join区别
说真的一直对数据库没有研究以至于连这些基础都不会了,事实证明,业精于勤荒于嬉. 废话不多说,直接开始 有A.B两张表: 1.inner join inner join 和 join 是没有区别的(如有 ...
- 第一章:MySQL架构和历史
1.MySQL逻辑架构 MySQL存储引擎架构:将查询处理以及其他任务系统和数据的存储处理分离开来,这样做的好处在于可以根据需要灵活选择存储引擎. 第一层架构 -- 连接处理.授权认证.安全等. 第二 ...
- java使用BigDecimal 实现随机金额红包拆分算法
原创代码,引用注明出处:https://www.cnblogs.com/guangxiang/p/12218714.html @Servicepublic class SplitRedPacketsS ...
- 读书笔记 - js高级程序设计 - 第三章 基本概念
启用严格模式 "use strict" 这是一个 pragma 编译指示 让编码意图更清晰 是一个重要原则 5种简单数据类型 Undefined Null Boolean Num ...