
App主界面Tab实现方法
ViewPager + FragmentPagerAdapter
这里模仿下微信APP界面的实现
国际惯例,先看下效果图:

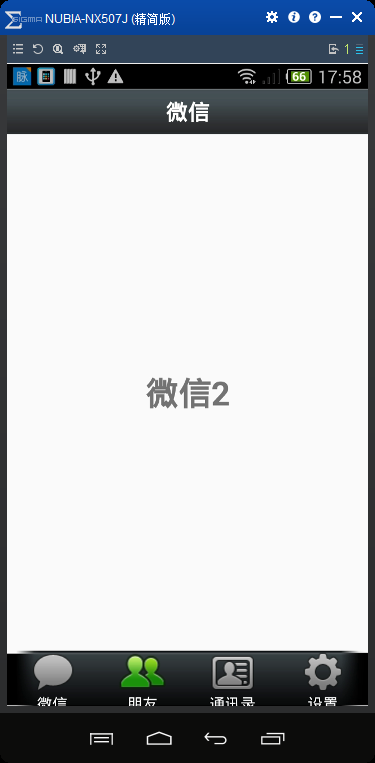
activity_main.xml 布局文件:
<?xml version="1.0" encoding="utf-8"?>

<LinearLayout xmlns:android="http://schemas.android.com/apk/res/android"

    xmlns:tools="http://schemas.android.com/tools"

    android:layout_width="match_parent"

    android:layout_height="match_parent"

    android:orientation="vertical"

    tools:context="com.kevin.viewpager_fragment.MainActivity">

    <include layout="@layout/top" />

    <android.support.v4.view.ViewPager

        android:id="@+id/id_viewpager"

        android:layout_width="match_parent"

        android:layout_height="0dp"

        android:layout_weight="1" />

    <include layout="@layout/bottom" />

</LinearLayout>
top.xml 布局文件
<?xml version="1.0" encoding="utf-8"?>

<LinearLayout xmlns:android="http://schemas.android.com/apk/res/android"

    android:layout_width="match_parent"

    android:layout_height="45dp"

    android:background="@mipmap/title_bar"

    android:gravity="center"

    android:orientation="vertical">

    <TextView

        android:layout_width="wrap_content"

        android:layout_height="wrap_content"

        android:layout_gravity="center"

        android:text="微信"

        android:textColor="#ffffff"

        android:textSize="20sp"

        android:textStyle="bold" />

</LinearLayout>
bottom.xml 布局文件
<?xml version="1.0" encoding="utf-8"?>

<LinearLayout xmlns:android="http://schemas.android.com/apk/res/android"

    android:layout_width="match_parent"

    android:layout_height="55dp"

    android:background="@mipmap/bottom_bar"

    android:orientation="horizontal">

    <LinearLayout

        android:id="@+id/id_tab_weixin"

        android:layout_width="0dp"

        android:layout_height="match_parent"

        android:layout_weight="1"

        android:gravity="center"

        android:orientation="vertical">

        <ImageButton

            android:id="@+id/id_tab_weixin_img"

            android:layout_width="wrap_content"

            android:layout_height="wrap_content"

            android:background="#00000000"

            android:clickable="false"

            android:src="@mipmap/tab_weixin_pressed" />

        <TextView

            android:layout_width="wrap_content"

            android:layout_height="wrap_content"

            android:text="微信"

            android:textColor="#ffffff" />

    </LinearLayout>

    <LinearLayout

        android:id="@+id/id_tab_frd"

        android:layout_width="0dp"

        android:layout_height="match_parent"

        android:layout_weight="1"

        android:gravity="center"

        android:orientation="vertical">

        <ImageButton

            android:id="@+id/id_tab_frd_img"

            android:layout_width="wrap_content"

            android:layout_height="wrap_content"

            android:background="#00000000"

            android:clickable="false"

            android:src="@mipmap/tab_find_frd_normal" />

        <TextView

            android:layout_width="wrap_content"

            android:layout_height="wrap_content"

            android:text="朋友"

            android:textColor="#ffffff" />

    </LinearLayout>

    <LinearLayout

        android:id="@+id/id_tab_address"

        android:layout_width="0dp"

        android:layout_height="match_parent"

        android:layout_weight="1"

        android:gravity="center"

        android:orientation="vertical">

        <ImageButton

            android:id="@+id/id_tab_address_img"

            android:layout_width="wrap_content"

            android:layout_height="wrap_content"

            android:background="#00000000"

            android:clickable="false"

            android:src="@mipmap/tab_address_normal" />

        <TextView

            android:layout_width="wrap_content"

            android:layout_height="wrap_content"

            android:text="通讯录"

            android:textColor="#ffffff" />

    </LinearLayout>

    <LinearLayout

        android:id="@+id/id_tab_setting"

        android:layout_width="0dp"

        android:layout_height="match_parent"

        android:layout_weight="1"

        android:gravity="center"

        android:orientation="vertical">

        <ImageButton

            android:id="@+id/id_tab_setting_img"

            android:layout_width="wrap_content"

            android:layout_height="wrap_content"

            android:background="#00000000"

            android:clickable="false"

            android:src="@mipmap/tab_settings_normal" />

        <TextView

            android:layout_width="wrap_content"

            android:layout_height="wrap_content"

            android:text="设置"

            android:textColor="#ffffff" />

    </LinearLayout>

</LinearLayout>
tap01.xml 布局文件
<?xml version="1.0" encoding="utf-8"?>

<LinearLayout xmlns:android="http://schemas.android.com/apk/res/android"

    android:layout_width="match_parent"

    android:layout_height="match_parent"

    android:orientation="vertical">

    <TextView

        android:layout_width="match_parent"

        android:layout_height="match_parent"

        android:gravity="center"

        android:text="微信"

        android:textSize="30sp"

        android:textStyle="bold" />

</LinearLayout>
tap02.xml 布局文件
<?xml version="1.0" encoding="utf-8"?>

<LinearLayout xmlns:android="http://schemas.android.com/apk/res/android"

    android:layout_width="match_parent"

    android:layout_height="match_parent"

    android:orientation="vertical">

    <TextView

        android:layout_width="match_parent"

        android:layout_height="match_parent"

        android:gravity="center"

        android:text="微信2"

        android:textSize="30sp"

        android:textStyle="bold" />

</LinearLayout>
tap03.xml 布局文件
<?xml version="1.0" encoding="utf-8"?>

<LinearLayout xmlns:android="http://schemas.android.com/apk/res/android"

    android:layout_width="match_parent"

    android:layout_height="match_parent"

    android:orientation="vertical">

    <TextView

        android:layout_width="match_parent"

        android:layout_height="match_parent"

        android:gravity="center"

        android:text="微信3"

        android:textSize="30sp"

        android:textStyle="bold" />

</LinearLayout>
tap04.xml 布局文件
<?xml version="1.0" encoding="utf-8"?>

<LinearLayout xmlns:android="http://schemas.android.com/apk/res/android"

    android:layout_width="match_parent"

    android:layout_height="match_parent"

    android:orientation="vertical">

    <TextView

        android:layout_width="match_parent"

        android:layout_height="match_parent"

        android:gravity="center"

        android:text="微信4"

        android:textSize="30sp"

        android:textStyle="bold" />

</LinearLayout>
MainActivity.class 主类。 使用的是FragmentPagerAdapter,这个承载的是一个个Fragment,需要注意的是,这里需要继承自 FragmentActivity 。 上源码吧,看了就知道是多么简单了。
 package com.kevin.viewpager_fragment;

 import android.os.Bundle;

 import android.support.v4.app.Fragment;

 import android.support.v4.app.FragmentActivity;

 import android.support.v4.app.FragmentPagerAdapter;

 import android.support.v4.view.ViewPager;

 import android.view.View;

 import android.widget.ImageButton;

 import android.widget.LinearLayout;

 import java.util.ArrayList;

 import java.util.List;

 import fragment.AddressFragment;

 import fragment.FrdFragment;

 import fragment.SettingFragment;

 import fragment.WeiXinFragment;

 public class MainActivity extends FragmentActivity implements View.OnClickListener {

     private ViewPager mViewPager;

     private FragmentPagerAdapter mAdapter;

     private List<Fragment> mFragments;

     private LinearLayout mTabWeixin;

     private LinearLayout mTabFrd;

     private LinearLayout mTabAddress;

     private LinearLayout mTabSetting;

     private ImageButton mImgWeixin;

     private ImageButton mImgFrd;

     private ImageButton mImgAddress;

     private ImageButton mImgSetting;

     @Override

     protected void onCreate(Bundle savedInstanceState) {

         super.onCreate(savedInstanceState);

         setContentView(R.layout.activity_main);

         initView();

         initEvent();

     }

     private void initEvent() {

         mTabWeixin.setOnClickListener(this);

         mTabFrd.setOnClickListener(this);

         mTabAddress.setOnClickListener(this);

         mTabSetting.setOnClickListener(this);

     }

     private void initView() {

         mViewPager = (ViewPager) findViewById(R.id.id_viewpager);

         mTabWeixin = (LinearLayout) findViewById(R.id.id_tab_weixin);

         mTabFrd = (LinearLayout) findViewById(R.id.id_tab_frd);

         mTabAddress = (LinearLayout) findViewById(R.id.id_tab_address);

         mTabSetting = (LinearLayout) findViewById(R.id.id_tab_setting);

         mImgWeixin = (ImageButton) findViewById(R.id.id_tab_weixin_img);

         mImgFrd = (ImageButton) findViewById(R.id.id_tab_frd_img);

         mImgAddress = (ImageButton) findViewById(R.id.id_tab_address_img);

         mImgSetting = (ImageButton) findViewById(R.id.id_tab_setting_img);

         mFragments = new ArrayList<>();

         Fragment mTab01 = new WeiXinFragment();

         Fragment mTab02 = new FrdFragment();

         Fragment mTab03 = new AddressFragment();

         Fragment mTab04 = new SettingFragment();

         mFragments.add(mTab01);

         mFragments.add(mTab02);

         mFragments.add(mTab03);

         mFragments.add(mTab04);

         mAdapter = new FragmentPagerAdapter(getSupportFragmentManager()) {

             @Override

             public Fragment getItem(int position) {

                 return mFragments.get(position);

             }

             @Override

             public int getCount() {

                 return mFragments.size();

             }

         };

         mViewPager.setAdapter(mAdapter);

         mViewPager.addOnPageChangeListener(new ViewPager.OnPageChangeListener() {

             @Override

             public void onPageScrolled(int position, float positionOffset, int positionOffsetPixels) {

             }

             @Override

             public void onPageSelected(int position) {

                 int currentItem = mViewPager.getCurrentItem();//拿到当前显示的那一个item页面

                 setTab(currentItem);

             }

             @Override

             public void onPageScrollStateChanged(int state) {

             }

         });

     }

     @Override

     public void onClick(View v) {

         switch (v.getId()) {

             case R.id.id_tab_weixin:

                 setSelect(0);

                 break;

             case R.id.id_tab_frd:

                 setSelect(1);

                 break;

             case R.id.id_tab_address:

                 setSelect(2);

                 break;

             case R.id.id_tab_setting:

                 setSelect(3);

                 break;

             default:

                 break;

         }

     }

     /*

     *  切换所有图片为暗色

     * */

     private void resetImgs() {

         mImgWeixin.setImageResource(R.mipmap.tab_weixin_normal);

         mImgFrd.setImageResource(R.mipmap.tab_find_frd_normal);

         mImgAddress.setImageResource(R.mipmap.tab_address_normal);

         mImgSetting.setImageResource(R.mipmap.tab_settings_normal);

     }

     private void setSelect(int i) {

         setTab(i);

         mViewPager.setCurrentItem(i);

     }

     private void setTab(int i) {

         resetImgs();//调用这个方法,设置所有的tab图片为暗色

         // 设置图片为亮色

         //切换内容区域

         switch (i) {

             case 0:

                 mImgWeixin.setImageResource(R.mipmap.tab_weixin_pressed);

                 break;

             case 1:

                 mImgFrd.setImageResource(R.mipmap.tab_find_frd_pressed);

                 break;

             case 2:

                 mImgAddress.setImageResource(R.mipmap.tab_address_pressed);

                 break;

             case 3:

                 mImgSetting.setImageResource(R.mipmap.tab_settings_pressed);

                 break;

         }

     }

 }
除了主类,接下来是4个Fragment页面。这里没什么内容,只是加载一个布局。
WeiXinFragment.class :
 package fragment;

 import android.os.Bundle;

 import android.support.annotation.Nullable;

 import android.support.v4.app.Fragment;

 import android.view.LayoutInflater;

 import android.view.View;

 import android.view.ViewGroup;

 import com.kevin.viewpager_fragment.R;

 /**

  * Created by ${火龙裸先生} on 2016/11/4.

  * 邮箱:791335000@qq.com

  */

 public class WeiXinFragment extends Fragment {

     @Nullable

     @Override

     public View onCreateView(LayoutInflater inflater, ViewGroup container, Bundle savedInstanceState) {

         View view = inflater.inflate(R.layout.tab01, container, false);

         return view;

     }

 }
FrdFragment.class :
 package fragment;

 import android.os.Bundle;

 import android.support.annotation.Nullable;

 import android.support.v4.app.Fragment;

 import android.view.LayoutInflater;

 import android.view.View;

 import android.view.ViewGroup;

 import com.kevin.viewpager_fragment.R;

 /**

  * Created by ${火龙裸先生} on 2016/11/4.

  * 邮箱:791335000@qq.com

  */

 public class FrdFragment extends Fragment {

     @Nullable

     @Override

     public View onCreateView(LayoutInflater inflater, ViewGroup container, Bundle savedInstanceState) {

         View view = inflater.inflate(R.layout.tab02, container, false);

         return view;

     }

 }
AddressFragment.class :
 package fragment;

 import android.os.Bundle;

 import android.support.annotation.Nullable;

 import android.support.v4.app.Fragment;

 import android.view.LayoutInflater;

 import android.view.View;

 import android.view.ViewGroup;

 import com.kevin.viewpager_fragment.R;

 /**

  * Created by ${火龙裸先生} on 2016/11/4.

  * 邮箱:791335000@qq.com

  */

 public class AddressFragment extends Fragment {

     @Nullable

     @Override

     public View onCreateView(LayoutInflater inflater, ViewGroup container, Bundle savedInstanceState) {

         View view = inflater.inflate(R.layout.tab03, container, false);

         return view;

     }

 }
SettingFragment.class :
package fragment;

import android.os.Bundle;

import android.support.annotation.Nullable;

import android.support.v4.app.Fragment;

import android.view.LayoutInflater;

import android.view.View;

import android.view.ViewGroup;

import com.kevin.viewpager_fragment.R;

/**

 * Created by ${火龙裸先生} on 2016/11/4.

 * 邮箱:791335000@qq.com

 */

public class SettingFragment extends Fragment {

    @Nullable

    @Override

    public View onCreateView(LayoutInflater inflater, ViewGroup container, Bundle savedInstanceState) {

        View view = inflater.inflate(R.layout.tab04, container, false);

        return view;

    }

}
就是这些代码了。
总结一下:实现这样功能的实现,不止这一种方法,但是,采用ViewPager + FragmentPagerAdapter, 这里的内容区域是Fragment,所以优势就出来了,Fragment管理自己的布局内部所有控件的事件等各种东西,不需要把代码都冗余在MainActivity.class中, 我们的MainActivity只作为一个调度器,调度显示不同的Fragment、隐藏不同的Fragment。 这样的话,便于后期的复用,也便于后期的维护。 然后,我们用的ViewPager,肯定有ViewPager的优势,如果大家希望能够左右拖动,大家就选择 “ViewPager + FragmentPagerAdapter”作为实现,如果大家不需要左右去拖动,比如QQ,一个页面有LitView或者RecyclerView,并且Item需要“侧滑删除”的一个效果,所以这个时候可能就不需要ViewPager的这样一个效果,这就可以选择直接使用Fragment去实现。也建议尽量去使用Fragment。
App主界面Tab实现方法的更多相关文章
- 【IMOOC学习笔记】多种多样的App主界面Tab实现方法(四)
ViewPagerIndicator+ViewPager 要想使用ViewPagerIndicator,要使用到viewPagerlibrary开源库 top.xml <?xml version ...
- 【IMOOC学习笔记】多种多样的App主界面Tab实现方法(二)
Fragment实现Tab 首先把activity_main.xml 文件中的ViewPager标签改成Fragment标签 <FrameLayout android:id="@+id ...
- 【IMOOC学习笔记】多种多样的App主界面Tab实现方法(一)
1.ViewPager实现Tab 首先实现底部和底部布局 <?xml version="1.0" encoding="utf-8"?> <Li ...
- 【IMOOC学习笔记】多种多样的App主界面Tab实现方法(三)
FragmentPagerAdapter+ViewPager 与之前直接用ViewPager不同的是,数组里面放的不再是View,而是Fraagment; 使用FragmentPagerAdapter ...
- 66、多种多样的App主界面Tab(1)------ ViewPager实现Tab
<?xml version="1.0" encoding="utf-8"?> <!-- bottom.xml --> <Linea ...
- 安卓开发_慕课网_Fragment实现Tab(App主界面)
学习内容来自“慕课网” 这里用Fragment来实现APP主界面 思路: 底部横向排列4个LinearLayout,每个LinearLayout包含一个图片按钮和一个文字 1.默认显示第一个功能(微信 ...
- Android学习系列(23)--App主界面实现
在上篇文章<Android学习系列(22)--App主界面比较>中我们浅略的分析了几个主界面布局,选了一个最大众化的经典布局.今天我们就这个经典布局,用代码具体的实现它. 1.预览图先看下 ...
- 安卓开发_慕课网_ViewPager与FragmentPagerAdapter实现Tab实现Tab(App主界面)
学习内容来自“慕课网” ViewPager与FragmentPagerAdapter实现Tab 将这两种实现Tab的方法结合起来.效果就是可以拖动内容区域来改变相应的功能图标亮暗 思路: Fragme ...
- 安卓开发_慕课网_ViewPager实现Tab(App主界面)
学习内容来自“慕课网” 网站上一共有4种方法来实现APP主界面的TAB方法 这里学习第一种 ViewPager实现Tab 布局文件有7个, 主界面acitivity.layout <Linear ...
随机推荐
- [译]git commit
git commit git commit命令提交stage区的快照到项目历史中去(HEAD). 被提交的快照被认为是一个项目的安全版本. Git不会修改他们, 除非你显示的要求了. 和git add ...
- 使用fiddler手机抓包
Fiddler不但能截获各种浏览器发出的HTTP请求, 也可以截获各种智能手机发出的HTTP/HTTPS请求. Fiddler能捕获IOS设备发出的请求,比如IPhone, IPad, MacBook ...
- 懒加载的用处和赋nil操作[iOS开发教程]
懒加载的用处和赋nil操作 1:数据,清空操作: self.array = nil; 2:归档从新从本地获取数据 self.archive = nil; ##id = nil的用处 block当参数, ...
- 系列文章:老项目的#iPhone6与iPhone6Plus适配#(持续更新中,更新日期2014年10月12日 星期日 )
本文永久地址为http://www.cnblogs.com/ChenYilong/p/4020399.html ,转载请注明出处. ********************************** ...
- 关于QT写注册表开机自启动
注册表中权限: 1.HKEY_CURRENT_USER 2.HKEY_LOCAL_MACHINE 网上有很多帖子都是用的2,其实这样有违用户权限,而且如果不是管理员用户,会写入不成功! 代码如下: Q ...
- 论在Windows下远程连接Ubuntu
Ubuntu下1:下载xrdp sudo apt-get install xrdp 2: urs/share/applications 下找到 远程桌面 设置成这样 Windows下 1; ...
- php网络编程
php面试题之三--PHP网络编程(高级部分) 三.PHP网络编程 [!!!]1.禁用COOKIE后SEESION还能用吗?(51.com笔试题) 可以,COOKIE和SESSION都是用来实现会话机 ...
- iOS开发——高级篇——Parse 教程:网络后台基础
本教程已针对Swift, iOS 8.3, Xcode 6.3及最新的Parse SDK(1.7.1版本)更新. 网络后台支持可以为你的App添加许多崭新的功能:不论是数据同步,社交分享,还是云端存储 ...
- 通过NavMeshObstacle解决NavMesh防卡
http://www.unity蛮牛.com/thread-33383-1-1.html. 许久未曾发帖了,最近忙于换工作的问题,经常处于纠结状态,so...偶尔上蛮牛还能看到大家对我的支持,感觉还是 ...
- 访问者(Visitor)模式
http://www.cnblogs.com/zhenyulu/articles/79719.html 一. 访问者(Visitor)模式 访问者模式的目的是封装一些施加于某种数据结构元素之上的操作. ...