android学习日记12--布局管理器
1、概述
布局管理器的用途:
a、可以更好的管理组件;
b、通过使用布局管理器,Android应用程序可以做到平台无关性
布局管理器都是ViewGroup的子类,所有可充当容器的父类都是ViewGroup,而ViewGroup也是View的子类

下面分别介绍常用的布局管理器
2、线性布局管理器
LinearLayout,最常用的布局之一。它提供控件水平或垂直排列的模型
常用属性及其对应方法:

gravity 可取属性说明:

当需要为gravity设多个值时,可用|分隔开
布局XML:
 <?xml version="1.0" encoding="utf-8"?>

 <LinearLayout xmlns:android="http://schemas.android.com/apk/res/android"

 android:orientation="horizontal"

 android:layout_width="fill_parent"

 android:layout_height="fill_parent"

 android:id="@+id/lla"

 android:gravity="right"

 >

 <Button

 android:text="添加"

 android:id="@+id/Button01"

 android:layout_width="wrap_content"

 android:layout_height="wrap_content">

 </Button>

 </LinearLayout>
JAVA代码:
 // 计数器,记录按钮个数

     int count = 0;

     @Override

     public void onCreate(Bundle savedInstanceState) { // 重写 onCreate 方法

         super.onCreate(savedInstanceState);

         setContentView(R.layout.horizontal_layout);

         // 获取屏幕中的按钮控件对象

         Button button = (Button) findViewById(R.id.Button01);

         // 为按钮添加 OnClickListener 接口实现

         button.setOnClickListener(

         new View.OnClickListener() {

             public void onClick(View v) {

                 // 获取线性布局对象

                 LinearLayout ll = (LinearLayout) findViewById(R.id.lla);

                 String msg = MainActivity.this.getResources().getString(

                         R.string.button);

                 // 创建一个 Button 对象

                 Button tempbutton = new Button(MainActivity.this);

                 tempbutton.setText(msg + (++count)); // 设置 Button 控件显示的内容

                 // 设置 Button 的宽度

                 tempbutton.setWidth(80);

                 // 向线性布局中添加 View

                 ll.addView(tempbutton);

             }

         });

     }
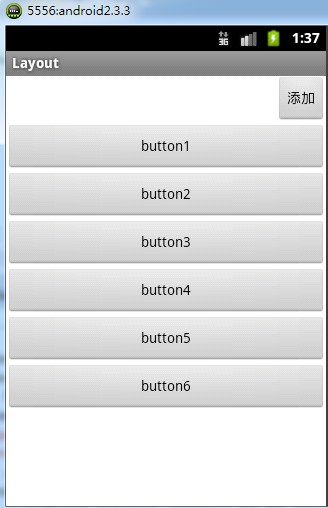
运行效果:每点击添加按钮一次会在下方垂直生成一个按钮
将布局文件中
android:orientation="vertical"
vertical改为horizontal
每点击一次会在右方水平方向生成一个按钮

当水平方向该行容不下一个宽度为80的按钮时,按钮就会被压缩,如下图

此时再点击添加按钮时,画面没有任何变化,不会另起一行添加按钮,超出屏幕的将不会被显示。
3、表格布局
TableLayout 类似HTML里的Table分为行和列来管理。
每一行为一个TableRow,也可以为View对象。当为View对象时就跨越该行所有列
TableRow中可以添加子控件,每个子控件为一列。并不会为每个单元格绘制边框
每个单元格为一个View,可以有空的单元格,也可以跨越多列
一个列的宽度由该列最宽的单元格决定的
TableLayout 可以设置三种属性
Shrinkable :它可以被压缩以适应其父容器的大小
Stretchable :它可以被拉伸以填满空闲区域
Collapsed :该列被隐藏

如果要对多列进行设置,用逗号隔开
这三个属性在JAVA代码也有对应的方法,值得一提的是它是继承Linearlayout的
布局XML:
 <LinearLayout xmlns:android="http://schemas.android.com/apk/res/android"

     android:id="@+id/LinearLayout01"

     android:layout_width="fill_parent"

     android:layout_height="fill_parent"

     android:background="@drawable/water"

     android:gravity="bottom"

     android:orientation="vertical" >

     <TableLayout

         android:id="@+id/TableLayout01"

         android:layout_width="fill_parent"

         android:layout_height="wrap_content" >

         <TextView

             android:id="@+id/TextView01"

             android:layout_width="wrap_content"

             android:layout_height="wrap_content"

             android:layout_centerInParent="true"

             android:layout_margin="4px"

             android:background="@drawable/darkgray"

             android:text="@string/tv1" >

         </TextView>

     </TableLayout>

     <TableLayout

         android:id="@+id/TableLayout02"

         android:layout_width="fill_parent"

         android:layout_height="wrap_content"

         android:stretchColumns="0" >

         <TableRow

             android:id="@+id/TableRow01"

             android:layout_width="wrap_content"

             android:layout_height="wrap_content" >

             <TextView

                 android:id="@+id/TextView02"

                 android:layout_width="wrap_content"

                 android:layout_height="wrap_content"

                 android:layout_centerInParent="true"

                 android:layout_margin="4px"

                 android:background="@drawable/blue"

                 android:text="@string/tvStrech" >

             </TextView>

             <TextView

                 android:id="@+id/TextView03"

                 android:layout_width="wrap_content"

                 android:layout_height="wrap_content"

                 android:layout_centerInParent="true"

                 android:layout_margin="4px"

                 android:text="@string/tvShort" >

             </TextView>

         </TableRow>

     </TableLayout>

     <TableLayout

         android:id="@+id/TableLayout03"

         android:layout_width="fill_parent"

         android:layout_height="wrap_content"

         android:collapseColumns="1"

         android:shrinkColumns="0" >

         <TableRow

             android:id="@+id/TableRow02"

             android:layout_width="wrap_content"

             android:layout_height="wrap_content" >

             <TextView

                 android:id="@+id/TextView04"

                 android:layout_width="wrap_content"

                 android:layout_height="wrap_content"

                 android:layout_centerInParent="true"

                 android:layout_margin="4px"

                 android:background="@drawable/darkgray"

                 android:text="@string/tvShrink" >

             </TextView>

             <TextView

                 android:id="@+id/TextView05"

                 android:layout_width="wrap_content"

                 android:layout_height="wrap_content"

                 android:layout_centerInParent="true"

                 android:layout_margin="4px"

                 android:background="@drawable/lightred"

                 android:text="@string/tvShort" >

             </TextView>

             <TextView

                 android:id="@+id/TextView06"

                 android:layout_width="wrap_content"

                 android:layout_height="wrap_content"

                 android:layout_centerInParent="true"

                 android:layout_margin="4px"

                 android:background="@drawable/blue"

                 android:text="@string/tvLong" >

             </TextView>

         </TableRow>

     </TableLayout>

 </LinearLayout>
运行效果:

4、相对布局
RelativeLayout子控件 的位置由兄弟控件或父容器来决定的
如果A控件由B控件来决定位置,则布局文件B控件要在A控件声明之前
常用属性
第一类:属性值为true或false
android:layout_centerHrizontal 水平居中
android:layout_centerVertical 垂直居中
android:layout_centerInparent 相对于父元素完全居中
android:layout_alignParentBottom 贴紧父元素的下边缘
android:layout_alignParentLeft 贴紧父元素的左边缘
android:layout_alignParentRight 贴紧父元素的右边缘
android:layout_alignParentTop 贴紧父元素的上边缘
android:layout_alignWithParentIfMissing 如果对应的兄弟元素找不到的话就以父元素做参照物
第二类:属性值必须为id的引用名“@id/id-name”
android:layout_below 在某元素的下方
android:layout_above 在某元素的的上方
android:layout_toLeftOf 在某元素的左边
android:layout_toRightOf 在某元素的右边
android:layout_alignTop 本元素的上边缘和某元素的的上边缘对齐
android:layout_alignLeft 本元素的左边缘和某元素的的左边缘对齐
android:layout_alignBottom 本元素的下边缘和某元素的的下边缘对齐
android:layout_alignRight 本元素的右边缘和某元素的的右边缘对齐
第三类:属性值为具体的像素值,如30dip,40px
android:layout_marginBottom 离某元素底边缘的距离
android:layout_marginLeft 离某元素左边缘的距离
android:layout_marginRight 离某元素右边缘的距离
android:layout_marginTop 离某元素上边缘的距离
布局XML:
 <RelativeLayout xmlns:android="http://schemas.android.com/apk/res/android"

     xmlns:tools="http://schemas.android.com/tools"

     android:layout_width="match_parent"

     android:layout_height="match_parent"

     android:paddingBottom="@dimen/activity_vertical_margin"

     android:paddingLeft="@dimen/activity_horizontal_margin"

     android:paddingRight="@dimen/activity_horizontal_margin"

     android:paddingTop="@dimen/activity_vertical_margin"

     tools:context=".MainActivity" >

     <TextView

         android:layout_width="wrap_content"

         android:layout_height="wrap_content"

         android:text="@string/hello_world"

         android:id="@+id/tv1"

         android:layout_centerInParent="true"

         />

     <TextView

         android:layout_width="wrap_content"

         android:layout_height="wrap_content"

         android:text="big"

         android:textSize="30sp"

         android:id="@+id/tv2"

         android:layout_toRightOf="@id/tv1"

         android:layout_alignBottom="@id/tv1"

         />

     <TextView

         android:layout_width="wrap_content"

         android:layout_height="wrap_content"

         android:text="middle"

         android:textSize="20sp"

         android:id="@+id/tv3"

         android:layout_above="@id/tv1"

         android:layout_alignLeft="@id/tv1"

         />

 </RelativeLayout>
运行效果:

5、帧布局
FrameLayout在屏幕上开辟一块区域,在这块区域可以添加多个控件
但都会被对其到屏幕左上角,并且大小取决于最大的控件,如果控件一样大,只能看到最上面的控件
布局XML:
 <?xml version="1.0" encoding="utf-8"?>

 <FrameLayout xmlns:android="http://schemas.android.com/apk/res/android"

     android:layout_width="fill_parent"

     android:layout_height="fill_parent"

     android:orientation="vertical" >

     <TextView

         android:layout_width="fill_parent"

         android:layout_height="fill_parent"

         android:background="@drawable/lightgray"

         android:gravity="center"

         android:text="big" />

     <TextView

         android:layout_width="150dp"

         android:layout_height="150dp"

         android:background="@drawable/darkgray"

         android:gravity="center"

         android:text="middle" />

     <TextView

         android:layout_width="50dp"

         android:layout_height="50dp"

         android:background="@drawable/blue"

         android:gravity="center"

         android:text="small" />

 </FrameLayout>
运行效果:

6、绝对布局
AbsoluteLayout是绝对位置布局。在此布局中的子元素的android:layout_x和android:layout_y属性将生效,用于描述该子元素的坐标位置。
屏幕左上角为坐标原点(0,0),第一个0代表横坐标,向右移动此值增大,第二个0代表纵坐标,向下移动,此值增大。
在此布局中的子元素可以相互重叠。在实际开发中,通常不采用此布局格式,因为它的界面代码过于刚性,以至于有可能不能很好的适配各种终端。
由于不采用,在此就不演示代码了。
android学习日记12--布局管理器的更多相关文章
- Android学习笔记(10).布局管理器
布局管理器的几个类都是ViewGroup派生的,用于管理组件的分布和大小,使用布局管理器能够非常好地解决屏幕适配问题. 布局管理器本身也是一个UI组件,布局管理器能够相互嵌套使用,以下是布局管理器的类 ...
- Android UI组件:布局管理器
为了更好的管理Android应用的用户界面中的组件,Android提供了布局管理器.通过使用布局管理器,Android应用的图形用户界面具有良好的平台无关性.通常,推荐使用布局管理器来管理组件的分布. ...
- Android开发5:布局管理器2(表格布局TableLayout)
版本:Android4.3 API18 学习整理:liuxinming 概念 TableLayout继承了LinearLayout,因此它的本质依然是线性布局管理器. 表格布局采 ...
- Android学习系列(二)布局管理器之线性布局的3种实现方式
转载请注明出处:http://blog.csdn.net/lhy_ycu/article/details/39643669 LinearLayout是Android控件中的线性布局控件,它包括的子控件 ...
- android中的常用布局管理器(三)
接上篇博客 (5)TableLayout 表格布局管理器 在android中,线性布局和表格布局用的是最多的. 在很多的输出操作中,往往会使用表格的形式对显示的数据进行排版,tablelayo ...
- android中常用的布局管理器(二)
接上篇博客 (3)LinearLayout 线性布局管理器 线性布局管理器是将放入其中的组件按照垂直或水平方向来布局,每一行或每一列只能放一个组件,并且不会换行,当组件排列到窗体的边缘后,后面 ...
- android中常用的布局管理器
Android中的几种常用的布局,主要介绍内容有: View视图 RelativeLayout 相对布局管理器 LinearLayout 线性布局管理器 FrameLayout ...
- android学习笔记57——电话管理器TelephoneyManager
电话管理器TelephoneyManager
- Android 布局管理器
为了更好地管理Android应用程序的用户界面组件,Android它提供了一个布局管理.通过使用布局管理,Android具有良好的平台无关的图形用户界面应用程序. 平时,推荐布局管理器来管理分布式组件 ...
随机推荐
- 在MFC[转载]在MFC状态栏显示时间 状态栏显示时间
原文:在MFC状态栏显示时间,谢小哈皮儿 c/c++ vc 在mfc状态栏显示时间,在VC的控件中有个Status bar可以在窗体状态栏中添加日期和时间.其实通过简单的代码,你就能创建一个有时钟显示 ...
- Balanced Numbers(数位+状压)
题意:求给定区间,一个数的数位上每个奇数出现偶数次,每个偶数出现奇数次,这样数的个数 分析:先考虑状态,但总是想不全,所以要把状态压缩一下,用三进制,0 该数不放 1 放了奇数次 2放了偶数次 dp ...
- Doing Homework(HDU 1074状压dp)
题意:给你n个要做的作业,它们的名字.期限.可完成所需天数(必须连续)在规定期限不能完成要扣分(每天一分)求做作业顺序使扣分最少. 分析:作业数量较少,用状态压缩,做到第i种作业花费的天数dp[i]. ...
- HDU4289 Control 最大流
经典题,求去掉若干个点,使得两个点不在连通,总价值最少 所以拆点最小割,除了拆点边,流量都为无穷,拆点边是流量为价值 #include <iostream> #include <cs ...
- 第二个App“今日美文”上架【原】
App store 下载地址 开发这个App的本意 之前偶然找到一个叫<每日一文>的应用,正是我一直想找的,优点如下: 界面够简单 推荐的文章也很好,而且都不太长 每天都不一样 但是用起来 ...
- 自问自答之VR遐想
先让我组织一下语言,作为表达能力超弱的战五渣来讲,归纳总结什么的最要命了. 我可以给你分析个1到N条出来,但是一般来讲没什么顺序,想到什么就说什么.而且我属于线性思维,有一个引子就可以按着话头一步步发 ...
- python网络编程(六)---web客户端访问
1.获取web页面 urllib2 支持任何协议的工作---不仅仅是http,还包括FTP,Gopher. import urllib2 req=urllib2.Request('http://www ...
- uvalive 4795 Paperweight
题意:给出一个5个顶点的多面体以及多面体内一点P.求让 多面体不同的方式(即以不同的面)放在地面上,设这个着地的面为A,多面体重心在A上的投影为B,在保证B在A内部且距离A的各个边界不小于0.2的前提 ...
- Good practice release jar to Nexus
Step suppose you need to develop a feature,when you finish the feature ,you need to release the jar ...
- BNUOJ-26482 Juice 树形DP
题目链接:http://www.bnuoj.com/bnuoj/problem_show.php?pid=26482 题意:给一颗树,根节点为送电站,可以无穷送电,其它节点为house,电量达到pi时 ...