Python—数据结构——链表
数据结构——链表
一.简介
  链表是一种物理存储上非连续,数据元素的逻辑顺序通过链表中的指针链接次序,实现的一种线性存储结构。由一系列节点组成的元素集合。每个节点包含两部分,
数据域item和指向下一个节点的指针next。通过节点之间的相互连接,最终串联成一个链表。
链表中的每个节点包括两个部分:一个是存储数据元素的数据域;另一个是存储下一个节点的地址的指针域
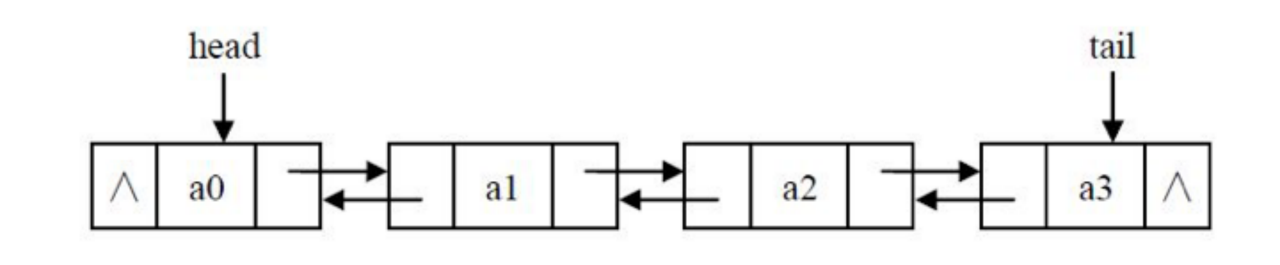
双向链表:双链表的每个节点有两个指针:一个指向后一个节点,另一个指向前一个节点。
二.Python实现
♦链表节点
class Node:

    def __init__(self, item=None):

        self.item = item

        self.next = None
♦单向链表
class SingleLinkedList:

    """

    单向链表

    """

    def __init__(self, heda=None):

        self._head = heda

        self.length = 0
♦添加节点
头插法:从链表的头部(左端)插入

    def add_head(self, element):

        """

        头插法:从头部插入

        :param element: 需要添加进去的元素

        :return:

        """

        node = Node(element)

        if self._head is None:

            self._head = node

        else:

            node.next = self._head

            self._head = node

        self.length += 1
尾插法:从链表的尾部(右端)插入
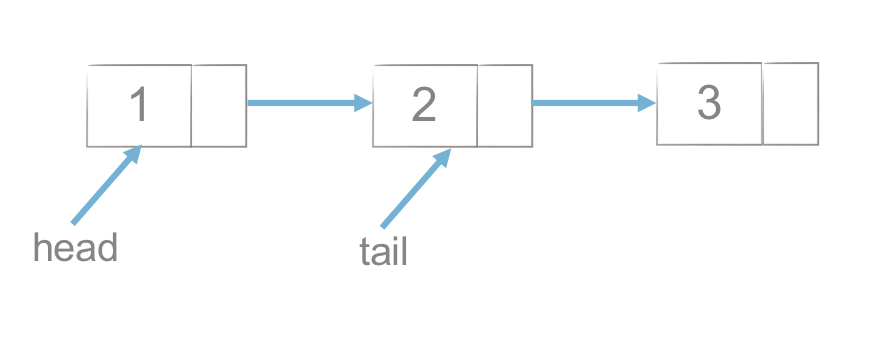
    def add_tail(self, element):

        """

        尾插法:从尾部添加元素

        :param element:需要添加进去的元素

        :return:

        """

        # 创建一个节点

        node = Node(element)

        if self._head is None:

            self._head = node

        else:

            cur = self._head

            # cur=node,node.next=None

            while cur.next:

                cur = cur.next

            cur.next = node

            return cur.next

        self.length += 1
♦插入节点
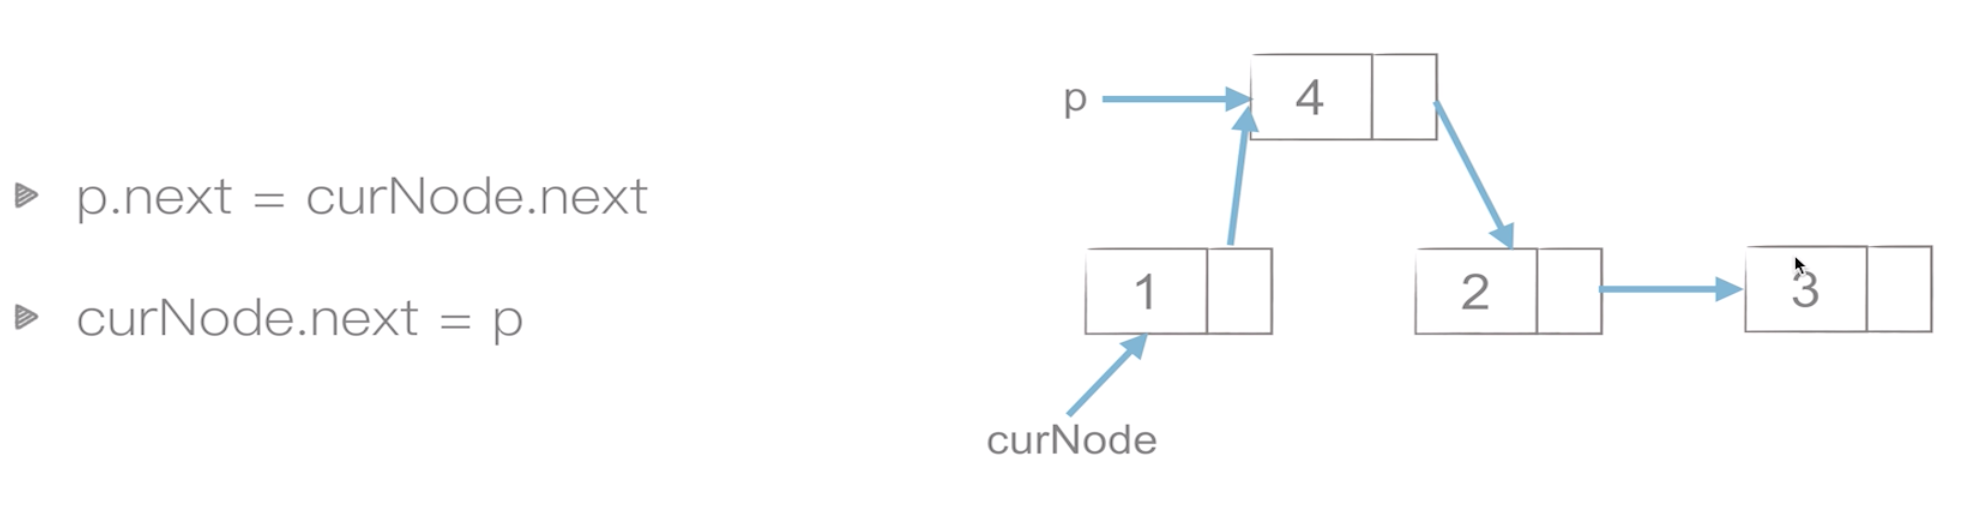
    def insert(self, item: Node, index: int):

        """

        往链表中指定位置插入值

        :param item: 插入的节点

        :param index: 插入的位置

        :return:

        """

        if index < 0 or index > self.length:

            print('index out of range')

            return

        # 构建节点

        if isinstance(item, Node):

            node_insert = item

        else:

            node_insert = Node(item)

        if index == 0:

            node_insert.next = self._head

            self._head = node_insert

        else:

            # 找到index的前一个节点

            pre = self._head

            for i in range(self.length):

                if i == index - 1:

                    node_insert.next = pre.next

                    pre.next = node_insert

                    break

                pre = pre.next

        self.length += 1

        return
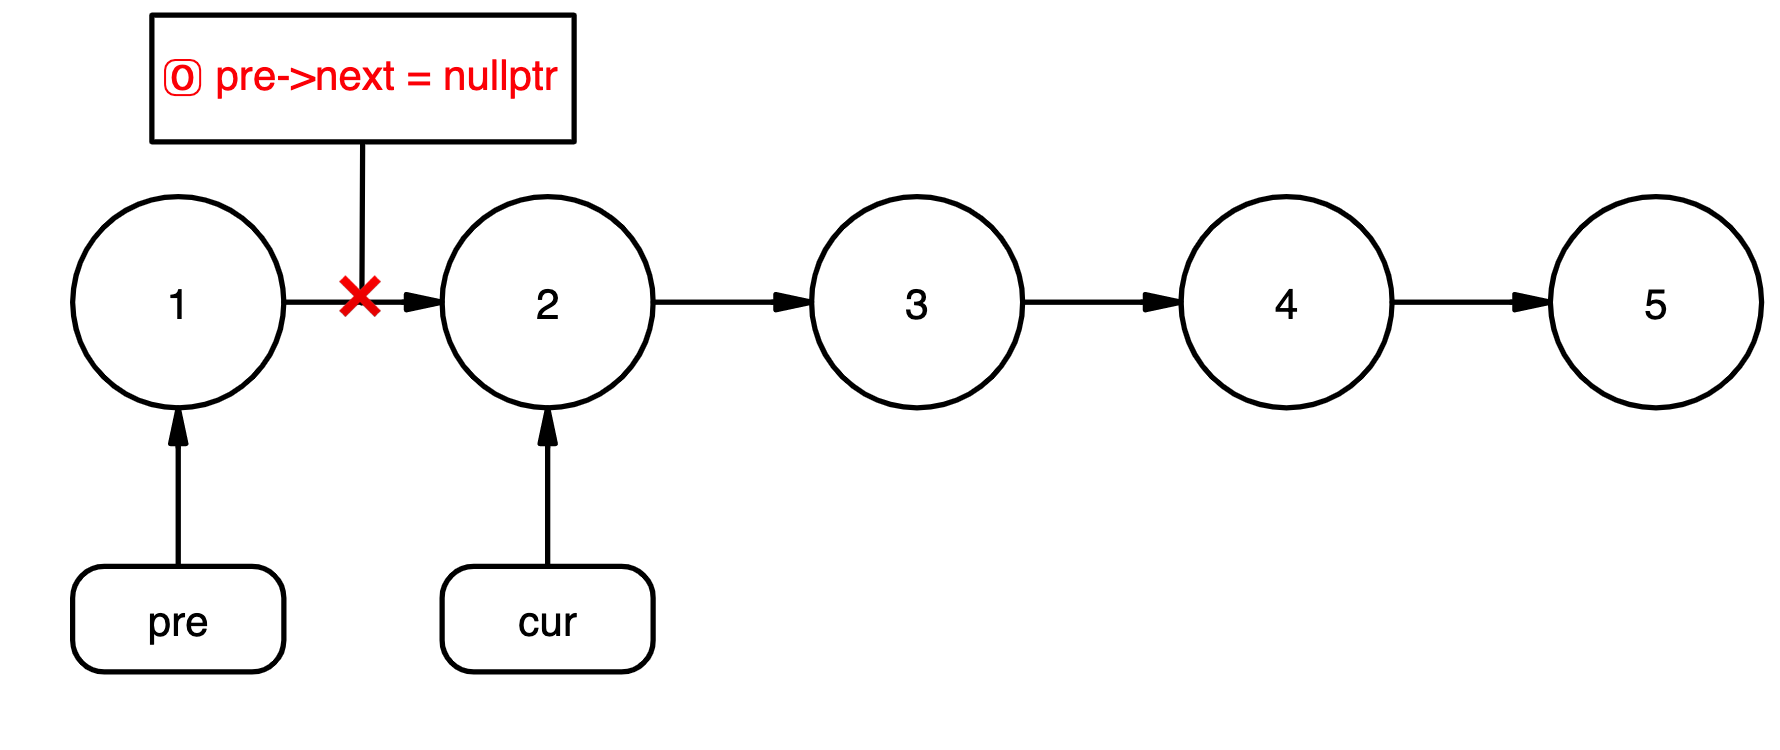
♦删除节点

    def delete(self, index: int):

        """

        删除指定位置的节点

        :param index: 节点的位置

        :return:

        """

        # 判空

        if self.is_empty():

            print('empty chain')

            return

        if index < 0 or index > self.length:

            print('index out of range')

            return

        if index == 0:

            self._head = self._head.next

        else:

            pre = self._head

            for i in range(self.length):

                if i == index - 1:

                    pre.next = pre.next.next

                    break

                pre = pre.next

        self.length -= 1

        return
♦修改节点
    def update(self, item, index: int):

        """

        修改节点item值

        :param item: 修改之后的值

        :param index:节点的位置

        :return:

        """

        # 判空

        if self.is_empty():

            print('empty chain')

            return

        if index < 0 or index >= self.length:

            print('index out of range')

            return

        node = self._head

        for i in range(self.length):

            if i == index:

                node.item = item

                return

            node = node.next
♦获取节点
    def get_item(self, index: int):

        """

        获取指定位置的节点item

        :param index:指定位置

        :return:item

        """

        # 判空

        if self.is_empty():

            print('empty chain')

            return

        if index < 0 or index >= self.length:

            print('index out of range')

            return

        node = self._head

        for i in range(self.length):

            if i == index:

                return node.item

            node = node.next
♦遍历链表
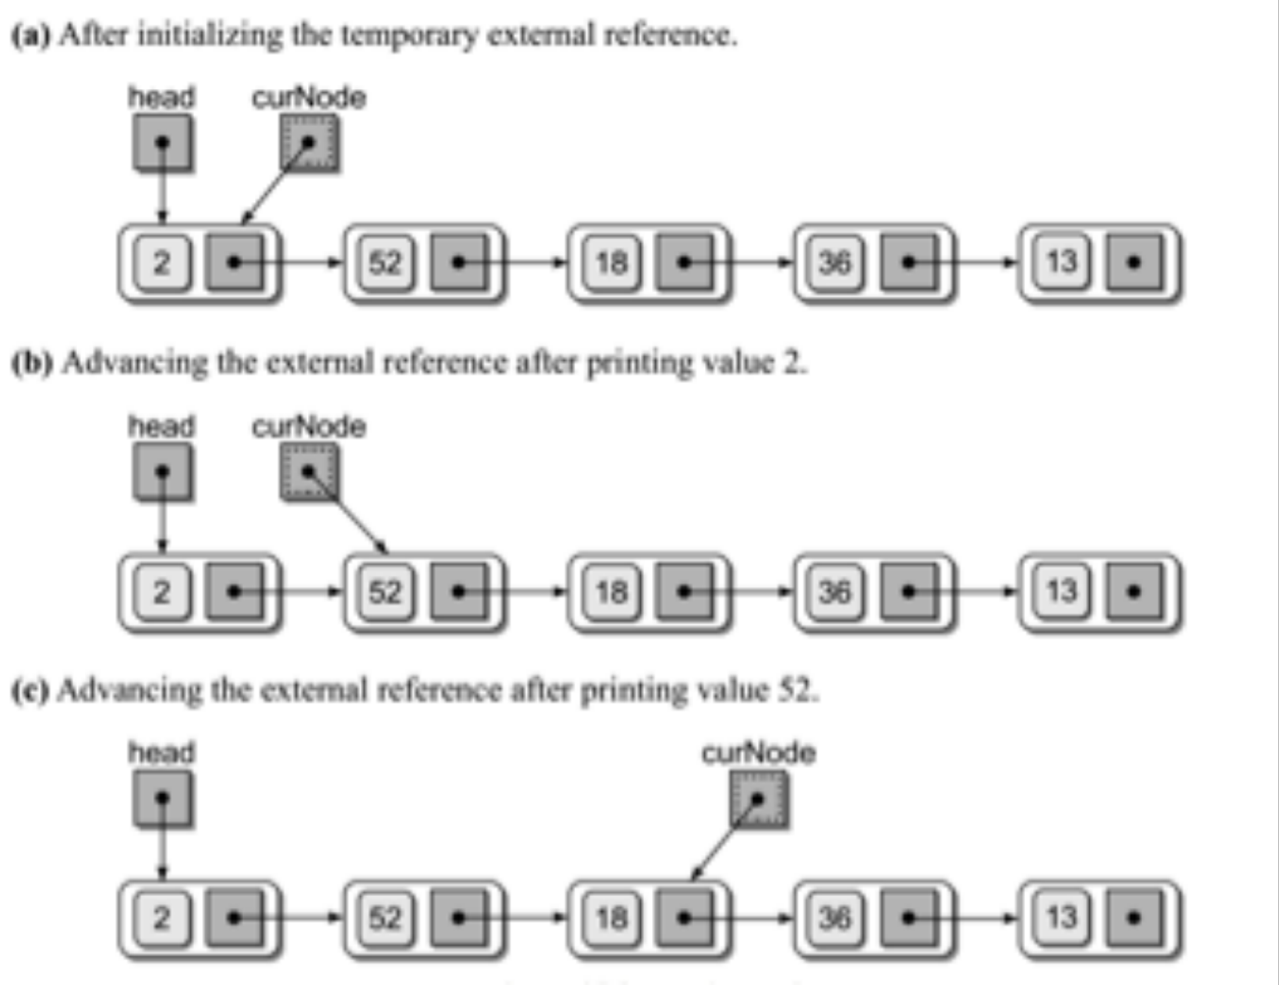
    def traversal(self):

        """链表遍历"""

        if self._head is None:

            return

        else:

            cur = self._head

            while cur:

                print(cur.item)

                cur = cur.next
♦反转链表


    def reverse(self):

        """

        单向链表的反转:Input:1>2>3>4>5

                     Output:5>4>3>2>1

        :return:

        """

        if self._head is None or self.size() == 1:

            return

        else:

            pre = None

            cur = self._head

            while cur is not None:

                post = cur.next

                cur.next = pre

                pre = cur

                cur = post

            self._head = pre            # 逆向后的头节点

            self.traversal()
♦双向链表
class Node:

    def __init__(self, item=None):

        self.item = item

        self.next = None

        self.prior = None
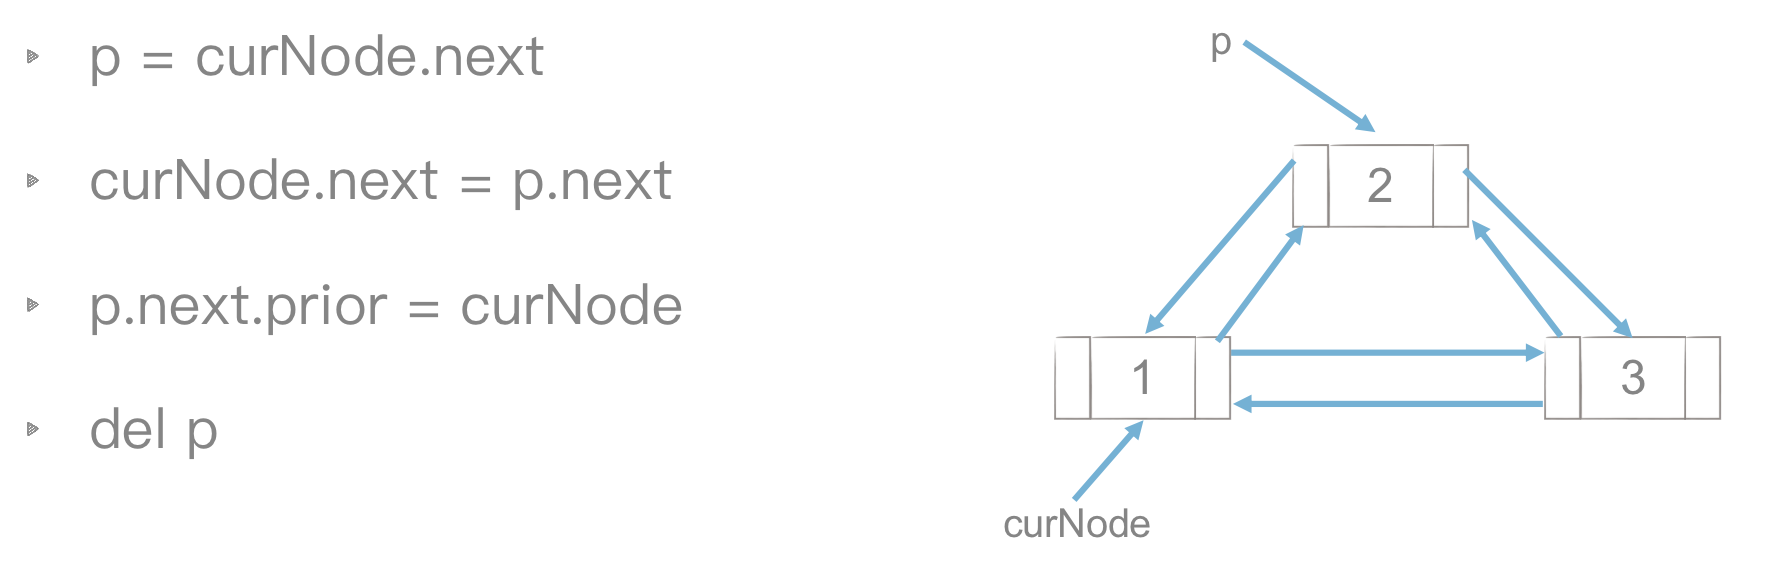
♦双链表节点删除
♦双链表节点插入

 class Node:

     def __init__(self, item=None):

         self.item = item

         self.next = None

         self.prior = None

 class SingleLinkedList:

     """

     单向链表

     """

     def __init__(self, heda=None):

         self._head = heda

         self.length = 0

     def is_empty(self):

         """判断是否为空"""

         return self.length == 0

     def add_tail(self, element):

         """

         尾插法:从尾部添加元素

         :param element:需要添加进去的元素

         :return:

         """

         # 创建一个节点

         node = Node(element)

         if self._head is None:

             self._head = node

         else:

             cur = self._head

             # cur=node,node.next=None

             while cur.next:

                 cur = cur.next

             cur.next = node

             return cur.next

         self.length += 1

     def add_head(self, element):

         """

         头插法:从头部插入

         :param element: 需要添加进去的元素

         :return:

         """

         node = Node(element)

         if self._head is None:

             self._head = node

         else:

             node.next = self._head

             self._head = node

         self.length += 1

     def size(self):

         """

         获取链表的大小

         :return:int

         """

         count = 0

         if self._head is None:

             return count

         else:

             cur = self._head

         while cur is not None:

             count += 1

             cur = cur.next

         return count

     def insert(self, item: Node, index: int):

         """

         往链表中指定位置插入值

         :param item: 插入的节点

         :param index: 插入的位置

         :return:

         """

         if index < 0 or index > self.length:

             print('index out of range')

             return

         # 构建节点

         if isinstance(item, Node):

             node_insert = item

         else:

             node_insert = Node(item)

         if index == 0:

             node_insert.next = self._head

             self._head = node_insert

         else:

             # 找到index的前一个节点

             pre = self._head

             for i in range(self.length):

                 if i == index - 1:

                     node_insert.next = pre.next

                     pre.next = node_insert

                     break

                 pre = pre.next

         self.length += 1

         return

     def delete(self, index: int):

         """

         删除指定位置的节点

         :param index: 节点的位置

         :return:

         """

         # 判空

         if self.is_empty():

             print('empty chain')

             return

         if index < 0 or index > self.length:

             print('index out of range')

             return

         if index == 0:

             self._head = self._head.next

         else:

             pre = self._head

             for i in range(self.length):

                 if i == index - 1:

                     pre.next = pre.next.next

                     break

                 pre = pre.next

         self.length -= 1

         return

     def update(self, item, index: int):

         """

         修改节点item值

         :param item: 修改之后的值

         :param index:节点的位置

         :return:

         """

         # 判空

         if self.is_empty():

             print('empty chain')

             return

         if index < 0 or index >= self.length:

             print('index out of range')

             return

         node = self._head

         for i in range(self.length):

             if i == index:

                 node.item = item

                 return

             node = node.next

     def get_item(self, index: int):

         """

         获取指定位置的节点item

         :param index:指定位置

         :return:item

         """

         # 判空

         if self.is_empty():

             print('empty chain')

             return

         if index < 0 or index >= self.length:

             print('index out of range')

             return

         node = self._head

         for i in range(self.length):

             if i == index:

                 return node.item

             node = node.next

     def traversal(self):

         """链表遍历"""

         if self._head is None:

             return

         else:

             cur = self._head

             while cur:

                 print(cur.item)

                 cur = cur.next

     def reverse(self):

         """

         单向链表的反转:Input:1>2>3>4>5

                      Output:5>4>3>2>1

         思路:先将head.next断开,即指向断开的元素pre(none);再将pre赋值head,将head赋值head.next;最后将head赋值pre

         :return:

         """

         if self._head is None or self.size() == 1:

             return

         else:

             pre = None

             cur = self._head

             while cur is not None:

                 post = cur.next

                 cur.next = pre

                 pre = cur

                 cur = post

             self._head = pre            # 逆向后的头节点

             self.traversal()
LinkedList
Python—数据结构——链表的更多相关文章
- Python 数据结构 链表
什么是时间复杂度 时间频度:一个算法执行所耗费的时间,从理论上是不能算出来的,必须上机运行测试才知道.但是我们不可能也没有必要对每一个算法都进行上机测试,只需要知道那个算法花费的时间多,那个算法花费得 ...
- python数据结构链表之单向链表
单向链表 单向链表也叫单链表,是链表中最简单的一种形式,它的每个节点包含两个域,一个信息域(元素域)和一个链接域.这个链接指向链表中的下一个节点,而最后一个节点的链接域则指向一个空值. 表元素域ele ...
- Python数据结构--链表
class Node(): def __init__(self, dataval=None): self.dataval = dataval self.nextval = None class SLi ...
- Python数据结构——链表的实现
链表由一系列不必在内存中相连的结构构成,这些对象按线性顺序排序.每个结构含有表元素和指向后继元素的指针.最后一个单元的指针指向NULL.为了方便链表的删除与插入操作,可以为链表添加一个表头. 删除操作 ...
- python数据结构与算法——链表
具体的数据结构可以参考下面的这两篇博客: python 数据结构之单链表的实现: http://www.cnblogs.com/yupeng/p/3413763.html python 数据结构之双向 ...
- Python数据结构之单链表
Python数据结构之单链表 单链表有后继结点,无前继结点. 以下实现: 创建单链表 打印单链表 获取单链表的长度 判断单链表是否为空 在单链表后插入数据 获取单链表指定位置的数据 获取单链表指定元素 ...
- python数据结构之链表(一)
数据结构是计算机科学必须掌握的一门学问,之前很多的教材都是用C语言实现链表,因为c有指针,可以很方便的控制内存,很方便就实现链表,其他的语言,则没那么方便,有很多都是用模拟链表,不过这次,我不是用模拟 ...
- python数据结构与算法
最近忙着准备各种笔试的东西,主要看什么数据结构啊,算法啦,balahbalah啊,以前一直就没看过这些,就挑了本简单的<啊哈算法>入门,不过里面的数据结构和算法都是用C语言写的,而自己对p ...
- 算法之python创建链表实现cache
算法之python创建链表实现cache 本节内容 问题由来 解决思路 实现代码 总结 1. 问题由来 问题起因于朋友的一次面试题,面试公司直接给出两道题,要求四十八小时之内做出来,语言不限,做出来之 ...
随机推荐
- MQTT 协议学习:Retained(保留消息) 与 LWT(最后遗嘱)
背景导入 让我们来看一下这个场景: 你有一个温度传感器,它每三个小时向一个 Topic 发布当前的温度.那么问题来了,有一个新的订阅者在它刚刚发布了当前温度之后订阅了这个主题,那么这个订阅端什么时候能 ...
- tornado peewee_async
https://peewee-async.readthedocs.io/en/latest/peewee_async/examples.html https://www.cnblogs.com/Vic ...
- Golang的运算符-比较运算符
Golang的运算符-比较运算符 作者:尹正杰 版权声明:原创作品,谢绝转载!否则将追究法律责任. 一.比较运算符概述 比较运算符也称为关系运算符,比较运算符返回的类型为bool类型,常见的比较运算符 ...
- java 三羊献瑞
三羊献瑞 观察下面的加法算式: 其中,相同的汉字代表相同的数字,不同的汉字代表不同的数字. 请你填写"三羊献瑞"所代表的4位数字(答案唯一),不要填写任何多余内容. public ...
- [百度之星]资格赛:IP聚合
保持着也不知道什么情怀,觉得到现在才能发出来.这道题做完之后看了其他人的代码,然后再看我的,不得不说,真是幼稚的很,尤其是输入这一块,都什么跟什么啊. 但相较于之前来说,不像以前慌张了,学会先思考再去 ...
- Linux系统下的/etc/nsswitch.conf文件
一.什么是nsswithch.conf(服务搜索顺序)文件呢? nsswitch.conf(name service switch configuration,名字服务切换配置)文件位于/etc目录下 ...
- Spring Boot2(006):关于配置类(Configuration Classes)和配置(Configuration)
一.配置类(Configuration Classes) Spring Boot 支持基于 xml 的配置,但更偏向于使用基于 Java 的配置,通常建议使用定义有 main 方法的主 @Config ...
- cf 398B. Painting The Wall
23333,还是不会..%%%http://hzwer.com/6276.html #include <bits/stdc++.h> #define LL long long #defin ...
- 七十六、SAP中数据库的查询用法之 COUNT(总数),SUM(求和),AVG(求平均),GROUP BY(分组)
一.我们来查看一个sbook的数据库 二.查看这个表的内容如下 三.表数据如下 四.代码如下 五.结果如下 *&---------------------------------------- ...
- 152-PHP htmlspecialchars函数
<?php //定义一个HTML代码字符串 $str=<<<HTM <a href=#><b><i>到一个网址的链接<>< ...