Android开发实例之miniTwitter登录界面的实现
原文: http://www.jizhuomi.com/android/example/134.html
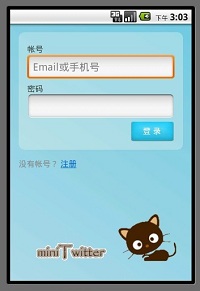
本文要演示的Android开发实例是如何完成一个Android中的miniTwitter登录界面,下面将分步骤讲解怎样实现图中的界面效果,让大家都能轻松的做出美观的登录界面。
miniTwitter登录界面效果图
先贴上最终要完成的效果图:
miniTwitter登录界面的布局分析
首先由界面图分析布局,基本可以分为三个部分,下面分别讲解每个部分。
第一部分是一个带渐变色背景的LinearLayout布局,关于背景渐变色就不再贴代码了,效果如下图所示:
第二部分,红色线区域内,包括1,2,3,4 如图所示:
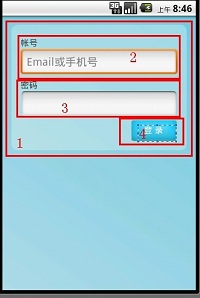
红色的1表示的是一个带圆角且背景色为#55FFFFFF(淡蓝色)的RelativeLayout布局,代码如下:
- <?xml version="1.0" encoding="UTF-8"?>
- <shape xmlns:android="http://schemas.android.com/apk/res/android">
- <solid android:color="#55FFFFFF" />
- <!-- 设置圆角
- 注意: bottomRightRadius是左下角而不是右下角 bottomLeftRadius右下角-->
- <corners android:topLeftRadius="10dp" android:topRightRadius="10dp"
- android:bottomRightRadius="10dp" android:bottomLeftRadius="10dp"/>
- </shape>
solid表示填充色,这里填充的是淡蓝色。corners是设置圆角。
dp (即dip,device independent pixels)设备独立像素:这个和设备硬件有关,一般我们为了支持WVGA、HVGA和QVGA ,不依赖像素。在android上开发的程序将会在不同分辨率的手机上运行。为了让程序外观不至于相差太大,所以引入了dip的概念。比如定义一个矩形10 x 10dip. 在分辨率为160dpi 的屏上,比如G1,正好是10 x 10像素。 而在240 dpi 的屏,则是15 x 15 像素。换算公式为 pixs = dips * (density/160)。density 就是屏的分辨率。
然后RelativeLayou的background引用此drawable,具体RelativeLayout设置如下:
- <RelativeLayout
- android:id="@+id/login_div"
- android:layout_width="fill_parent"
- android:layout_height="wrap_content"
- android:padding="15dip"
- android:layout_margin="15dip"
- android:background="@drawable/background_login_div_bg"
- >
- </RelativeLayout>
padding 是指内边距(也就是指内容与边框的距离),layout_margin为外边距(它的上一层与边框的距离)。
接下来是区域2,为账号的文本和输入框,首先是账号的文本,代码如下:
- <TextView
- android:id="@+id/login_user_input"
- android:layout_width="wrap_content"
- android:layout_height="wrap_content"
- android:layout_alignParentTop="true"
- android:layout_marginTop="5dp"
- android:text="@string/login_label_username"
- style="@style/normalText"/>
android:layout_alignParentTop 这里表示此TextView的位置处于顶部
android:layout_marginTop="5dp" 这里表示此TextView的边框与RelativeLayout的顶部边框距离有5dp
这里需要对这个TextView设置下字体颜色和字体大小,定义在res/style.xml里面:
- <style name="normalText" parent="@android:style/TextAppearance">
- <item name="android:textColor">#444</item>
- <item name="android:textSize">14sp</item>
- </style>
定义账号的输入框,如下:
- <EditText
- android:id="@+id/username_edit"
- android:layout_width="fill_parent"
- android:layout_height="wrap_content"
- android:hint="@string/login_username_hint"
- android:layout_below="@id/login_user_input"
- android:singleLine="true"
- android:inputType="text"/>
android:hint 输入框里面的提示文字,android:layout_below这里是设置为在账号的文本框的下面,android:singleLine 为单行输入(即你输入回车的时候不会在换行了),android:inputType这里text表示输入的类型为文本。
区域3是密码文本和输入框,同区域2,代码如下:
- <TextView
- android:id="@+id/login_password_input"
- android:layout_width="wrap_content"
- android:layout_height="wrap_content"
- android:layout_below="@id/username_edit"
- android:layout_marginTop="3dp"
- android:text="@string/login_label_password"
- style="@style/normalText"/>
- <EditText
- android:id="@+id/password_edit"
- android:layout_width="fill_parent"
- android:layout_height="wrap_content"
- android:layout_below="@id/login_password_input"
- android:password="true"
- android:singleLine="true"
- android:inputType="textPassword"
- />
区域4,登录按钮:
- <Button
- android:id="@+id/signin_button"
- android:layout_width="wrap_content"
- android:layout_height="wrap_content"
- android:layout_below="@id/password_edit"
- android:layout_alignRight="@id/password_edit"
- android:text="@string/login_label_signin"
- android:background="@drawable/blue_button"
- />
第三部分:底下的文字和两张图片,分别标记了1,2,3,4:
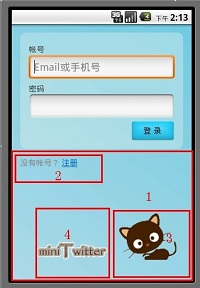
区域1:还是一个RelativeLayout,但这里设置的很简单,代码如下:
- <RelativeLayout
- android:layout_width="fill_parent"
- android:layout_height="wrap_content">
- </RelativeLayout>
区域2:"没有账号?注册"这几个文字定义在string里面,包含了一个<a>标签:
- <string name="login_register_link">没有帐号? <a href="#" mce_href="#">注册</a></string>
定义如下:
- <TextView android:id="@+id/register_link"
- android:text="@string/login_register_link"
- android:layout_width="wrap_content"
- android:layout_height="wrap_content"
- android:layout_marginLeft="15dp"
- android:textColor="#888"
- android:textColorLink="#FF0066CC"
- />
TextView是支持简单的html标签的,如<a>标签,但并不是支持所有标签,支持更复杂的html标签得用webView组件。
android:textColorLink是设置文字链接的颜色. 虽然TextView支持<a>标签,但是这里是不能点此链接的,不要被假象迷惑。
区域3是一直猫的卡通图片,貌似有点丑,将就下吧:
- <ImageView android:id="@+id/miniTwitter_logo"
- android:src="@drawable/cat"
- android:layout_width="wrap_content"
- android:layout_height="wrap_content"
- android:layout_alignParentRight="true"
- android:layout_alignParentBottom="true"
- android:layout_marginRight="25dp"
- android:layout_marginLeft="10dp"
- android:layout_marginBottom="25dp"
- />
android:layout_alignParentRight="true" 位于layout的最右边
android:layout_alignParentBottom="true" 位于layout的最底部
android:layout_marginRight="25dp" 该imageView的边框距离layout边框有25dp,其他的margin类似。
区域4 是一个带文字的图片的ImageView:
- <ImageView android:src="@drawable/logo"
- android:layout_width="wrap_content"
- android:layout_height="wrap_content"
- android:layout_toLeftOf="@id/miniTwitter_logo"
- android:layout_alignBottom="@id/miniTwitter_logo"
- android:paddingBottom="8dp"
- />
android:layout_toLeftOf="@id/miniTwitter_logo" 在那个小猫ImageView的左边(水平位置)
android:layout_alignBottom="@id/miniTwitter_logo" 这里意思是这两个ImageView(区域3和区域4)下边缘对齐
android:paddingBottom="8dp" 图片距离ImageView底部边框8dp,也就是将图片上抬个8dp
实现miniTwitter登陆界面的具体步骤
具体步骤如下:
第一步:一些字符串定义
/miniTwitterLoginDemo/res/values/strings.xml
- <?xml version="1.0" encoding="utf-8"?>
- <resources>
- <string name="hello">Hello World, LoginActivity!</string>
- <string name="login_label_username">帐号</string>
- <string name="login_label_password">密码</string>
- <string name="login_label_signin">登 录</string>
- <string name="login_status_logging_in">登录中...</string>
- <string name="login_username_hint">Email或手机号</string>
- <string name="login_register_link">没有帐号? <a href="#" mce_href="#">注册</a></string>
- <string name="app_name">miniTwitter</string>
- </resources>
第二步:
/miniTwitterLoginDemo/res/values/style.xml
- <?xml version="1.0" encoding="utf-8"?>
- <resources>
- <style name="normalText" parent="@android:style/TextAppearance">
- <item name="android:textColor">#444</item>
- <item name="android:textSize">14sp</item>
- </style>
- </resources>
第三步:背景色为渐变色
/miniTwitterLoginDemo/res/drawable-mdpi/background_login.xml
- <?xml version="1.0" encoding="utf-8"?>
- <shape xmlns:android="http://schemas.android.com/apk/res/android">
- <gradient
- android:startColor="#FFACDAE5"
- android:endColor="#FF72CAE1"
- android:angle="45"
- />
- </shape>
第四步:背景色味淡蓝色且为圆角
/miniTwitterLoginDemo/res/drawable-mdpi/background_login_div_bg.xml
- <?xml version="1.0" encoding="UTF-8"?>
- <shape xmlns:android="http://schemas.android.com/apk/res/android">
- <solid android:color="#55FFFFFF" />
- <!-- 设置圆角
- 注意: bottomRightRadius是左下角而不是右下角 bottomLeftRadius右下角-->
- <corners android:topLeftRadius="10dp" android:topRightRadius="10dp"
- android:bottomRightRadius="10dp" android:bottomLeftRadius="10dp"/>
- </shape>
第五步:
/miniTwitterLoginDemo/res/layout/login.xml
- <?xml version="1.0" encoding="utf-8"?>
- <LinearLayout
- xmlns:android="http://schemas.android.com/apk/res/android"
- android:orientation="vertical"
- android:layout_width="fill_parent"
- android:layout_height="fill_parent"
- android:background="@drawable/background_login">
- <!-- padding 内边距 layout_margin 外边距
- android:layout_alignParentTop 布局的位置是否处于顶部 -->
- <RelativeLayout
- android:id="@+id/login_div"
- android:layout_width="fill_parent"
- android:layout_height="wrap_content"
- android:padding="15dip"
- android:layout_margin="15dip"
- android:background="@drawable/background_login_div_bg"
- >
- <!-- 账号 -->
- <TextView
- android:id="@+id/login_user_input"
- android:layout_width="wrap_content"
- android:layout_height="wrap_content"
- android:layout_alignParentTop="true"
- android:layout_marginTop="5dp"
- android:text="@string/login_label_username"
- style="@style/normalText"/>
- <EditText
- android:id="@+id/username_edit"
- android:layout_width="fill_parent"
- android:layout_height="wrap_content"
- android:hint="@string/login_username_hint"
- android:layout_below="@id/login_user_input"
- android:singleLine="true"
- android:inputType="text"/>
- <!-- 密码 text -->
- <TextView
- android:id="@+id/login_password_input"
- android:layout_width="wrap_content"
- android:layout_height="wrap_content"
- android:layout_below="@id/username_edit"
- android:layout_marginTop="3dp"
- android:text="@string/login_label_password"
- style="@style/normalText"/>
- <EditText
- android:id="@+id/password_edit"
- android:layout_width="fill_parent"
- android:layout_height="wrap_content"
- android:layout_below="@id/login_password_input"
- android:password="true"
- android:singleLine="true"
- android:inputType="textPassword"
- />
- <!-- 登录button -->
- <Button
- android:id="@+id/signin_button"
- android:layout_width="wrap_content"
- android:layout_height="wrap_content"
- android:layout_below="@id/password_edit"
- android:layout_alignRight="@id/password_edit"
- android:text="@string/login_label_signin"
- android:background="@drawable/blue_button"
- />
- </RelativeLayout>
- <RelativeLayout
- android:layout_width="fill_parent"
- android:layout_height="wrap_content"
- >
- <TextView android:id="@+id/register_link"
- android:text="@string/login_register_link"
- android:layout_width="wrap_content"
- android:layout_height="wrap_content"
- android:layout_marginLeft="15dp"
- android:textColor="#888"
- android:textColorLink="#FF0066CC"
- />
- <ImageView android:id="@+id/miniTwitter_logo"
- android:src="@drawable/cat"
- android:layout_width="wrap_content"
- android:layout_height="wrap_content"
- android:layout_alignParentRight="true"
- android:layout_alignParentBottom="true"
- android:layout_marginRight="25dp"
- android:layout_marginLeft="10dp"
- android:layout_marginBottom="25dp"
- />
- <ImageView android:src="@drawable/logo"
- android:layout_width="wrap_content"
- android:layout_height="wrap_content"
- android:layout_toLeftOf="@id/miniTwitter_logo"
- android:layout_alignBottom="@id/miniTwitter_logo"
- android:paddingBottom="8dp"
- />
- </RelativeLayout>
- </LinearLayout>
第七步:
/miniTwitterLoginDemo/src/com/mytwitter/acitivity/LoginActivity.java
这里要注意的是,该Activity是无标题的,设置无标题需要在setContentView之前设置,否则会报错。
- package com.mytwitter.acitivity;
- import android.app.Activity;
- import android.os.Bundle;
- import android.view.Window;
- public class LoginActivity extends Activity {
- @Override
- public void onCreate(Bundle savedInstanceState) {
- super.onCreate(savedInstanceState);
- requestWindowFeature(Window.FEATURE_NO_TITLE);
- setContentView(R.layout.login);
- }
- }
到此,Android中的miniTwitter登录界面的制作就介绍完毕了,是不是做出不错的登录界面并不算难呢?
Android开发实例之miniTwitter登录界面的实现的更多相关文章
- WPF开发实例——仿QQ登录界面
原文:WPF开发实例--仿QQ登录界面 版权声明:本文为博主原创文章,如需转载请标明转载地址 http://blog.csdn.net/u013981858 https://blog.csdn.net ...
- Android开发1:基本UI界面设计——布局和组件
前言 啦啦啦~本学期要开始学习Android开发啦~ 博主在开始学习前是完完全全的小白,只有在平时完成老师要求的实验的过程中一步一步学习~从此篇博文起,博主将开始发布Android开发有关的博文,希望 ...
- Android开发实例详解之IMF(Android SDK Sample—SoftKeyboard)
本博前面的文章介绍了Android开发环境的搭建和模拟器的常用操作.本次,将以Android Sample中经典的SoftKeyboard项目为例,详细解析Android上一个小型项目的开发过程和注意 ...
- 国产化即时通信系统开发 -- 实现GGTalk的登录界面(Linux、Ubuntu、UOS、中标麒麟)
距离2013年开源GGTalk以来,7年已经过去了,GGTalk现在有了完整的PC版.安卓版.iOS版(即将发布),以及Xamarin版本. 然而,时代一直在变化,在今天,有个趋势越来越明显,那就是政 ...
- Android开发实例-健康食谱应用(一)
转载请注明出处:http://blog.csdn.net/einarzhang/article/details/44774635 本系列文章的重点是如何使用Android开发一个简单的健康食谱软件.使 ...
- Android 仿 窗帘效果 和 登录界面拖动效果 (Scroller类的应用) 附 2个DEMO及源码
在android学习中,动作交互是软件中重要的一部分,其中的Scroller就是提供了拖动效果的类,在网上,比如说一些Launcher实现滑屏都可以通过这个类去实现.下面要说的就是上次Scroller ...
- Android开发之自己主动登录功能的实现
在我们平时使用的手机应用都能够实现仅仅须要登陆一次账号后,第二次进入应用直接跳转到效果界面的效果,还有QQ的登陆框是怎样记忆我们的隐身登陆,保存账号选项的呢,这些都是通过使用SharedPrefere ...
- Android开发精彩博文收藏——UI界面类
本文收集整理Android开发中关于UI界面的相关精华博文,共大家参考!本文不定期更新! 1. Android使用Fragment来实现TabHost的功能(解决切换Fragment状态不保存)以及各 ...
- Android开发实例总结
写一个修改密码的界面 1画界面总结: 需要弄清楚什么地方用相对布局,什么地方使用线性布局 希望这过后自己花时间去弄清楚他们内嵌的的所有组件以及组件的属性包括用法. 2逻辑总结: 逻辑描述总是那么几步的 ...
随机推荐
- iframe重新加载
方法1: document.getElementById('iframeId').contentWindow.location.reload(true); 方法2: document.getEleme ...
- ubuntu14.04安装好Hadoo之后接着安装hbase和介绍常用命令
1.解压 tar -zxvf hbase-1.0.0-bin.tar.gzsudo mv hbase-1.0.0 /opt/hbasecd /optsudo chmod -R 775 hbase 2. ...
- html学习-第二集(CSS)
head标签里面添加style标签,可以为标签添加样式 id选择器 类选择器 标签选择器 层级选择器 组合选择器 属性选择器 <!DOCTYPE html> <html lang=& ...
- dockerfile的编写参数
注意细节 “#”号开头是注释 ,指令不区分大小写,顺序执行 FROM 指定基础镜像:注意必须是文件里第一个非注释行 ENV name 值 设置变量,注意没有=号 变量引用 ${name:-chenxi ...
- 连接(JOIN)
join 用于把来自两个或多个表的行结合起来,基于这些表之间的共同字段. INNER JOIN 从多个表中返回满足 JOIN 条件的所有行. INNER JOIN:如果表中有至少一个匹配,则返回行 L ...
- Go语言基础之runtime包
文章引用自 Golang中runtime的使用 runtime调度器是非常有用的东西,关于runtime包几个方法: Gosched:让当前线程让出cpu以让其他线程运行,它不会挂起当前线程,因此当前 ...
- 2020年英特尔CPU供应短缺将持续
导读 有着相当靠谱的爆料历史的台媒 DigiTimes 报道称,其预计英特尔的 CPU 供应短缺问题,将持续到 2020 年末.对于这样的预测,我们其实早已见怪不怪,毕竟该公司首席执行官 Bob Sw ...
- div 悬浮
一个小需求,鼠标移动一个产品那, 显示这个产品的具体信息 代码如下: <a href="javascript:void(0);" onclick="frameSea ...
- Color the ball(差分数组)
N个气球排成一排,从左到右依次编号为1,2,3....N.每次给定2个整数a b(a <= b),lele便为骑上他的“小飞鸽"牌电动车从气球a开始到气球b依次给每个气球涂一次颜色.但 ...
- Centos7下载和安装教程
https://blog.csdn.net/qq_42570879/article/details/82853708 阿里下载64bit镜像:http://mirrors.aliyun.com/cen ...