android菜鸟学习笔记6----android布局(一)
Android应用的UI组件都是继承自View类,View类表示的就是一个空白的矩形区域。常用的组件如TextView、Button、EditText等都直接或间接继承自View。
此外,View还有一个重要的子类ViewGroup,该类可以用来包含多个View组件,本身也可以当做一个View组件被其他的ViewGroup所包含,由此,可以构建出非常复杂的UI界面。
常用的布局管理器如FrameLayout、LinearLayout、RelativeLayout等都直接继承自ViewGroup。
在Android应用中,Activity就相当于传统桌面开发中的Form,刚创建出来就是一个空白的屏幕,因此,要显示UI界面时,就需要调用setContentView()方法传入要显示的视图实例或者布局资源。
如:
传入一个布局资源:
setContentView(R.layout.main);
传入一个View实例:
TextView myTv = new TextView(this);
setContentView(myTv);
myTv.setText(“hello, world”);
因为setContentView()只能接受一个View实例,要显示复杂的UI界面,就需要用到ViewGroup来包含多个多个View实例,然后将ViewGroup实例传给setContentView。ViewGroup是个抽象类,一般直接使用的都是它的子类,被称之为布局管理器。
Android有两种方式编写UI界面,一种是在xml布局资源文件中,另一种是直接在代码中编写,如上面的传入一个View实例的做法就是直接在代码中编写,这是传统的Form编程的做法。现在比较推荐的是在xml布局资源文件中编写UI界面,这样一来就可以将应用表示层与逻辑层相分离,无需修改代码就可以修改表示层。
要编写复杂的UI界面,需要掌握android中常用的布局管理器。主要有:
AbsoluteLayout:绝对布局
FrameLayout:帧布局
LinearLayout:线性布局
RelativeLayout:相对布局
TableLayout:表格布局
GridLayou:网格布局(Android 4.0添加的新的布局管理器)
1.LinearLayout 线性布局
线性布局就是放在其中的View组件将进行线性对齐排列,可以设置是垂直排列还是水平排列。
新建一个布局资源文件的方法:
右击res/layout,然后在弹出的菜单中选择new,然后选择Android Xml File,要新建LinearLayout布局文件,就选择LinearLayout作为其根节点即可。
linear_layout.xml代码如下:
 <?xml version="1.0" encoding="utf-8"?>

 <LinearLayout xmlns:android="http://schemas.android.com/apk/res/android"

     android:layout_width="match_parent"

     android:layout_height="match_parent"

     android:orientation="vertical">

     <Button

         android:layout_width="match_parent"

         android:layout_height="wrap_content"

         android:text="aaaaaa"

         />

     <Button

         android:layout_width="match_parent"

         android:layout_height="wrap_content"

         android:text="bbbbbb"

         />

     <Button

         android:layout_width="match_parent"

         android:layout_height="wrap_content"

         android:text="cccccc"

         />

     <Button

         android:layout_width="match_parent"

         android:layout_height="wrap_content"

         android:text="dddddd"

         />

 </LinearLayout>
activity中代码如下:
 protected void onCreate(Bundle savedInstanceState) {

            // TODO Auto-generated method stub

            super.onCreate(savedInstanceState);

            setContentView(R.layout.linear_layout);

 }
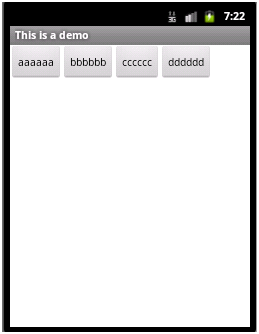
显示效果:

常用的几个属性:
1)orientation属性:设置LinearLayout中组件的排列方式,可以取值vertical或者horizontal表示垂直排成一列或者水平排成一行。
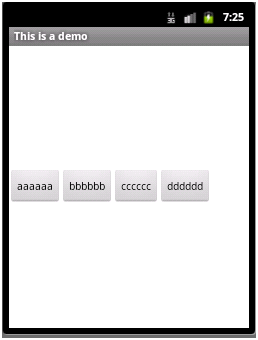
上面代码中,如果把orientation设置为horizontal。显示则变为:

因为只显示一行,而第一个Button的宽度就是充满父元素,所以只显示出来了第一个Button。
2)layout_width属性:设置在父元素中该组件的宽度,可以取值wrap_content、match_parent或者fill_parent。其中wrap_content表示宽度能够包裹该组件中的内容即可,fill_parent和match_parent含义相同表示宽度充满父元素,现在,更常使用match_parent,而很少用fill_parent。
如上面代码中把所有的Button的layout_width都设置为wrap_content,则显示效果如下:
3)layout_height属性:设置在父元素中该组件的宽度,取值同layout_width。
4)grativity属性:设置该容器内组件的对齐方式。
如在LinearLayout节点中添加属性:android:gravity="center_vertical"
则显示效果如下:
该属性的取值可以是:top、bottom、left、right、center、center_vertical、center_horizontal等值,或者这些值相或(即位或运算 | )
如:android:gravity="bottom|right" 显示效果

5)layout_gravity属性:当前控件在父元素的位置。
如将aaaaaa那个Button中layout_gravity设置为”center”,其效果将会与其所处容器即LinearLayout中的gravity属性效果进行叠加,显示如下:

垂直上进行了居中,水平上还是排在bbbbbb的左边
6)layout_weight属性:在子控件中设置父元素中多出来的额外空间的分配权重。

此时,如果只在aaaaaa这个button中设置layout_weight属性,可以设置为任意值,习惯设置为1。则aaaaaa这个button会拉伸占据剩下的空间,显示如下:

如果同时在aaaaaa和dddddd两个button中都设置layout_weight属性,且第一个设置为1,第二个设置为2,则之前多出来的剩余空间会分给aaaaaa 1/3,分给dddddd 2/3,即各自的权重值/总的权重值,即为各自所分得的剩余空间的比例,显示如下:

7)weightSum属性:设置容器中剩余空间的总的权重值,这个属性是LinearLayout中的属性,而layout_weight是各个子控件中的属性,若不设置,则默认为各个子控件layout_weight属性值的总和。
若如上面aaaaaa的layout_weight值为1,dddddd的layout_weight的值为2,同时在LinearLayout中设置weightSum值为6,则仍会有一半的剩余空间,aaaaaa只分得原来剩余空间的1/6,dddddd分得2/6,显示如下:

8)visibility属性:控制是否显示,取值可以是invisible、visible、gone。visible表示显示出来,invisible和gone不显示出来,其中invisible不显示,但控件仍然存在,占用着空间,而gone表示控件不存在了,也就不占用空间了。
如:cccccc设置visibility属性为gone,显示如下:

若改为invisible:

LinearLayout设置invisible:

2.RelativeLayout:相对布局
顾名思义,即根据各控件的相对位置进行布局,相对位置,可以是子控件A相对父控件的位置,也可以是子控件A相对于子控件B的位置。
右击res/layout,然后在弹出的菜单中选择new,然后选择Android Xml File,要新建RelativeLayout布局文件,就选择RelativeLayout作为其根节点即可。文件名为relative_layout.xml。
代码如下:
 <?xml version="1.0" encoding="utf-8"?>

 <RelativeLayout xmlns:android="http://schemas.android.com/apk/res/android"

     android:layout_width="match_parent"

     android:layout_height="match_parent" >

     <Button

         android:id="@+id/aa"

         android:layout_width="wrap_content"

         android:layout_height="wrap_content"

         android:layout_centerInParent="true"

         android:text="aaaaaa"

         />

     <Button

         android:id="@+id/bb"

         android:layout_width="wrap_content"

         android:layout_height="wrap_content"

         android:layout_toRightOf="@id/aa"

         android:layout_alignTop="@id/aa"

         android:text="bbbbbb"

         />

     <Button

         android:id="@+id/cc"

         android:layout_width="wrap_content"

         android:layout_height="wrap_content"

         android:layout_toLeftOf="@id/aa"

         android:layout_alignBottom="@id/aa"

         android:text="cccccc"

         />

     <Button

         android:id="@+id/dd"

         android:layout_width="wrap_content"

         android:layout_height="wrap_content"

         android:layout_above="@id/aa"

         android:layout_alignLeft="@id/aa"

         android:text="dddddd"

         />

     <Button

         android:id="@+id/ee"

         android:layout_width="wrap_content"

         android:layout_height="wrap_content"

         android:layout_below="@id/aa"

         android:layout_alignLeft="@id/aa"

         android:text="eeeeee"

         />

 </RelativeLayout>
修改FirstActivity中setContentView(R.layout.relative_layout);
显示效果:

aaaaaa在父容器中居中显示
bbbbbb在aaaaaa的右边显示,并且与aaaaaa顶部对齐
ccccccc在aaaaaa的左边显示,并且与aaaaaa顶部对齐
dddddd在aaaaaa的上面显示,并且与aaaaaa左对齐
eeeeee在aaaaaa的下面显示,并且与aaaaaa左对齐
主要属性:均为设置父子相对位置,或者子控件与子控件的相对位置
android:layout_toRightOf 在指定控件的右边
android:layout_toLeftOf 在指定控件的左边
android:layout_above 在指定控件的上边
android:layout_below 在指定控件的下边
android:layout_alignBaseline 跟指定控件水平对齐
android:layout_alignLeft 跟指定控件左对齐
android:layout_alignRight 跟指定控件右对齐
android:layout_alignTop 跟指定控件顶部对齐
android:layout_alignBottom 跟指定控件底部对齐
android:layout_alignParentLeft 是否跟父布局左对齐
android:layout_alignParentTop 是否跟父布局顶部对齐
android:layout_alignParentRight 是否跟父布局右对齐
android:layout_alignParentBottom 是否跟父布局底部对齐
android:layout_centerVertical 在父布局中垂直居中
android:layout_centerHorizontal 在父布局中水平居中
android:layout_centerInParent 在父布局中居中
android菜鸟学习笔记6----android布局(一)的更多相关文章
- android菜鸟学习笔记7----android布局(二)
3.FrameLayout:帧布局 如同Flash或者photoshop中图层的概念,在上面的图层遮盖下面的图层,没被遮到的地方仍然显示出来. 右击res/layout,然后在弹出的菜单中选择new, ...
- Android Studio 学习笔记(二):布局简介和xmlns说明
初学Android Studio,是在b站看的教程视频,这里的笔记也是以其为基础的,个人强烈安利: [天哥]Android开发视频教程最新版 Android Studio开发 Android 布局简介 ...
- android菜鸟学习笔记30----Android使用百度地图API(一)准备工作及在应用中显示地图
1.准备工作: 百度地图API是免费开放的,但是需要申请API Key: 1)先注册一个百度开发者帐号 2)进入百度开放服务平台http://developer.baidu.com/ 3)进入LBS云 ...
- android菜鸟学习笔记29----Android应用向用户发送提示信息的方式总结
常见的向用户发送提示信息的方式有3种,分别为: 1)发送Toast信息 2)弹出对话框 3)发送通知 总结如下: 方式1:发送Toast信息: 这种方式最简单,在之前的学习中多次使用过.Toast是在 ...
- android菜鸟学习笔记24----与服务器端交互(一)使用HttpURLConnection和HttpClient请求服务端数据
主要是基于HTTP协议与服务端进行交互. 涉及到的类和接口有:URL.HttpURLConnection.HttpClient等 URL: 使用一个String类型的url构造一个URL对象,如: U ...
- android菜鸟学习笔记31----Android使用百度地图API(二)获取地理位置及地图控制器的简单使用
1.获取当前地理位置: Android中提供了一个LocationManager的类,用于管理地理位置.不能通过构造函数获取该类的实例,而是通过Context的getSystemService(): ...
- android菜鸟学习笔记28----Android中的Service生命周期及本地和远程服务绑定的实现
Service是Android中长期在后台运行的没有界面的组件,使用服务的优势在于:能够提高进程的优先级,系统不容易回收掉进程,即便回收了,内存充足的时候,会把进程重新创建. 1.服务的简单使用示例: ...
- android菜鸟学习笔记21----ContentProvider(一)ContentProvider的简单使用
ContentProvider是Android四大组件之一,它用来封装数据,并通过ContentResolver接口将数据提供给其他应用.只有当需要在多个应用之间共享数据时才会用到ContentPro ...
- android菜鸟学习笔记14----Android控件(三) ListView的简单使用
MVC模式: MVC的基本原理就是通过Controller连接View和Model.当View中所显示的数据发生变化时,会通知Controller,然后由Controller调用Model中的相关方法 ...
- android菜鸟学习笔记12----Android控件(一) 几个常用的简单控件
主要参考<第一行代码> 1.TextView: 功能与传统的桌面应用开发中的Label控件相似,用于显示文本信息 如: <TextView android:layout_width= ...
随机推荐
- (3)Django 配置
一.settings django安装的应用程序 INSTALLED_APPS = [ 'django.contrib.admin', 'django.contrib.auth', 'django.c ...
- Cygwin下vi和vim方向键和Backspace不好用的问题(转)
执行p4 client时vi打开文本,编辑起来恼火,于是找到了这个: 默认的vi(vim)没有配置文件,因此导致了方向键出现ABCD,以及Backspace只会移动光标,字符不消失的问题.cygwin ...
- 基于WPF系统框架设计(3)-Fluent Ribbon界面布局
一个系统框架除了功能菜单导航,有系统内容显示区域,系统状态栏. Silver: Blue: Black: 系统界面设计,就不进行技术细节介绍了,主题以框架设计为主,Xaml源码参考: <Flue ...
- 人生中的那口井 z
有两个和尚住在隔壁,每天都会在同一时间下山去溪边挑水,不知不觉己经过了五年. 突然有一天,左边这座山的和尚没有下山挑水,过了一个星期,还是没有下山挑水. 直到过了一个月,右边那座山的和尚很担心就去探望 ...
- Scut游戏服务器引擎6.0.5.0发布-支持C#脚本
1. 增加C#脚本支持2. 增加Pay和Sns中间件对Mysql数据库支持3. 精简布署步骤,取消Redis写入程序,将其移到游戏底层运行4. 修正Mysql对中文可能会出现乱码的BUG 点击下载:S ...
- java.io.IOException: Cannot run program "java" (in directory "/data01/var/lib/jenkins/workspace/2540cb62a866eda983ab8cba34fcd4f9"): error=2, No such file or directory
通过下图所示方式,可以在同一台机器上启动多个jenkins slave 执行项目的时候报错: 解决办法:首先排查,目标文件或者目录是否存在,如果存在,则在目录机器添加/usr/bin/java的软链接 ...
- 移动端弹窗 layer.js 使用
<!DOCTYPE html> <html lang="en"> <head> <meta charset="UTF-8&quo ...
- OCP学习基本知识点总结
下面是我总结的OCP教程的知识点.以备參考之用. 1, What's Oracle Server? · It's a database management system that ...
- socket连接和TCP连接的关系
我们在数据传输时,能够仅仅使用(传输层)TCP/IP协议,可是那样的话,假设没有应用层.便无法识别数据内容,假设想要使传输的数据有意义.则必须使用到应用层协议,应用层协议有非常多,比方HTTP.FTP ...
- Mongo-Hadoop
下载 https://github.com/mongodb/mongo-hadoop/releases 解压到/home/kevin/hadoop/hadoop/share/mongo-hadoop- ...