
【Gerrit】持续集成工具Jenkins的安装配置与使用过程中遇到的问题整理
1.下载war包
2.安装
java -jar jenkins.war
Error:

Feb 21, 2019 2:17:25 AM winstone.Logger logInternal

SEVERE: Container startup failed

java.io.IOException: Failed to start Jetty

	at winstone.Launcher.<init>(Launcher.java:186)

	at winstone.Launcher.main(Launcher.java:354)

	at sun.reflect.NativeMethodAccessorImpl.invoke0(Native Method)

	at sun.reflect.NativeMethodAccessorImpl.invoke(NativeMethodAccessorImpl.java:62)

	at sun.reflect.DelegatingMethodAccessorImpl.invoke(DelegatingMethodAccessorImpl.java:43)

	at java.lang.reflect.Method.invoke(Method.java:498)

	at Main._main(Main.java:344)

	at Main.main(Main.java:160)

Caused by: java.net.BindException: Address already in use

	at sun.nio.ch.Net.bind0(Native Method)

	at sun.nio.ch.Net.bind(Net.java:433)

	at sun.nio.ch.Net.bind(Net.java:425)

	at sun.nio.ch.ServerSocketChannelImpl.bind(ServerSocketChannelImpl.java:223)

	at sun.nio.ch.ServerSocketAdaptor.bind(ServerSocketAdaptor.java:74)

	at org.eclipse.jetty.server.ServerConnector.openAcceptChannel(ServerConnector.java:339)

	at org.eclipse.jetty.server.ServerConnector.open(ServerConnector.java:307)

	at org.eclipse.jetty.server.AbstractNetworkConnector.doStart(AbstractNetworkConnector.java:80)

	at org.eclipse.jetty.server.ServerConnector.doStart(ServerConnector.java:235)

	at org.eclipse.jetty.util.component.AbstractLifeCycle.start(AbstractLifeCycle.java:68)

	at org.eclipse.jetty.server.Server.doStart(Server.java:395)

	at org.eclipse.jetty.util.component.AbstractLifeCycle.start(AbstractLifeCycle.java:68)

	at winstone.Launcher.<init>(Launcher.java:184)

	... 7 more
解决:
修改Jenkins端口java -jar jenkins.war --httpPort=8081
jenkins plugin提示: Update information obtained: 不可用 ago;
出现堆栈错误;
解决:
我们将.jenkins/hudson.model.UpdateCenter.xml文件内容中的https://updates.jenkins.io/update-center.json改为http://updates.jenkins.io/update-center.json即可;即为https协议改为http协议;然后我们重启一下jenkins,插件即可正常搜索访问;
jenkins时区设置为上海时间
打开 【系统管理】->【脚本命令行】运行下面的命令
System.setProperty('org.apache.commons.jelly.tags.fmt.timeZone', 'Asia/Shanghai')
jenkins 关闭和重启实现方式.
1、关闭Jenkins
只需要在访问jenkins服务器的网址url地址后加上exit。例如我jenkins的地址http://localhost:8080/,那么我只需要在浏览器地址栏上敲下http://localhost:8080/exit 网址就能关闭jenkins服务.
2、重启Jenkies
http://localhost:8080/restart
3、重新加载配置信息
http://localhost:8080/reload
3.项目配置(gerrit提交patch动态触发jenkins自动编译)
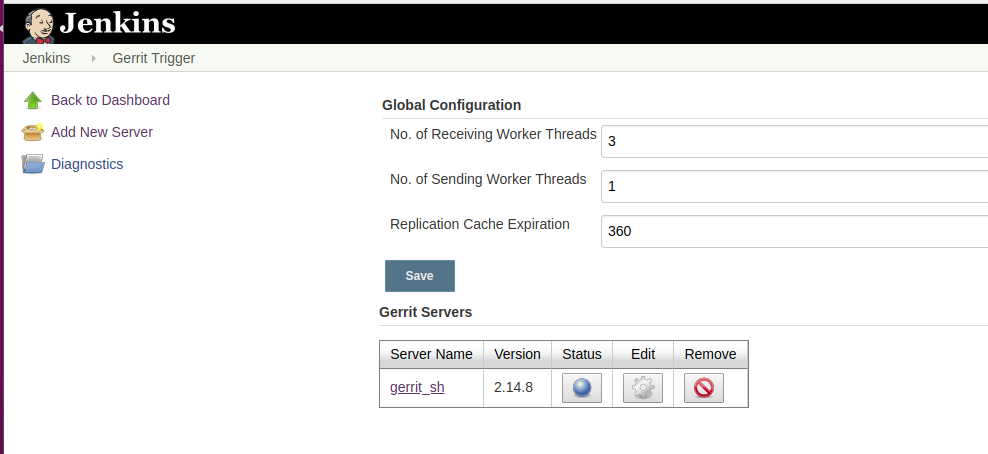
①建立gerrit服务器连接
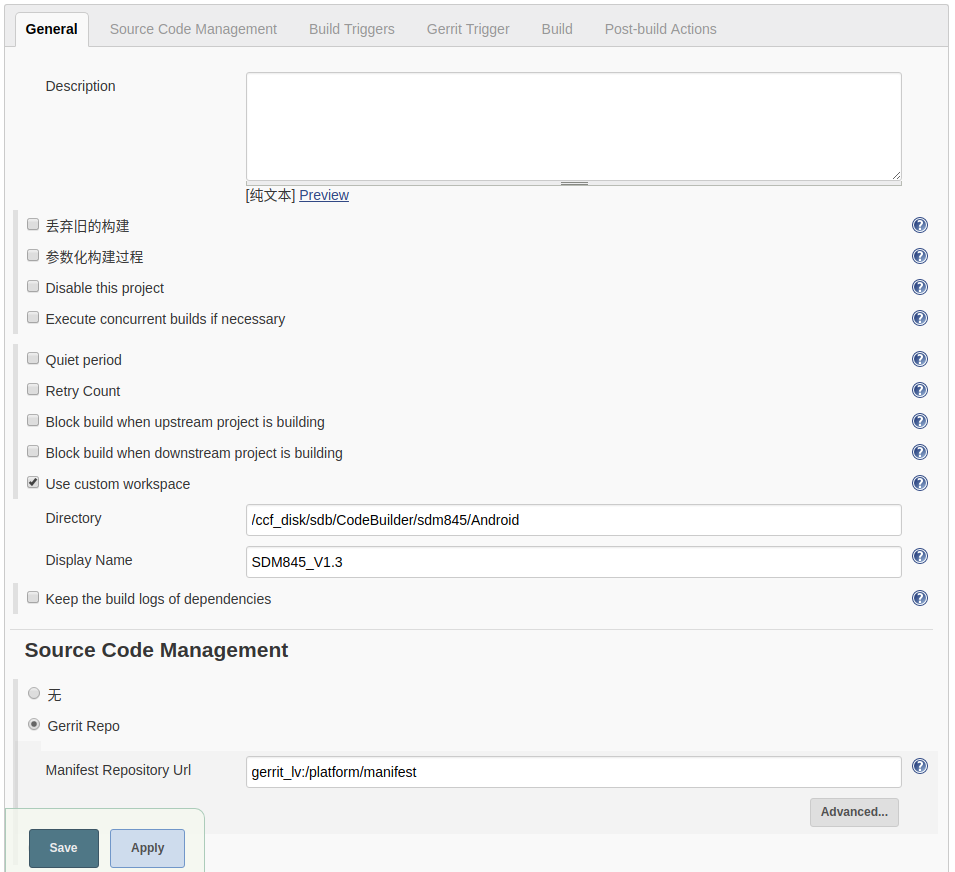
②确保手动触发的可执行性

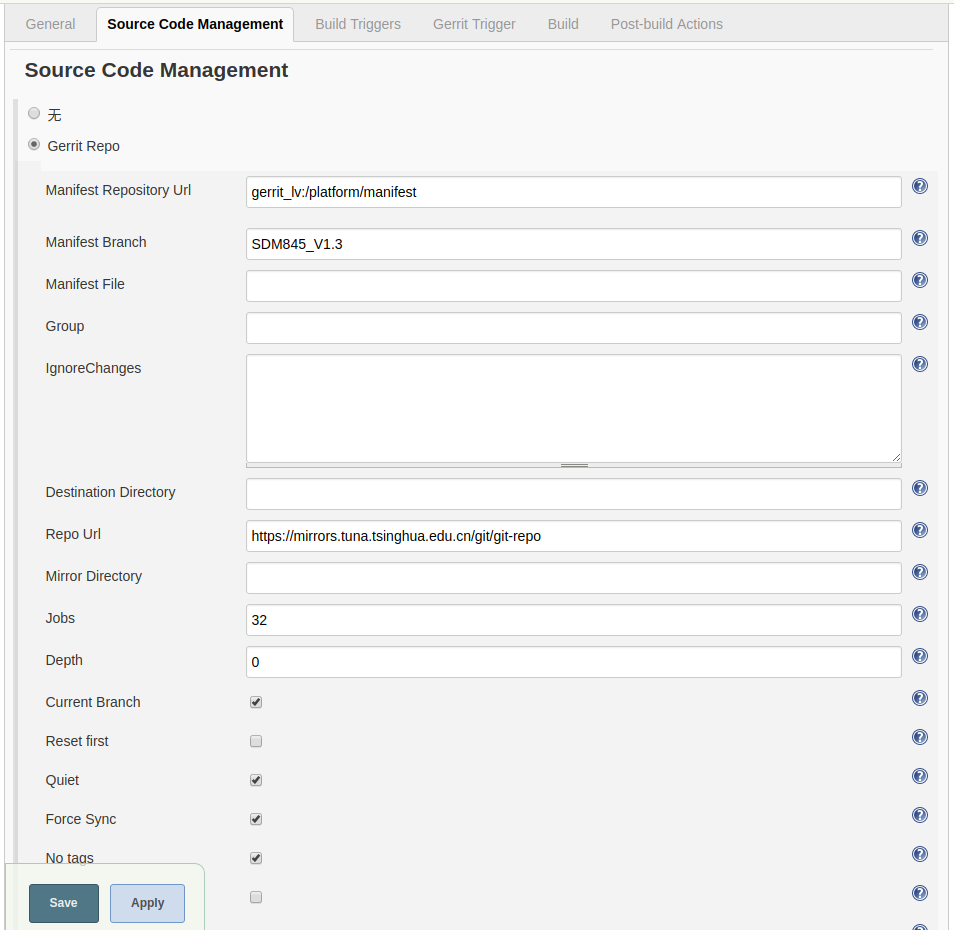
③项目动态触发条件配置

4.构建脚本
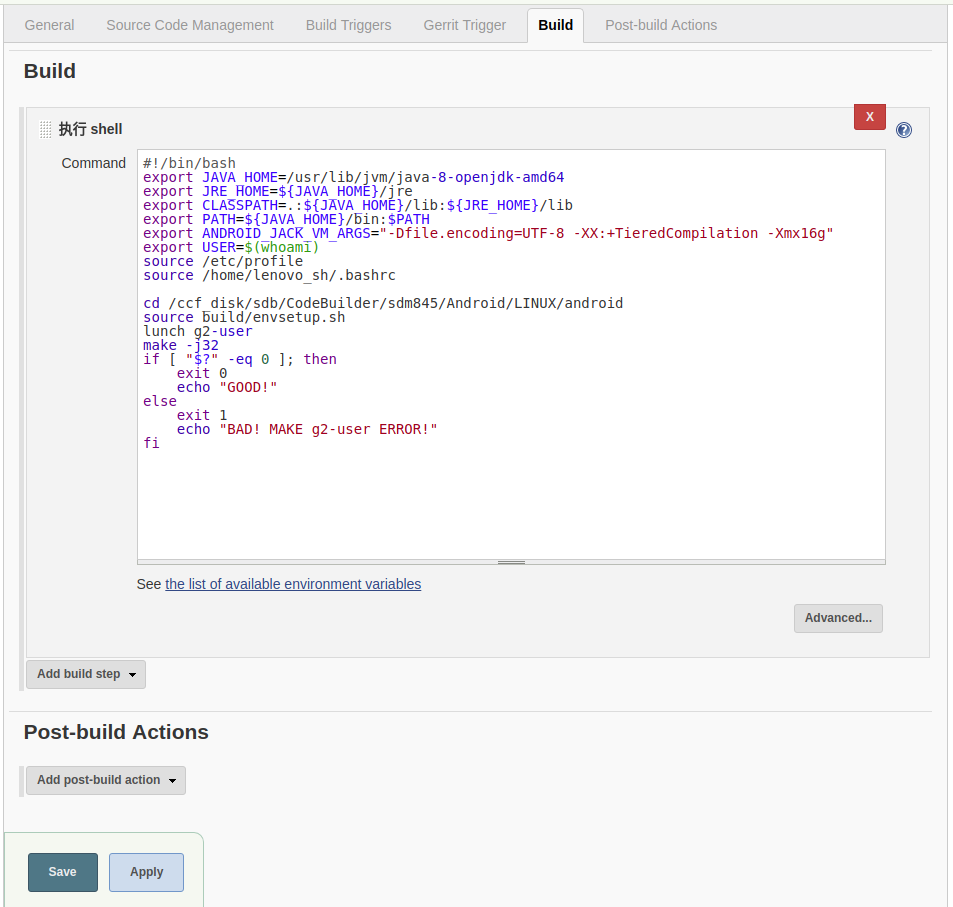
以下是构建脚本可能需要的一些参数,仅供参考:
-----------------------------------------------------------Gerrit--triggered--parameters-------------------------------------------------------------
Trigger the build on Gerrit events.

The triggered build will be provided with the following parameters:

For all events

GERRIT_PROJECT: The name of the project.

GERRIT_EVENT_TYPE: The type of this event.

GERRIT_EVENT_HASH: A unique hash making all triggered builds unique in the queue.

GERRIT_EVENT_ACCOUNT: The name and email of the account associated with the event, if any. "Name" <name@somewhere.com>.

GERRIT_EVENT_ACCOUNT_NAME: The name of the account associated with the event, if any.

GERRIT_EVENT_ACCOUNT_EMAIL: The email of the account associated with the event, if any.

GERRIT_NAME: The name of the Gerrit instance that provided the event.

GERRIT_HOST: The hostname of the Gerrit instance that provided the event.

GERRIT_PORT: The port number of the Gerrit instance that provided the event.

GERRIT_SCHEME: The protocol name of the Gerrit instance that provided the event.

GERRIT_VERSION: The version number of the Gerrit instance that provided the event.

For events on a change (Patch set created, Draft published, Change merged, Change abandoned, Change restored, Comment added)

GERRIT_CHANGE_ID: The Change-Id.

GERRIT_CHANGE_SUBJECT: The first line of the commit message.

GERRIT_CHANGE_COMMIT_MESSAGE: The full commit message, UTF-8 Base64 encoded. (Only when Gerrit version is 2.8 or above).

GERRIT_CHANGE_NUMBER: The change number.

GERRIT_CHANGE_URL: The URL to the change.

GERRIT_PATCHSET_NUMBER: The Patch Set number.

GERRIT_PATCHSET_REVISION: The Patch Set revision id.

GERRIT_BRANCH: The name of the branch.

GERRIT_TOPIC: The name of the topic.

GERRIT_REFSPEC: The ref-spec. (refs/changes/xx/xxxx/z).

GERRIT_CHANGE_OWNER: The name and email of the owner of the change "Name" <name@somewhere.com>.

GERRIT_CHANGE_OWNER_NAME: The name of the owner of the change.

GERRIT_CHANGE_OWNER_EMAIL: The email of the owner of the change.

GERRIT_PATCHSET_UPLOADER: The name and email of the uploader of the Patch Set "Name" <name@somewhere.com>.

GERRIT_PATCHSET_UPLOADER_NAME: The name of the uploader of the Patch Set.

GERRIT_PATCHSET_UPLOADER_EMAIL: The email of the uploader of the Patch Set.

GERRIT_PATCHSET_ABANDONER: The name and email of the abandoner of the Patch Set "Name" <name@somewhere.com>.

GERRIT_PATCHSET_ABANDONER_NAME: The name of the abandoner of the Patch Set.

GERRIT_PATCHSET_ABANDONER_EMAIL: The email of the abandoner of the Patch Set.

GERRIT_PATCHSET_RESTORER: The name and email of the restorer of the Patch Set "Name" <name@somewhere.com>.

GERRIT_PATCHSET_RESTORER_NAME: The name of the restorer of the Patch Set.

GERRIT_PATCHSET_RESTORER_EMAIL: The email of the restorer of the Patch Set.

Additionally for Change merged events

GERRIT_NEWREV: The revision of the merge commit.

Additionally for Comment added events

GERRIT_EVENT_COMMENT_TEXT: The comment posted to Gerrit, UTF-8 Base64 encoded.

For Reference updated events

GERRIT_REFNAME: Ref name within project.

GERRIT_OLDREV: The old value of the ref, prior to the update.

GERRIT_NEWREV: The new value the ref was updated to.

The parameters will be available to the build as environment variables. E.g. $GERRIT_REFSPEC
【Gerrit】持续集成工具Jenkins的安装配置与使用过程中遇到的问题整理的更多相关文章
- 老李分享:持续集成学好jenkins之安装
老李分享:持续集成学好jenkins之安装 poptest是国内唯一一家培养测试开发工程师的培训机构,以学员能胜任自动化测试,性能测试,测试工具开发等工作为目标.如果对课程感兴趣,请大家咨询qq: ...
- 持续集成工具Jenkins安装、部署、使用
本文介绍jenkins,利用其做项目发布与持续集成交付工具. 一.Jenkins是什么? Jenkins是基于Java开发的一种持续集成工具,用于监控持续重复的工作,功能包括: 1.持续的软件版本发布 ...
- 持续集成工具Jenkins学习总结
概述 持续集成(Continuous Integration,简称CI)是一种软件开发实践,团队开发人员每次都通过自动化的构建(编译.发布.自动化测试)来验证,从而尽早的发现集成错误.持续集成最大的优 ...
- 持续集成工具jenkins的使用
jenkins类似于Hadson,是一款持续集成工具.使用jenkins完成自动化部署的表现为:当开发人员向版本库提交新的代码后,应用服务器上自动部署,用户或测试人员使用的马上就是最新的应用程序.搭建 ...
- 轻松搭建持续集成工具jenkins
1.Jenkins介绍1)什么是持续集成随着软件开发复杂度的不断提高,团队开发成员间如何更好地协同工作以确保软件开发的质量已经慢慢成为开发过程中不可回避的问题.尤其是近些年来,敏捷(Agile) 在软 ...
- 持续集成工具——Jenkins
一.jenkins简介 1.持续集成工具 2.基于JAVA环境 二.环境搭建 1.安装JDK 2.安装配置git 3.安装配置tomcat Tomcat是针对Java的一个开源中间件服务器(容器),基 ...
- 持续集成工具-Jenkins 使用介绍
Jenkins 是一个可扩展的持续集成引擎,可以为我们提供代码自动编译.打包和发布工作,减少部署成本. 一.安装与启动 Jenkins 提供了多种便捷的安装方式,比较推荐使用执行 war 包的方式. ...
- CI工具Jenkins的安装配置【linux】——jenkins集成sonarqube-异常解决
Setup 官网https://jenkins.io/ 下载war包,扔到tomcat下启动即可. 如果有port限制,在iptables中打开商品限制. 访问http://ip:port/jenki ...
- linux-centos下持续集成工具jenkins部署使用教程
centos下准备工作: 1.安装jdk环境 2.安装maven环境(用于构建项目) 3.git客户端(用于拉取源码) 此外码云还要准备一份java源码(springboot项目) 一.安装jenki ...
随机推荐
- VNC不同用户 Oracle
VNC登录用户缺省是root,但在安装oracle时必须用oracle用户的身份登录,下面我们就以oracle为例说明如何配置VNC,从而可以使用不同的用户登录到主机.步骤描述如下: 步骤一:修 ...
- TI_DSP_SRIO - Doorbell原理
前文介绍到SRIO有多种类型的包,当中包括了Doorbell包,Doorbell是一种高速的通知类型的短消息,包头和携带信息都非常短,用于master srio设备通知slave srio设备,可用于 ...
- C++ 与 Java 语言对比
1 . Java 是完全封装的,而 C++ 的函数是可以定义在 Class 的外部的.从这里就可以看出 C++ 的 OO 思想不够彻底,至少在封装这一点上. 2. C++ 中有拷贝构造函数,可以把一个 ...
- 【v2.x OGE-example 第一节】 绘制实体
前言: OGE即 OGEngine,是由橙子游戏开发的基于Java支持跨平台的开源游戏引,从12年4月项目成立至今已经有2年多的发展历程.在此期间基于OGEngine开发的项目已经有非常多成功投放市场 ...
- Wpf的布局舍入属性(可以解决软件字体模糊的问题)
原文:Wpf的布局舍入属性(可以解决软件字体模糊的问题) 版权声明:本文为博主原创文章,未经博主允许不得转载. https://blog.csdn.net/HK_JY/article/details/ ...
- iOS项目中所有icon的尺寸以及命名
一般icon以下几个: Icon.png – 57×57 iPhone (ios5/6) Icon@2x.png – 114×114 iPhone Retina (ios5/6) Icon-72.pn ...
- erlang判断模块导出函数问题
erlang本身提供一个接口,可以用来检查模块是否有导出函数,这个接口是erlang:function_exported/3,但是很多时候这个接口无法正常使用. 下面重现一下这个问题: 1> e ...
- BZOJ 2330 - 差分约束系统
传送门 题目分析 差分约束 这里做个简单介绍:形如\(x_i - x_j >= d\)的不等式,可以联想到我们求最短路时\(d_v <= d_u + len\),则上式可以变形为\(x_i ...
- redis 注册为服务
进入redis的util目录下,拷贝redis_init_script到/etc/init.d/下并重命名为redis 修改CONF,指定配置文件,我的redis配置文件为/etc/redis/red ...
- 最简单的基于JavaEE和FFmpeg的视频网站
最简单的视频网站 Simplest Video Website 雷霄骅 Lei Xiaohua leixiaohua1020@126.com 中国传媒大学/数字电视技术 Communication U ...