
持续集成工具Jenkins学习总结
概述
持续集成(Continuous Integration,简称CI)是一种软件开发实践,团队开发人员每次都通过自动化的构建(编译、发布、自动化测试)来验证,从而尽早的发现集成错误。持续集成最大的优点是避免了传统模式在集成阶段的除虫会议(bug meeting),其要素包括统一的代码库、自动构建、自动测试、自动部署、频繁提交修改过的代码等。
Jenkins的前身是Hudson,是基于Java开发的一种持续集成工具,是一个开源软件项目,主要用于:
- 持续、自动地构建/测试软件项目,如CruiseControl与DamageControl;
- 监控一些定时执行的任务;
Jenkins的官网:http://jenkins-ci.org/,下面我总结一下Windows下Jenkins的安装和使用。
Jenkins安装
(1)安装素材
- JDK(Jenkins运行需要Java 1.6以上的版本)
- Jenkins安装包(官网下载)
(2)安装JDK
(3)安装Jenkins
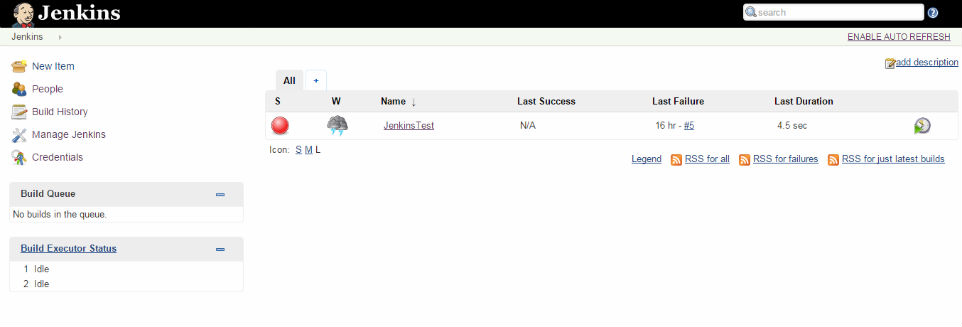
运行Jenkins安装包,按提示安装即可,安装成功之后会自动打开网页http://localhost:8080/,Jenkins主界面如下所示:
Jenkins配置
(1)配置http端口号
Jenkins默认端口号是8080,如果该端口号与其他任务的端口号冲突,就需要更改。打开Jenkins安装目录下的Jenkins.xml文件,如下所示:
<!--

  Windows service definition for Jenkins

  To uninstall, run "jenkins.exe stop" to stop the service, then "jenkins.exe uninstall" to uninstall the service.

  Both commands don't produce any output if the execution is successful.

-->

<service>

  <id>jenkins</id>

  <name>Jenkins</name>

  <description>This service runs Jenkins continuous integration system.</description>

  <env name="JENKINS_HOME" value="%BASE%"/>

  <!--

    if you'd like to run Jenkins with a specific version of Java, specify a full path to java.exe.

    The following value assumes that you have java in your PATH.

  -->

  <executable>%BASE%\jre\bin\java</executable>

  <arguments>-Xrs -Xmx256m -Dhudson.lifecycle=hudson.lifecycle.WindowsServiceLifecycle -jar "%BASE%\jenkins.war" --httpPort=8080</arguments>

  <!--

    interactive flag causes the empty black Java window to be displayed.

    I'm still debugging this.

  <interactive />

  -->

  <logmode>rotate</logmode>

  <onfailure action="restart" />

</service>
将<arguments>元素中的httpPort的值8080改为其他值即可。
(2)管理插件
Jenkins默认安装了一些插件,可根据自己的需要再安装其他插件,我额外安装的插件有:MSBuild plugin、MSTest plugin、Git plugin、GitHub plugin、Email Extension plugin等。
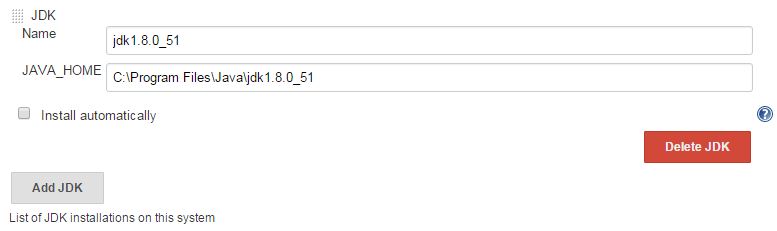
(3)配置JDK
(4)配置Git和GitHub
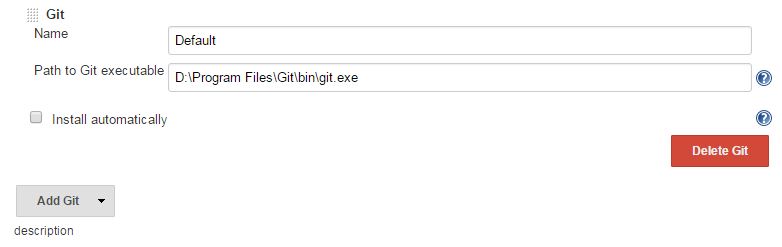
(5)配置MSBuild
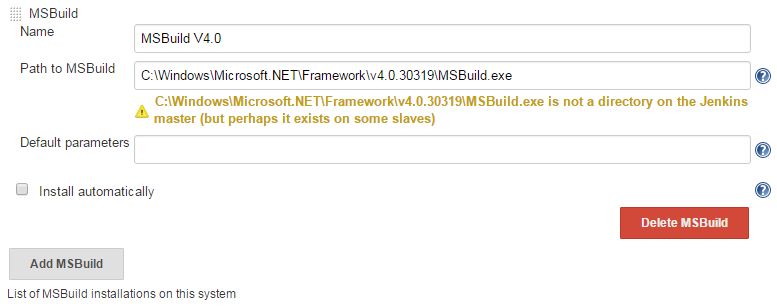
这个MSBuild是我编译DotNet程序用的,如果编译其他的(如C++程序),可点击Add MSBuild增加相应的MSBuild。
注意:如果电脑上未安装,可从其他电脑上拷贝一个。
(6)配置Extended E-mail Notification
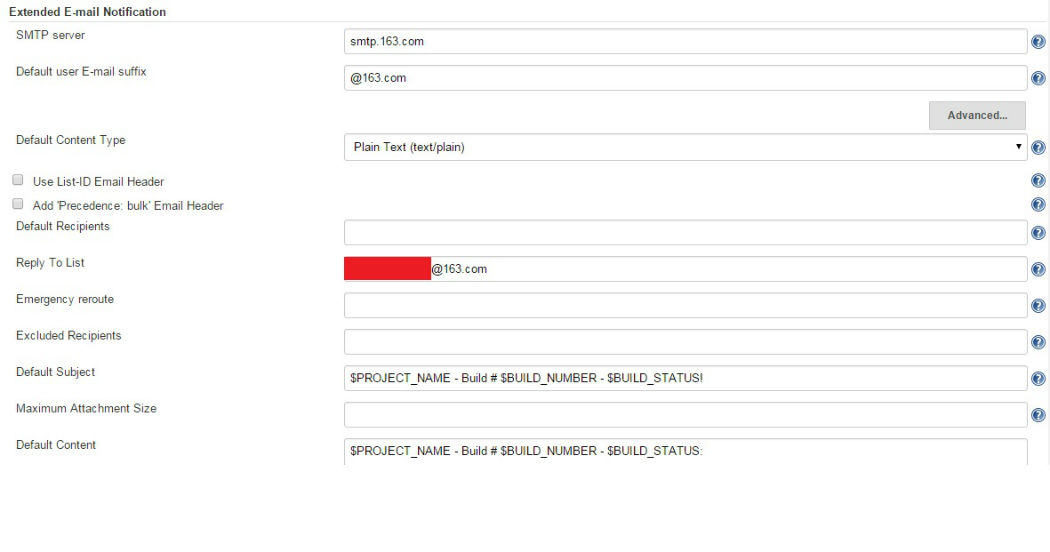
问题:这样设置后还是出现“邮件发送失败”,如果哪位解决了,还请告知,谢谢
Jenkins构建项目
(1)新建项目
在Jenkins首页点击New Item,Item Name:JenkinsTest,选择freestyle Project,OK
(2)常规设置
勾选GitHub Project,输入Project url,如我的是“https://github.com/GaoHongchen/WinFormGit.git/”
(3)设置Source Code Management
在Source Code Management项中,选择Git,填写Repository URL:https://github.com/GaoHongchen/WinFormGit.git,其他默认
(4)设置Build Triggers
根据自己的情况进行勾选,我选的是Build when a change is pushed to GitHub
(5)设置Build
点击Add Build Step,进行选择:
1)Build a Visual Studio Project or solution using Build
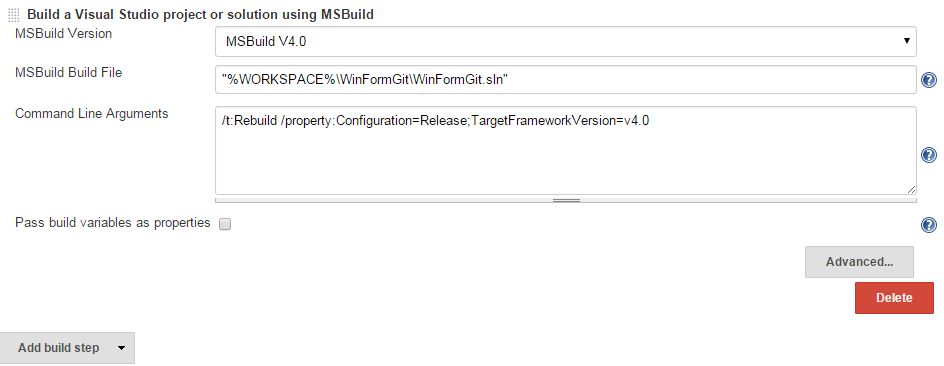
2)Execute Windows batch command
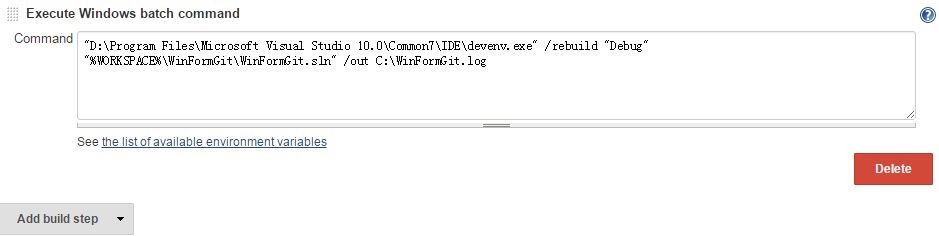
Windows Batch Command如下:
"D:\Program Files\Microsoft Visual Studio 10.0\Common7\IDE\devenv.exe" /rebuild "Debug" "%WORKSPACE%\WinFormGit\WinFormGit.sln" /out C:\WinFormGit.log
以上两种Build方式殊途同归,本项目中选择一种即可。
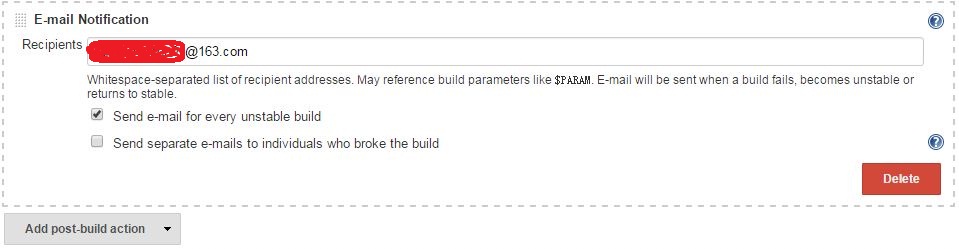
(6)设置Post-build Actions
点击Add post-build Action,我选择EMail notification,如下所示:
(7)开始构建
设置完成后,点击左侧的Build Now,开始进行构建
(8)构建结果
点击Console Output,查看构建过程及结果。若构建失败,在此可查看失败原因。
Console Output如下:
Started by user anonymous

Building in workspace D:\Program Files\Jenkins\jobs\JenkinsTest\workspace

 > D:\Program Files\Git\bin\git.exe rev-parse --is-inside-work-tree # timeout=

Fetching changes from the remote Git repository

 > D:\Program Files\Git\bin\git.exe config remote.origin.url https://github.com/GaoHongchen/WinFormGit.git # timeout=10

Fetching upstream changes from https://github.com/GaoHongchen/WinFormGit.git

 > D:\Program Files\Git\bin\git.exe --version # timeout=

 > D:\Program Files\Git\bin\git.exe -c core.askpass=true fetch --tags --progress https://github.com/GaoHongchen/WinFormGit.git +refs/heads/*:refs/remotes/origin/*

 > D:\Program Files\Git\bin\git.exe rev-parse "refs/remotes/origin/master^{commit}" # timeout=

 > D:\Program Files\Git\bin\git.exe rev-parse "refs/remotes/origin/origin/master^{commit}" # timeout=

Checking out Revision 2562db18b228c399d3d0e14f83ce305f09f64be1 (refs/remotes/origin/master)

 > D:\Program Files\Git\bin\git.exe config core.sparsecheckout # timeout=

 > D:\Program Files\Git\bin\git.exe checkout -f 2562db18b228c399d3d0e14f83ce305f09f64be1

 > D:\Program Files\Git\bin\git.exe rev-list 2562db18b228c399d3d0e14f83ce305f09f64be1 # timeout=

Path To MSBuild.exe: C:\Windows\Microsoft.NET\Framework\v4.0.30319\MSBuild.exe

Executing the command cmd.exe /C " C:\Windows\Microsoft.NET\Framework\v4.0.30319\MSBuild.exe /t:Rebuild /property:Configuration=Release;TargetFrameworkVersion=v4.0 "%WORKSPACE%\WinFormGit\WinFormGit.sln" " && exit %%ERRORLEVEL%% from D:\Program Files\Jenkins\jobs\JenkinsTest\workspace

[workspace] $ cmd.exe /C " C:\Windows\Microsoft.NET\Framework\v4.0.30319\MSBuild.exe /t:Rebuild /property:Configuration=Release;TargetFrameworkVersion=v4.0 "%WORKSPACE%\WinFormGit\WinFormGit.sln" " && exit %%ERRORLEVEL%%

Microsoft(R) 生成引擎版本 4.0.30319.17929

[Microsoft .NET Framework 版本 4.0.30319.18052]

版权所有(C) Microsoft Corporation 。保留所有权利。

Building the projects in this solution one at a time. To enable parallel build, please add the "/m" switch.

生成启动时间为 // ::。

项目“D:\Program Files\Jenkins\jobs\JenkinsTest\workspace\WinFormGit\WinFormGit.sln”在节点  上(Rebuild 个目标)。

ValidateSolutionConfiguration:

  正在生成解决方案配置“Release|x86”。

项目“D:\Program Files\Jenkins\jobs\JenkinsTest\workspace\WinFormGit\WinFormGit.sln”()正在节点  上生成“D:\Program Files\Jenkins\jobs\JenkinsTest\workspace\WinFormGit\WinFormGit\WinFormGit.csproj”() (Rebuild 个目标)。

CoreClean:

  正在删除文件“D:\Program Files\Jenkins\jobs\JenkinsTest\workspace\WinFormGit\WinFormGit\bin\Release\WinFormGit.exe”。

  正在删除文件“D:\Program Files\Jenkins\jobs\JenkinsTest\workspace\WinFormGit\WinFormGit\bin\Release\WinFormGit.pdb”。

  正在删除文件“D:\Program Files\Jenkins\jobs\JenkinsTest\workspace\WinFormGit\WinFormGit\obj\x86\Release\WinFormGit.csprojResolveAssemblyReference.cache”。

  正在删除文件“D:\Program Files\Jenkins\jobs\JenkinsTest\workspace\WinFormGit\WinFormGit\obj\x86\Release\WinFormGit.Form1.resources”。

  正在删除文件“D:\Program Files\Jenkins\jobs\JenkinsTest\workspace\WinFormGit\WinFormGit\obj\x86\Release\WinFormGit.Properties.Resources.resources”。

  正在删除文件“D:\Program Files\Jenkins\jobs\JenkinsTest\workspace\WinFormGit\WinFormGit\obj\x86\Release\WinFormGit.csproj.GenerateResource.Cache”。

  正在删除文件“D:\Program Files\Jenkins\jobs\JenkinsTest\workspace\WinFormGit\WinFormGit\obj\x86\Release\WinFormGit.exe”。

  正在删除文件“D:\Program Files\Jenkins\jobs\JenkinsTest\workspace\WinFormGit\WinFormGit\obj\x86\Release\WinFormGit.pdb”。

ResolveAssemblyReferences:

  将生成 TargetFramework 配置文件排除列表。

CoreResGen:

  "c:\Program Files\Microsoft SDKs\Windows\v7.0A\bin\NETFX 4.0 Tools\resgen.exe" /useSourcePath /r:"C:\Program Files\Reference Assemblies\Microsoft\Framework\.NETFramework\v4.0\Profile\Client\Microsoft.CSharp.dll" /r:"C:\Program Files\Reference Assemblies\Microsoft\Framework\.NETFramework\v4.0\Profile\Client\mscorlib.dll" /r:"C:\Program Files\Reference Assemblies\Microsoft\Framework\.NETFramework\v4.0\Profile\Client\System.Core.dll" /r:"C:\Program Files\Reference Assemblies\Microsoft\Framework\.NETFramework\v4.0\Profile\Client\System.Data.DataSetExtensions.dll" /r:"C:\Program Files\Reference Assemblies\Microsoft\Framework\.NETFramework\v4.0\Profile\Client\System.Data.dll" /r:"C:\Program Files\Reference Assemblies\Microsoft\Framework\.NETFramework\v4.0\Profile\Client\System.Deployment.dll" /r:"C:\Program Files\Reference Assemblies\Microsoft\Framework\.NETFramework\v4.0\Profile\Client\System.dll" /r:"C:\Program Files\Reference Assemblies\Microsoft\Framework\.NETFramework\v4.0\Profile\Client\System.Drawing.dll" /r:"C:\Program Files\Reference Assemblies\Microsoft\Framework\.NETFramework\v4.0\Profile\Client\System.Windows.Forms.dll" /r:"C:\Program Files\Reference Assemblies\Microsoft\Framework\.NETFramework\v4.0\Profile\Client\System.Xml.dll" /r:"C:\Program Files\Reference Assemblies\Microsoft\Framework\.NETFramework\v4.0\Profile\Client\System.Xml.Linq.dll" /compile Form1.resx,obj\x86\Release\WinFormGit.Form1.resources Properties\Resources.resx,obj\x86\Release\WinFormGit.Properties.Resources.resources

  正在将资源文件“Form1.resx”处理到“obj\x86\Release\WinFormGit.Form1.resources”中。

  正在将资源文件“Properties\Resources.resx”处理到“obj\x86\Release\WinFormGit.Properties.Resources.resources”中。

GenerateTargetFrameworkMonikerAttribute:

正在跳过目标“GenerateTargetFrameworkMonikerAttribute”,因为所有输出文件相对于输入文件而言都是最新的。

CoreCompile:

  C:\Windows\Microsoft.NET\Framework\v4.0.30319\Csc.exe /noconfig /nowarn:, /nostdlib+ /platform:x86 /errorreport:prompt /warn: /define:TRACE /highentropyva- /reference:"C:\Program Files\Reference Assemblies\Microsoft\Framework\.NETFramework\v4.0\Profile\Client\Microsoft.CSharp.dll" /reference:"C:\Program Files\Reference Assemblies\Microsoft\Framework\.NETFramework\v4.0\Profile\Client\mscorlib.dll" /reference:"C:\Program Files\Reference Assemblies\Microsoft\Framework\.NETFramework\v4.0\Profile\Client\System.Core.dll" /reference:"C:\Program Files\Reference Assemblies\Microsoft\Framework\.NETFramework\v4.0\Profile\Client\System.Data.DataSetExtensions.dll" /reference:"C:\Program Files\Reference Assemblies\Microsoft\Framework\.NETFramework\v4.0\Profile\Client\System.Data.dll" /reference:"C:\Program Files\Reference Assemblies\Microsoft\Framework\.NETFramework\v4.0\Profile\Client\System.Deployment.dll" /reference:"C:\Program Files\Reference Assemblies\Microsoft\Framework\.NETFramework\v4.0\Profile\Client\System.dll" /reference:"C:\Program Files\Reference Assemblies\Microsoft\Framework\.NETFramework\v4.0\Profile\Client\System.Drawing.dll" /reference:"C:\Program Files\Reference Assemblies\Microsoft\Framework\.NETFramework\v4.0\Profile\Client\System.Windows.Forms.dll" /reference:"C:\Program Files\Reference Assemblies\Microsoft\Framework\.NETFramework\v4.0\Profile\Client\System.Xml.dll" /reference:"C:\Program Files\Reference Assemblies\Microsoft\Framework\.NETFramework\v4.0\Profile\Client\System.Xml.Linq.dll" /debug:pdbonly /filealign: /optimize+ /out:obj\x86\Release\WinFormGit.exe /resource:obj\x86\Release\WinFormGit.Form1.resources /resource:obj\x86\Release\WinFormGit.Properties.Resources.resources /target:winexe /utf8output Form1.cs Form1.Designer.cs Program.cs Properties\AssemblyInfo.cs Properties\Resources.Designer.cs Properties\Settings.Designer.cs "C:\Windows\TEMP\.NETFramework,Version=v4.0,Profile=Client.AssemblyAttributes.cs"

CopyFilesToOutputDirectory:

  正在将文件从“obj\x86\Release\WinFormGit.exe”复制到“bin\Release\WinFormGit.exe”。

  WinFormGit -> D:\Program Files\Jenkins\jobs\JenkinsTest\workspace\WinFormGit\WinFormGit\bin\Release\WinFormGit.exe

  正在将文件从“obj\x86\Release\WinFormGit.pdb”复制到“bin\Release\WinFormGit.pdb”。

已完成生成项目“D:\Program Files\Jenkins\jobs\JenkinsTest\workspace\WinFormGit\WinFormGit\WinFormGit.csproj”(Rebuild 个目标)的操作。

已完成生成项目“D:\Program Files\Jenkins\jobs\JenkinsTest\workspace\WinFormGit\WinFormGit.sln”(Rebuild 个目标)的操作。

已成功生成。

     个警告

     个错误

已用时间 ::00.47

Finished: SUCCESS
Console Output
最终,项目构建状态如下:

为了配置好Jenkins,我可是构建了12次啊。虽然花费了不少时间,但学会了用Jenkins持续集成,这还是令人高兴的,哈哈。。。
持续集成工具Jenkins学习总结的更多相关文章
- 持续集成工具jenkins的使用
jenkins类似于Hadson,是一款持续集成工具.使用jenkins完成自动化部署的表现为:当开发人员向版本库提交新的代码后,应用服务器上自动部署,用户或测试人员使用的马上就是最新的应用程序.搭建 ...
- 持续集成工具Jenkins安装、部署、使用
本文介绍jenkins,利用其做项目发布与持续集成交付工具. 一.Jenkins是什么? Jenkins是基于Java开发的一种持续集成工具,用于监控持续重复的工作,功能包括: 1.持续的软件版本发布 ...
- 轻松搭建持续集成工具jenkins
1.Jenkins介绍1)什么是持续集成随着软件开发复杂度的不断提高,团队开发成员间如何更好地协同工作以确保软件开发的质量已经慢慢成为开发过程中不可回避的问题.尤其是近些年来,敏捷(Agile) 在软 ...
- 持续集成工具——Jenkins
一.jenkins简介 1.持续集成工具 2.基于JAVA环境 二.环境搭建 1.安装JDK 2.安装配置git 3.安装配置tomcat Tomcat是针对Java的一个开源中间件服务器(容器),基 ...
- 持续集成工具-Jenkins 使用介绍
Jenkins 是一个可扩展的持续集成引擎,可以为我们提供代码自动编译.打包和发布工作,减少部署成本. 一.安装与启动 Jenkins 提供了多种便捷的安装方式,比较推荐使用执行 war 包的方式. ...
- linux-centos下持续集成工具jenkins部署使用教程
centos下准备工作: 1.安装jdk环境 2.安装maven环境(用于构建项目) 3.git客户端(用于拉取源码) 此外码云还要准备一份java源码(springboot项目) 一.安装jenki ...
- 【Gerrit】持续集成工具Jenkins的安装配置与使用过程中遇到的问题整理
1.下载war包 https://jenkins.io/download/ 2.安装 java -jar jenkins.war Error: Feb 21, 2019 2:17:25 AM wins ...
- 持续集成工具之jenkins+sonarqube做代码扫描
上一篇我们主要聊了下代码质量管理平台sonarqube的安装部署以及它的工作方式做了简单的描述和代码扫描演示:回顾请参考https://www.cnblogs.com/qiuhom-1874/p/13 ...
- 【持续集成】jenkins安装部署从git获取代码
一:持续集成的概念: 1.1:总体的概括 持续集成Continuous Integration 持续交付Continuous Delivery 持续部署Continuous Deployment 1. ...
随机推荐
- Android开发--Socket通信
一.Socket通信简介 Android与服务器的通信方式主要有两种,一是Http通信,一是Socket通信.两者的最大差异在于,http连接使用的是"请求-响应方式",即在请求时 ...
- 1.mysql基础之 php 连接
1.连接数据库 $db=@mysql_connect('DB_HOST','DB_USER','DB_PASS') or die("Unable to connect"); DB_ ...
- mongodb ubuntu下自启动
个人测试开发的时经常会采用shell 启动mongodb,当进入项目团队开发测试时,必须让mongodb可以随系统自启动. 1.编写启动命令 sudo vim /etc/rc/local 1-1 mo ...
- char wchar 互转 多字符 宽字符 的N种方式
1: 用 CString 如果没有mfc 可以用 ATL 中的 CString #include <atlstr.h> CStringA v1 = "111&quo ...
- NRF51822之IIC(MEMS_LIS2DH12)
在上篇介绍了OLED的II以写操作为主,没有进行读取操作.所以在现再补充读取的操作. 我在此以LIS2DH为例子 uint8_t temp; lis2dh_read_registers(LIS2DH_ ...
- 利用循环播放dataurl的视频来防止锁屏:NoSleep.js
mark下. 地址:http://www.open-open.com/lib/view/open1430796889882.html
- 在Windows和Linux上安装paramiko模块以及easy_install的安装方法
一.paramiko模块有什么用? paramiko是用python语言写的一个模块,遵循SSH2协议,支持以加密和认证的方式,进行远程服务器的连接.由于使用的是python这样的能够跨平台运行的语言 ...
- ajaxfileupload.js的简单使用
上传文件 未选择任何文件 引入 <script src="../javaScript/ajaxfileupload.js"></script> <bu ...
- Linux课程实践一:Linux基础实践(SSH)
一.SSH服务 1. 安装SSH (1)查看是否已经安装过ssh服务 rpm -qa |grep ssh (2)进行安装 sudo apt-get install openssh-server Ubu ...
- 集合的概念 Stack和Queue Dictionary ArrayList和List<T>方法及用法
Stack和stack<T>方法一样// 管理方式: 后进先出 LIFO 栈// Stack<string> s=new Stack<string>();//(放一 ...