SpringCloud——eureka集群
目的:
第一种普通方式
第二种方式骚操作
Eureka自我保护机制
Eureka集群搭建
说的通俗易懂一点就是,同一个项目部署在多个服务器上。
当注册中心扛不住高并发的时候,这时候 要用集群来扛;
今天介绍搭建的两种方式:
第一种方式普通方式:
在上篇博客的基础上再构建两个项目,而这两个项目的配置又不能都是本地,开3个虚拟机又太麻烦,所以我们直接配置本机hosts来实现本机的域名映射
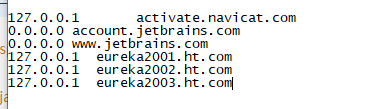
进入你的系统文件:C:\Windows\System32\drivers\etc 找到hosts文件,然后加上你的域名映射,后面在yml文件中配置
127.0.0.1  eureka2001.ht.com

127.0.0.1  eureka2002.ht.com

127.0.0.1  eureka2003.ht.com
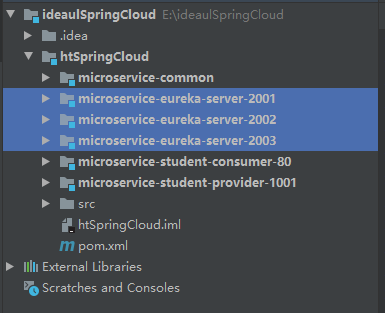
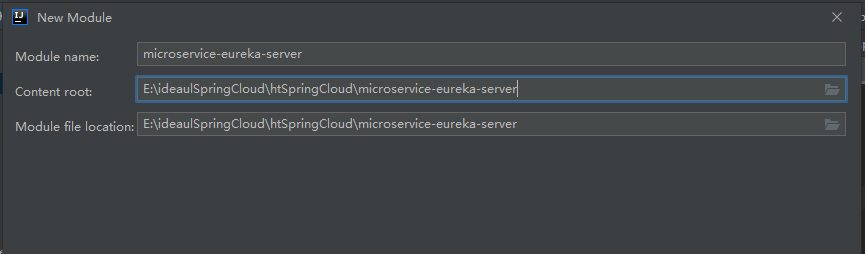
创建三个POM依赖相同的Springboot项目
microservice-eureka-server-2001
microservice-eureka-server-2002
microservice-eureka-server-2003
pom依赖
<?xml version="1.0" encoding="UTF-8"?>

<project xmlns="http://maven.apache.org/POM/4.0.0" xmlns:xsi="http://www.w3.org/2001/XMLSchema-instance"

         xsi:schemaLocation="http://maven.apache.org/POM/4.0.0 https://maven.apache.org/xsd/maven-4.0.0.xsd">

    <modelVersion>4.0.0</modelVersion>

    <parent>

        <groupId>com.ht</groupId>

        <artifactId>htSpringCloud</artifactId>

        <version>1.0-SNAPSHOT</version>

    </parent>

    <artifactId>microservice-eureka-server-2003</artifactId>

    <properties>

        <java.version>1.8</java.version>

    </properties>

    <dependencies>

        <dependency>

            <groupId>org.springframework.cloud</groupId>

            <artifactId>spring-cloud-starter-eureka-server</artifactId>

        </dependency>

        <dependency>

            <groupId>org.springframework.boot</groupId>

            <artifactId>spring-boot-starter-test</artifactId>

            <scope>test</scope>

        </dependency>

        <!--  修改后立即生效,热部署  -->

        <dependency>

            <groupId>org.springframework</groupId>

            <artifactId>springloaded</artifactId>

        </dependency>

        <dependency>

            <groupId>org.springframework.boot</groupId>

            <artifactId>spring-boot-devtools</artifactId>

        </dependency>

    </dependencies>

    <build>

        <plugins>

            <plugin>

                <groupId>org.springframework.boot</groupId>

                <artifactId>spring-boot-maven-plugin</artifactId>

            </plugin>

        </plugins>

    </build>

</project>
第二步配置yml文件
microservice-eureka-server-2001
server:

  port: 2001

  context-path: /

eureka:

  instance:

    # 单机 hostname: localhost #eureka注册中心实例名称

    hostname: eureka2001.ht.com # 集群

  client:

    register-with-eureka: false     #false 由于该应用为注册中心,所以设置为false,代表不向注册中心注册自己。

    fetch-registry: false     #false 由于注册中心的职责就是维护服务实例,它并不需要去检索服务,所以也设置为false

    service-url:

      defaultZone: http://eureka2002.ht.com:2002/eureka/,http://eureka2003.ht.com:2003/eureka/ # 集群
microservice-eureka-server-2002
server:

  port: 2002

  context-path: /

eureka:

  instance:

    # 单机 hostname: localhost #eureka注册中心实例名称

    hostname: eureka2002.ht.com # 集群

  client:

    register-with-eureka: false     #false 由于该应用为注册中心,所以设置为false,代表不向注册中心注册自己。

    fetch-registry: false     #false 由于注册中心的职责就是维护服务实例,它并不需要去检索服务,所以也设置为false

    service-url:

      defaultZone: http://eureka2001.ht.com:2001/eureka/,http://eureka2003.ht.com:2003/eureka/ # 集群

      #单机defaultZone: http://${eureka.instance.hostname}:${server.port}/eureka/       #设置与Eureka注册中心交互的地址,查询服务和注册服务用到
microservice-eureka-server-2003
server:

  port: 2003

  context-path: /

eureka:

  instance:

    # 单机 hostname: localhost #eureka注册中心实例名称

    hostname: eureka2003.ht.com # 集群

  client:

    register-with-eureka: false     #false 由于该应用为注册中心,所以设置为false,代表不向注册中心注册自己。

    fetch-registry: false     #false 由于注册中心的职责就是维护服务实例,它并不需要去检索服务,所以也设置为false

    service-url:

      defaultZone: http://eureka2001.ht.com:2001/eureka/,http://eureka2002.ht.com:2002/eureka/ # 集群

      #单机defaultZone: http://${eureka.instance.hostname}:${server.port}/eureka/       #设置与Eureka注册中心交互的地址,查询服务和注册服务用到
给服务提供者修改的application.yml重新配置eureka
server:

  port: 1001

  context-path: /

spring:

  datasource:

    type: com.alibaba.druid.pool.DruidDataSource

    driver-class-name: com.mysql.jdbc.Driver

    url: jdbc:mysql://localhost:3306/test?useUnicode=true&characterEncoding=utf8

    username: root

    password: root

  jpa:

    hibernate:

      ddl-auto: update

    show-sql: true

eureka:

  instance:

    #eureka客户端主机实例名称

    hostname: localhost

    #客户端服务名

    appname: microservice-student

    #客户端实例名称

    instance-id: microservice-student:1001

    #显示IP

    prefer-ip-address: true

  client:

    service-url:

      defaultZone: http://eureka2001.ht.com:2001/eureka/,http://eureka2002.ht.com:2002/eureka/,http://eureka2003.ht.com:2003/eureka/

info:

  groupId: com.ht.htSpringCloud

  artifactId: microservice-student-provider-1001

  version: 1.0-SNAPSHOT

  userName: http://ht.com

  phone: 123456
记得在每个启动类加上注解@EnableEurekaServer
运行你自己所配置的文件路径
127.0.0.1 eureka2001.ht.com
127.0.0.1 eureka2002.ht.com
127.0.0.1 eureka2003.ht.com

第二种方式骚操作
上面eureka服务搭建,除了yml文件不一样,其他文件都一样,那么我们有什么办法能够将多个eureka服务集合到一个工程中去呢?
创建一个microservice-eureka-server(三合一)子工程
Pom依赖
<?xml version="1.0" encoding="UTF-8"?>

<project xmlns="http://maven.apache.org/POM/4.0.0" xmlns:xsi="http://www.w3.org/2001/XMLSchema-instance"

         xsi:schemaLocation="http://maven.apache.org/POM/4.0.0 https://maven.apache.org/xsd/maven-4.0.0.xsd">

    <modelVersion>4.0.0</modelVersion>

    <parent>

        <groupId>com.ht</groupId>

        <artifactId>htSpringCloud</artifactId>

        <version>1.0-SNAPSHOT</version>

    </parent>

    <artifactId>microservice-eureka-server</artifactId>

    <properties>

        <java.version>1.8</java.version>

    </properties>

    <dependencies>

        <dependency>

            <groupId>org.springframework.cloud</groupId>

            <artifactId>spring-cloud-starter-eureka-server</artifactId>

        </dependency>

        <dependency>

            <groupId>org.springframework.boot</groupId>

            <artifactId>spring-boot-starter-test</artifactId>

            <scope>test</scope>

        </dependency>

        <!-- 修改后立即生效,热部署 -->

        <dependency>

            <groupId>org.springframework</groupId>

            <artifactId>springloaded</artifactId>

        </dependency>

        <dependency>

            <groupId>org.springframework.boot</groupId>

            <artifactId>spring-boot-devtools</artifactId>

        </dependency>

    </dependencies>

    <build>

        <plugins>

            <plugin>

                <groupId>org.springframework.boot</groupId>

                <artifactId>spring-boot-maven-plugin</artifactId>

            </plugin>

        </plugins>

    </build>

</project>
配置yml文件
---

server:

  port: 2001

  context-path: /

eureka:

  instance:

    hostname: eureka2001.ht.com

  client:

    register-with-eureka: false

    fetch-registry: false

    service-url:

      defaultZone: http://eureka2002.ht.com:2002/eureka/,http://eureka2003.ht.com:2003/eureka/

spring:

  profiles: eureka2001

---

server:

  port: 2002

  context-path: /

eureka:

  instance:

    hostname: eureka2002.ht.com

  client:

    register-with-eureka: false

    fetch-registry: false

    service-url:

      defaultZone: http://eureka2001.ht.com:2001/eureka/,http://eureka2003.ht.com:2003/eureka/

spring:

  profiles: eureka2002

---

server:

  port: 2003

  context-path: /

eureka:

  instance:

    hostname: eureka2003.ht.com

  client:

    register-with-eureka: false

    fetch-registry: false

    service-url:

      defaultZone: http://eureka2001.ht.com:2001/eureka/,http://eureka2002.ht.com:2002/eureka/

spring:

  profiles: eureka2003
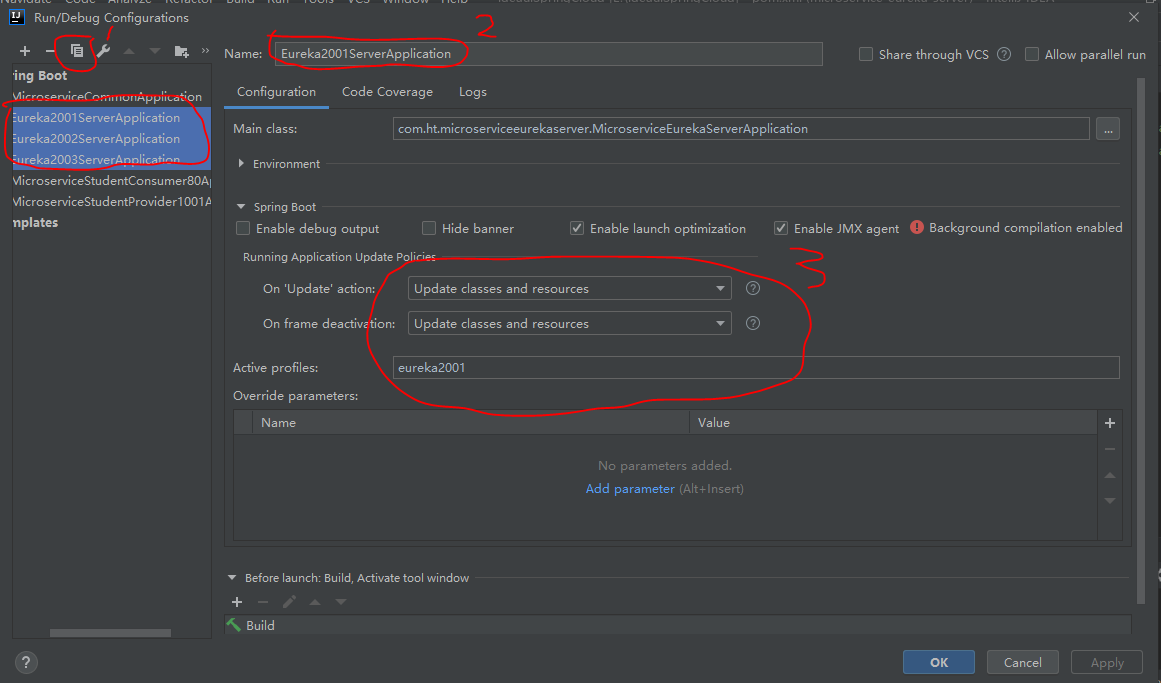
记得在启动类上添加@EnableEurekaServer
package com.ht.microserviceeurekaserver;

import org.springframework.boot.SpringApplication;

import org.springframework.boot.autoconfigure.SpringBootApplication;

import org.springframework.cloud.netflix.eureka.server.EnableEurekaServer;

@EnableEurekaServer

@SpringBootApplication

public class MicroserviceEurekaServerApplication {

    public static void main(String[] args) {

        SpringApplication.run(MicroserviceEurekaServerApplication.class, args);

    }

}
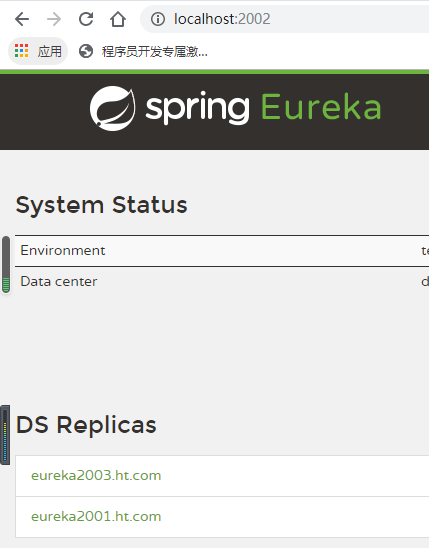
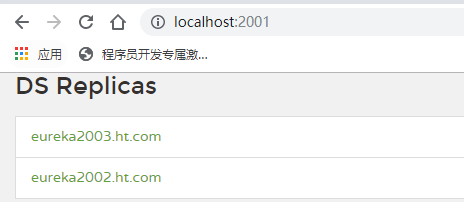
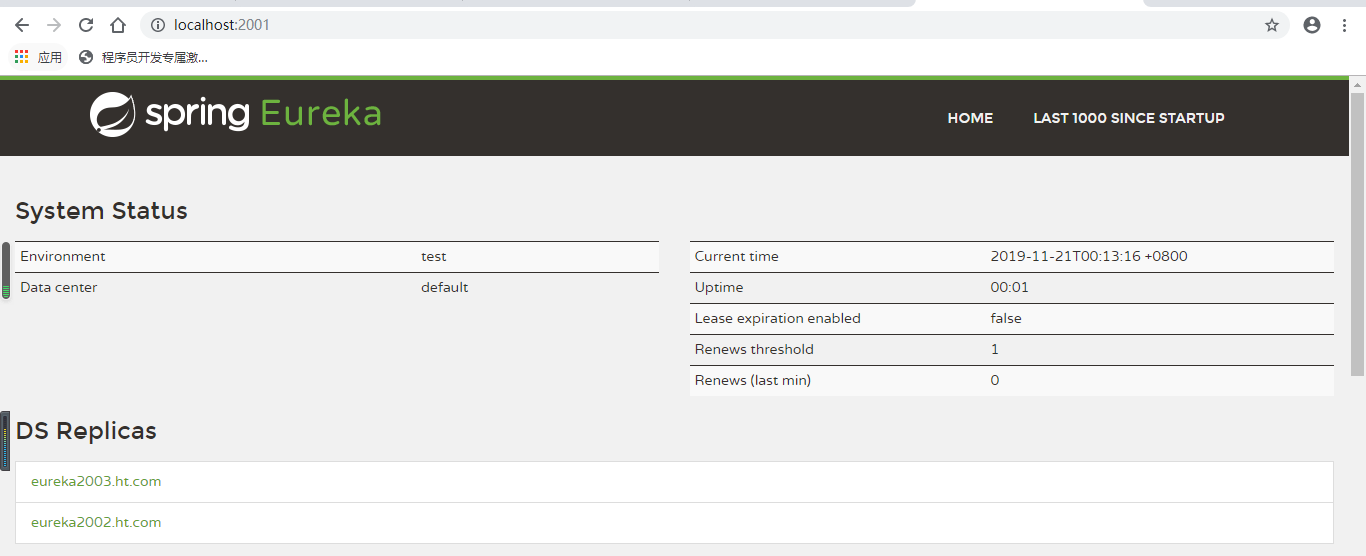
效果:
Eureka自我保护机制
如果在服务注册中心注册过的服务提供者突然失去了联系的话,服务注册中心不会立即注销掉该服务提供者的信息,而是会等个90秒再注销。
这样就使得Eureka集群更加的健壮和稳定

谢谢观看!
SpringCloud——eureka集群的更多相关文章
- SpringCloud之Eureka集群
前面我们介绍了SpringCloud注册中心Eureka,但是存在一个单点故障的问题,一个注册中心远远不能满足实际的生产环境,现在我们介绍一下如何搭建一个Eureka集群. 一:集群环境搭建 我们先建 ...
- springcloud费话之Eureka集群
目录: springcloud费话之Eureka基础 springcloud费话之Eureka集群 springcloud费话之Eureka服务访问(restTemplate) springcloud ...
- 三(2)、springcloud之Eureka集群配置
1)原理说明** 服务启动后向Eureka注册,Eureka Server会将注册信息向其他Eureka Server进行同步,当服务消费者要调用服务提供者,则向服务注册中心获取服务提供者地址,然后会 ...
- SpringCloud学习之—Eureka集群搭建
Eureka集群的搭建 上次说过了在SpringCloud应用中使用Eureka注册中心,用来对服务提供者进行服务注册与发现,但同时,它也是一个"微服务",单个应用使用空间有限,因 ...
- F版本SpringCloud 5—Eureka集群和自我保护机制
源码地址:https://gitee.com/bingqilinpeishenme/Java-Tutorials 前言 上篇文章中,通过代码搭建了Eureka注册中心和客户端,是Eureka的简单应用 ...
- SpringCloud学习之搭建eureka集群,手把手教学,新手教程
一.为什么需要集群 上一篇文章讲解了如何搭建单个节点的eureka,这篇讲解如何搭建eureka集群,这里的集群还是本地不同的端口执行三个eureka,因为条件不要允许,没有三台电脑,所以大家将就一下 ...
- 基于dns搭建eureka集群
eureka集群方案: 1.通常我们部署的eureka节点多于两个,根据实际需求,只需要将相邻节点进行相互注册(eureka节点形成环状),就达到了高可用性集群,任何一个eureka节点挂掉不会受到影 ...
- SpringCloud实现集群和负载均衡
Spring cloud是一个基于Spring Boot实现的服务治理工具包,在微服务架构中用于管理和协调服务的. 组成部分 spingcloud的五大神兽 服务发现——Netflix Eureka ...
- eureka集群高可用配置
譬如eureka.client.register-with-eureka和fetch-registry是否要配置,配不配区别在哪里:eureka的客户端添加service-url时,是不是需要把所有的 ...
随机推荐
- circus docker image web 运行异常问题的解决
经过查看官方文档,因为我使用的是python 较高版本,存在兼容问题,解决方法 修改基础镜像版本 代码如下: FROM python:2.7-slim-stretch LABEL AUTHOR=&qu ...
- Educational Codeforces Round 67
Educational Codeforces Round 67 CF1187B Letters Shop 二分 https://codeforces.com/contest/1187/submissi ...
- GDOI2018 小学生图论题 [NTT]
并没有传送门qwq 思路 首先要知道一个结论(或者说是一个套路):一个竞赛图缩点之后必定是一条链. 那么强联通分量的个数,就是这条链的边数+1. 考虑一条边什么时候会出现:当且仅当点集可以被分成\(S ...
- hotspot编译
"AA=="1",==", /usr/bin/make -s VERBOSE="-s" LOG_LEVEL="warn" ...
- Spring 事务模板方法设计模式
接上一篇文章 上一篇讲到了doGetTransaction方法 一.模板方法设计模式 这里涉及到了一个经典的设计模式:模板方法 如下图: AbstractPlatformTransactionMana ...
- Python3之logging模块浅析
Python3之logging模块浅析 目录 Python3之logging模块浅析 简单用法 日志与控制台同时输出 一个同时输出到屏幕.文件的完成例子 日志文件截取 日志重复打印问题解决 问题分 ...
- Python3教程—很经典可以快速上手
原文地址:https://www.runoob.com/python3/python3-tutorial.html Python 3 教程 Python 的 3.0 版本,常被称为 Python 30 ...
- Nginx location wildcard
Module ngx_http_core_modulehttps://nginx.org/en/docs/http/ngx_http_core_module.html#location locatio ...
- WdatePicker 时间插件
1.下载地址:链接:https://pan.baidu.com/s/1ggusfZX 密码:gu22 常用法: <input type="text" class=" ...
- react ui 参考网站
react.semantic-ui.com react官方中文网址 https://zh-hans.reactjs.org/ es6标准入门 nodejs官网文档 nodejs.org https:/ ...