
vue-element-admin 实现动态路由(从后台查询出菜单列表绑定)
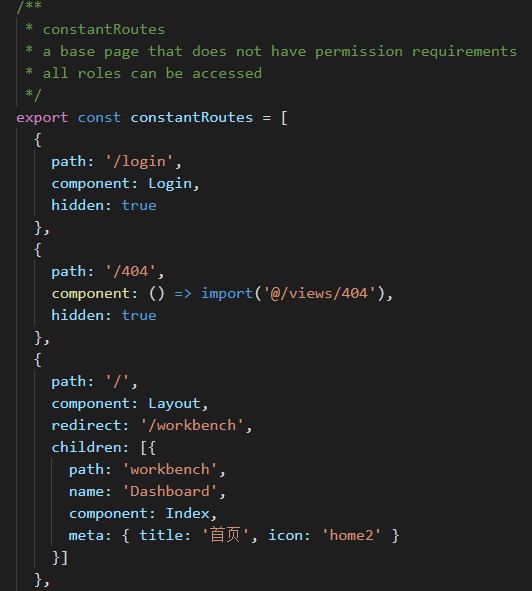
1. 在路由实例中保留基础路由
router/index.js中只需要保留基础路由,其他的都删了
2. 获取用户菜单,并保存到Vuex中
stroe/modules/user.js中,有个getInfo方法查询用户基本信息,返回了用户的菜单列表
// get user info

  getInfo({ commit, state }) {

    return new Promise((resolve, reject) => {

      getInfo(state.token).then(response => {

        const { data } = response

        if (!data) {

          reject('Verification failed, please Login again.')

        }

        console.log(data)

        const menus =

        [{

          path: '/books',

          component: 'Layout',

          children: [{

            path: 'index',

            name: 'AddressBook',

            component: 'workbench/addressbook',

            meta: { title: '通讯录', icon: 'company' }

          }]

        },

        {

          path: '/systool',

          component: 'Layout',

          redirect: '/systool/coder',

          name: 'SysTool',

          meta: { title: '实验室', icon: 'example' },

          children: [

            {

              path: 'calendar',

              name: 'Calendar',

              component: 'workbench/calendar',

              meta: { title: '日程', icon: 'table' }

            }

          ]

        }]

        const { name, avatar, companyName, employeeid } = data

        commit('SET_NAME', name)

        commit('SET_AVATAR', avatar)

        commit('SET_CMPNAME', companyName)

        commit('SET_USERID', employeeid)

        commit('SET_MENUS', menus)

        resolve(data)

      }).catch(error => {

        reject(error)

      })

    })

  }
user.js
const getters = {

  sidebar: state => state.app.sidebar,

  device: state => state.app.device,

  token: state => state.user.token,

  avatar: state => state.user.avatar,

  name: state => state.user.name,

  cmpname: state => state.user.cmpname,

  userid: state => state.user.userid,

  menus: state => state.user.menus

}

export default getters
getter.js
3.动态生成权限路由(核心)
根据环境配置导入组件,在vue中,将菜单路径作为参数,实现路由地址的注入
在 src/router 文件夹下,建立两个文件,各只需添加一行代码, 定义导入方法
src/router/_import_development.js

//开发环境导入组件

module.exports = file => require('@/views' + file + '.vue').default // vue-loader at least v13.0.0+


---------------------------------------------------------------------

src/router/_import_production.js

//生产环境导入组件

module.exports = file => () => import('@/views' + file + '.vue')
A,组件导入 —— _import
//获取组件的方法

const _import = require('./router/_import_' + process.env.NODE_ENV)

// .......

//导入路径下的组件

route.component = _import(route.path)
B,在路由钩子中,过滤路由,并生成路由
核心在src目录下的permission.js中,router.beforeEach路由钩子
 import router from './router'

 import store from './store'

 import {

   Message

 } from 'element-ui'

 import NProgress from 'nprogress' // progress bar

 import 'nprogress/nprogress.css' // progress bar style

 import {

   getToken

 } from '@/utils/auth' // get token from cookie

 import getPageTitle from '@/utils/get-page-title'

 import Layout from '@/layout'

 const _import = require('./router/_import_' + process.env.NODE_ENV) // 获取组件的方法

 NProgress.configure({

   showSpinner: false

 }) // NProgress Configuration

 const whiteList = ['/login'] // no redirect whitelist

 router.beforeEach(async(to, from, next) => {

   // start progress bar

   NProgress.start()

   // set page title

   document.title = getPageTitle(to.meta.title)

   // determine whether the user has logged in

   const hasToken = getToken()

   if (hasToken) {

     if (to.path === '/login') {

       // if is logged in, redirect to the home page

       next({

         path: '/'

       })

       NProgress.done()

     } else {

       const hasGetUserInfo = store.getters.name

       if (hasGetUserInfo) {

         next()

       } else {

         try {

           // get user info

           await store.dispatch('user/getInfo')

           if (store.getters.menus.length < 1) {

             global.antRouter = []

             next()

           }

           const menus = filterAsyncRouter(store.getters.menus) // 1.过滤路由

           router.addRoutes(menus) // 2.动态添加路由

           global.antRouter = menus // 3.将路由数据传递给全局变量,做侧边栏菜单渲染工作

           next({

             ...to,

             replace: true

           }) // hack方法 确保addRoutes已完成 ,set the replace

         } catch (error) {

           // remove token and go to login page to re-login

           await store.dispatch('user/resetToken')

           Message.error(error || 'Has Error')

           next(`/login?redirect=${to.path}`)

           NProgress.done()

         }

       }

     }

   } else {

     /* has no token*/

     if (whiteList.indexOf(to.path) !== -1) {

       // in the free login whitelist, go directly

       next()

     } else {

       // other pages that do not have permission to access are redirected to the login page.

       next(`/login?redirect=${to.path}`)

       NProgress.done()

     }

   }

 })

 router.afterEach(() => {

   // finish progress bar

   NProgress.done()

 })

 // 遍历后台传来的路由字符串,转换为组件对象

 function filterAsyncRouter(asyncRouterMap) {

   const accessedRouters = asyncRouterMap.filter(route => {

     if (route.component) {

       if (route.component === 'Layout') {

         route.component = Layout

       } else {

         route.component = _import(route.component) // 导入组件

       }

     }

     if (route.children && route.children.length) {

       route.children = filterAsyncRouter(route.children)

     }

     return true

   })

   return accessedRouters

 }
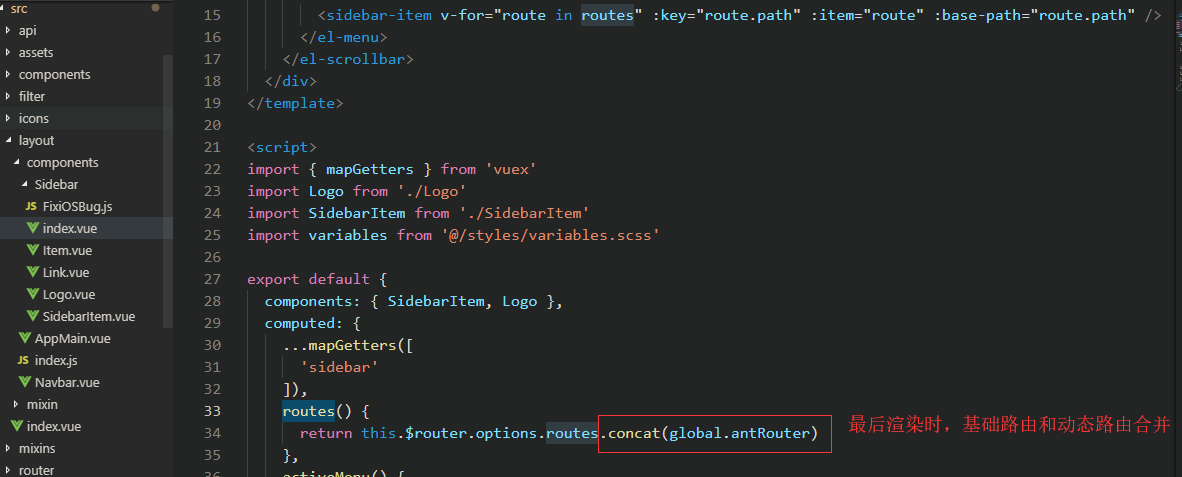
4.最后一步,合并路由
vue-element-admin 实现动态路由(从后台查询出菜单列表绑定)的更多相关文章
- vue管理平台的动态路由(后台传递路由,前端拿到并生成侧边栏)
前端的路由从后台获取,包括权限: 大体步骤包括:路由拦截(钩子函数)---->后台获取路由数据 ----> 保存到本地或vuex中. 在router-->index.js中: rou ...
- 循序渐进VUE+Element 前端应用开发(19)--- 后端查询接口和Vue前端的整合
循序渐进VUE+Element 前端应用开发的系列文章中,前面介绍了系统各个功能的处理实现,本篇随笔从一个主线上介绍前后端开发的整合,让我们从ABP框架后端的查询接口的处理,前端API接口调用的封装, ...
- 在微信框架模块中,基于Vue&Element前端的微信公众号和企业微信的用户绑定
在一个和微信相关的业务管理系统,我们有时候需要和用户的微信账号信息进行绑定,如对公众号.企业微信等账号绑定特定的系统用户,可以进行扫码登录.微信信息发送等操作,用户的绑定主要就是记录公众号用户的ope ...
- Vue | 自定义指令和动态路由实现权限控制
功能概述: 根据后端返回接口,实现路由动态显示 实现按钮(HTML元素)级别权限控制 涉及知识点: 路由守卫 Vuex使用 Vue自定义指令 导航守卫 前端工程采用Github开源项目Vue-elem ...
- Vue.js 中的动态路由
静态路由是不可以传递参数的.需要传递参数得用到动态路由 那么如何将参数作为路由呢? //在参数名前面加上 : ,然后将参数写在路由的 path 内 routes: [ //将页面组件与path指令的路 ...
- vue+element UI以组件递归方式实现多级导航菜单
介绍 这是一个是基于element-UI的导航菜单组件基础上,进行了二次封装的菜单组件,该组件以组件递归的方式,实现了可根据从后端接收到的json菜单数据,动态渲染多级菜单的功能. 使用方法 由于该组 ...
- 循序渐进VUE+Element 前端应用开发(29)--- 高级查询条件的界面设计
在系统模块中的业务列表展示里面,一般我们都会在列表中放置一些查询条件,如果是表字段不多,大多数情况下,放置的条件有十个八个就可以了,如果是字段很多,而这些条件信息也很关键的时候,就可能放置很多条件,但 ...
- vue element Admin - 修改浏览器标签名 + 添加tagView标签 +固定导航头部 + 添加侧边栏Logo
1 .修改浏览器标签名称: 修改浏览器标签名称在文件:\src\settings.js image.png 2 .修改固定头部Header和侧边栏 Logo: image.png 1)侧边栏文 ...
- vue+element项目中动态表格合并
需求:elementui里的table虽然有合并函数(:span-method),单基本都是设置固定值合并.现在有一个树型结构的数据,要求我们将里面的某个list和其他属性一起展开展示,并且list中 ...
随机推荐
- 2019 汇量科技java面试笔试题 (含面试题解析)
本人5年开发经验.18年年底开始跑路找工作,在互联网寒冬下成功拿到阿里巴巴.今日头条.汇量科技等公司offer,岗位是Java后端开发,因为发展原因最终选择去了汇量科技,入职一年时间了,也成为了面 ...
- Vue学习之webpack中使用vue(十七)
一.包的查找规则: 1.在项目根目录中找有没有 node_modules 的文件夹: 2.在 node_modules 中根据包名,找对应的vue 文件夹: 3.在vue 文件夹中,找 一个叫做 pa ...
- 设计的一些kubernetes面试题
公司现在上了一部分的业务至k8s,老实说,我心里很慌,在项目改造中,每天都会遇到很多问题,好友找我出一份k8s面试题,参考了网上的一些,再加上自己公司遇到的一些问题,整理如下: 参考链接:http:/ ...
- Spring boot项目分环境Maven打包,动态配置文件,动态配置项目
Spring boot Maven 项目打包 使用Maven 实现多环境 test dev prod 打包 项目的结构 在下图中可用看出,我们打包时各个环境需要分开,采用 application-环境 ...
- Linux虚拟机安装(rhel 7.4)
Linux虚拟机安装(rhel 7.4) linux 1. 创建虚拟机 1.1. 新建虚拟机 1.2. 启动虚拟机 附录:部分配置 1. 创建虚拟机 1.1. 新建虚拟机 新建虚拟机 典型虚拟机 稍后 ...
- 离线安装docker(RedHat7.4)
离线安装docker(RedHat7.4) docker 1. 下载地址 2. 解压并注册为service 1. 下载地址 官网下载地址:下载 官网文档地址:文档 2. 解压并注册为service 下 ...
- node基础学习——http基础知识-02-http响应数据流
<一> 发送服务器端响应流 在createServer()方法的参数值回调函数或服务器对象的request事件函数中的第二个参数值为一个http.ServerResponse对象,可以利用 ...
- 《TensorFlow2深度学习》学习笔记(四)对笔记二中的模型增加正确率展示
全部代码如下:(红色部分为与笔记二不同之处) #1.Import the neccessary libraries needed import numpy as np import tensorflo ...
- springboot禁用内置Tomcat的不安全请求方法
起因:安全组针对接口测试提出的要求,需要关闭不安全的请求方法,例如put.delete等方法,防止服务端资源被恶意篡改. 用过springMvc都知道可以使用@PostMapping.@GetMapp ...
- PySpark 的背后原理--在Driver端,通过Py4j实现在Python中调用Java的方法.pyspark.executor 端一个Executor上同时运行多少个Task,就会有多少个对应的pyspark.worker进程。
PySpark 的背后原理 Spark主要是由Scala语言开发,为了方便和其他系统集成而不引入scala相关依赖,部分实现使用Java语言开发,例如External Shuffle Service等 ...