Spring Boot Security
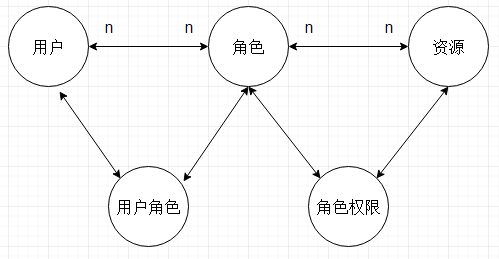
如图,是一种通用的用户权限模型。一般情况下会有5张表,分别是:用户表,角色表,权限表,用户角色关系表,角色权限对应表。
一般,资源分配时是基于角色的(即,资源访问权限赋给角色,用户通过角色进而拥有权限);而访问资源的时候是基于资源权限去进行授权判断的。
Spring Security和Apache Shiro是两个应用比较多的权限管理框架。Spring Security依赖Spring,其功能强大,相对于Shiro而言学习难度稍大一些。
Spring的强大是不言而喻的,可扩展性也很强,强大到用Spring家族的产品只要按照其推荐的做法来就非常非常简单,否则,自己去整合过程可能会很痛苦。
目前,我们项目是基于Spring Boot的,而且Spring Boot的权限管理也是推荐使用Spring Security的,所以再难也是要学习的。
Spring Security简介
Spring Security致力于为Java应用提供认证和授权管理。它是一个强大的,高度自定义的认证和访问控制框架。
具体介绍参见https://docs.spring.io/spring-security/site/docs/5.0.5.RELEASE/reference/htmlsingle/
这句话包括两个关键词:Authentication(认证)和 Authorization(授权,也叫访问控制)
认证是验证用户身份的合法性,而授权是控制你可以做什么。
简单地来说,认证就是你是谁,授权就是你可以做什么。
在开始集成之前,我们先简单了解几个接口:
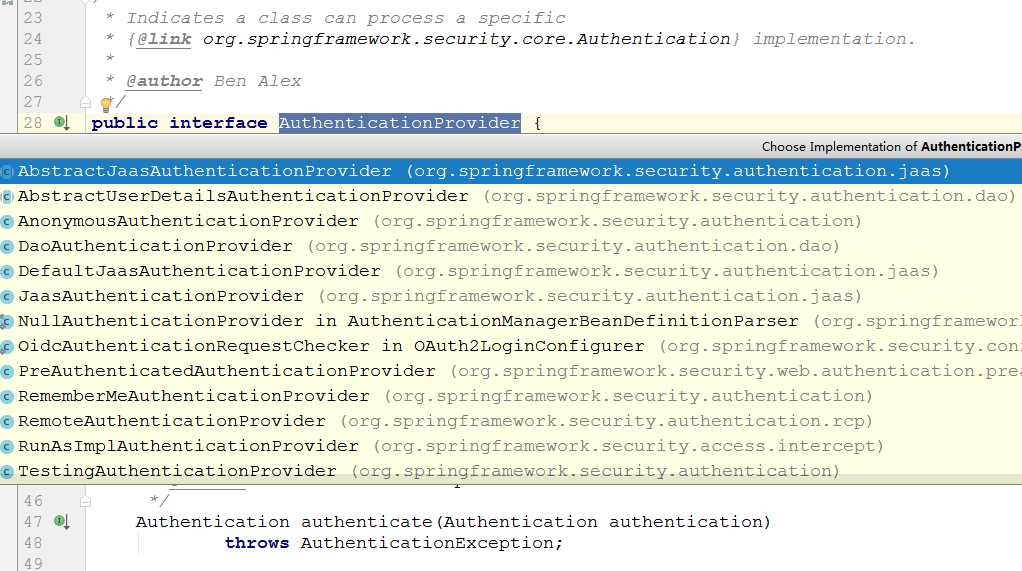
AuthenticationProvider
AuthenticationProvider接口是用于认证的,可以通过实现这个接口来定制我们自己的认证逻辑,它的实现类有很多,默认的是JaasAuthenticationProvider
它的全称是 Java Authentication and Authorization Service (JAAS)
AccessDecisionManager
AccessDecisionManager是用于访问控制的,它决定用户是否可以访问某个资源,实现这个接口可以定制我们自己的授权逻辑。

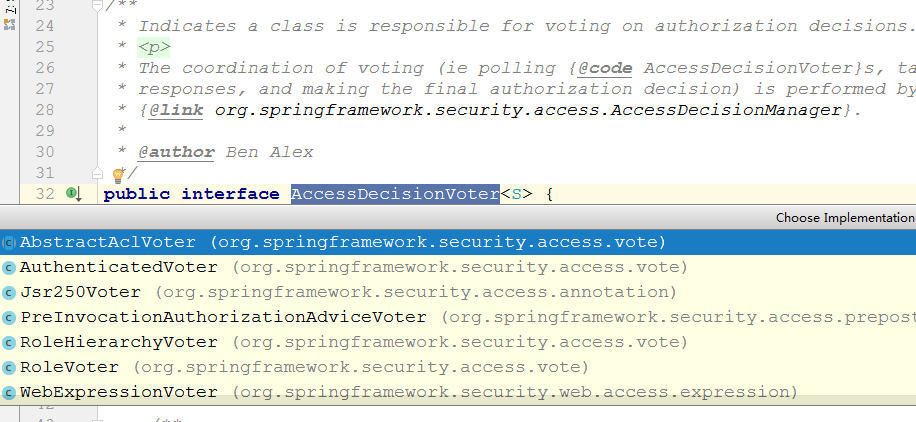
AccessDecisionVoter
AccessDecisionVoter是投票器,在授权的时通过投票的方式来决定用户是否可以访问,这里涉及到投票规则。

UserDetailsService
UserDetailsService是用于加载特定用户信息的,它只有一个接口通过指定的用户名去查询用户。
UserDetails
UserDetails代表用户信息,即主体,相当于Shiro中的Subject。User是它的一个实现。
Spring Boot集成Spring Security
按照官方文档的说法,为了定义我们自己的认证管理,我们可以添加UserDetailsService, AuthenticationProvider, or AuthenticationManager这种类型的Bean。
实现的方式有多种,这里我选择最简单的一种(因为本身我们这里的认证授权也比较简单)
通过定义自己的UserDetailsService从数据库查询用户信息,至于认证的话就用默认的。
Maven依赖
 <?xml version="1.0" encoding="UTF-8"?>

 <project xmlns="http://maven.apache.org/POM/4.0.0" xmlns:xsi="http://www.w3.org/2001/XMLSchema-instance"

     xsi:schemaLocation="http://maven.apache.org/POM/4.0.0 http://maven.apache.org/xsd/maven-4.0.0.xsd">

     <modelVersion>4.0.0</modelVersion>

     <groupId>com.cjs.example</groupId>

     <artifactId>cjs-springsecurity-example</artifactId>

     <version>0.0.1-SNAPSHOT</version>

     <packaging>jar</packaging>

     <name>cjs-springsecurity-example</name>

     <description></description>

     <parent>

         <groupId>org.springframework.boot</groupId>

         <artifactId>spring-boot-starter-parent</artifactId>

         <version>2.0.2.RELEASE</version>

         <relativePath/> <!-- lookup parent from repository -->

     </parent>

     <properties>

         <project.build.sourceEncoding>UTF-8</project.build.sourceEncoding>

         <project.reporting.outputEncoding>UTF-8</project.reporting.outputEncoding>

         <java.version>1.8</java.version>

     </properties>

     <dependencies>

         <dependency>

             <groupId>org.springframework.boot</groupId>

             <artifactId>spring-boot-starter-cache</artifactId>

         </dependency>

         <dependency>

             <groupId>org.springframework.boot</groupId>

             <artifactId>spring-boot-starter-data-redis</artifactId>

         </dependency>

         <dependency>

             <groupId>org.springframework.boot</groupId>

             <artifactId>spring-boot-starter-security</artifactId>

         </dependency>

         <dependency>

             <groupId>org.springframework.boot</groupId>

             <artifactId>spring-boot-starter-thymeleaf</artifactId>

         </dependency>

         <dependency>

             <groupId>org.springframework.boot</groupId>

             <artifactId>spring-boot-starter-web</artifactId>

         </dependency>

         <dependency>

             <groupId>org.thymeleaf.extras</groupId>

             <artifactId>thymeleaf-extras-springsecurity4</artifactId>

             <version>3.0.2.RELEASE</version>

         </dependency>

         <dependency>

             <groupId>org.projectlombok</groupId>

             <artifactId>lombok</artifactId>

             <optional>true</optional>

         </dependency>

         <dependency>

             <groupId>org.springframework.boot</groupId>

             <artifactId>spring-boot-starter-test</artifactId>

             <scope>test</scope>

         </dependency>

         <dependency>

             <groupId>org.springframework.security</groupId>

             <artifactId>spring-security-test</artifactId>

             <scope>test</scope>

         </dependency>

     </dependencies>

     <build>

         <plugins>

             <plugin>

                 <groupId>org.springframework.boot</groupId>

                 <artifactId>spring-boot-maven-plugin</artifactId>

             </plugin>

         </plugins>

     </build>

 </project>
Security配置
 package com.cjs.example.config;

 import com.cjs.example.support.MyUserDetailsService;

 import org.springframework.beans.factory.annotation.Autowired;

 import org.springframework.context.annotation.Bean;

 import org.springframework.context.annotation.Configuration;

 import org.springframework.security.config.annotation.authentication.builders.AuthenticationManagerBuilder;

 import org.springframework.security.config.annotation.method.configuration.EnableGlobalMethodSecurity;

 import org.springframework.security.config.annotation.web.builders.HttpSecurity;

 import org.springframework.security.config.annotation.web.configuration.EnableWebSecurity;

 import org.springframework.security.config.annotation.web.configuration.WebSecurityConfigurerAdapter;

 import org.springframework.security.crypto.bcrypt.BCryptPasswordEncoder;

 import org.springframework.security.crypto.password.PasswordEncoder;

 @Configuration

 @EnableWebSecurity

 @EnableGlobalMethodSecurity(prePostEnabled = true)  //  启用方法级别的权限认证

 public class SecurityConfig extends WebSecurityConfigurerAdapter {

     @Autowired

     private MyUserDetailsService myUserDetailsService;

     @Override

     protected void configure(HttpSecurity http) throws Exception {

         //  允许所有用户访问"/"和"/index.html"

         http.authorizeRequests()

                 .antMatchers("/", "/index.html").permitAll()

                 .anyRequest().authenticated()   // 其他地址的访问均需验证权限

                 .and()

                 .formLogin()

                 .loginPage("/login.html")   //  登录页

                 .failureUrl("/login-error.html").permitAll()

                 .and()

                 .logout()

                 .logoutSuccessUrl("/index.html");

     }

     @Override

     protected void configure(AuthenticationManagerBuilder auth) throws Exception {

         auth.userDetailsService(myUserDetailsService).passwordEncoder(passwordEncoder());

     }

     @Bean

     public PasswordEncoder passwordEncoder() {

         return new BCryptPasswordEncoder();

     }

 }
MyUserDetailsService
 package com.cjs.example.support;

 import com.cjs.example.entity.SysPermission;

 import com.cjs.example.entity.SysRole;

 import com.cjs.example.entity.SysUser;

 import com.cjs.example.service.UserService;

 import org.springframework.beans.factory.annotation.Autowired;

 import org.springframework.security.core.authority.SimpleGrantedAuthority;

 import org.springframework.security.core.userdetails.User;

 import org.springframework.security.core.userdetails.UserDetails;

 import org.springframework.security.core.userdetails.UserDetailsService;

 import org.springframework.security.core.userdetails.UsernameNotFoundException;

 import org.springframework.stereotype.Service;

 import java.util.ArrayList;

 import java.util.List;

 @Service

 public class MyUserDetailsService implements UserDetailsService {

     @Autowired

     private UserService userService;

     /**

      * 授权的时候是对角色授权,而认证的时候应该基于资源,而不是角色,因为资源是不变的,而用户的角色是会变的

      */

     @Override

     public UserDetails loadUserByUsername(String username) throws UsernameNotFoundException {

         SysUser sysUser = userService.getUserByName(username);

         if (null == sysUser) {

             throw new UsernameNotFoundException(username);

         }

         List<SimpleGrantedAuthority> authorities = new ArrayList<>();

         for (SysRole role : sysUser.getRoleList()) {

             for (SysPermission permission : role.getPermissionList()) {

                 authorities.add(new SimpleGrantedAuthority(permission.getCode()));

             }

         }

         return new User(sysUser.getUsername(), sysUser.getPassword(), authorities);

     }

 }
权限分配
 package com.cjs.example.service.impl;

 import com.cjs.example.dao.UserDao;

 import com.cjs.example.entity.SysUser;

 import com.cjs.example.service.UserService;

 import org.springframework.beans.factory.annotation.Autowired;

 import org.springframework.cache.annotation.Cacheable;

 import org.springframework.stereotype.Service;

 @Service

 public class UserServiceImpl implements UserService {

     @Autowired

     private UserDao userDao;

     @Cacheable(cacheNames = "authority", key = "#username")

     @Override

     public SysUser getUserByName(String username) {

         return userDao.selectByName(username);

     }

 }
 package com.cjs.example.dao;

 import com.cjs.example.entity.SysPermission;

 import com.cjs.example.entity.SysRole;

 import com.cjs.example.entity.SysUser;

 import lombok.extern.slf4j.Slf4j;

 import org.springframework.stereotype.Repository;

 import java.util.Arrays;

 @Slf4j

 @Repository

 public class UserDao {

     private SysRole admin = new SysRole("ADMIN", "管理员");

     private SysRole developer = new SysRole("DEVELOPER", "开发者");

     {

         SysPermission p1 = new SysPermission();

         p1.setCode("UserIndex");

         p1.setName("个人中心");

         p1.setUrl("/user/index.html");

         SysPermission p2 = new SysPermission();

         p2.setCode("BookList");

         p2.setName("图书列表");

         p2.setUrl("/book/list");

         SysPermission p3 = new SysPermission();

         p3.setCode("BookAdd");

         p3.setName("添加图书");

         p3.setUrl("/book/add");

         SysPermission p4 = new SysPermission();

         p4.setCode("BookDetail");

         p4.setName("查看图书");

         p4.setUrl("/book/detail");

         admin.setPermissionList(Arrays.asList(p1, p2, p3, p4));

         developer.setPermissionList(Arrays.asList(p1, p2));

     }

     public SysUser selectByName(String username) {

         log.info("从数据库中查询用户");

         if ("zhangsan".equals(username)) {

             SysUser sysUser = new SysUser("zhangsan", "$2a$10$EIfFrWGINQzP.tmtdLd2hurtowwsIEQaPFR9iffw2uSKCOutHnQEm");

             sysUser.setRoleList(Arrays.asList(admin, developer));

             return sysUser;

         }else if ("lisi".equals(username)) {

             SysUser sysUser = new SysUser("lisi", "$2a$10$EIfFrWGINQzP.tmtdLd2hurtowwsIEQaPFR9iffw2uSKCOutHnQEm");

             sysUser.setRoleList(Arrays.asList(developer));

             return sysUser;

         }

         return null;

     }

 }
示例
这里我设计的例子是用户登录成功以后跳到个人中心,然后用户可以可以进入图书列表查看。
用户zhangsan可以查看所有的,而lisi只能查看图书列表,不能添加不能查看详情。
页面设计
LoginController.java
 package com.cjs.example.controller;

 import org.springframework.stereotype.Controller;

 import org.springframework.ui.Model;

 import org.springframework.web.bind.annotation.RequestMapping;

 @Controller

 public class LoginController {

     // Login form

     @RequestMapping("/login.html")

     public String login() {

         return "login.html";

     }

     // Login form with error

     @RequestMapping("/login-error.html")

     public String loginError(Model model) {

         model.addAttribute("loginError", true);

         return "login.html";

     }

 }
BookController.java
package com.cjs.example.controller; import org.springframework.security.access.prepost.PreAuthorize;
import org.springframework.stereotype.Controller;
import org.springframework.web.bind.annotation.GetMapping;
import org.springframework.web.bind.annotation.RequestMapping; @Controller
@RequestMapping("/book")
public class BookController { @PreAuthorize("hasAuthority('BookList')")
@GetMapping("/list.html")
public String list() {
return "book/list";
} @PreAuthorize("hasAuthority('BookAdd')")
@GetMapping("/add.html")
public String add() {
return "book/add";
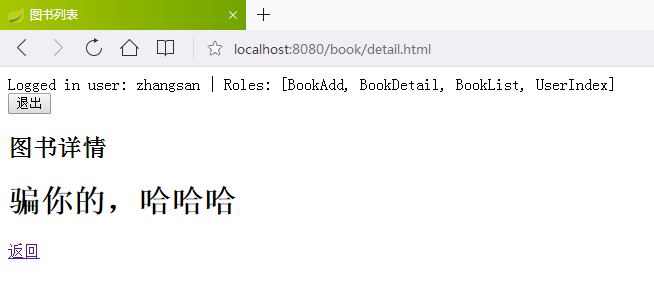
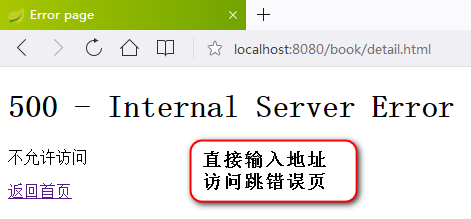
} @PreAuthorize("hasAuthority('BookDetail')")
@GetMapping("/detail.html")
public String detail() {
return "book/detail";
}
}
UserController.java
 package com.cjs.example.controller;

 import com.cjs.example.entity.SysUser;

 import com.cjs.example.service.UserService;

 import org.springframework.beans.factory.annotation.Autowired;

 import org.springframework.security.access.prepost.PreAuthorize;

 import org.springframework.stereotype.Controller;

 import org.springframework.web.bind.annotation.GetMapping;

 import org.springframework.web.bind.annotation.RequestMapping;

 import org.springframework.web.bind.annotation.ResponseBody;

 @Controller

 @RequestMapping("/user")

 public class UserController {

     @Autowired

     private UserService userService;

     /**

      * 个人中心

      */

     @PreAuthorize("hasAuthority('UserIndex')")

     @GetMapping("/index")

     public String index() {

         return "user/index";

     }

     @RequestMapping("/hi")

     @ResponseBody

     public String hi() {

         SysUser sysUser = userService.getUserByName("zhangsan");

         return sysUser.toString();

     }

 }
index.html
 <!DOCTYPE html>

 <html lang="en">

 <head>

     <meta charset="UTF-8">

     <title>首页</title>

 </head>

 <body>

     <h2>这里是首页</h2>

 </body>

 </html>
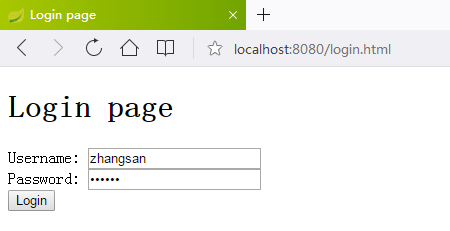
login.html
<!DOCTYPE html>
<html lang="zh" xmlns:th="http://www.thymeleaf.org">
<head>
<meta charset="UTF-8">
<title>Login page</title>
</head>
<body>
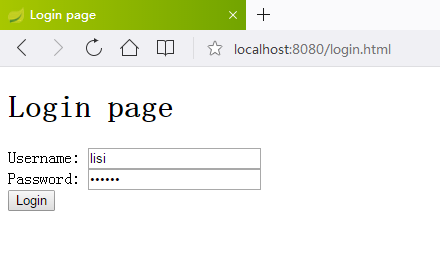
<h1>Login page</h1>
<p th:if="${loginError}" class="error">用户名或密码错误</p>
<form th:action="@{/login.html}" method="post">
<label for="username">Username</label>:
<input type="text" id="username" name="username" autofocus="autofocus" /> <br />
<label for="password">Password</label>:
<input type="password" id="password" name="password" /> <br />
<input type="submit" value="Login" />
</form>
</body>
</html>
/user/index.html
<!DOCTYPE html>
<html lang="zh" xmlns:th="http://www.thymeleaf.org">
<head>
<meta charset="UTF-8">
<title>个人中心</title>
</head>
<body>
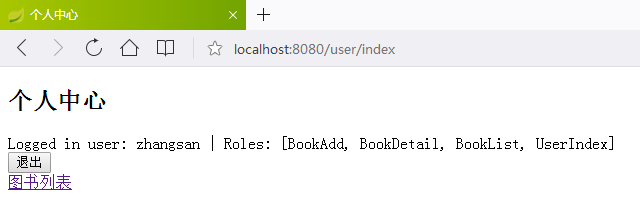
<h2>个人中心</h2>
<div th:insert="~{fragments/header::logout}"></div>
<a href="/book/list.html">图书列表</a>
</body>
</html>
/book/list.html
<!DOCTYPE html>
<html lang="zh" xmlns:th="http://www.thymeleaf.org" xmlns:sec="http://www.thymeleaf.org/thymeleaf-extras-springsecurity4">
<head>
<meta charset="UTF-8">
<title>图书列表</title>
</head>
<body>
<div th:insert="~{fragments/header::logout}"></div>
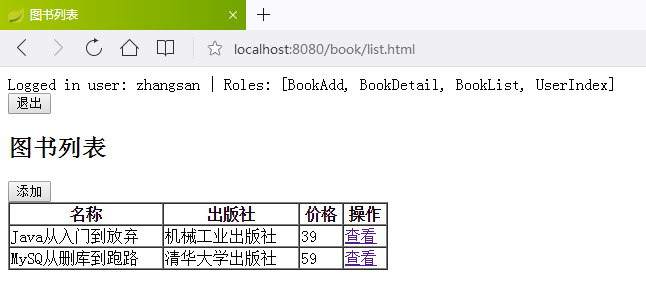
<h2>图书列表</h2>
<div sec:authorize="hasAuthority('BookAdd')">
<button onclick="">添加</button>
</div>
<table border="1" cellspacing="0" style="width: 20%">
<thead>
<tr>
<th>名称</th>
<th>出版社</th>
<th>价格</th>
<th>操作</th>
</tr>
</thead>
<tbody>
<tr>
<td>Java从入门到放弃</td>
<td>机械工业出版社</td>
<td>39</td>
<td><span sec:authorize="hasAuthority('BookDetail')"><a href="/book/detail.html">查看</a></span></td>
</tr>
<tr>
<td>MySQ从删库到跑路</td>
<td>清华大学出版社</td>
<td>59</td>
<td><span sec:authorize="hasAuthority('BookDetail')"><a href="/book/detail.html">查看</a></span></td>
</tr>
</tbody>
</table>
</body>
</html>
header.html
 <!DOCTYPE html>

 <html xmlns:th="http://www.thymeleaf.org" xmlns:sec="http://www.thymeleaf.org/thymeleaf-extras-springsecurity4">

 <body>

 <div th:fragment="logout" class="logout" sec:authorize="isAuthenticated()">

     Logged in user: <span sec:authentication="name"></span> |

     Roles: <span sec:authentication="principal.authorities"></span>

     <div>

         <form action="#" th:action="@{/logout}" method="post">

             <input type="submit" value="退出" />

         </form>

     </div>

 </div>

 </body>

 </html>
错误处理
ErrorController.java
 package com.cjs.example.controller;

 import lombok.extern.slf4j.Slf4j;

 import org.springframework.http.HttpStatus;

 import org.springframework.ui.Model;

 import org.springframework.web.bind.annotation.ControllerAdvice;

 import org.springframework.web.bind.annotation.ExceptionHandler;

 import org.springframework.web.bind.annotation.ResponseStatus;

 @Slf4j

 @ControllerAdvice

 public class ErrorController {

     @ExceptionHandler(Throwable.class)

     @ResponseStatus(HttpStatus.INTERNAL_SERVER_ERROR)

     public String exception(final Throwable throwable, final Model model) {

         log.error("Exception during execution of SpringSecurity application", throwable);

         String errorMessage = (throwable != null ? throwable.getMessage() : "Unknown error");

         model.addAttribute("errorMessage", errorMessage);

         return "error";

     }

 }
error.html
 <!DOCTYPE html>

 <html xmlns:th="http://www.thymeleaf.org">

 <head>

     <title>Error page</title>

     <meta charset="utf-8" />

 </head>

 <body th:with="httpStatus=${T(org.springframework.http.HttpStatus).valueOf(#response.status)}">

 <h1 th:text="|${httpStatus} - ${httpStatus.reasonPhrase}|">404</h1>

 <p th:utext="${errorMessage}">Error java.lang.NullPointerException</p>

 <a href="index.html" th:href="@{/index.html}">返回首页</a>

 </body>

 </html>
效果演示
zhangsan登录
lisi登录
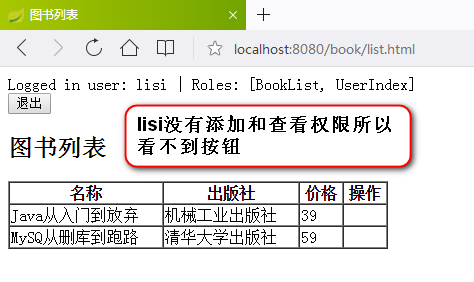
至此,可以实现基本的权限管理
工程结构
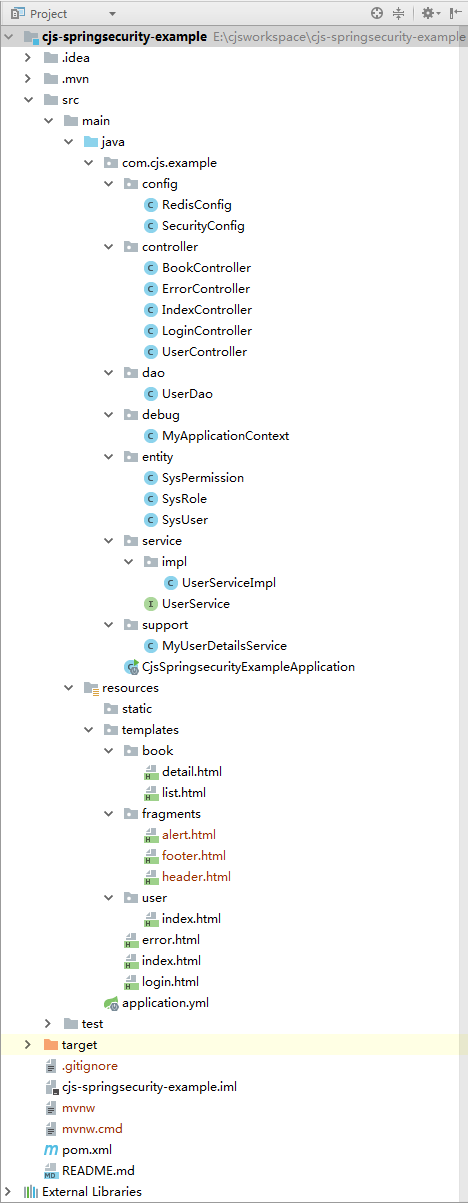
代码已上传至https://github.com/chengjiansheng/cjs-springsecurity-example.git
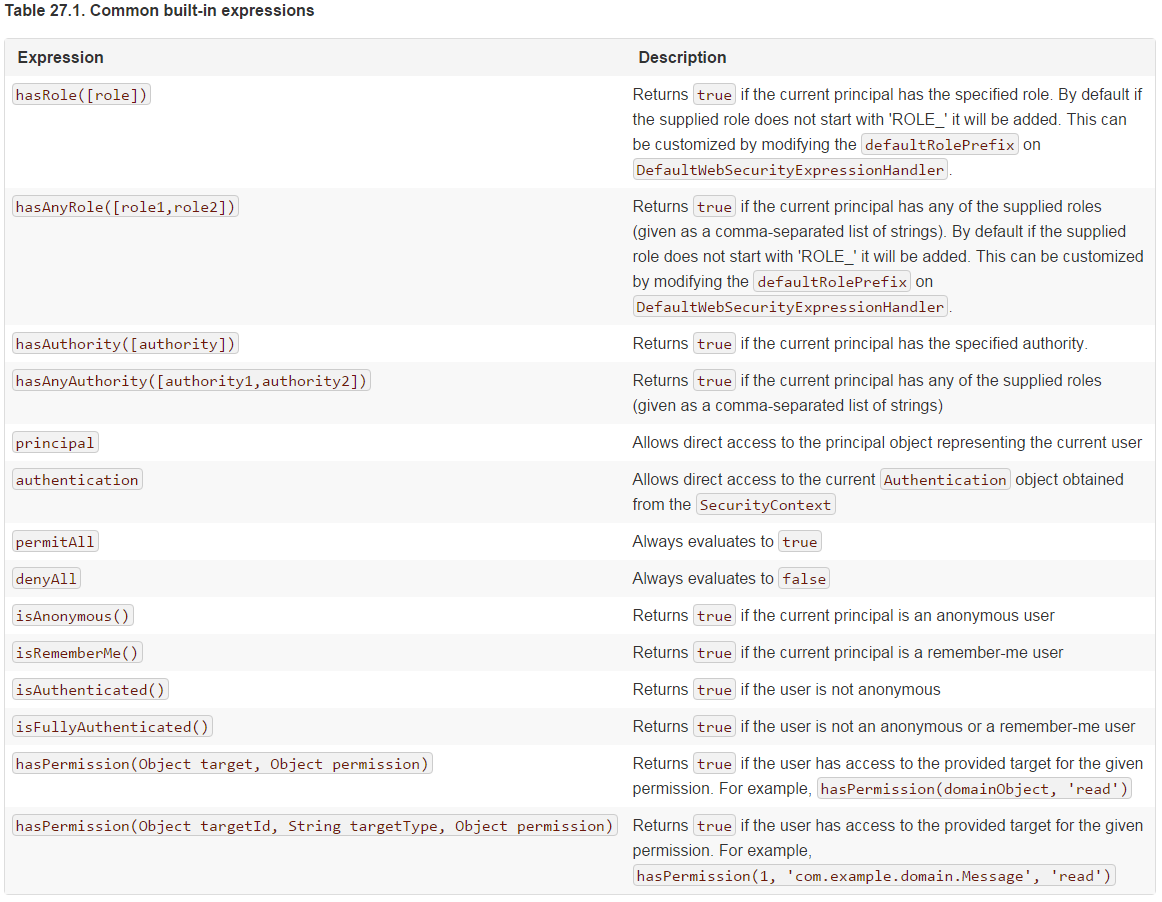
访问控制表达式
其它
通常情况下登录成功或者失败以后不是跳转到页面而是返回json数据,该怎么做呢?
可以继承SavedRequestAwareAuthenticationSuccessHandler,并在配置中指定successHandler或者继承SimpleUrlAuthenticationFailureHandler,并在配置中指定failureHandler
 package com.cjs.example.handler;

 import org.springframework.security.core.Authentication;

 import org.springframework.security.web.authentication.SavedRequestAwareAuthenticationSuccessHandler;

 import javax.servlet.ServletException;

 import javax.servlet.http.HttpServletRequest;

 import javax.servlet.http.HttpServletResponse;

 import java.io.IOException;

 import java.util.HashMap;

 public class MySavedRequestAwareAuthenticationSuccessHandler extends SavedRequestAwareAuthenticationSuccessHandler {

     @Override

     public void onAuthenticationSuccess(HttpServletRequest request, HttpServletResponse response, Authentication authentication) throws ServletException, IOException {

 //        // Use the DefaultSavedRequest URL

 //        String targetUrl = savedRequest.getRedirectUrl();

 //        logger.debug("Redirecting to DefaultSavedRequest Url: " + targetUrl);

 //        getRedirectStrategy().sendRedirect(request, response, targetUrl);

         Map<String, Object> map = new HashMap<>();

         response.getWriter().write(JSON.toJSONString(map));

     }

 }
这么复杂感觉还不如自己写个Filter还简单些
是的,仅仅是这些的话还真不如自己写个过滤器来得简单,但是Spring Security的功能远不止如此,比如OAuth2,CSRF等等
这个只适用单应用,不可能每个需要权限的系统都这么去写,可以不可以做成认证中心,做单点登录?
当然是可以的,而且必须可以。权限分配可以用一个管理后台,认证和授权必须独立出来,下一节用OAuth2.0来实现
参考
https://docs.spring.io/spring-security/site/docs/5.0.5.RELEASE/reference/htmlsingle/#el-pre-post-annotations
https://docs.spring.io/spring-security/site/docs/5.0.5.RELEASE/reference/htmlsingle/#getting-started
https://www.thymeleaf.org/doc/articles/standarddialect5minutes.html
https://www.thymeleaf.org/doc/articles/layouts.html
https://www.thymeleaf.org/doc/articles/springsecurity.html
https://blog.csdn.net/u283056051/article/details/55803855
https://segmentfault.com/a/1190000008893479
https://www.bbsmax.com/A/A2dmY2DWde/
https://blog.csdn.net/qq_29580525/article/details/79317969
Spring Boot Security的更多相关文章
- Spring Boot Security OAuth2 实现支持JWT令牌的授权服务器
概要 之前的两篇文章,讲述了Spring Security 结合 OAuth2 .JWT 的使用,这一节要求对 OAuth2.JWT 有了解,若不清楚,先移步到下面两篇提前了解下. Spring Bo ...
- Spring Boot Security 整合 JWT 实现 无状态的分布式API接口
简介 JSON Web Token(缩写 JWT)是目前最流行的跨域认证解决方案.JSON Web Token 入门教程 - 阮一峰,这篇文章可以帮你了解JWT的概念.本文重点讲解Spring Boo ...
- Spring Boot Security 整合 OAuth2 设计安全API接口服务
简介 OAuth是一个关于授权(authorization)的开放网络标准,在全世界得到广泛应用,目前的版本是2.0版.本文重点讲解Spring Boot项目对OAuth2进行的实现,如果你对OAut ...
- boke练习: spring boot: security post数据时,要么关闭crst,要么添加隐藏域
spring boot: security post数据时,要么关闭crst,要么添加隐藏域 http.csrf().disable(); 或者: <input name="${_cs ...
- Spring Boot Security配置教程
1.简介 在本文中,我们将了解Spring Boot对spring Security的支持. 简而言之,我们将专注于默认Security配置以及如何在需要时禁用或自定义它. 2.默认Security设 ...
- Spring Boot Security Oauth2之客户端模式及密码模式实现
Spring Boot Security Oauth2之客户端模式及密码模式实现 示例主要内容 1.多认证模式(密码模式.客户端模式) 2.token存到redis支持 3.资源保护 4.密码模式用户 ...
- Spring Boot Security And JSON Web Token
Spring Boot Security And JSON Web Token 说明 流程说明 何时生成和使用jwt,其实我们主要是token更有意义并携带一些信息 https://github.co ...
- Spring Boot Security 保护你的程序
Spring Boot Security 本示例要内容 基于角色的权限访问控制 加密.解密 基于Spring Boot Security 权限管理框架保护应用程序 String Security介绍 ...
- Spring Boot Security 使用教程
虽然,我在实际项目中使用的是 shiro 进行权限管理,但 spring boot security 早已大名鼎鼎,虽然他的入门要相对复杂一点,但是设计视乎更加吸引人. 本章节就是以一篇快速入门 sp ...
- Spring Boot Security JWT 整合实现前后端分离认证示例
前面两章节我们介绍了 Spring Boot Security 快速入门 和 Spring Boot JWT 快速入门,本章节使用 JWT 和 Spring Boot Security 构件一个前后端 ...
随机推荐
- Linux中设置服务自启动的三种方式,ln -s 建立启动软连接
有时候我们需要Linux系统在开机的时候自动加载某些脚本或系统服务(http://www.0830120.com) 主要用三种方式进行这一操作: ln -s 在/etc/rc.d/rc*.d目录中建立 ...
- C语言第01次作业--顺序、分支结构
1.本章学习总结 1.1 思维导图 1.2本章学习体会及代码量学习体会 1.2.1学习体会 本周我学到了很多C语言中基础的结构和语法(见思维导图),能对一些生活中的简单问题对应编写程序解决一些这些简单 ...
- 基本排序算法(Java)
基本排序算法 (Java) 经过几次笔试,发现自己的Java基础有些薄弱,基本的排序算法掌握的还不够熟练,需要多加学习总结. 1. 选择排序 思想: 给定一个整数数组,例 int[] a ={38,6 ...
- 面试题int和Integer
int和Integer的区别 1.Integer是int的包装类,int则是java的一种基本数据类型 2.Integer变量必须实例化后才能使用,而int变量不需要 3.Integer实际是对象的引 ...
- css3 图片阴影
box-shadow:1px 2px 4px #999999; 效果:
- react 的进阶
一 react 中table报错 validateDOMNesting(...): <tr> cannot appear as a child of <table>. See ...
- 3.SSM整合_多表_一对多的增删改查
1.配置文件跟上一章一样,这里就不多写了,主要是Mapper映射文件,一对多反过来就是多对一 一 接口 public interface CategoryMapper { public void ad ...
- jsp页面的地址
1. ${pageContext.request.contextPath}是JSP取得绝对路径的方法,等价于<%=request.getContextPath()%> . 也就是取出部署的 ...
- SQL插入数据--数据中的某一列来自本表中的数据
背景: 项目初期使用的配置库和业务库两种数据库并行,所有配置数据位于配置库,所有业务数据根据不同省份位于不同数据库.由于使用省份越来越多,各省的配置数据也越来越多导致配置库的数据量过于庞大,各省共用一 ...
- 基于js的数据结构与算法-数组
Given an array of integers, return indices of the two numbers such that they add up to a specific ta ...