
桌面小部件----LED电子时钟实现
桌面控件是通过 Broadcast 的形式来进行控制的,因此每个桌面控件都对应于一个BroadcastReceiver。为了简化桌面控件的开发,Android 系统提供了一个 AppWidgetProvider类 , 它 就 是 BroadcastReceiver 的 子 类 , 也 就 是 说 开 发 者 开 发 桌 面 控 件 只 要 继 承
AppWidgetProvider 类即可。
为了开发桌面控件,开发者只要开发一个继承 AppWidgetProvider 的子类,并重写AppWidgetProvider 不同状态的生命周期方法即可。AppWidgetProvider 里提供如下 4 个不同的生命周期方法。
- onUpdate():负责更新桌面控件的方法;实现桌面控件通常会考虑重写该方法。
- onDeleted():当一个或多个桌面控件被删除时回调该方法。
- onEnabled():当接收到ACTION_APPWIDGET_ENABLED Broadcast 时回调该方法。
- onDisabled():当接收到 ACTION_APPWIDGET_DISABLED Broadcast 时回调该方法。
一般来说,开发桌面控件只需要定义一个 AppWidgetProvider 的子类,并重写它的onUpdate()方法即可,重写该方法按如下步骤进行。
- 创建一个 RemoteViews 对象,创建该对象时可以指定加载指定的界面布局文件。
- 如果需要改变上一步所加载的界面布局文件的的内容,可通过 RemoteViews 对象进行修改。
- 创建一个 ComponentName 对象。
- 调用 AppWidgetManager 更新桌面控件。
如下代码简单的将一张图片作为部件放到桌面上:
public class DesktopApp extends AppWidgetProvider

{

    @Override

    public void onUpdate(Context context, AppWidgetManager appWidgetManager,

        int[] appWidgetIds)

    {

        // 加载指定界面布局文件,创建RemoteViews对象

        RemoteViews remoteViews = new RemoteViews(

            context.getPackageName(),

            R.layout.main);  //①

        // 为show ImageView设置图片

        remoteViews.setImageViewResource(R.id.show

            , R.drawable.logo);   //②

        // 将AppWidgetProvider子类实例包装成ComponentName对象

        ComponentName componentName = new ComponentName(

            context, DesktopApp.class);  //③

        // 调用AppWidgetManager将remoteViews添加到ComponentName中

        appWidgetManager.updateAppWidget(componentName

            , remoteViews);  //④

    }

}
为了实现一个液晶时钟的桌面组件,开发者需要在程序界面上定义 8 个 ImageView,其中 6 个 ImageView 用于显示小时、分钟、秒钟的数字,另外两个 ImageView 用于显示小时、分钟、秒钟之间的冒号。
为了让桌面组件实时地显示当前时间,程序需要每隔 1 秒更新一次程序界面上的 6 个ImageView,让它们显示当前小时、分钟、秒钟的数字即可。
LED电子时钟桌面部件依赖如下代码实现:
main.xml
<?xml version="1.0" encoding="utf-8"?>

<LinearLayout xmlns:android="http://schemas.android.com/apk/res/android"

    android:orientation="horizontal"

    android:layout_width="fill_parent"

    android:layout_height="fill_parent"

    >

<!-- 定义5个ImageView来显示液晶数字 -->

<ImageView

    android:id="@+id/img01"

    android:layout_width="wrap_content"

    android:layout_height="wrap_content"

    />

<ImageView

    android:id="@+id/img02"

    android:layout_width="wrap_content"

    android:layout_height="wrap_content"

    />

<ImageView

    android:id="@+id/img03"

    android:layout_width="wrap_content"

    android:layout_height="wrap_content"

    android:src="@drawable/su00"

    />

<ImageView

    android:id="@+id/img04"

    android:layout_width="wrap_content"

    android:layout_height="wrap_content"

    />

<ImageView

    android:id="@+id/img05"

    android:layout_width="wrap_content"

    android:layout_height="wrap_content"

    />

<ImageView

    android:id="@+id/img06"

    android:layout_width="wrap_content"

    android:layout_height="wrap_content"

    android:src="@drawable/su00"

    />

<ImageView

    android:id="@+id/img07"

    android:layout_width="wrap_content"

    android:layout_height="wrap_content"

    />

<ImageView

    android:id="@+id/img08"

    android:layout_width="wrap_content"

    android:layout_height="wrap_content"

    />

</LinearLayout>
Manifest.xml
<?xml version="1.0" encoding="utf-8"?>

<manifest

    xmlns:android="http://schemas.android.com/apk/res/android"

    package="org.crazyit.desktop"

    android:versionCode="1"

    android:versionName="1.0">

    <uses-sdk

        android:minSdkVersion="10"

        android:targetSdkVersion="17" />

    <application

        android:icon="@drawable/ic_launcher"

        android:label="@string/app_name">

        <receiver

            android:name=".LedClock"

            android:label="@string/app_name">

            <!-- 将该BroadcastReceiver当成桌面控件 -->

            <intent-filter>

                <action android:name="android.appwidget.action.APPWIDGET_UPDATE" />

            </intent-filter>

            <!-- 指定桌面控件的meta-data -->

            <meta-data

                android:name="android.appwidget.provider"

                android:resource="@xml/my_clock" />

        </receiver>

    </application>

</manifest>
my_clock.xml
<?xml version="1.0" encoding="utf-8"?>

<!-- 指定该桌面组件的基本配置信息:

    minWidth:桌面控件的最小宽度。

    minWidth:桌面控件的最小高度。

    updatePeriodMillis:更新频率

    initialLayout:初始时显示的布局 -->

<appwidget-provider

    xmlns:android="http://schemas.android.com/apk/res/android"

    android:minWidth="800px"

    android:minHeight="30px"

    android:updatePeriodMillis="1000"

    android:initialLayout="@layout/main"/>
LedClock.java
package org.crazyit.desktop;

import java.text.SimpleDateFormat;

import java.util.Date;

import java.util.Timer;

import java.util.TimerTask;

import android.appwidget.AppWidgetManager;

import android.appwidget.AppWidgetProvider;

import android.content.ComponentName;

import android.content.Context;

import android.os.Handler;

import android.os.Message;

import android.widget.RemoteViews;

/**

 * Description:

 * <br/>site: <a href="http://www.crazyit.org">crazyit.org</a>

 * <br/>Copyright (C), 2001-2014, Yeeku.H.Lee

 * <br/>This program is protected by copyright laws.

 * <br/>Program Name:

 * <br/>Date:

 * @author  Yeeku.H.Lee kongyeeku@163.com

 * @version  1.0

 */

public class LedClock extends AppWidgetProvider

{

    private Timer timer = new Timer();

    private AppWidgetManager appWidgetManager;

    private Context context;

    // 将0~9的液晶数字图片定义成数组

    private int[] digits = new int[]

    {

        R.drawable.su01,

        R.drawable.su02,

        R.drawable.su03,

        R.drawable.su04,

        R.drawable.su05,

        R.drawable.su06,

        R.drawable.su07,

        R.drawable.su08,

        R.drawable.su09,

        R.drawable.su10,

    };

    // 将显示小时、分钟、秒钟的ImageView定义成数组

    private int[] digitViews = new int[]

       {

           R.id.img01,

           R.id.img02,

           R.id.img04,

           R.id.img05,

           R.id.img07,

           R.id.img08

       };

    @Override

    public void onUpdate(Context context, AppWidgetManager appWidgetManager,

            int[] appWidgetIds)

    {

        System.out.println("--onUpdate--");

        this.appWidgetManager = appWidgetManager;

        this.context = context;

        // 定义计时器

        timer = new Timer();

        // 启动周期性调度

        timer.schedule(new TimerTask()

        {

            public void run()

            {

                // 发送空消息,通知界面更新

                handler.sendEmptyMessage(0x123);

            }

        }, 0, 1000);

    }

    private Handler handler = new Handler()

    {

        public void handleMessage(Message msg)

        {

            if (msg.what == 0x123)

            {

                RemoteViews views = new RemoteViews(context

                        .getPackageName(), R.layout.main);

                // 定义SimpleDateFormat对象

                SimpleDateFormat df = new SimpleDateFormat(

                        "HHmmss");

                // 将当前时间格式化成HHmmss的形式

                String timeStr = df.format(new Date());

                for(int i = 0 ; i < timeStr.length() ;i++)

                {

                    // 将第i个数字字符转换为对应的数字,charAt函数返回的是ASCII编码,1的ASCII编码是49,所以需要减去偏移量48。

                    int num = timeStr.charAt(i) - 48;

                    // 将第i个图片的设为对应的液晶数字图片

                    views.setImageViewResource(digitViews[i], digits[num]);

                }

                // 将AppWidgetProvider子类实例包装成ComponentName对象

                ComponentName componentName = new ComponentName(context,

                    LedClock.class);

                // 调用AppWidgetManager将remoteViews添加到ComponentName中

                appWidgetManager.updateAppWidget(componentName, views);

            }

            super.handleMessage(msg);

        }

    };

}
效果:
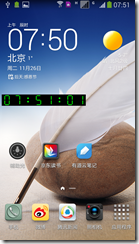
桌面小部件----LED电子时钟实现的更多相关文章
- 解决 三星Note3 桌面小部件不实时更新/不刷新 的问题
机型及问题描述:我的是三星note3 (国行 SM-N9008V),已ROOT,安装了LBE安全大师.在桌面小部件中,有些不会实时更新.比如有 滴答清单(办过的事项无法勾选),百度云音乐(歌曲播放更新 ...
- Android 桌面小部件
1. 添加AppWidgetProvider 实际上就是个带有界面的BroadcastReceiver public class SimpleWidgetProvider extends AppWid ...
- Android开发中实现桌面小部件
详细信息请参考原文:Android开发中实现桌面小部件 在Android开发中,有时候我们的App设计的功能比较多的时候,需要根据需要更简洁的为用户提供清晰已用的某些功能的时候,用桌面小部件就是一个很 ...
- 桌面小部件AppWidgetProvider简单分析
1.一般桌面小部件涉及到的类 AppWidgetProvider :BroadcastRecevier子类,用于接收更新,删除通知 AppWidgetProvderInfo:AppWidget相关信息 ...
- 桌面小部件Wight父类AppWidgetProvider的三个方法
onUpdate()这个方法会在每次更新App Widget的时候调用,数据更新的逻辑都写在这个方法里边.而且要注意的是:在用户添加小部件的时候,会首先调用这个方法,应该在这个方法里进行初始化操作,比 ...
- 优质Android小部件:索尼滚动相册
虽然骚尼手机卖的不怎么样,但是有些东西还是做的挺好的,工业设计就不用说了,索尼的相册的双指任意缩放功能也是尤其炫酷.其桌面小部件滚动相册我觉得也挺好的,比谷歌原生的相册墙功能好多了,网上搜了一下也没发 ...
- Android-RemoteView-桌面小部件
Android-RemoteView-桌面小部件 学习自 <Android开发艺术探索> https://developer.android.google.cn/guide/topics/ ...
- 【Android界面实现】AppWidght全面学习之电量监控小部件的实现具体解释
版权声明:本文为博主原创文章,未经博主同意不得转载. https://blog.csdn.net/bz419927089/article/details/35791047 前几天翻看之前下载的各种资料 ...
- Android简易实战教程--第十四话《模仿金山助手创建桌面Widget小部件》
打开谷歌api,对widget小部件做如下说明: App Widgets are miniature application views that can be embedded in otherap ...
随机推荐
- slidingmenu+fragment实现经常使用的側滑效果(包含Fragment状态的保存)
一.需求 关于fragment的问题,一直想写一篇博客了.应该当初自己也是对这玩意一点都不熟悉到如今也大概知道个日常的使用的地步. 一个側滑的导航栏,内有4个条目.每个选项点击进入相应的界面,每个界面 ...
- mybatis3温故
MyBatis可以利用SQL映射文件来配置,也可以利用Annotation来设置.MyBatis提供的一些基本注解如下表所示. 注解 目标 相应的XML 描述 @CacheNamespace 类 &l ...
- Android三种实现自定义ProgressBar的方式介绍
一.通过动画实现 定义res/anim/loading.xml如下: View Row Code<?xml version="1.0" encoding="UTF- ...
- TCP/IP源码(59)——TCP中的三个接收队列
http://blog.chinaunix.net/uid-23629988-id-3482647.html TCP/IP源码(59)——TCP中的三个接收队列 作者:gfree.wind@gmai ...
- Qt知识点、疑难杂症的治疗
Q: QVariant 保存指针数据 A1: 1,使用QVariant::fromValue((void*)target)保存数据 2,使用(ShortcutItem*)(v.value<v ...
- cocos2d-x项目过程记录(纹理和内存优化方面)
1.参考资料:Cocos2d-x纹理优化的一些方案 cocos2d-x如何优化内存的应用 iOS和android游戏纹理优化和内存优化(cocos2d-x) 2.加载贴图集纹理 CCSpriteF ...
- session绑定javaBean
1.HttpSessionBindingListener 这个监听器,可以让javaBean对象,感知它被绑定到session中或从session中移除.2.HttpSessionActivati ...
- bootstrap新闻模块样式模板
<!-- news beginning --> <div class="container mp30"> <div class="row&q ...
- Mysql 列转行group_concat函数,与行转列
1.正常情况. SELECT JoinEventIds from nt_mainnum 2.使用group_concat函数 select group_concat(JoinEventIds) fro ...
- CXF处理Date类型的俩种方式
1. CXF利用wsdl2java生成客户端时Date日期类型转换 http://cwfmaker.iteye.com/blog/1142835 2. GregorianCalendar cal = ...