
Directx11教程(49) stencil的应用-镜面反射
原文:Directx11教程(49) stencil的应用-镜面反射
本教程中,我们利用stencil来实现一个镜面反射效果。
1、首先我们要在D3DClass中增加几个成员变量及函数。
ID3D11DepthStencilState* m_depthStencilStateMirror;
ID3D11DepthStencilState* m_depthStencilStateReflect;
m_depthStencilStateMirror是渲染镜子时候,使用的depth stencil 状态,我们设置stencil 函数为D3D11_COMPARISON_ALWAYS,这样,stencil测试总能pass,然后pass的操作为D3D11_STENCIL_OP_REPLACE,这样,会用设置的ref值填充stencil buffer。
depthStencilDesc.DepthEnable = true;
depthStencilDesc.DepthWriteMask = D3D11_DEPTH_WRITE_MASK_ALL
depthStencilDesc.DepthFunc = D3D11_COMPARISON_LESS;
depthStencilDesc.StencilEnable = true;
depthStencilDesc.StencilReadMask = 0xFF;
depthStencilDesc.StencilWriteMask = 0xFF;
// 对于front face 像素使用的模版操作操作.
depthStencilDesc.FrontFace.StencilFailOp = D3D11_STENCIL_OP_KEEP;
depthStencilDesc.FrontFace.StencilDepthFailOp = D3D11_STENCIL_OP_KEEP;
depthStencilDesc.FrontFace.StencilPassOp = D3D11_STENCIL_OP_REPLACE;
depthStencilDesc.FrontFace.StencilFunc = D3D11_COMPARISON_ALWAYS;
// 对于back face像素使用的模版操作模式.
depthStencilDesc.BackFace.StencilFailOp = D3D11_STENCIL_OP_KEEP;
depthStencilDesc.BackFace.StencilDepthFailOp = D3D11_STENCIL_OP_DECR;
depthStencilDesc.BackFace.StencilPassOp = D3D11_STENCIL_OP_REPLACE;
depthStencilDesc.BackFace.StencilFunc = D3D11_COMPARISON_ALWAYS;
// 创建深度模版状态,使其生效
result = m_device->CreateDepthStencilState(&depthStencilDesc, &m_depthStencilStateMirror);
if(FAILED(result))
{
HR(result);
return false;
}
m_depthStencilStateReflect用来渲染镜子中反射的物体,此时禁止depth test,使depth test总是pass,stencil函数用等于比较,及当前的stencil ref值和stencil buffer中的值比较,等于则pass stencil test。
// 设置reflect object深度模版状态描述.
depthStencilDesc.DepthEnable = true;
depthStencilDesc.DepthWriteMask = D3D11_DEPTH_WRITE_MASK_ZERO;//D3D11_DEPTH_WRITE_MASK_ZERO禁止写深度缓冲
depthStencilDesc.DepthFunc = D3D11_COMPARISON_ALWAYS;
// 对于front face 像素使用的模版操作操作.
depthStencilDesc.FrontFace.StencilPassOp = D3D11_STENCIL_OP_KEEP;
depthStencilDesc.FrontFace.StencilFunc = D3D11_COMPARISON_EQUAL;
// 创建深度模版状态,使其生效
result = m_device->CreateDepthStencilState(&depthStencilDesc, &m_depthStencilStateReflect);
if(FAILED(result))
{
HR(result);
return false;
}
m_alphaEnableBlendingState状态变量创建一个alpha blend状态,这个状态主要在渲染镜子中物体时候使用,因为我们的镜面是一个纹理表示,alpha blend会把镜面纹理和渲染物体进行混合操作。
// 创建一个alpha blend状态.
blendStateDescription.RenderTarget[0].BlendEnable = TRUE;
//blendStateDescription.RenderTarget[0].SrcBlend = D3D11_BLEND_ONE;
blendStateDescription.RenderTarget[0].SrcBlend = D3D11_BLEND_BLEND_FACTOR;
blendStateDescription.RenderTarget[0].DestBlend = D3D11_BLEND_INV_BLEND_FACTOR;
blendStateDescription.RenderTarget[0].BlendOp = D3D11_BLEND_OP_ADD;
blendStateDescription.RenderTarget[0].SrcBlendAlpha = D3D11_BLEND_ONE;
blendStateDescription.RenderTarget[0].DestBlendAlpha = D3D11_BLEND_ZERO;
blendStateDescription.RenderTarget[0].BlendOpAlpha = D3D11_BLEND_OP_ADD;
blendStateDescription.RenderTarget[0].RenderTargetWriteMask = D3D11_COLOR_WRITE_ENABLE_ALL;//0x0f;
// 用描述符创建一个alpha blend状态
result = m_device->CreateBlendState(&blendStateDescription, &m_alphaEnableBlendingState);
if(FAILED(result))
{
return false;
}
另外还有一个函数ChangeBackCullMode(bool b),用来改变渲染状态,设置front face 为顺时针渲染。因为在渲染镜子中物体时候,镜子中物体正面其实对应物体的反面,这是需要改变渲染次序。
下面的几个函数用来改变这几个新增加的状态。
void TurnOnAlphaBlending();
void TurnOffAlphaBlending();
void ChangeBackCullMode(bool b);
void EnableDefaultDepthStencil();
void EnableMirrorDepthStencil();
void EnableReflectDepthStencil();
2、D3Dclass中的BeginSence函数小改动,每帧渲染之前清除stencil值为0
void D3DClass::BeginScene(float red, float green, float blue, float alpha)
{
…
//清除深度缓冲.
m_deviceContext->ClearDepthStencilView(m_depthStencilView, D3D11_CLEAR_DEPTH|D3D11_CLEAR_STENCIL, 1.0f, 0);
return;
}
3、增加了一个MirrorModelClass类用来表示镜子的mesh。
4、在graphicsClass类中依次渲染物体
首先渲染地面,墙以及box
m_D3D->EnableMirrorDepthStencil();
渲染镜子
m_D3D->EnableDefaultDepthStencil();
定义镜子反射平面,计算反射矩阵,注意D3DXMatrixReflect计算反射矩阵时候,对平面进行了归一化,所以我加了一个平移操作。
D3DXPLANE mirrorPlane(0.0, 0.0, 10.99, 0.0);
D3DXMATRIX R;
//得到基于mirrorPlane平面的反射矩阵
D3DXMatrixReflect(&R, &mirrorPlane);
//box在原点位置,没有变化,它的世界坐标矩阵为worldMatrix
D3DXMATRIX W = worldMatrix * R;
D3DXMatrixTranslation(&worldMatrix1, 0.0, 0.0, -18.0);
W = worldMatrix1*W;
接下来,设置状态
m_D3D->EnableReflectDepthStencil();
m_D3D->TurnOnAlphaBlending();
m_D3D->ChangeBackCullMode(true);
渲染镜子中box
m_D3D->EnableDefaultDepthStencil();
m_D3D->TurnOffAlphaBlending();
m_D3D->ChangeBackCullMode(false);
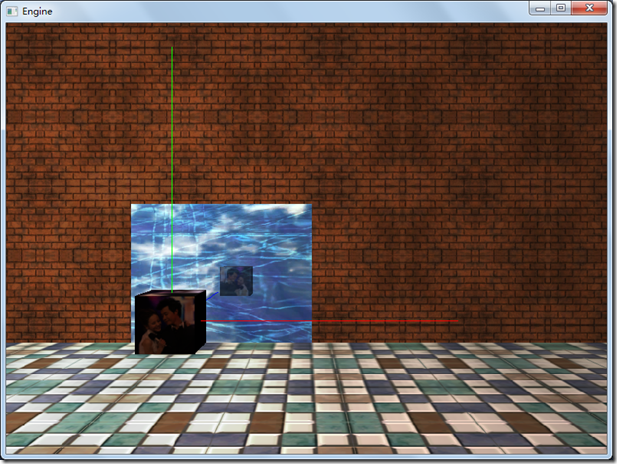
程序最终的效果如下:
完整的代码请参考:
工程文件myTutorialD3D11_43
代码下载:
http://files.cnblogs.com/mikewolf2002/d3d1139-49.zip
Directx11教程(49) stencil的应用-镜面反射的更多相关文章
- Directx11教程(50) 输出depth/stencil buffer的内容
原文:Directx11教程(50) 输出depth/stencil buffer的内容 有时候,我们需要查看depth/stencil buffer的内容,比如上一章中,我们要查看sten ...
- Directx11教程(48) depth/stencil buffer的作用
原文:Directx11教程(48) depth/stencil buffer的作用 在D3D11中,有depth/stencil buffer,它们和framebuffer相对应,如下图所 ...
- Directx11教程(67) 显示模型文件
原文:Directx11教程(67) 显示模型文件 在前面的教程中,我们都是通过在ModelClass中直接产生顶点和索引数据,简单的三角形,立方体等等还好说,毕竟比较简单,如何显示复杂的 ...
- Directx11教程(66) D3D11屏幕文本输出(1)
原文:Directx11教程(66) D3D11屏幕文本输出(1) 在D3D10中,通过ID3DX10Font接口对象,我们可以方便的在屏幕上输出文字信息,一个DrawText函数就能解决所 ...
- Directx11教程(65) 渲染到纹理
原文:Directx11教程(65) 渲染到纹理 通常情况下,我们的render target都是后缓冲,但也可以把render target设置为一个2d 纹理,然后再通过贴图的方式,把这个 ...
- Directx11教程(64) tessellation学习(6)-PN Triangles
原文:Directx11教程(64) tessellation学习(6)-PN Triangles 前面我们用tessellation细分三角形或者四边形,产生的细分点都是在三角形或四边形 ...
- Directx11教程(63) tessellation学习(5)
原文:Directx11教程(63) tessellation学习(5) TS中生成细分后顶点的u,v,{w}坐标,我们根据控制点和u,w,{w}坐标生成新的顶点位置,在前面四边形的细分 ...
- Directx11教程(62) tessellation学习(4)
原文:Directx11教程(62) tessellation学习(4) 现在看看四边形在不同tess factor时,四边形细分的细节,下图是tess factor1-8时候的细分.te ...
- Directx11教程(61) tessellation学习(3)
原文:Directx11教程(61) tessellation学习(3) 现在我们看看在不同tess factor的情况下,三角形是如何细分的?(这儿三条边和内部tess factor值是 ...
随机推荐
- [转]js模块化——AMD及require.js
由CommonJS组织提出了许多新的JavaScript架构方案和标准,希望能为前端开发提供统一的指引.AMD规范就是其中比较著名一个,全称是Asynchronous Module Definitio ...
- springboot核心技术(一)-----入门、配置
Hello World 1.创建一个maven工程:(jar) 2.导入spring boot相关的依赖 <parent> <groupId>org.springframewo ...
- python—时间与时间戳之间的转换
python-时间与时间戳之间的转换 对于时间数据,如2016-05-05 20:28:54,有时需要与时间戳进行相互的运算,此时就需要对两种形式进行转换,在Python中,转换时需要用到time模块 ...
- jquery的each()遍历和ajax传值
页面展示 JS代码部分 /*功能:删除选中用户信息数据*/ function delUser(){ $("#delU").click(function(){ var unoStr ...
- independent set 1
independent set 1 时间限制:C/C++ 1秒,其他语言2秒空间限制:C/C++ 102400K,其他语言204800K64bit IO Format: %lld 题目描述 Note: ...
- global.fun.php
<?php /** 所有公共函数文件*/ /** 序列化*/function _serialize($obj){ return base64_encode(gzcompress( ...
- LUOGU P1290 欧几里德的游戏
题目描述 欧几里德的两个后代Stan和Ollie正在玩一种数字游戏,这个游戏是他们的祖先欧几里德发明的.给定两个正整数M和N,从Stan开始,从其中较大的一个数,减去较小的数的正整数倍,当然,得到的数 ...
- [LOJ2114][HNOI2015]-菜肴制作-拓扑排序+贪心
<题面> 一个蒟蒻的痛苦一天 在今天的节目集训中,麦蒙将带领大家学习9种错误的解题策略 $15\%$算法(看两个就往下走吧) 1> puts("Impossible!&qu ...
- c#多线程通信之委托(事件)
在研究c# 线程之间通信时,发现传统的方法大概有三种 ①全局变量,由于同一进程下的多个进程之间共享数据空间,所以使用全局变量是最简单的方法,但要记住使用volatile进行限制. ②线程之间发送消息( ...
- Laravel 5.4: 特殊字段太长报错 420000 字段太长
laravel 5.4 改变了默认的数据库字符集,现在utf8mb4包括存储emojis支持.如果你运行MySQL v5.7.7或者更高版本,则不需要做任何事情. 当你试着在一些MariaDB或者一些 ...