新版Azure Automation Account 浅析(二) --- 更新Powershell模块和创建Runbook
前篇我们讲了怎样创建一个自动化账户以及创建时候“Run As Account”选项背后的奥秘。这一篇针对在Azure自动化账户中使用Powershell Runbook的用户讲一下怎样更新powershell 模块。
更新Powershell模块
首先,我们需要先了解一下Azure Automation的系统架构。我们已经知道用户可以通过运行Runbook来实现自动化运维,Runbook运行则是在Azure Automation的沙盒里执行的,沙盒是一组由Azure管理的虚机资源, 我们可以把其当做是Azure的一个PaaS服务。Pass服务自然是需要提供可伸缩高可用多租客隔离的运行环境。显然,我们需要能够为Runbook的运行环境指定所需要的Powershell模块和版本。同时,我们还需要能够升级更新相关的powershell模块。
打开我们前面创建的azpoctest自动化账户,在左边菜单选择“共享的资源”-》“模块”。
非常好,用户可以添加自定义的模块“添加模块”,也可以升级已有模块版本“更新Azure模块”。用户还可以浏览powershell模块库来导入新模块。
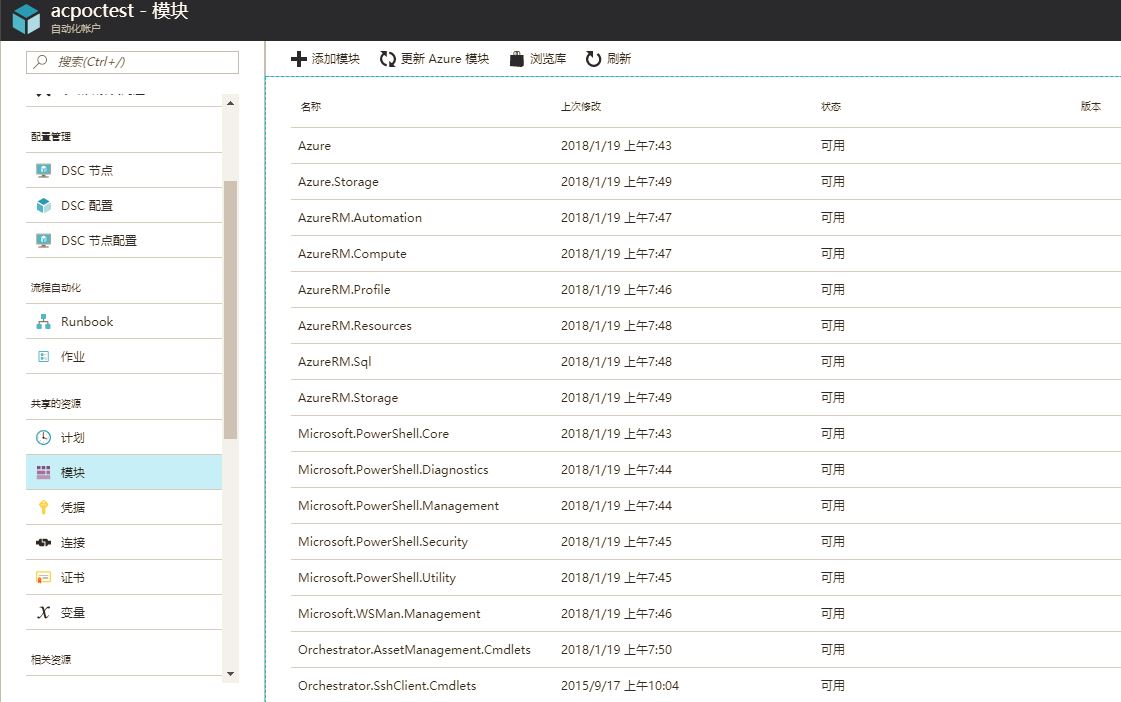
仔细研究一下这个页面,目测创建自动化账户时候自带的模块远少于目前Azure已经release的Powershell模块。如果需要运行Runbook来自动化运维Azure资源的话,目前这些模块是远远不够的。
记得光是ARM相关的powershell模块就有几十个,一个个导入的话工作量实在太大,那我们能不能像在powershell 命令行那样,用Install-Module和Import-Module两条命令就可以完成所有AzureRM
相关的模块安装呢?
点击“浏览库”,选择“AzureRM”,点击“导入”。“确定”按钮是灰色的,显然在Azure Portal中不支持有依赖关系的模块集中导入。

记得16年在Global做Automation Account的时候,毫无怨言地填坑,手动一个个把这些模块导入。今天我们换个填坑的法子
接下来我们会写一个Runbook,用脚本来导入AzureRM的Powershell模块
创建Runbook
在自动化账户左边菜单选取“流程自动化”-》“Runbook”-》“添加Runbook“ ,创建一个新的Runbook

创建成功后,浏览器会自动跳转到Runbook编辑器,我们可以开始写Powershell脚本了
首先,因为Runbook是运行在一个多租户的沙盒中,我们需要登录这个自动化账户所在的Azure订阅才能为这个自动化账户导入模块。
登录的代码可以reuse我们在上一篇提到的Runbook模板
$connectionName = "AzureRunAsConnection"

try

{

    # Get the connection "AzureRunAsConnection "

    $servicePrincipalConnection=Get-AutomationConnection -Name $connectionName

    "Logging in to Azure..."

    Add-AzureRmAccount `

        -ServicePrincipal `

        -TenantId $servicePrincipalConnection.TenantId `

        -ApplicationId $servicePrincipalConnection.ApplicationId `

        -CertificateThumbprint $servicePrincipalConnection.CertificateThumbprint `

        -EnvironmentName AzureChinaCloud

 }

catch {

    if (!$servicePrincipalConnection)

    {

        $ErrorMessage = "Connection $connectionName not found."

        throw $ErrorMessage

    } else{

        Write-Error -Message $_.Exception

        throw $_.Exception

    }

}
接下来,我们需要在Powershell Gallery里查找导入模块及其版本,如果存在,我们会先去找一个模块实际存储的Blob Storage地址,用New-AzureRmAutomationModule这条命令来导入
如果有Dependency的模块,脚本会首先去导入Dependency模块。下文脚本包含了资源组,自动化账户,模块(AzureRM)和模块版本(最新),考虑到模块和模块版本在不同时期可能有变化,这2部分其实可以做参数化,由Automation的variable来存储。那样脚本就不需要经常修改。
param(

    [Parameter(Mandatory=$true)]

    [String] $ResourceGroupName,

    [Parameter(Mandatory=$true)]

    [String] $AutomationAccountName,

    [Parameter(Mandatory=$true)]

    [String] $ModuleName,

    [Parameter(Mandatory=$false)]

    [String] $ModuleVersion

)

$ModulesImported = @()

function _doImport {

    param(

        [Parameter(Mandatory=$true)]

        [String] $ResourceGroupName,

        [Parameter(Mandatory=$true)]

        [String] $AutomationAccountName,

        [Parameter(Mandatory=$true)]

        [String] $ModuleName,

        # if not specified latest version will be imported

        [Parameter(Mandatory=$false)]

        [String] $ModuleVersion

    )

    $Url = "https://www.powershellgallery.com/api/v2/Search()?`$filter=IsLatestVersion&searchTerm=%27$ModuleName%27&targetFramework=%27%27&includePrerelease=false&`$skip=0&`$top=40"

    $SearchResult = Invoke-RestMethod -Method Get -Uri $Url -UseBasicParsing

    if($SearchResult.Length -and $SearchResult.Length -gt ) {

        $SearchResult = $SearchResult | Where-Object -FilterScript {

            return $_.properties.title -eq $ModuleName

        }

    }

    if(!$SearchResult) {

        Write-Error "Could not find module '$ModuleName' on PowerShell Gallery."

    }

    else {

        $ModuleName = $SearchResult.properties.title # get correct casing for the module name

        $PackageDetails = Invoke-RestMethod -Method Get -UseBasicParsing -Uri $SearchResult.id

        if(!$ModuleVersion) {

            # get latest version

            $ModuleVersion = $PackageDetails.entry.properties.version

        }

        $ModuleContentUrl = "https://www.powershellgallery.com/api/v2/package/$ModuleName/$ModuleVersion"

        # Make sure module dependencies are imported

        $Dependencies = $PackageDetails.entry.properties.dependencies

        if($Dependencies -and $Dependencies.Length -gt ) {

            $Dependencies = $Dependencies.Split("|")

            # parse depencencies, which are in the format: module1name:module1version:|module2name:module2version:

            $Dependencies | ForEach-Object {

                if($_ -and $_.Length -gt ) {

                    $Parts = $_.Split(":")

                    $DependencyName = $Parts[]

                    $DependencyVersion = $Parts[]

                    # check if we already imported this dependency module during execution of this script

                    if(!$ModulesImported.Contains($DependencyName)) {

                        $AutomationModule = Get-AzureRmAutomationModule `

                            -ResourceGroupName $ResourceGroupName `

                            -AutomationAccountName $AutomationAccountName `

                            -Name $DependencyName `

                            -ErrorAction SilentlyContinue

                        # check if Automation account already contains this dependency module of the right version

                        if((!$AutomationModule) -or $AutomationModule.Version -ne $DependencyVersion) {

                            $DependencyVersion = $DependencyVersion.Split("[")[].Split("]")[]

                            Write-Output "Importing dependency module $DependencyName of version $DependencyVersion first."

                            # this dependency module has not been imported, import it first

                            _doImport `

                                -ResourceGroupName $ResourceGroupName `

                                -AutomationAccountName $AutomationAccountName `

                                -ModuleName $DependencyName `

                                -ModuleVersion $DependencyVersion

                            $ModulesImported += $DependencyName

                        }

                    }

                }

            }

        }

        # Find the actual blob storage location of the module

        do {

            $ActualUrl = $ModuleContentUrl

            $ModuleContentUrl = (Invoke-WebRequest -Uri $ModuleContentUrl -MaximumRedirection  -UseBasicParsing -ErrorAction Ignore).Headers.Location

        } while(!$ModuleContentUrl.Contains(".nupkg"))

        $ActualUrl = $ModuleContentUrl

        Write-Output "Importing $ModuleName module of version $ModuleVersion from $ActualUrl to Automation"

        $AutomationModule = New-AzureRmAutomationModule `

            -ResourceGroupName $ResourceGroupName `

            -AutomationAccountName $AutomationAccountName `

            -Name $ModuleName `

            -ContentLink $ActualUrl

        while(

            $AutomationModule.ProvisioningState -ne "Created" -and

            $AutomationModule.ProvisioningState -ne "Succeeded" -and

            $AutomationModule.ProvisioningState -ne "Failed"

        )

        {

            Write-Verbose -Message "Polling for module import completion"

            Start-Sleep -Seconds

            $AutomationModule = $AutomationModule | Get-AzureRmAutomationModule

        }

        if($AutomationModule.ProvisioningState -eq "Failed") {

            Write-Error "Importing $ModuleName module to Automation failed."

        }

        else {

            Write-Output "Importing $ModuleName module to Automation succeeded."

        }

    }

}

_doImport `

    -ResourceGroupName "chdaiAC" `

    -AutomationAccountName "acpoctest" `

    -ModuleName "AzureRM" `

    -ModuleVersion $ModuleVersion
编辑完成,点击保存。随后继续点击“测试窗格”。这个功能将测试我们刚完成的Runbook。
在输出窗口会看到后台沙盒运行脚本把AzureRM的dependency模块一个个被导入到自动化账户

最后导入AzureRM的时候运行会报错,这个没有关系。AzureRM模块本身不包含任何功能。所以ARM管理的Powershell命令都在AzureRM的Dependency 模块里。
现在回到模块列表,可以看到AzureRM相关模块已经全部导入了

现在万事具备,下一篇我们可以开始在日常工作中运用Azure自动化账户
新版Azure Automation Account 浅析(二) --- 更新Powershell模块和创建Runbook的更多相关文章
- 新版Azure Automation Account 浅析(三) --- 用Runbook管理AAD Application Key
新版Azure Automation Account 浅析(三) --- 用Runbook管理AAD应用的Key 前篇讲过有一个面向公众的Runbook库,社区和微软一直往其中加入新的Runbook, ...
- 新版Azure Automation Account 浅析(一) --- 创建和Run As Account
去年年底Azure中国的Automation Account悄悄做了升级.新版本不管从功能还是end user experience方面都让人耳目一新.如果说升级前只是一个运行脚本的小工具,升级后的A ...
- 利用Azure Automation实现云端自动化运维(1)
Azure Automation是Azure上的一个自动化工作流引擎,基于Powershell,来帮助用户简化,集成和自动化Azure上的运维工作,例如: 实现定时开关虚拟机,节约成本 实现定时创建删 ...
- Step by Step 用Azure Automation 来开虚机(ARM)
使用Azure Automation来自动化处理各种重复的耗时的云管理任务从而帮助云运维人员提升效率,帮助降低运营成本. 具体相关的介绍以及怎样利用Azure Automation来完成定期开关虚拟机 ...
- 【Azure Developer】Azure Automation 自动化账号生成的时候怎么生成连接 与证书 (Connection & Certificate)
Azure Automation :The Azure Automation service provides a highly reliable and scalable workflow exec ...
- Azure Automation (1) 入门
<Windows Azure Platform 系列文章目录> 通过Azure Automation(自动化),开发人员可以自动完成通常要在云环境中执行的手动.长时间进行.易出错且重复性高 ...
- Azure Automation (2) 定期删除存储账号中的文件
<Windows Azure Platform 系列文章目录> 本文介绍的是国内由世纪互联运维的Azure China. 本文是对笔者之前的文档Azure Backup (1) 将SQL ...
- Azure Automation:存储帐户之间blob拷贝
在两个存储帐户之间进行blob拷贝,在客户端,使用Azue PowerShell脚本, 用存储帐户上下文(New-AzureStorageContext)来获取某个StorageAccount中的Co ...
- 如何利用Azure Automation以及Tag自动开关VM
这是本博客第一篇技术相关的小贴士,在这里我不会详细介绍所涉及的技术组件的具体使用细节,因为我相信这些大家都可以通过官方文档了解到.如果你是一个看了官方文档依然一脸茫然的IT小白,个人建议是先从基础重新 ...
随机推荐
- 3D轮播切换特效 源码
这个3D轮播切换特效是我2017年2月份写的 当初我 刚接触HTML不久,现在把源码分享给大家 源码的注释超级清楚 . <!-- 声明文档类型:html 作用:符合w3c统一标准规范 每个浏览器 ...
- ThinkPHP使用阿里云通信短信服务
一.下载SDK 目前给出的SDK版本有JAVA.PHP.Python三个版本,我们使用PHP版本 二.文档结构 将下载的PHP-SDK解压,放入tp框架的Library目录下 发送短信主要使用api_ ...
- VS2010 Extension实践(2)
在上一篇(VS2010 Extension (1)实践)里,主要展示了如何使用MEF扩展VS2010,来扩展编辑控制和展现自己的UI:在实现QuickToolbar的时候,发现MEF仅仅提供了很基本的 ...
- python利用pysvn发布lib的小程序
背景: 本人在公司的平台部门工作,我们部门写出的代码都是编译成.a文件,定期发布版本到各个产品,现在老大要求我负责每周向公司的某个产品发布lib.发布lib的步骤大概就是自动化的兄弟给我提供一个归档的 ...
- Protobuf的简单介绍、使用和分析
Protobuf的简单介绍.使用和分析 一.protobuf是什么? protobuf(Google Protocol Buffers)是Google提供一个具有高效的协议数据交换格式工具库( ...
- Python新式类与经典类的区别
1.新式类与经典类 在Python 2及以前的版本中,由任意内置类型派生出的类(只要一个内置类型位于类树的某个位置),都属于“新式类”,都会获得所有“新式类”的特性:反之,即不由任意内置类型派生出的类 ...
- php require、require_once和include、include_once的区别
一.引入php文件路径的方法require '文件路径'; require ('文件路径');require_once '文件路径'; require_once ('文件路径');include 同 ...
- Mysql使用小tips
一..常用函数 1.IFNULL(expr1,expr2) 如果expr1不是NULL,IFNULL()返回expr1,否则它返回expr2.IFNULL()返回一个数字或字符串值, ...
- Sqlserver如何递归查询层级数据将父级字段和本级某个字段合并?如何自定义用户函数并调用?
开门见山,首先说下遇到的问题:前期系统地区字典表中,每个省市县只存了本级名称,没存完整的字段.如:肥西县隶属安徽省合肥市,表中就存了一个肥西县.现有需求需要将完整字段显示,由于系统已在线上运营,无法做 ...
- winform展示Unity3D文件(支持动态改变文件路径)
winform下展示Unity3D文件可以支持对Unity3D实现的模块进行包装,以及在其他的项目中需要展示Unity3D的界面时候,恰到适宜地进行打开展示,这里我展示如何使用winform打开Uni ...