
Springboot 使用 webSocket
介绍
WebSocket是HTML5开始提供的一种在单个 TCP 连接上进行全双工通讯的协议。在WebSocket API中,浏览器和服务器只需要完成一次握手,两者之间就直接可以创建持久性的连接,并进行双向数据传输。WebSocket使用和 HTTP 相同的 TCP 端口,可以绕过大多数防火墙的限制。默认情况下,WebSocket协议使用80端口;运行在TLS之上时,默认使用443端口。
WebSocket协议建立连接的时候需要握手,握手过程中需要借助HTTP协议来完成,当连接建立后,就可以使用WebSocket协议进行通信,通信结束后,通信双方都可以关闭连接。
API文档:https://developer.mozilla.org/zh-CN/docs/Web/API/WebSocket
前端:
1、新建服务器的连接:var webSocket = new WebSocket(url);

2、初始化回调函数

ex:webSocket.onmessage = function (event){

var data = event.data;

console.log(“收到的消息”+data);

}
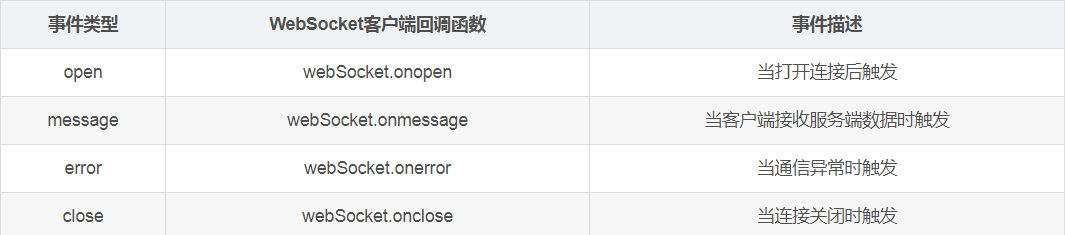
3、发送消息给服务器
webSocket.send(message);
后端:
- 配置pom文件
   <!-- 引入 websocket 依赖类-->

         <dependency>

           <groupId>org.springframework.boot</groupId>

             <artifactId>spring-boot-starter-websocket</artifactId>

        </dependency>
开启WebSocket服务端的自动注册
注意:ServerEndpointExporter 是由Spring官方提供的标准实现,用于扫描ServerEndpointConfig配置类和@ServerEndpoint注解实例。使用规则也很简单:1.如果使用默认的嵌入式容器 比如Tomcat 则必须手工在上下文提供ServerEndpointExporter。2. 如果使用外部容器部署war包,则不要提供提供ServerEndpointExporter,因为此时SpringBoot默认将扫描服务端的行为交给外部容器处理
/**

 * 开启WebSocket支持

 */

@Configuration

public class WebSocketConfig {

    @Bean

    public ServerEndpointExporter serverEndpointExporter() {

        return new ServerEndpointExporter();

    }

}
- 创建WebSocket服务端
①通过注解@ServerEndpoint来声明实例化WebSocket服务端。(注意配置@Component才能被spring扫描)
② 通过注解@OnOpen、@OnMessage、@OnClose、@OnError 来声明回调函数。
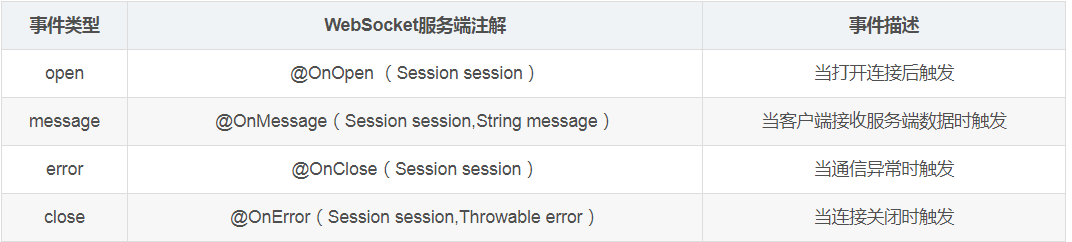
③发送消息:new Session().getBasicRemote().sendText(message);
- WebSocket服务类编写
这里对照下面的代码看:
- 第20行,@ServerEndpoint("/websocket/{userID}"),括号中的内容就是客户端请求Socket连接时的访问路径,userID是我要求客户端传来的参数,我这里算是为了标识该客户端吧。
- 第28行,在该类中添加属性 userID,并添加对应的getUserID()方法。
- 第46行,在onOpen()方法即建立连接的时候就接收参数userID,需要标识@PathParam("userID") 。接收参数后直接赋值给属性userID。
- 第140-157行,是针对特定客户端发送消息。服务器和客户端在建立连接成功后就生成了一个WebSocket对象,并存在集合中,对象里特有的属性是我们设置的userID。所以通过唯一的userID就能标识服务器与该客户端建立的那个连接啦!这样要求发送消息时,传入userID与消息,服务器在自己的WebSocket连接集合中遍历找到对应客户端的连接,就可以直接发消息过去啦~~
package com.cuc.happyseat.websocket;

import java.io.IOException;

import java.util.concurrent.CopyOnWriteArraySet;

import javax.websocket.EncodeException;

import javax.websocket.OnClose;

import javax.websocket.OnError;

import javax.websocket.OnMessage;

import javax.websocket.OnOpen;

import javax.websocket.Session;

import javax.websocket.server.PathParam;

import javax.websocket.server.ServerEndpoint;

import org.springframework.stereotype.Component;

/*@ServerEndpoint注解是一个类层次的注解,它的功能主要是将目前的类定义成一个websocket服务器端,

* 注解的值将被用于监听用户连接的终端访问URL地址,客户端可以通过这个URL来连接到WebSocket服务器端

*/

@ServerEndpoint("/websocket/{userID}")

@Component

public class WebSocketServer {

        //每个客户端都会有相应的session,服务端可以发送相关消息

        private Session session;

        //接收userID

        private Integer userID;

        //J.U.C包下线程安全的类,主要用来存放每个客户端对应的webSocket连接

        private static CopyOnWriteArraySet<WebSocketServer> copyOnWriteArraySet = new CopyOnWriteArraySet<WebSocketServer>();

        public Integer getUserID() {

            return userID;

        }

       /**

       * @Name:onOpen

       * @Description:打开连接。进入页面后会自动发请求到此进行连接

       * @Author:mYunYu

       * @Create Date:14:46 2018/11/15

       * @Parameters:@PathParam("userID") Integer userID

       * @Return:

       */

        @OnOpen

        public void onOpen(Session session, @PathParam("userID") Integer userID) {

            this.session = session;

            this.userID = userID;

            System.out.println(this.session.getId());

            //System.out.println("userID:" + userID);

            copyOnWriteArraySet.add(this);

            System.out.println("websocket有新的连接, 总数:"+ copyOnWriteArraySet.size());

        }

       /**

       * @Name:onClose

       * @Description:用户关闭页面,即关闭连接

       * @Author:mYunYu

       * @Create Date:14:46 2018/11/15

       * @Parameters:

       * @Return:

       */

        @OnClose

        public void onClose() {

            copyOnWriteArraySet.remove(this);

            System.out.println("websocket连接断开, 总数:"+ copyOnWriteArraySet.size());

        }

        /**

        * @Name:onMessage

        * @Description:测试客户端发送消息,测试是否联通

        * @Author:mYunYu

        * @Create Date:14:46 2018/11/15

        * @Parameters:

        * @Return:

        */

        @OnMessage

        public void onMessage(String message) {

            System.out.println("websocket收到客户端发来的消息:"+message);

        }

        /**

        * @Name:onError

        * @Description:出现错误

        * @Author:mYunYu

        * @Create Date:14:46 2018/11/15

        * @Parameters:

        * @Return:

        */

        @OnError

        public void onError(Session session, Throwable error) {

            System.out.println("发生错误:" + error.getMessage() + "; sessionId:" + session.getId());

            error.printStackTrace();

        }

        public void sendMessage(Object object){

            //遍历客户端

            for (WebSocketServer webSocket : copyOnWriteArraySet) {

                System.out.println("websocket广播消息:" + object.toString());

                try {

                    //服务器主动推送

                    webSocket.session.getBasicRemote().sendObject(object) ;

                } catch (Exception e) {

                    e.printStackTrace();

                }

            }

        }

        /**

        * @Name:sendMessage

        * @Description:用于发送给客户端消息(群发)

        * @Author:mYunYu

        * @Create Date:14:46 2018/11/15

        * @Parameters:

        * @Return:

        */

        public void sendMessage(String message) {

            //遍历客户端

            for (WebSocketServer webSocket : copyOnWriteArraySet) {

                System.out.println("websocket广播消息:" + message);

                try {

                    //服务器主动推送

                    webSocket.session.getBasicRemote().sendText(message);

                } catch (Exception e) {

                    e.printStackTrace();

                }

            }

        }

        /**

        * @throws Exception

         * @Name:sendMessage

        * @Description:用于发送给指定客户端消息

        * @Author:mYunYu

        * @Create Date:14:47 2018/11/15

        * @Parameters:

        * @Return:

        */

        public void sendMessage(Integer userID, String message) throws Exception {

            Session session = null;

            WebSocketServer tempWebSocket = null;

            for (WebSocketServer webSocket : copyOnWriteArraySet) {

                if (webSocket.getUserID() == userID) {

                    tempWebSocket = webSocket;

                    session = webSocket.session;

                    break;

                }

            }

            if (session != null) {

                //服务器主动推送

                tempWebSocket.session.getBasicRemote().sendText(message);

            } else {

                System.out.println("没有找到你指定ID的会话:{}"+ "; userId:" + userID);

            }

        }

}
- Controller类的编写。
- 我在看博客的时候,发现有的博主写了Controller类,有的没写,我就有点疑惑了。后来,咳咳,发现特地写了一个Controller类只是为了测试。。
- 一般在实际项目中,在确保建立连接过程没有问题的情况下,我们就直接在一些写好的接口中写 WebSocketServer.sendMessage(param, message)语句就行了。
- 也因此,你写的位置就决定了你什么时候给你的客户端发消息,这样也就实现了主动推送消息的功能咯~
前提是:在你的Controller类里,以@Resource的方式注入WebSocket,而不是@Autowired方式哦(⊙o⊙)。
@Resource

    WebSocketServer webSocket;

@Autowired

     UserService userService;

调用示例:

    if(userID>0) {

            boolean location = userService.getLocation(userID);

            if(location==false) {//验证用户当前不在馆内

                boolean i = userService.modifyLocation(userID, true);

                if(i==true) {

                modelMap.put("successEnter", true);

                //发消息给客户端

                webSocket.sendMessage(userID, "success");

                }

            }else {

                modelMap.put("successEnter", false);

                //发消息给客户端

                webSocket.sendMessage(userID, "fail");

            }

        }else {

            modelMap.put("successEnter", false);

            //发消息给客户端

            webSocket.sendMessage(userID, "fail");

        }
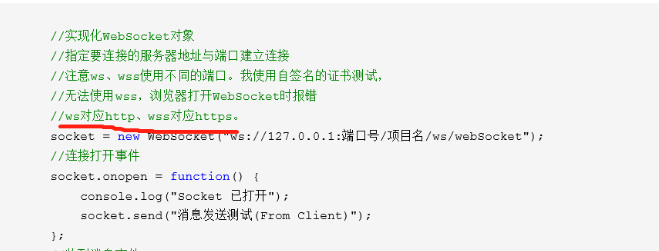
小程序是只支持https访问的,所以得用wss
嘿嘿嘿,下面是学习WebSocket过程中参考的几篇博文:
转载:https://www.cnblogs.com/codecheng/archive/2019/04/06/10657530.html
Springboot 使用 webSocket的更多相关文章
- Springboot整合Websocket遇到的坑
Springboot整合Websocket遇到的坑 一.使用Springboot内嵌的tomcat启动websocket 1.添加ServerEndpointExporter配置bean @Confi ...
- SpringBoot 整合 WebSocket
SpringBoot 整合 WebSocket(topic广播) 1.什么是WebSocket WebSocket为游览器和服务器提供了双工异步通信的功能,即游览器可以向服务器发送消息,服务器也可以向 ...
- SpringBoot集成WebSocket【基于纯H5】进行点对点[一对一]和广播[一对多]实时推送
代码全部复制,仅供自己学习用 1.环境搭建 因为在上一篇基于STOMP协议实现的WebSocket里已经有大概介绍过Web的基本情况了,所以在这篇就不多说了,我们直接进入正题吧,在SpringBoot ...
- SpringBoot基于websocket的网页聊天
一.入门简介正常聊天程序需要使用消息组件ActiveMQ或者Kafka等,这里是一个Websocket入门程序. 有人有疑问这个技术有什么作用,为什么要有它?其实我们虽然有http协议,但是它有一个缺 ...
- springboot整合websocket原生版
目录 HTTP缺点 HTTP websocket区别 websocket原理 使用场景 springboot整合websocket 环境准备 客户端连接 加入战队 微信公众号 主题 HTTP请求用于我 ...
- 使用springboot+layim+websocket实现webim
使用springboot+layim+websocket实现webim 小白技术社 项目介绍 采用springboot和layim构建webim,使用websocket作为通讯协议,目前已经能够正 ...
- SpringBoot+Vue+WebSocket 实现在线聊天
一.前言 本文将基于 SpringBoot + Vue + WebSocket 实现一个简单的在线聊天功能 页面如下: 在线体验地址:http://www.zhengqingya.com:8101 二 ...
- springboot集成websocket的两种实现方式
WebSocket跟常规的http协议的区别和优缺点这里大概描述一下 一.websocket与http http协议是用在应用层的协议,他是基于tcp协议的,http协议建立链接也必须要有三次握手才能 ...
- springboot集成websocket实现向前端浏览器发送一个对象,发送消息操作手动触发
工作中有这样一个需示,我们把项目中用到代码缓存到前端浏览器IndexedDB里面,当系统管理员在后台对代码进行变动操作时我们要更新前端缓存中的代码怎么做开始用想用版本方式来处理,但这样的话每次使用代码 ...
- springBoot 使用webSocket
本文(2019年6月18日 飞快的蜗牛博客) 有许多人走着走着,就迷失了自己,所以不论发生了什么,有时候抱着自己去静下来想想,要好好的对待自己:"钱塘江上潮信来,今日方知我是我", ...
随机推荐
- python cx_oracle 环境搭建
背景说明: 之前的环境本来是可以用的,是另外一个项目(python27)需要的时候搭建的.新项目采用的是python36,安装的cx_oracle的版本是7,而环境中的Oracle客户端是11,导致p ...
- Codeforces 1190B. Tokitsukaze, CSL and Stone Game
传送门 不妨把每一堆按照石头数量从小到大排序 注意到每次只能拿一个石头,那么不论何时每堆石头的排名都是一样的 那么最终所有堆的状态一定就是 $0,1,2,...,n-1$,现在每一堆最终的石头数量都确 ...
- easyui在table单元格中添加进度条
function XR_jd(alue, rowData, rowIndex){ var value; ...... var htmlstr = '<div class="easyui ...
- 上海的Costco,谈谈你的理解和感受
众所周知,Costco在上海第一天开业,由于人流量过大,一度暂停营业.我觉得Costco的成功在于不走寻常路,换位思考(站在用户.厂商角度看问题),下面几点是我觉得它做得比较独特的地方: 1. Cos ...
- vue-resource 全局拦截器
项目中可能会添加超时登录的功能,因此根据tokenid 判断是否超时.如果token已过期,需要跳转至登录页面. 因此需要用到全局拦截器拦截返回的状态 //下边代码添加在main.js中 Vue.ht ...
- 红色警戒2CE修改教程
在大学的时候特别喜欢玩游戏,尤其偏爱单机游戏.在玩一些单机游戏的时候,特意使用了一些修改工具.本来是打算做成一个系列的,但是现在由于时间问题,仅介绍一些.(大概包括rimworld,饥荒,放逐之城,缺 ...
- 多线程编程-- part 8 CyclicBarrier
CyclicBarrier简介 cuclicBarrier允许一组线程互相等待,直到到达某个公共屏障点(common barrier point).因为该barrier在释放等待线程后可以重用,所以称 ...
- mysql数据库查询过程探究和优化建议
查询过程探究 我们先看一下向mysql发送一个查询请求时,mysql做了什么? 如上图所示,查询执行的过程大概可分为6个步骤: 客户端向MySQL服务器发送一条查询请求 服务器首先检查查询缓存,如果命 ...
- linux下/etc/rc.d目录的介绍及redhat启动顺序
init inittab rc0 rc1 rc2 rc3 rc5 rc6 rcS init.d init 系统启动超级进程 inittab 进程启动配置文件 rc0 - rc6 各启动级别的启动脚本 ...
- 微软内部封杀 Slack
就在 Slack 在股市上亮相之际,有一家大公司却不允许员工在日常工作中使用这款企业协作和聊天应用软件. 微软已禁止其 100000 多名员工使用免费版 Slack.IT 外媒 GeekWire 报道 ...