
http://www.gasi.ch/blog/inside-deep-zoom-1/
In March 2007 Blaise Aguera y Arcas presented Seadragon & Photosynth at TED that created quite some buzz around the web. About a year later, in March 2008, Microsoft released Deep Zoom (formerly Seadragon) as a «killer feature» of their Silverlight 2 (Beta) launch at Mix08. Following this event, there was quite some back andforth in the blogosphere (damn, I hate that word) about the true innovation behind Microsoft's Deep Zoom.
Today, I don't want to get into the same kind of discussion but rather start a series that will give you a «behind the scenes» of Microsoft's Deep Zoom and similar technologies.
This first part of «Inside Deep Zoom» introduces the main ideas & concepts behind Deep Zoom. In part two, I'll talk about some of the mathematics involved and finally, part three will feature a discussion of the possibilities of this kind of technology and a demo of something you probably haven't seen yet.
Background
As part of my awesome internship at Zoomorama in Paris, I was working on some amazing things (of which you'll hopefully hear soon) and in my spare time, I've decided to have a closer look at Deep Zoom (formerly Seadragon.) This is when I did a lot of research around this topic and where I had the idea for this series in which I wanted to share my knowledge.
Introduction
Let's begin with a quote from Blaise Aguera y Arcas demo of Seadragon at the TED conference[1]:…the only thing that ought to limit the performance of a system like this one is the number of pixels on your screen at any given moment.
What is this supposed to mean? See, I have a 24" screen with a maximum resolution of 1920 x 1200 pixels. Now let's take a photo from my digital camera which shoots at 12 megapixel. The photo's size is typically 3872 x 2592 pixels. When I get the photo onto my computer, I roughly end with something that looks like this:
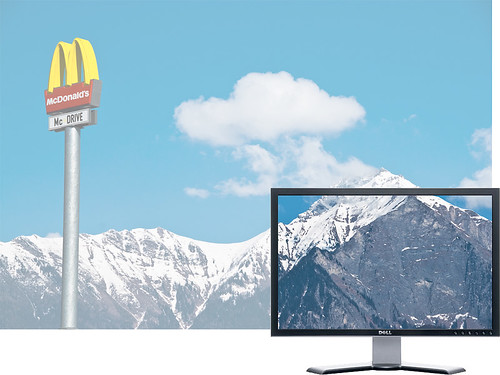
No matter how I put it, I'll never be able to see the entire 12 megapixel photo at 100% magnification on my 2.3 megapixel screen. Although this might seem obvious, let's take the time and look at it from another angle: With this in mind we don't care anymore if an image has 10 megapixel (that is 10'000'000 pixels) or 10 gigapixel (10'000'000'000 pixels) since the number of pixels we can see at any moment is limited by the resolution of our screen. This again means, looking at a 10 megapixel image and 10 gigapixel image on the same computer screen should have the same performance. The same should hold for looking at the same two images on a mobile device such as the iPhone. However, important to note is that with reference to the quote above we might experience a performance difference between the two devices since they differ in the number of pixels they can display.
So how do we manage to make the performance of displaying image data independent of its resolution? This is where the concept of an image pyramid steps in.
The Image Pyramid
Deep Zoom, or for that matter any other similar technology such asZoomorama, Zoomify, Google Maps etc., uses something called animage pyramid as a basic building block for displaying large images in an efficient way:
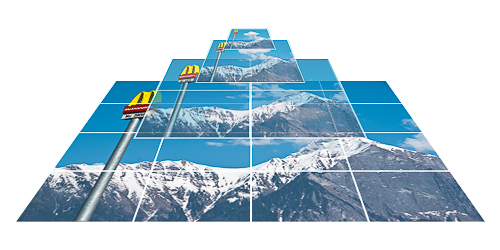
The picture above illustrates the layout of such of an image pyramid. The two purposes of a typical image pyramid are to store an image of any size at many different resolutions (hence the term multi-scale) as well as these different resolutions sliced up in many parts, referred to as tiles.
Because the pyramid stores the original image (redundantly) at different resolutions we can display the resolution that is closest to the one we need and in a case where not the entire image fits on our screen, only the parts of the image (tiles) that are actually visible. Setting the parameter values for our pyramid such as number of levels and tile size allows us to control the required data transfer.
Image pyramids are the result of a space vs. bandwidth trade-off, often found in computer science. The image pyramid obviously has a bigger file size than its single image counterpart (for finding out how much exactly, be sure to come back for part two) but as you see in the illustration below, regarding bandwidth it's much more efficient at displaying high-resolution images where most parts of the image are typically not visible anyway (grey area):
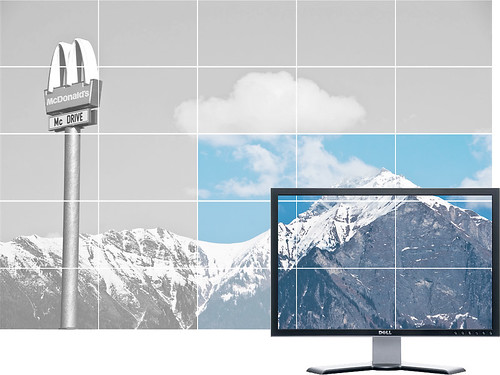
As you can see in the picture above, there is still more data loaded (colored area) than absolutely necessary to display everything that is visible on the screen. This is where the image pyramid parameters I mentioned before come into play: Tile size and number of levels determine the relationship between amount of storage, number of network connections and bandwidth required for displaying high-resolution images.
Next
Well, this was it for part one of Inside Deep Zoom. I hope you enjoyed this short introduction to image pyramids & multi-scale imaging. If you want to find out more, as usual, I've collected some links in theFurther Reading section. Other than that, be sure to come back, as the next part of this series – part two – will discuss the characteristics of the Deep Zoom image pyramid and I will show you some of the mathematics behind it.
Further Reading
- Wikipedia: Pyramid (image processing)
- Wikipedia: Gaussian Pyramid
- Wikipedia: Mipmap
- Paper: Pyramid Methods in Image Processing (PDF)
- Video: Seadragon Tech Demo (prior to Microsoft acquisition)
References
http://www.gasi.ch/blog/inside-deep-zoom-1/的更多相关文章
- http://www.gasi.ch/blog/inside-deep-zoom-2/
Inside Deep Zoom – Part II: Mathematical Analysis Welcome to part two of Inside Deep Zoom. In part o ...
- [WPF系列]-Deep Zoom
参考 Deep Zoom in Silverlight
- openseadragon.js与deep zoom java实现艺术品图片展示
openseadragon.js 是一款用来做图像缩放的插件,它可以用来做图片展示,做展示的插件很多,也很优秀,但大多数都解决不了图片尺寸过大的问题. 艺术品图像展示就是最简单的例子,展示此类图片一般 ...
- A SIMPLE LIBRARY TO BUILD A DEEP ZOOM IMAGE
My current project requires a lot of work with Deep Zoom images. We recently received some very high ...
- 零元学Expression Blend 4 - Chapter 23 Deep Zoom Composer与Deep Zoom功能
原文:零元学Expression Blend 4 - Chapter 23 Deep Zoom Composer与Deep Zoom功能 最近有机会在工作上用到Deep Zoom这个功能,我就顺便介绍 ...
- 论文笔记之:Dueling Network Architectures for Deep Reinforcement Learning
Dueling Network Architectures for Deep Reinforcement Learning ICML 2016 Best Paper 摘要:本文的贡献点主要是在 DQN ...
- What are some good books/papers for learning deep learning?
What's the most effective way to get started with deep learning? 29 Answers Yoshua Bengio, ...
- Life of an Oracle I/O: tracing logical and physical I/O with systemtap
https://db-blog.web.cern.ch/blog/luca-canali/2014-12-life-oracle-io-tracing-logical-and-physical-io- ...
- RNN and LSTM saliency Predection Scene Label
http://handong1587.github.io/deep_learning/2015/10/09/rnn-and-lstm.html //RNN and LSTM http://hando ...
随机推荐
- lua -- debug
framework.debug 调试支持 ~~ echo 功能同 print. 格式: echo(值, [值, 值, ...]) ~~ printf 按照特定格式输出. 格式: printf(格式字符 ...
- lua -- table.nums
table.nums 计算表格包含的字段数量. 格式: count = table.nums(表格对象) Lua 的“#”操作可以取得表格的长度,但仅限从 开始连续数字为索引的表格.table.num ...
- Gluster vs Ceph:开源存储领域的正面较量
https://www.oschina.net/news/49048/gluster-vs-ceph 引言:开源存储软件Ceph和Gluster能够提供相似的特性并且能够为用户节省不小的开支.那么谁更 ...
- Oracle 数据库连接池
jdbc:oracle:thin:@(DESCRIPTION=(failover=on)(enable=broken)(ADDRESS_LIST=(ADDRESS=(PROTOCOL=TCP)(HOS ...
- Pycharm 2017.1 激活服务器
最近发现pycharm激活异常困难 原来的激活码 都不能用了 so 根据网上 教程 自己建了激活服务器 尝试可用服务器 20170504 测试发现 给需要域名 http://www.05nb.com: ...
- MVC的项目部署成应用程序或虚拟目录路径的问题
1.js和css的引用出错 a.~/可以取得应用程序目录 b. ./定位到路径,./代表到本目录,../代表父级目录 2.打开页面view a. ./定位到路径 3.img src a. ./定位 ...
- 【内核】几个重要的linux内核文件
Preface 当用户编译一个linux内核代码后,会产生几个文件:vmlinz.initrd.img, 以及System.map,如果配置过grub引导管理器程序,会在/boot目录下看到这几个文件 ...
- Vue2键盘事件:keydown/keyup...
Vue2键盘事件:keydown/keyup... 1.使用 <!DOCTYPE html> <html> <head> <title></tit ...
- Java类的成员初始化顺序
Java类的成员初始化顺序 2017-06-01 代码: public class InitializeSequence { public static void main(String[] args ...
- mysql 乱码解决方案
如何解决MYSQL数据中文乱码问题? 第一种方法,总结: 经常更换虚拟主机,而各个服务商的MYSQL版本不同,当导入数据后,总会出现乱码等无法正常显示的问题,查了好多资料,总结出自己的一点技巧: WI ...