axis2 webService开发指南(2)
1 Axis2的简单WebService示例
1.1 新建一个web工程,创建一个类Greeting,用于当作webservice服务
代码如下:
package amyservices;

import java.text.SimpleDateFormat;

import java.util.ArrayList;

import java.util.Calendar;

import java.util.Date;

import java.util.List;

import Com.WebService.Model.Person;

public class Greeting {

    public String getGreeting(String name){

        return "你好:" + name;

    }

    public int getPrice()

    {

        return new java.util.Random().nextInt(1000);

    }

    public List<Person> GetPersonList()

    {

        List<Person> list = new ArrayList<Person>();

        Person model = new Person();

        model.setKeyID("1214324234234234324");

        model.setName("張三");

        Calendar birth = Calendar.getInstance();

        birth.set(1990, 11, 22);

        model.setBirth(birth);

        list.add(model);

        model = new Person();

        model.setKeyID("1214324234234234324");

        model.setName("李四");

        birth = Calendar.getInstance();

        birth.set(1990, 11, 22);

        model.setBirth(birth);

        System.out.println(birth.toString());

        list.add(model);

        for(Person item : list)

        {

            System.out.println(item.getName());

        }

        return list;

    }

    public String PrintNow()

    {

        Calendar cale = Calendar.getInstance();

        Date tasktime=cale.getTime();

        SimpleDateFormat df=new SimpleDateFormat("yyyy-MM-dd HH:mm:ss");

        System.out.println(df.format(tasktime));

        return  df.format(tasktime);

    }

}
.classpath文件如下:
<?xml version="1.0" encoding="UTF-8"?>

<classpath>

    <classpathentry kind="src" path="src"/>

    <classpathentry kind="con" path="org.eclipse.jdt.launching.JRE_CONTAINER/org.eclipse.jdt.internal.debug.ui.launcher.StandardVMType/JavaSE-1.7">

        <attributes>

            <attribute name="owner.project.facets" value="java"/>

        </attributes>

    </classpathentry>

    <classpathentry kind="con" path="com.genuitec.runtime.library/com.genuitec.generic_7.0">

        <attributes>

            <attribute name="owner.project.facets" value="jst.web"/>

        </attributes>

    </classpathentry>

    <classpathentry kind="con" path="org.eclipse.jst.j2ee.internal.web.container"/>

    <classpathentry kind="con" path="org.eclipse.jst.j2ee.internal.module.container"/>

    <classpathentry kind="con" path="com.genuitec.runtime.library/com.genuitec.jstl_1.2.2">

        <attributes>

            <attribute name="org.eclipse.jst.component.dependency" value="WEB-INF/lib"/>

            <attribute name="owner.project.facets" value="jst.web.jstl"/>

        </attributes>

    </classpathentry>

    <classpathentry kind="output" path="WebRoot/WEB-INF/classes"/>

</classpath>
1.2 点击File-->New-->other,选择Axis2 Service Archiver
配置Class File Location,配置路径到工程的WEB-INF\classess目录下,同时将下图的复选框勾选去掉,继续根据向导完成创建。
创建成功,在axis2的工程目录下,多了我们刚配置好的文件
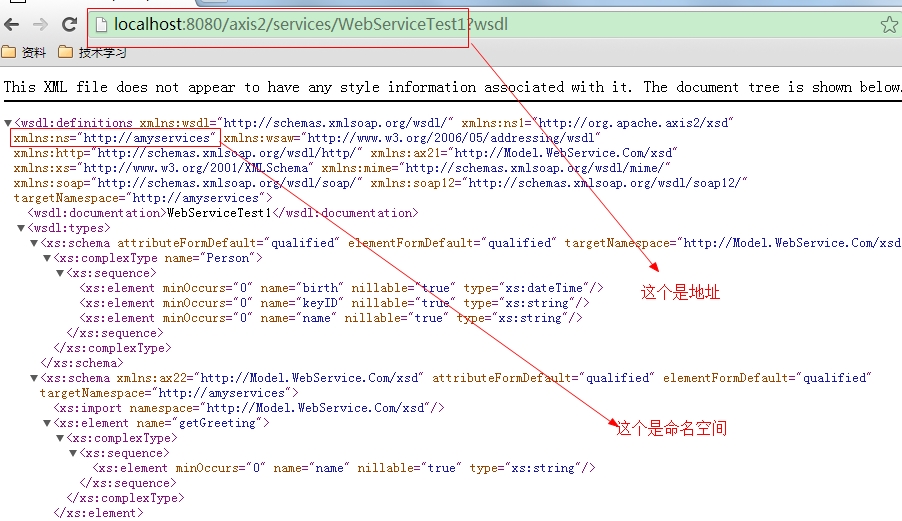
输入网址http://localhost:8080/axis2/services/listServices,会发现增加了我们刚创建的服务。
2 创建客户端
2.1 创建一个java项目
2.2 新建一个WsClient测试类
代码如下:
package com.amy.client; import javax.xml.namespace.QName;
import org.apache.axis2.AxisFault;
import org.apache.axis2.addressing.EndpointReference;
import org.apache.axis2.client.Options;
import org.apache.axis2.rpc.client.RPCServiceClient; public class WsClient {
private RPCServiceClient serviceClient;
private Options options;
private EndpointReference targetERP; public WsClient(String endpoint) throws AxisFault{
this.serviceClient = new RPCServiceClient();
this.options = this.serviceClient.getOptions();
this.targetERP = new EndpointReference(endpoint);
this.options.setTo(this.targetERP);
} public Object[] invokeOp(String targetNamespace, String opName,Object[] opArgs, Class<?>[]opReturnType) throws AxisFault, ClassNotFoundException{
QName opQName = new QName(targetNamespace, opName);
return this.serviceClient.invokeBlocking(opQName, opArgs, opReturnType);
} public static void main(String args[])
{
final String endpointReference = "http://localhost:8080/axis2/services/WebServiceTest1";
final String targetNamesPace = "http://amyservices";
try {
WsClient client = new WsClient(endpointReference);
String opName = "GetPersonList";
Object[] opArgs = new Object[]{};
Class<?>[] opReturnType = new Class[]{Person.class};
Object[] response = client.invokeOp(targetNamesPace, opName, opArgs, opReturnType);
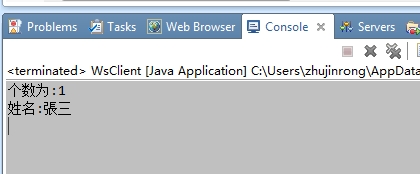
if (response != null && response.length > 0)
{
System.out.println(response.length);
for(Object obj : response)
{
Person model = (Person)obj;
System.out.println(model.getName());
}
} } catch (AxisFault e) {
// TODO Auto-generated catch block
e.printStackTrace();
} catch (ClassNotFoundException e) {
// TODO Auto-generated catch block
e.printStackTrace();
} }
}
2.3 要引用的jar包有
.classpath文件如下:
<?xml version="1.0" encoding="UTF-8"?>

<classpath>

    <classpathentry kind="src" path="src"/>

    <classpathentry kind="con" path="org.eclipse.jdt.launching.JRE_CONTAINER/org.eclipse.jdt.internal.debug.ui.launcher.StandardVMType/JavaSE-1.7"/>

    <classpathentry kind="lib" path="lib/axiom-impl-1.2.13.jar"/>

    <classpathentry kind="lib" path="lib/axis2-adb-1.6.2.jar"/>

    <classpathentry kind="lib" path="lib/axis2-kernel-1.6.2.jar" sourcepath="C:/Users/zhujinrong/.m2/repository/org/apache/axis2/axis2-kernel/1.6.2/axis2-kernel-1.6.2-sources.jar"/>

    <classpathentry kind="lib" path="lib/axis2-transport-http-1.6.2.jar"/>

    <classpathentry kind="lib" path="lib/axis2-transport-local-1.6.2.jar"/>

    <classpathentry kind="lib" path="lib/commons-codec-1.3.jar"/>

    <classpathentry kind="lib" path="lib/commons-httpclient-3.1.jar"/>

    <classpathentry kind="lib" path="lib/commons-logging-1.1.1.jar"/>

    <classpathentry kind="lib" path="lib/httpcore-4.0.jar"/>

    <classpathentry kind="lib" path="lib/neethi-3.0.2.jar"/>

    <classpathentry kind="lib" path="lib/wsdl4j-1.6.2.jar"/>

    <classpathentry kind="lib" path="lib/XmlSchema-1.4.7.jar"/>

    <classpathentry kind="lib" path="lib/axiom-api-1.2.13.jar"/>

    <classpathentry kind="lib" path="lib/activation-1.1.jar"/>

    <classpathentry kind="lib" path="lib/axis2-adb-codegen-1.6.2.jar"/>

    <classpathentry kind="lib" path="lib/axis2-java2wsdl-1.6.2.jar"/>

    <classpathentry kind="lib" path="lib/mail-1.4.jar"/>

    <classpathentry kind="lib" path="lib/woden-api-1.0M9.jar"/>

    <classpathentry kind="lib" path="lib/woden-impl-commons-1.0M9.jar"/>

    <classpathentry kind="lib" path="lib/woden-impl-dom-1.0M9.jar"/>

    <classpathentry kind="lib" path="lib/wstx-asl-3.2.9.jar"/>

    <classpathentry kind="lib" path="lib/xmlbeans-2.3.0.jar"/>

    <classpathentry kind="output" path="bin"/>

</classpath>
3 执行结果
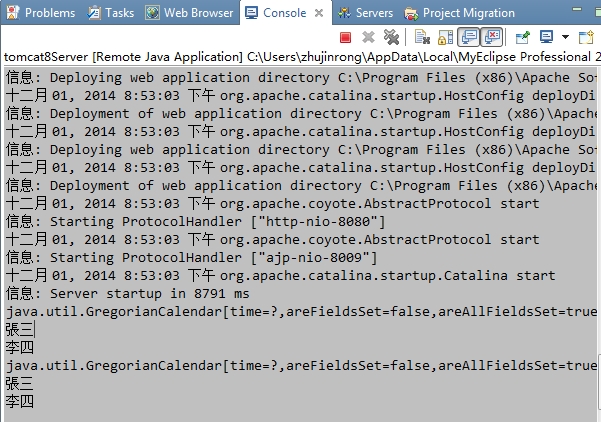
3.1 查看服务器启动

3.2 客户端
3.3 服务端情况
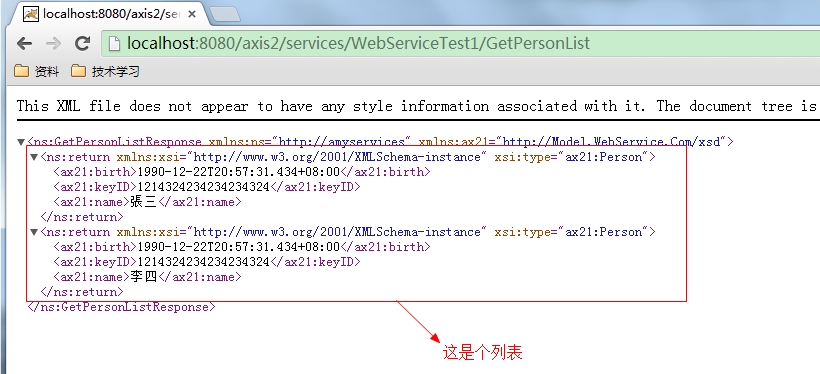
3.4 直接查询
axis2 webService开发指南(2)的更多相关文章
- axis2 webService开发指南(1)
参考文件:blog.csdn.net/IBM_hoojo http://hoojo.cnblogs.com/ 1 WebService简介 WebService让一个程序可以透明的调用互联网的程序,不 ...
- axis2 webService开发指南(3)
复杂对象类型的WebService 这次我们编写复杂点的WebService方法,返回的数据是我们定义属性带getter.setter方法JavaBean,一维数组.二维数组等 1.服务源代码 新建一 ...
- eclipse+axis2+webservice开发实例
myeclipse10安装axis2插件 第一步:下载axis2-1.6的插件压缩包,axis2-eclipse-codegen-plugin-1.6.2.zip 和 axis2-eclipse-se ...
- WebService开发指南
WebServiceInAurora Web Service Web Service是一种面向服务的架构的技术,通过标准的Web协议提供服务,目的是保证不同平台的应用服务可以互操作.在Aurora框架 ...
- 基于Myeclipse+Axis2的WebService开发实录
最近开始学习了下在Myeclipse开发工具下基于WebSerivce的开发,下面将相关相关关键信息予以记录 Myeclipse的安装,本文以Myeclipse2014-blue为开发环境,相关配置执 ...
- Axis2 webservice入门--写个简单的webservice
上一篇介绍了webservice开发前的准备.下面开始写webservice.如果不了解axis2请看上一篇,如果是新手:建议一边看一边写代码,自己动手完成这个过程. 一.新建一个web项目 二.新建 ...
- axis1,xfire,jUnit 测试案列+开Web Service开发指南+axis1.jar下载 代码
axis1,xfire,jUnit 测试案列+Web Service开发指南(中).pdf+axis1.jar下载 代码 项目和资源文档+jar 下载:http://download.csdn. ...
- Webservice开发概念
一.Web Service基本概念 Web Service由两部分组成 SOAP--Web Service之间的基本通信协议. WSDL--Web Service描述语言,它定义了Web Servic ...
- ASP.NET Aries 开源开发框架:开发指南(一)
前言: 上周开源了Aries开发框架后,好多朋友都Download了源码,在运行过程里,有一些共性的问题会问到. 所以本篇打算写一下简单的开发指南,照顾一下不是太看的懂源码的同学,同时也会讲解一下框架 ...
随机推荐
- C#/.NET 读取或修改文件的创建时间和修改时间
手工在博客中添加 Front Matter 文件头可是个相当费事儿的做法,这种事情就应该自动完成. .NET 中提供了非常方便的修改文件创建时间的方法,使用这种方法,能够帮助自动完成一部分文件头的编写 ...
- JSONModel源码阅读笔记
JSONModel是一个解析服务器返回的Json数据的库. http://blog.csdn.net/dyllove98/article/details/9050905 通常服务器传回的json数据要 ...
- 《DSP using MATLAB》示例Example 8.25
- 《DSP using MATLAB》示例Example 8.17
代码: %% ------------------------------------------------------------------------ %% Output Info about ...
- scrapy爬取验证码登录网页
scrapy 验证码登录程序, https://accounts.douban.com/login # -*- coding: utf-8 -*- import scrapy import urlli ...
- 【DUBBO】dubbo的Cluster接口
Directory中的多个Invoker伪装成一个Invoker, 对上层透明,包含集群的容错机制 Cluster可以看做是工厂类, 将目录directory下的invoker合并成一个统一的Invo ...
- java基础--关键字
- npm 可执行模块的开发&&私服发布
备注: 大家日常在使用npm 安装依赖的时候有一些是命令行工具,比如vue-cli,具体的开发比较简单,同时 可以基于此开发一些脚手架,方便开发. 1. 项目初始化 npm init 备注:按照 ...
- 将 PCB 文件转换为可读的文本
将 PCB 文件转换为可读的文本 将元件转成列表. 坐标也放到列表中. 以元件号为排序. 使用 json 格式,并格式,方便对比. 元件网络转成单独文件. 特殊说明生成单独文件.
- 【转】一步一步教你在Ubuntu12.04搭建gstreamer开发环境
原文网址:http://blog.csdn.net/xsl1990/article/details/8333062 闲得蛋疼 无聊寂寞冷 随便写写弄弄 看到网上蛮多搭建gstreamer开 ...