基于nginx搭建yum源服务器
1、首先关闭防护墙或者设置规则通过且关闭selinux
停止firewall
systemctl stop firewalld
禁止firewall开机启动
systemctl disable firewalld
或设置firewall规则
firewall-cmd --permanent --zone=public --add-service=http

firewall-cmd --reload
修改SELINUX=enforce行为SELINUX=disabled
sed -i 's/SELINUX=setenforce 0/SELINUX=disabled/' /etc/sysconfig/selinux
2、nginx-1.14.2版本(编译安装)-自定义安装路径
安装路径:/usr/local/nginx
1.前期准备
安装编译需要的gcc和gcc-c++
yum install -y gcc gcc-c++
安装nginx依赖pcre-devel、openssl-devel、zlib-devel
yum install -y pcre pcre-devel openssl openssl-devel zlib zlib-devel
下载nginx源码包并解压到当前目录
wget http://nginx.org/download/nginx-1.14.2.tar.gz

tar zxvf nginx-1.14..tar.gz
2.nginx编译安装
生成Makefile文件
cd nginx-1.14.

./configure --user=nginx \

--group=nginx \

--prefix=/usr/local/nginx/ \

--with-http_v2_module \

--with-http_ssl_module \

--with-http_sub_module \

--with-http_stub_status_module \

--with-http_gzip_static_module \

--with-pcre
编译源代码并安装
make && make install
3.后期结尾
创建用户
useradd nginx
添加环境变量,创建nginx命令软链接到环境变量
ln -s /usr/local/nginx/sbin/* /usr/local/sbin/
4.配置nginx开启php支持(仅参考)
在server段中开启php支持
找到如下内容,删除注释字符,并将倒数第二行的 /scripts 替换为 $document_root
修改前
#location ~ \.php$ {
# root html;
# fastcgi_pass 127.0.0.1:9000;
# fastcgi_index index.php;
# fastcgi_param SCRIPT_FILENAME /scripts$fastcgi_script_name;
# include fastcgi_params;
#}
修改后
location ~ \.php$ {
root html;
fastcgi_pass 127.0.0.1:9000;
fastcgi_index index.php;
fastcgi_param SCRIPT_FILENAME $document_root$fastcgi_script_name;
include fastcgi_params;
}
该段代码在server中的位置:
server {
listen 80;
server_name localhost;
location / {
root html;
index index.php index.html index.htm;
}
location ~ \.php$ {
root html;
fastcgi_pass 127.0.0.1:9000;
fastcgi_index index.php;
fastcgi_param SCRIPT_FILENAME $document_root$fastcgi_script_name;
include fastcgi_params;
}
}
注意:location ~ \.php$ {}块中root的值和location / {}块中root的值需要一致
3、开启nginx目录浏览
vim /usr/local/nginx/conf/nginx.conf
添加如下内容:
location / {

        root /usr/local/nginx/html/pack/    //指定实际目录绝对路径;

        autoindex on;                       //开启目录浏览功能;

        autoindex_exact_size off;           //关闭详细文件大小统计,让文件大小显示MB,GB单位,默认为b;

        autoindex_localtime on;             //开启以服务器本地时区显示文件修改日期!

}

还有一个问题是这里开启的是全局的目录浏览功能,那么如何实现具体目录浏览功能呢?(仅参考)
2. 只打开网站部分目录浏览功能
只打开http://www.******.com/soft 目录浏览
vi /usr/local/nginx/conf/nginx.conf #编辑配置文件,在server {下面添加以下内容:
location /soft {
autoindex on;
autoindex_exact_size off;
autoindex_localtime on;
}
:wq! #保存,退出
4、创建目录
在web根目录下创建centosplus、extras、updates、os四个目录
mkdir centosplus extras updates os
#这四个目录用来区分类型(仅参考)
for DIR in $(ls); do cd $DIR; mkdir Packages; cd ..; done
#分别在四个目录下创建存储rpm包的目录
5、利用rsync同步至本地
rsync -avz --delete rsync://mirrors.ustc.edu.cn/centos/6/os/x86_64/Packages/ /usr/local/nginx/html/pack/centos/6/os/x86_64/Packages/

rsync -avz --delete rsync://mirrors.ustc.edu.cn/centos/6/extras/x86_64/Packages/ /usr/local/nginx/html/pack/centos/6/extras/x86_64/Packages/

rsync -avz --delete rsync://mirrors.ustc.edu.cn/centos/6/updates/x86_64/Packages/ /usr/local/nginx/html/pack/centos/6/updates/x86_64/Packages/

rsync -avz --delete rsync://mirrors.ustc.edu.cn/centos/6/centosplus/x86_64/Packages/ /usr/local/nginx/html/pack/centos/6/centosplus/x86_64/Packages/
rsync -avz --delete rsync://mirrors.ustc.edu.cn/centos/7/os/x86_64/Packages/ /usr/local/nginx/html/pack/centos/7/os/x86_64/Packages/

rsync -avz --delete rsync://mirrors.ustc.edu.cn/centos/7/extras/x86_64/Packages/ /usr/local/nginx/html/pack/centos/7/extras/x86_64/Packages/

rsync -avz --delete rsync://mirrors.ustc.edu.cn/centos/7/updates/x86_64/Packages/ /usr/local/nginx/html/pack/centos/7/updates/x86_64/Packages/

rsync -avz --delete rsync://mirrors.ustc.edu.cn/centos/7/centosplus/x86_64/Packages/ /usr/local/nginx/html/pack/centos/7/centosplus/x86_64/Packages/
或者同步全部数据(数据量较大不推荐,大小约136G)
rsync -avz --delete rsync://mirrors.ustc.edu.cn/centos/ /usr/local/nginx/html/pack/centos/
提供几个支持rsync同步的网站
mirrors.tuna.tsinghua.edu.cn
mirrors.ustc.edu.cn
mirrors.kernel.org
mirrors.neusoft.edu.cn
6、创建仓库
对三个目录使用createrepo创建仓库(生成repodata目录),供client端检索使用
yum install -y createrepo
createrepo /usr/local/nginx/html/pack/centos//os/x86_64/

createrepo /usr/local/nginx/html/pack/centos//extras/x86_64/

createrepo /usr/local/nginx/html/pack/centos//updates/x86_64/

createrepo /usr/local/nginx/html/pack/centos//centosplus/x86_64/
createrepo /usr/local/nginx/html/pack/centos//os/x86_64/

createrepo /usr/local/nginx/html/pack/centos//extras/x86_64/

createrepo /usr/local/nginx/html/pack/centos//updates/x86_64/

createrepo /usr/local/nginx/html/pack/centos//centosplus/x86_64/
#-o 指定repodata生成的目录
此时yum服务器已经搭建完成
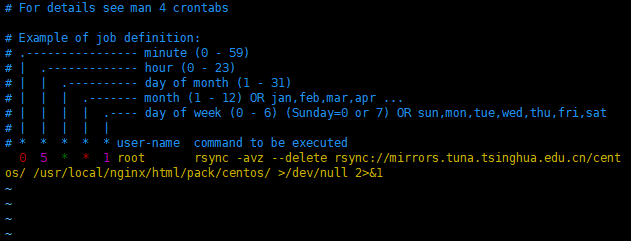
7、创建计划任务
vim /etc/crontab
添加以下内容:
* * root rsync -avz --delete rsync://mirrors.ustc.edu.cn/centos/ /usr/local/nginx/html/pack/centos/ >/dev/null 2>&1 #每周一5点执行同步命令
同步完成后需要更新仓库
createrepo --update /usr/local/nginx/html/pack/centos//os/x86_64/

createrepo --update /usr/local/nginx/html/pack/centos//extras/x86_64/

createrepo --update /usr/local/nginx/html/pack/centos//updates/x86_64/

createrepo --update /usr/local/nginx/html/pack/centos//centosplus/x86_64/

createrepo --update /usr/local/nginx/html/pack/centos//os/x86_64/

createrepo --update /usr/local/nginx/html/pack/centos//extras/x86_64/

createrepo --update /usr/local/nginx/html/pack/centos//updates/x86_64/

createrepo --update /usr/local/nginx/html/pack/centos//centosplus/x86_64/
8、客户端配置
mv /etc/yum.repos.d/CentOS-Base.repo /etc/yum.repos.d/CentOS-Base.repo.bak
cat >> /etc/yum.repos.d/CentOS-Base.repo << eof

[base]

name=CentOS-$releasever - Base

baseurl=http://mirrors.yryun.com/centos/$releasever/os/$basearch/

enabled=

gpgcheck=

#released updates

[updates]

name=CentOS-$releasever - Updates

baseurl=http://mirrors.yryun.com/centos/$releasever/updates/$basearch/

enabled=

gpgcheck=

#additional packages that may be useful

[extras]

name=CentOS-$releasever - Extras

baseurl=http://mirrors.yryun.com/centos/$releasever/extras/$basearch/

enabled=

gpgcheck=

#additional packages that extend functionality of existing packages

[centosplus]

name=CentOS-$releasever - Plus

baseurl=http://mirrors.yryun.com/centos/$releasever/centosplus/$basearch/

enabled=

gpgcheck=

eof
#清除所有缓存
yum clean all
#建立缓存
yum makecache
#查看yum源列表
yum repolist
#当yum服务器内容修改了之后或者修改了yum源文件,客户机需要重新建立缓存
#baseurl指向仓库(repodata)所在的目录
基于nginx搭建yum源服务器的更多相关文章
- 基于http方式搭建YUM源服务器
基于http方式搭建YUM源服务器 (2012-09-21 11:59:14) 转载▼ 标签: yum linux lnmp lamp http 分类: Linux 为了方便公司80多台Linux服务 ...
- CentOS6下基于Nginx搭建mp4/flv流媒体服务器
CentOS6下基于Nginx搭建mp4/flv流媒体服务器(可随意拖动)并支持RTMP/HLS协议(含转码工具) 1.先添加几个RPM下载源 1.1)安装RPMforge的CentOS6源 [roo ...
- FTP搭建YUM源服务器
一.FTP搭建YUM源服务器 1.服务器 挂载centos镜像[root@localhost ~]#yum install vsftpd[root@localhost ~]#systemctl sta ...
- Ubuntu 14.10下基于Nginx搭建mp4/flv流媒体服务器(可随意拖动)并支持RTMP/HLS协议(含转码工具)
Ubuntu 14.10下基于Nginx搭建mp4/flv流媒体服务器(可随意拖动)并支持RTMP/HLS协议(含转码工具) 最近因为项目关系,收朋友之托,想制作秀场网站,但是因为之前一直没有涉及到这 ...
- windows环境下基于nginx搭建rtmp服务器
基于nginx搭建rtmp服务器需要引入rtmp模块,引入之后需重新编译nginx linux环境几个命令行就能实现编译,笔者未尝试,网上有很多教程. windows环境还需要安装一系列的编译环境,例 ...
- 基于nginx搭建简易的基于wcf集群的复杂均衡
很多情况下基于wcf的复杂均衡都首选zookeeper,这样可以拥有更好的控制粒度,但zk对C# 不大友好,实现起来相对来说比较麻烦,实际情况下,如果 你的负载机制粒度很粗糙的话,优先使用nginx就 ...
- 在centos中搭建基于nginx的apt源服务器,整合yum源和apt源在一台服务器
1.首先关闭防护墙或者设置规则通过且关闭selinux 2.nginx-1.14.2版本(编译安装)-自定义安装路径 3.开启nginx目录浏览 以上步骤请参考前文:https://www.cnblo ...
- RedHat7搭建yum源服务器
1.新建目录 # mkdir -p /content/rhel7/x86_64/{isos,dvd}/ 2.上传RedHat安装光盘镜像,上传后的路径为 /content/rhel7/x86_64/i ...
- CentOS6.4下基于Nginx搭建mp4/flv流媒体服务器
我的步骤如下:1. 安装依赖包: yum install glibc.i686#yum –y update#yum -y install gcc glibc glibc-devel make nasm ...
随机推荐
- java.lang.UnsatisfiedLinkError:dlopen failed: “**/*/arm/*.so” has unexpected e_machine: 3
转载请标明出处,维权必究:https://www.cnblogs.com/tangZH/p/10458448.html 今天在做APP的时候使用so库,可结果一加载so库的时候便发生了这个莫名其妙的错 ...
- Android 上传图片到服务器 okhttp一
[目录] (一)上传图片到服务器一 ---------------------------------Android代码 (二)上传图片到服务器二--------------------------- ...
- 【转载】 Sqlserver中查看自定义函数被哪些对象引用
Sqlserver数据库中支持自定义函数,包含表值函数和标量值函数,表值函数一般返回多个数据行即数据集,而标量值函数一般返回一个值,在数据库的存储过程中可调用自定义函数,也可在该自定义函数中调用另一个 ...
- 【SQL Server】利用游标将学生表中的成绩转化为绩点
软件工程综合实践第一次作业 代码来源:班上同学的数据库大作业 alter table sc add GPA float; --加入绩点列 alter table sc ,);--将表按原始位置顺序编号 ...
- 正确的git开发流程
正确的git开发流程 第一步 在github中创建一个新的仓库,这时候项目是空的,而且只有一个master分支 第二步 第一个开发人员进来了,他在本地创建一个develop分支,并且提交到远程 git ...
- 禁止WPS2019开机自启动
最近开机发现WPS总是自己启动,导致开机速度会慢5s左右,从网上找了很多办法都没用,包括运行+msconfig,启动项里面没有WPS:杀毒软件自启动管理里面也没有找到WPS,百度了一圈也没有找到任何有 ...
- 你所不知道的 CSS 阴影技巧与细节
关于 CSS 阴影,之前已经有写过一篇,box-shadow 与 filter:drop-shadow 详解及奇技淫巧,介绍了一些关于 box-shadow 的用法. 最近一个新的项目,CSS-Ins ...
- PHP全栈学习笔记3
trim()函数,用于去除字符串首尾空格和特殊字符 返回的是去掉的空格和特殊字符后的字符串 string trim(string str [,string charlist]); str 要操作的字符 ...
- RocketMQ4.4.0新特性分享
rocketmq1.架构 MQ历史 由数据结构队列发展而来 MQ使用场景 异步处理 解耦 削峰填谷 数据同步2.队列3.使用 生产 同步(sync) 默认重试2次总共3次 默认等待超时时间为3s 异步 ...
- python进程和线程(五)
python的进程 由于GIL的存在,python中的多线程其实并不是真正的多线程,如果想要充分地使用多核CPU的资源,在python中大部分情况需要使用多进程.Python提供了非常好用的多进程包m ...