第四章 客户端负载均衡:Spring Cloud Ribbon
spring cloud ribbon 是一个基于 HTTP 和 TCP 的客户端负载均衡工具,它基于Netflix Ribbon 实现。通过Spring Cloud 的封装,可以轻松的将面向服务的REST模块请求自动转换为客户端负载均衡的服务调用。Spring Cloud Ribbon 虽然只是一个工具类框架,不像服务注册中心、配置中心、API网关那样需要独立部署,但它几乎存在于每一个Spring Cloud 构建的微服务和基础设施中。因为微服务间的调用,API网关的请求转发等内容,实际上都是通过 Ribbon 来实现的,包括后续要介绍的 Feign,它也是基于Ribbon实现的工具。
客户端负载均衡
负载均衡在系统架构中是一个非常重要,并且不得不去实施的内容。因为负载均衡是对系统的高可用、网络压力的缓解和处理能力扩容的重要手段之一。通常说的负载均衡都指的是服务端负载均衡,其中分为硬件负载均衡和软件负载均衡。硬件负载均衡主要是通过在服务器节点之间安装专门用于负载均衡的设备,比如F5等;而软件负载均衡则是通过在服务器上安装一些具有负载均衡功能或模块的软件来完成请求分发工作,比如Nginx等。不管是硬件还是软件负载均衡,只要是服务器端负载均衡都能以类似下图的架构方式构建起来:
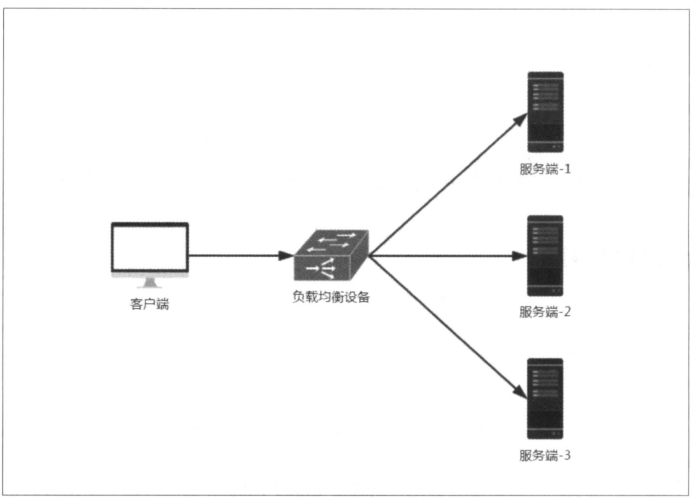
硬件负载均衡的设备或是软件负载均衡的软件模块都会维护一个下挂可用的服务端清单,通过心跳监测来剔除故障的服务端节点以保证清单中都是可以正常访问的服务端节点。当客户端发送请求到负载均衡设备的时候,该设备按某种算法(比如线性轮询、按权重负载、按流量负载等)从维护的可用服务端清单中取出一台服务端的地址,然后进行转发。
而客户端的负载均衡和服务端的负载均衡最大的不同点在于上面所提到的服务清单所存储的位置。在客户端负载均衡中,所有客户端节点都维护着自己要访问的服务端清单,而这些服务端的清单来自于服务注册中心,比如上一章中介绍的Eureka服务端。同服务端负载均衡的架构类似,在客户端负载均衡中也需要心跳去维护服务端清单的健康性,只是这个步骤需要与服务注册中心配合完成。在Spring Cloud 实现的服务治理框架中,默认会创建针对各个服务治理框架的 Ribbon 自动化整合配置,比如 Eureka 中的 org.springframework.cloud.netflix.ribbon.eureka.RibbonEurekaAutoConfiguration,Consul 中的 org.springframework.cloud.consul.discovery.RibbonConsulAutoConfiguration。在实际使用的时候,可以通过查看这两个类的实现,以找到它们的配置详情来帮助我们更好的使用它。
通过 Spring Cloud Ribbon 的封装,我们在微服务架构中使用客户端负载均衡调用非常简单,只需要如下两步:
- 服务提供者只需要启动多个服务实例并注册到一个注册中心或是多个相关联的服务注册中心。
- 服务消费者直接通过调用被 @LoadBalanced 注解修饰过的 RestTemplate 来实现面向服务的接口调用。
RestTemplate 详解
上一章中,我们通过引入Ribbon实现了服务消费者的客户端负载均衡功能。其中,我们使用了一个非常有用的对象 RestTemplate 。该对象会使用 Ribbon 的自动化配置,同时通过配置 @LoadBalanced 还能够开启客户端负载均衡。之前演示了通过 RestTemplate 实现了最简单的服务访问,下面详细介绍 RestTemplate 针对几种不同请求类型和参数类型的服务调用实现。
GET请求
在 RestTemplate 中,对GET请求可以通过如下两个方法进行调用。
第一种:getForEntity 函数。该方法返回的是 ResponseEntity,该对象是Spring 对 HTTP 请求响应的封装,其中主要存储了 HTTP 的几个重要元素,比如 HTTP 请求状态码的枚举对象 HttpStatus(404,500这些错误码)、在它的父类 HttpEntity 中还存储着 HTTP 请求的头信息对象 HttpHeaders 以及泛型类型的请求体对象。比如下面的例子,就是访问HELLO-SERVER服务的/index请求,同时最后一个参数didi 会替换 url 中的 {1} 占位符,而返回的 ResponseEntity 对象中的 body 内容类型会根据第二个参数转换为 String 类型。
RestTemplate restTemplate = new RestTemplate ();

ResponseEntity<String> responseEntity = restTemplate.getForEntity("http://HELLO-SERVICE/index?name={1}",String.class,"didi");

String body = responseEntity.getBody();
若希望返回一个自定义类型,比如返回User类型,可以把第二个参数换成User.class,如下:
RestTemplate restTemplate = new RestTemplate ();

ResponseEntity<String> responseEntity = restTemplate.getForEntity("http://HELLO-SERVICE/index?name={1}",User.class,"didi");

User body = responseEntity.getBody();
上面的例子是比较常用的方法,getForEntity 函数实际上提供了一下三种不同的重载实现。
- getForEntity(String url, Class<T> responseType, Object... uriVariables):url 为请求地址,responseType 为请求响应体body的包装类型, uriVariables 为 url 中的参数绑定。GET 请求的参数绑定通常使用url 中拼接的方式,比如 http://HELLO-SERVICE/index?name= didi ,但更好的方法是在 url 中使用占位符并配合 uriVariables 参数实现GET 请求的参数绑定。由于uriVariables 参数一个数组,所以它的顺序会对应 url 中占位符定义的数字顺序。
- getForEntity(String url, Class<T> responseType, Map<String, ?> uriVariables):这个方法和上述的方法只有uriVariables 的参数类型不同,表示此处需要在占位符中指定Map中参数的key值,比如: http://HELLO-SERVICE/index?name={name},而Map类型的 uriVariables 中,就需要一个 key 为name 的参数来绑定 url 中 {name} 占位符的值。
- getForEntity(URI url, Class<T> responseType):该方法使用 URI 对象来替代之前的 url 和 uriVariables 参数来指定访问地址和参数绑定。URI 是 JDK java.net 包下的一个类,它表示一个统一资源标识符引用。
第二种:getForObject 函数。该方法可以理解为对 getForEntity 的进一步封装,它通过 HttpMessageConverterExtractor 对 HTTP 的请求响应体 body 内容进行对象转换,实现请求直接返回包装好的对象内容。比如:
RestTemplate restTemplate = new RestTemplate ();

String body = restTemplate .getForObject(url, String.class);
当body 是一个User对象时,可以直接这样实现:
RestTemplate restTemplate = new RestTemplate ();

User body = restTemplate .getForObject(url, User.class);
该方法也提供了三种不同的重载实现(参数和上面的方法类似):
- getForObject(String url, Class<T> responseType, Object... uriVariables)
- getForObject(String url, Class<T> responseType, Map<String, ?> uriVariables)
- getForObject(URI url, Class<T> responseType)
POST请求
在RestTemplate中,对POST请求时可以通过如下三个方法进行调用实现。
第一种:postForEntity 函数。使用方法和 getForEntity 函数类似
postForEntity 函数也实现了三种不同的重载方法。
- postForEntity(String url, Object request, Class<T> responseType, Object... uriVariables)
- postForEntity(String url, Object request, Class<T> responseType, Map<String, ?> uriVariables)
- postForEntity(URI url, Object request, Class<T> responseType)
这几个函数的参数用法大部分都与 getForEntity 函数一致。
第二种:postForObject 函数。该函数也和 getForObject 函数类似,它的作用是简化 postForEntity 函数的后续处理。
postForObject 函数也实现了三种不同的重载方法(使用方法和上述类似):
- postForObject(String url, Object request, Class<T> responseType, Object... uriVariables)
- postForObject(String url, Object request, Class<T> responseType, Map<String, ?> uriVariables)
- postForObject(URI url, Object request, Class<T> responseType)
第三种:postForLocation 函数
postForLocation 也实现了三种不同的重载方法(使用方法和上述类似):
- postForLocation(String url, Object request, Object... uriVariables)
- postForLocation(String url, Object request, Map<String, ?> uriVariables)
- postForLocation(URI url, Object request)
PUT请求、DELETE请求
这两个请求的函数都直接以 put 、delete 作为方法名,使用方法和上述类似。
源码分析
从上述消费者示例中可以发现, @LoadBalanced 注解实现了客户端的负载均衡。通过搜索LoadBalancerClient 可以发现,这是 Spring Cloud 中定义的一个接口:
//

// Source code recreated from a .class file by IntelliJ IDEA

// (powered by Fernflower decompiler)

//

package org.springframework.cloud.client.loadbalancer;

import java.io.IOException;

import java.net.URI;

import org.springframework.cloud.client.ServiceInstance;

import org.springframework.cloud.client.loadbalancer.LoadBalancerRequest;

import org.springframework.cloud.client.loadbalancer.ServiceInstanceChooser;

public interface LoadBalancerClient extends ServiceInstanceChooser {

    <T> T execute(String var1, LoadBalancerRequest<T> var2) throws IOException;

    <T> T execute(String var1, ServiceInstance var2, LoadBalancerRequest<T> var3) throws IOException;

    URI reconstructURI(ServiceInstance var1, URI var2);

}
//

// Source code recreated from a .class file by IntelliJ IDEA

// (powered by Fernflower decompiler)

//

package org.springframework.cloud.client.loadbalancer;

import org.springframework.cloud.client.ServiceInstance;

public interface ServiceInstanceChooser {

    ServiceInstance choose(String var1);

}
从该接口中,我们可以通过定义的抽象方法来了解客户端负载均衡器中应具备的几种能力:
- ServiceInstance choose(String serviceId):根据传入的服务名serviceId ,从负载均衡器中挑选一个对应服务的实例。
- T execute(String serviceId,LoadBalancerRequest request) throws IOException:使用从负载均衡器中挑选出的服务实例来执行请求内容。
- URI reconstructURI(ServiceInstance instance,URI original):为系统构建一个合适的host:port 形式的URI。在分布式系统中,我们使用逻辑上的服务名称作为host 来构建URI(替代服务实例的host:port形式)进行请求,比如 http://myservice/path/to/service。在该操作的定义中,前者 ServiceInstance 对象是带有 host 和port 的具体服务实例,而后者URI 对象则是使用逻辑服务名定义为 host 的URI,而返回的 URI 内容则是通过 ServiceInstance 的服务实例详情拼接出的具体的 host:port 形式的请求地址。
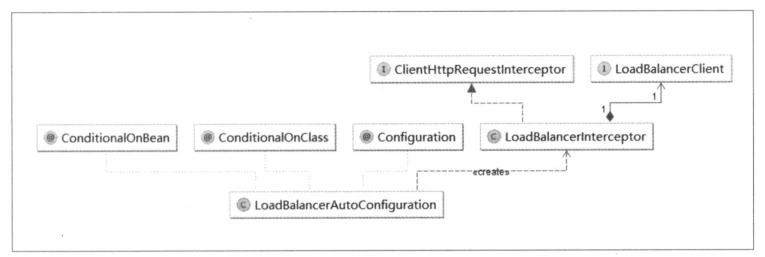
顺着 LoadBalancerClient 接口的所属包 org.springframework.cloud.client.loadbalancer,我们对其内容进行整理,可以得出如下图所示的关系:
从类名可初步判断 loadBalancerAutoConfiguration 为实现客户端负载均衡器的自动化配置类。通过查看源码,可以得到验证:
//

// Source code recreated from a .class file by IntelliJ IDEA

// (powered by Fernflower decompiler)

//

package org.springframework.cloud.client.loadbalancer;

import java.util.ArrayList;

import java.util.Collections;

import java.util.Iterator;

import java.util.List;

import org.springframework.beans.factory.SmartInitializingSingleton;

import org.springframework.beans.factory.annotation.Autowired;

import org.springframework.boot.autoconfigure.condition.ConditionalOnBean;

import org.springframework.boot.autoconfigure.condition.ConditionalOnClass;

import org.springframework.boot.autoconfigure.condition.ConditionalOnMissingBean;

import org.springframework.boot.autoconfigure.condition.ConditionalOnMissingClass;

import org.springframework.boot.context.properties.EnableConfigurationProperties;

import org.springframework.cloud.client.loadbalancer.LoadBalanced;

import org.springframework.cloud.client.loadbalancer.LoadBalancedRetryPolicyFactory;

import org.springframework.cloud.client.loadbalancer.LoadBalancerClient;

import org.springframework.cloud.client.loadbalancer.LoadBalancerInterceptor;

import org.springframework.cloud.client.loadbalancer.LoadBalancerRequestFactory;

import org.springframework.cloud.client.loadbalancer.LoadBalancerRequestTransformer;

import org.springframework.cloud.client.loadbalancer.LoadBalancerRetryProperties;

import org.springframework.cloud.client.loadbalancer.RestTemplateCustomizer;

import org.springframework.cloud.client.loadbalancer.RetryLoadBalancerInterceptor;

import org.springframework.cloud.client.loadbalancer.LoadBalancedRetryPolicyFactory.NeverRetryFactory;

import org.springframework.context.annotation.Bean;

import org.springframework.context.annotation.Configuration;

import org.springframework.retry.support.RetryTemplate;

import org.springframework.web.client.RestTemplate;

@Configuration

@ConditionalOnClass({RestTemplate.class})

@ConditionalOnBean({LoadBalancerClient.class})

@EnableConfigurationProperties({LoadBalancerRetryProperties.class})

public class LoadBalancerAutoConfiguration {

    @LoadBalanced

    @Autowired(

        required = false

    )

    private List<RestTemplate> restTemplates = Collections.emptyList();

    @Autowired(

        required = false

    )

    private List<LoadBalancerRequestTransformer> transformers = Collections.emptyList();

    public LoadBalancerAutoConfiguration() {

    }

    @Bean

    public SmartInitializingSingleton loadBalancedRestTemplateInitializer(final List<RestTemplateCustomizer> customizers) {

        return new SmartInitializingSingleton() {

            public void afterSingletonsInstantiated() {

                Iterator var1 = LoadBalancerAutoConfiguration.this.restTemplates.iterator();

                while(var1.hasNext()) {

                    RestTemplate restTemplate = (RestTemplate)var1.next();

                    Iterator var3 = customizers.iterator();

                    while(var3.hasNext()) {

                        RestTemplateCustomizer customizer = (RestTemplateCustomizer)var3.next();

                        customizer.customize(restTemplate);

                    }

                }

            }

        };

    }

    @Bean

    @ConditionalOnMissingBean

    public LoadBalancerRequestFactory loadBalancerRequestFactory(LoadBalancerClient loadBalancerClient) {

        return new LoadBalancerRequestFactory(loadBalancerClient, this.transformers);

    }

    @Configuration

    @ConditionalOnClass({RetryTemplate.class})

    public static class RetryInterceptorAutoConfiguration {

        public RetryInterceptorAutoConfiguration() {

        }

        @Bean

        @ConditionalOnMissingBean

        public RetryLoadBalancerInterceptor ribbonInterceptor(LoadBalancerClient loadBalancerClient, LoadBalancerRetryProperties properties, LoadBalancedRetryPolicyFactory lbRetryPolicyFactory, LoadBalancerRequestFactory requestFactory) {

            return new RetryLoadBalancerInterceptor(loadBalancerClient, properties, lbRetryPolicyFactory, requestFactory);

        }

        @Bean

        @ConditionalOnMissingBean

        public RestTemplateCustomizer restTemplateCustomizer(final RetryLoadBalancerInterceptor loadBalancerInterceptor) {

            return new RestTemplateCustomizer() {

                public void customize(RestTemplate restTemplate) {

                    ArrayList list = new ArrayList(restTemplate.getInterceptors());

                    list.add(loadBalancerInterceptor);

                    restTemplate.setInterceptors(list);

                }

            };

        }

    }

    @Configuration

    @ConditionalOnClass({RetryTemplate.class})

    public static class RetryAutoConfiguration {

        public RetryAutoConfiguration() {

        }

        @Bean

        public RetryTemplate retryTemplate() {

            RetryTemplate template = new RetryTemplate();

            template.setThrowLastExceptionOnExhausted(true);

            return template;

        }

        @Bean

        @ConditionalOnMissingBean

        public LoadBalancedRetryPolicyFactory loadBalancedRetryPolicyFactory() {

            return new NeverRetryFactory();

        }

    }

    @Configuration

    @ConditionalOnMissingClass({"org.springframework.retry.support.RetryTemplate"})

    static class LoadBalancerInterceptorConfig {

        LoadBalancerInterceptorConfig() {

        }

        @Bean

        public LoadBalancerInterceptor ribbonInterceptor(LoadBalancerClient loadBalancerClient, LoadBalancerRequestFactory requestFactory) {

            return new LoadBalancerInterceptor(loadBalancerClient, requestFactory);

        }

        @Bean

        @ConditionalOnMissingBean

        public RestTemplateCustomizer restTemplateCustomizer(final LoadBalancerInterceptor loadBalancerInterceptor) {

            return new RestTemplateCustomizer() {

                public void customize(RestTemplate restTemplate) {

                    ArrayList list = new ArrayList(restTemplate.getInterceptors());

                    list.add(loadBalancerInterceptor);

                    restTemplate.setInterceptors(list);

                }

            };

        }

    }

}
从该类的类注解可知,Ribbon 实现的负载均衡自动化配置需要满足下面两个条件。
- @ConditionOnClass(RestTemplate.class):RestTemplate 类必须存在于当前工程的环境中。
- @ConditionOnBean(LoadBalancerClient.class):在Spring的Bean工程中必须有 LoadBalancerClient 的实现Bean。
在该类中,主要做了下面三件事:
- 创建了一个 LoadBalancerInterceptor 的 Bean,用于实现对客户端发起请求时进行拦截,以实现客户端负载均衡。
- 创建了一个 RestTemplateCustomizer 的 Bean,用于给 RestTemplate 增加 LoadBalancerInterceptor 拦截器。
- 维护了一个被 @LoadBalanced 注解修饰的 RestTemplate 对象列表,并在这里进行初始化,通过调用 RestTemplateCustomizer 的实例来给需要客户端负载均衡的 RestTemplate 增加 LoadBalancerInterceptor 拦截器。
接着看下 LoadBalancerInterceptor 拦截器是如何讲一个普通的 RestTemplate 变成客户端负载均衡的:
//

// Source code recreated from a .class file by IntelliJ IDEA

// (powered by Fernflower decompiler)

//

package org.springframework.cloud.client.loadbalancer;

import java.io.IOException;

import java.net.URI;

import org.springframework.cloud.client.loadbalancer.LoadBalancerClient;

import org.springframework.cloud.client.loadbalancer.LoadBalancerRequestFactory;

import org.springframework.http.HttpRequest;

import org.springframework.http.client.ClientHttpRequestExecution;

import org.springframework.http.client.ClientHttpRequestInterceptor;

import org.springframework.http.client.ClientHttpResponse;

import org.springframework.util.Assert;

public class LoadBalancerInterceptor implements ClientHttpRequestInterceptor {

    private LoadBalancerClient loadBalancer;

    private LoadBalancerRequestFactory requestFactory;

    public LoadBalancerInterceptor(LoadBalancerClient loadBalancer, LoadBalancerRequestFactory requestFactory) {

        this.loadBalancer = loadBalancer;

        this.requestFactory = requestFactory;

    }

    public LoadBalancerInterceptor(LoadBalancerClient loadBalancer) {

        this(loadBalancer, new LoadBalancerRequestFactory(loadBalancer));

    }

    public ClientHttpResponse intercept(HttpRequest request, byte[] body, ClientHttpRequestExecution execution) throws IOException {

        URI originalUri = request.getURI();

        String serviceName = originalUri.getHost();

        Assert.state(serviceName != null, "Request URI does not contain a valid hostname: " + originalUri);

        return (ClientHttpResponse)this.loadBalancer.execute(serviceName, this.requestFactory.createRequest(request, body, execution));

    }

}
通过源码以及之前的自动化配置类,我们可以看到在拦截器中注入了 LoadBalancerClient 的实现。当一个被 @LoadBalanced 注解修饰的 RestTemplate 对象向外发起 HTTP 请求时,会被 LoadBalancerInterceptor 类的 intercept 函数所拦截。由于我们在使用 RestTemplate 时采用了服务名作为host,所以直接从 HttpRequest 的 URI 对象中通过 getHost 函数就可以拿到服务名,然后调用 execute 函数去根据服务名来选择实例并发起实际的请求。
到此,LoadBalancerClient 还只是一个抽象的负载均衡器接口,所以我们还需要找到它的具体实现类来进一步分析。通过查看 Ribbon 的源码,可以在 org.springframework.cloud.netflix.ribbon 包下找到对应的实现类 RibbonLoadBalancerClient 。
public <T> T execute(String serviceId, LoadBalancerRequest<T> request) throws IOException {

        ILoadBalancer loadBalancer = this.getLoadBalancer(serviceId);

        Server server = this.getServer(loadBalancer);

        if(server == null) {

            throw new IllegalStateException("No instances available for " + serviceId);

        } else {

            RibbonLoadBalancerClient.RibbonServer ribbonServer = new RibbonLoadBalancerClient.RibbonServer(serviceId, server, this.isSecure(server, serviceId), this.serverIntrospector(serviceId).getMetadata(server));

            return this.execute(serviceId, ribbonServer, request);

        }

    }

    public <T> T execute(String serviceId, ServiceInstance serviceInstance, LoadBalancerRequest<T> request) throws IOException {

        Server server = null;

        if(serviceInstance instanceof RibbonLoadBalancerClient.RibbonServer) {

            server = ((RibbonLoadBalancerClient.RibbonServer)serviceInstance).getServer();

        }

        if(server == null) {

            throw new IllegalStateException("No instances available for " + serviceId);

        } else {

            RibbonLoadBalancerContext context = this.clientFactory.getLoadBalancerContext(serviceId);

            RibbonStatsRecorder statsRecorder = new RibbonStatsRecorder(context, server);

            try {

                Object ex = request.apply(serviceInstance);

                statsRecorder.recordStats(ex);

                return ex;

            } catch (IOException var8) {

                statsRecorder.recordStats(var8);

                throw var8;

            } catch (Exception var9) {

                statsRecorder.recordStats(var9);

                ReflectionUtils.rethrowRuntimeException(var9);

                return null;

            }

        }

    }
可以看到,在execute 函数的实现中,第一步做的就是通过 getServer 根据传入的服务名 serviceId 去获得具体的服务实例:
 protected Server getServer(ILoadBalancer loadBalancer) {

        return loadBalancer == null?null:loadBalancer.chooseServer("default");

 }
通过该函数的实现,可以看到这里获取具体服务实例的时候并没有使用 LoadBalancerClient 接口中的 choose 函数,而是使用了 Netflix Ribbon 自身的 ILoadBalancer 接口中定义的 chooseServer 函数。
//

// Source code recreated from a .class file by IntelliJ IDEA

// (powered by Fernflower decompiler)

//

package com.netflix.loadbalancer;

import com.netflix.loadbalancer.Server;

import java.util.List;

public interface ILoadBalancer {

    void addServers(List<Server> var1);

    Server chooseServer(Object var1);

    void markServerDown(Server var1);

    /** @deprecated */

    @Deprecated

    List<Server> getServerList(boolean var1);

    List<Server> getReachableServers();

    List<Server> getAllServers();

}
可以看到,在该接口中定义了一个客户端负载均衡器需要的一系列抽象操作。
- addServers:向负载均衡器中维护的实例列表增加服务实例。
- chooseServer:通过某种策略,从负载均衡器中挑选一个具体的服务实例。
- markServerDown:用来通知和标识负载均衡器中某个具体实例已经停止服务,不然负载均衡器在下一次获取服务实例清单前会认为服务实例均是正常服务的。
- getReachableServers:获取当前正常服务的实例列表。
- getAllServers:获取所有已知的服务实例列表,包括正常服务和停止服务的实例。
在该接口定义中涉及的Server 对象定义是一个传统的服务端节点,在该类中存储了服务端节点的一些元数据信息,包括 host、port 以及一些部署信息等。
对于该接口的实现,可以整理出下图所示的结构。可以看到 BaseLoadBalancer 类实现了基础的 负载均衡,而 DynamicServerListLoadBalancer 和 ZoneAwareLoadBalancer 在负载均衡的策略上做了一些功能的扩展。

那么在整合Ribbon的时候 Spring Cloud 默认采用了哪个具体实现呢,可以通过 RibbonClientConfiguration 配置类看出在整合时默认采用了 ZoneAwareLoadBalancer 来实现负载均衡器。
 @Bean

    @ConditionalOnMissingBean

    public ILoadBalancer ribbonLoadBalancer(IClientConfig config, ServerList<Server> serverList, ServerListFilter<Server> serverListFilter, IRule rule, IPing ping, ServerListUpdater serverListUpdater) {

        return (ILoadBalancer)(this.propertiesFactory.isSet(ILoadBalancer.class, this.name)?(ILoadBalancer)this.propertiesFactory.get(ILoadBalancer.class, config, this.name):new ZoneAwareLoadBalancer(config, rule, ping, serverList, serverListFilter, serverListUpdater));

    }
下面回到 RibbonLoadBalancerClient 的 execute 函数逻辑,在通过 ZoneAwareLoadBalancer 的 chooseServer 函数获取负载均衡策略分配到的服务实例对象 Server 后,将其内容包装成 RibbonServer 对象,然后使用该对象再回调 LoadBalancerInterceptor 请求拦截器中 LoadBalancerRequest 的 apply(final ServiceInstance instance)函数,向一个实际的具体服务实例发起请求,从而实现一开始以服务名为host 的 URI 请求到host:port形式的实际访问地址的转换。
…………
负载均衡器
第四章 客户端负载均衡:Spring Cloud Ribbon的更多相关文章
- 【SpringCloud微服务实战学习系列】客户端负载均衡Spring Cloud Ribbon
Spring Cloud Ribbon是一个基于HTTP和TCP的客户端负载均衡工具,它基于Netflix Ribbon实现.通过Spring Cloud的封装,可以让我们轻松地将面向服务的RES模板 ...
- SpringCloud---客户端负载均衡---Spring Cloud Ribbon
1.概述 1.1 Spring Cloud Ribbon是一个基于HTTP和TCP的客户端负载均衡工具: 基于Netflix Ribbon实现: 通过Spring Cloud的封装,可以轻松将面向服务 ...
- Spring Cloud第四篇 | 客户端负载均衡Ribbon
本文是Spring Cloud专栏的第四篇文章,了解前三篇文章内容有助于更好的理解本文: Spring Cloud第一篇 | Spring Cloud前言及其常用组件介绍概览 Spring Cl ...
- Spring Cloud微服务笔记(四)客户端负载均衡:Spring Cloud Ribbon
客户端负载均衡:Spring Cloud Ribbon 一.负载均衡概念 负载均衡在系统架构中是一个非常重要,并且是不得不去实施的内容.因为负载均衡对系统的高可用性. 网络压力的缓解和处理能力的扩容的 ...
- SpringCloud开发学习总结(四)—— 客户端负载均衡Ribbon
通过上一章<SpringCloud开发学习总结(三)—— 服务治理Eureka>,我们已经搭建起微服务架构中的核心组件——服务注册中心(包括单点模式和高可用模式).同时还注册了一个服务,命 ...
- SpringCloud微服务实战二:Spring Cloud Ribbon 负载均衡 + Spring Cloud Feign 声明式调用
1.Spring Cloud Ribbon的作用 Ribbon是Netflix开发的一个负载均衡组件,它在服务体系中起着重要作用,Pivotal将其整合成为Spring Cloud Ribbon,与其 ...
- 基于Spring cloud Ribbon和Eureka实现客户端负载均衡
前言 本案例将基于Spring cloud Ribbon和Eureka实现客户端负载均衡,其中Ribbon用于实现客户端负载均衡,Eureka主要是用于服务注册及发现: 传统的服务端负载均衡 常见的服 ...
- 客户端负载均衡Ribbon
客户端负载均衡Ribbon 一.Ribbon是什么 二.Ribbon实现客户端负载均衡 三.Ribbon负载均衡策略 四.Rest请求模板类解读 4.1 RestTemplate的GET请求 第一种: ...
- 【springcloud】客户端负载均衡(Ribbon)
转自:https://blog.csdn.net/pengjunlee/article/details/86594934 服务器端负载均衡负载均衡是我们处理高并发.缓解网络压力和进行服务器扩容的重要手 ...
随机推荐
- Python练习-生成器、迭代器-2018.12.01
如果列表元素可以按照某种算法推算出来,可以在循环的过程中不断推算出后续的元素.这样就不必创建完整的list,从而节省大量的空间.在Python中,这种一边循环一边计算的机制,称为生成器:generat ...
- CentOS7中firewall防火墙详解和配置,.xml服务配置详解
修改防火墙配置文件之前,需要对之前防火墙做好备份 重启防火墙后,需要确认防火墙状态和防火墙规则是否加载,若重启失败或规则加载失败,则所有请求都会被防火墙 1. firewall-cmd --state ...
- 学习笔记《简明python教程》
学习笔记<简明python教程> 体会:言简意赅,很适合新手入门 2018年3月14日21:45:59 1.global 语句 在不使用 global 语句的情况下,不可能为一个定义于函数 ...
- 【Spark2.0源码学习】-7.Driver与DriverRunner
承接上一节内容,Client向Master发起RequestSubmitDriver请求,Master将DriverInfo添加待调度列表中(waitingDrivers),下面针对于Dri ...
- rabbitmq shovel插件
官网说明https://www.rabbitmq.com/shovel.html#management-status 启用shovel插件命令: rabbitmq-plugins enable rab ...
- How to configure Samba Server share on Debian 9 Stretch Linux
Lubos Rendek Debian 13 June 2017 Contents 1. Objective 2. Operating System and Software Versions 3. ...
- python之全局变量和局部变量
一.定义 1.全局变量 定义在函数外部一级代码的变量,叫全局变量,全局能用. 2.局部变量 定义在函数内的变量,只能在局部生效 二.用法 1.在函数内部可以引用全局变量,如果全局和局部都有一个变量na ...
- python入门之两种方法修改文件内容
1.占硬盘修改 import os file_name="兼职.txt" new_file_name="%s.new".% file_name old_str= ...
- 《Linux就该这么学》第九天课程
这次课程主要学了如何分区以及RAID技术 有扩展分区:扩展分区可以指定sdb*中的*(1~4)为多少,则其他三个为主分区,扩展分区中的逻辑分区sdb*(*从5开始)无扩展分区:四个皆为主分区 RAID ...
- 决策树模型组合之随机森林与GBDT(转)
版权声明: 本文由LeftNotEasy发布于http://leftnoteasy.cnblogs.com, 本文可以被全部的转载或者部分使用,但请注明出处,如果有问题,请联系wheeleast@gm ...