Visual Studio 2017使用Asp.Net Core构建Angular4应用程序
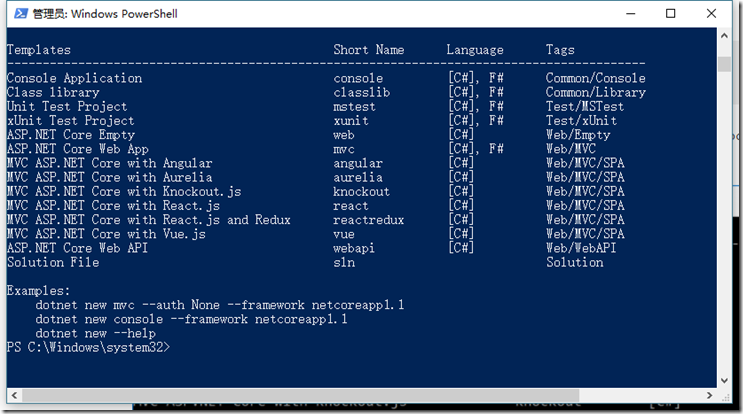
dotnet new --install Microsoft.AspNetCore.SpaTemplates::*
安装结果应如下图所示

<Project Sdk="Microsoft.NET.Sdk.Web">

  <PropertyGroup>

    <TargetFramework>netcoreapp1.1</TargetFramework>

    <TypeScriptCompileBlocked>true</TypeScriptCompileBlocked>

  </PropertyGroup>

  <ItemGroup>

    <Folder Include="wwwroot\" />

  </ItemGroup>

  <ItemGroup>

    <PackageReference Include="Microsoft.ApplicationInsights.AspNetCore" Version="2.0.0" />

    <PackageReference Include="Microsoft.AspNetCore" Version="1.1.1" />

    <PackageReference Include="Microsoft.AspNetCore.Mvc" Version="1.1.3" />

    <PackageReference Include="Microsoft.AspNetCore.StaticFiles" Version="1.1.2" />

    <PackageReference Include="Microsoft.Extensions.Logging.Debug" Version="1.1.1" />

  </ItemGroup>

  <ItemGroup>

    <DotNetCliToolReference Include="Microsoft.VisualStudio.Web.CodeGeneration.Tools" Version="1.0.0" />

  </ItemGroup>

</Project>
注:
<PackageReference Include="Microsoft.AspNetCore.Mvc" Version="1.1.3" />
<PackageReference Include="Microsoft.AspNetCore.StaticFiles" Version="1.1.2" />
Microsoft.AspNetCore.Mvc包能够允许我们添加控制器并且构建WebAPI,
而Microsoft.AspNetCore.StaticFiles包可以让我们配置提供静态目录访问的功能。例如默认提供/wwwroot目录的访问。<TypeScriptCompileBlocked>true</TypeScriptCompileBlocked>
我们会使用其他工具去编译Typescript文件,所以需要在PropertyGroup节点中配置

三、配置Startup.cs文件
首先在ConfigServives方法中添加MVC服务:
  public void ConfigureServices(IServiceCollection services)

    {

      // Add framework services.

      services.AddMvc();

    }
其次Configure方法中的所有代码,使用如下代码替换:
public void Configure(IApplicationBuilder app, IHostingEnvironment env, ILoggerFactory loggerFactory)

    {

      app.Use(async (context, next) =>

      {

        await next();

        if (context.Response.StatusCode == 404 &&

           !System.IO.Path.HasExtension(context.Request.Path.Value) &&

           !context.Request.Path.Value.StartsWith("/api/"))

        {

          context.Request.Path = "/index.html";

          await next();

        }

      });

      app.UseMvcWithDefaultRoute();

      app.UseDefaultFiles();

      app.UseStaticFiles();

    }
第一个app.Use中间件的作用是当系统返回404状态码并且访问的Request不包含文件扩展名并且访问Request不是以“/api/”开头的访问直接将其跳转到/index.html
app.UseMvcWithDefaultRoute()的意思是使用MVC的默认路由中间件。
app.UseDefaultFiles()的意思是启用默认文档提供器中间件,他会对只有主机的URL进行访问时搜索default.html、default.htm、index.html、index.htm文件,如果有就返回内容。
app.UseStaticFiles()的意思启用程序的静态文件支持,也就是启用wwwroot文件夹可以通过URL访问。
四、新建一WebAPIController=》ValuesController,修改get方法
public IEnumerable<string> Get()

 {

     return new string[] { "Hello Angular4", "Hello Asp.Net Core 1.1" };

 }
五、安装angular/cli,以管理员身份运行命令行,导航到项目根目录
npm install –g @angular/cli
六、测试cli是否安装成功 ng -v
七、创建angular项目;
ng new mycat --skip-install
八、调整目录结构,提取mycat文件到根目录,重命名src为myapp
九、启用Angular的HTTP模式和表单绑定模式,修改myapp/app/app.module.ts
import { BrowserModule } from '@angular/platform-browser';

import { NgModule } from '@angular/core';

import { FormsModule } from '@angular/forms';

import { HttpModule } from '@angular/http';

import { AppComponent } from './app.component';

@NgModule({

   declarations: [

     AppComponent

   ],

   imports: [

       BrowserModule,

       FormsModule,

       HttpModule

   ],

   providers: [],

   bootstrap: [AppComponent]

})

export class AppModule { }
十、配置.angular-cli.json,tsconfig.json,tsconfig.app.json,tsconfig.spec.json
angular-cli.json:
{

  "$schema": "./node_modules/@angular/cli/lib/config/schema.json",

  "project": {

    "name": "bamboo.my-web-app"

  },

  "apps": [

    {

      "root": "MyApp",

      "outDir": "wwwroot",

      "assets": [

        "assets",

        "favicon.ico"

      ],

      "index": "index.html",

      "main": "main.ts",

      "polyfills": "polyfills.ts",

      "test": "test.ts",

      "tsconfig": "tsconfig.app.json",

      "testTsconfig": "tsconfig.spec.json",

      "prefix": "app",

      "styles": [

        "styles.css"

      ],

      "scripts": [],

      "environmentSource": "environments/environment.ts",

      "environments": {

        "dev": "environments/environment.ts",

        "prod": "environments/environment.prod.ts"

      }

    }

  ],

  "e2e": {

    "protractor": {

      "config": "./protractor.conf.js"

    }

  },

  "lint": [

    {

      "project": "src/tsconfig.app.json",

      "exclude": "**/node_modules/**"

    },

    {

      "project": "src/tsconfig.spec.json",

      "exclude": "**/node_modules/**"

    },

    {

      "project": "e2e/tsconfig.e2e.json",

      "exclude": "**/node_modules/**"

    }

  ],

  "test": {

    "karma": {

      "config": "./karma.conf.js"

    }

  },

  "defaults": {

    "styleExt": "css",

    "component": {}

  }

}
tsconfig.json
{

  "compileOnSave": false,

  "compilerOptions": {

    "outDir": "./wwwroot/dist/out-tsc",

    "baseUrl": "MyApp",

    "sourceMap": true,

    "declaration": false,

    "moduleResolution": "node",

    "emitDecoratorMetadata": true,

    "experimentalDecorators": true,

    "target": "es5",

    "typeRoots": [

      "node_modules/@types"

    ],

    "lib": [

      "es2017",

      "dom"

    ]

  }

}
tsconfig.app.json
{

  "extends": "../tsconfig.json",

  "compilerOptions": {

    "outDir": "../wwwroot/out-tsc/app",

    "baseUrl": "./",

    "module": "es2015",

    "types": []

  },

  "exclude": [

    "test.ts",

    "**/*.spec.ts"

  ]

}
tsconfig.spec.json
{

  "extends": "../tsconfig.json",

  "compilerOptions": {

    "outDir": "../wwwroot/out-tsc/spec",

    "baseUrl": "./",

    "module": "commonjs",

    "target": "es5",

    "types": [

      "jasmine",

      "node"

    ]

  },

  "files": [

    "test.ts"

  ],

  "include": [

    "**/*.spec.ts",

    "**/*.d.ts"

  ]

}
app.component.ts
import { Component, OnInit } from '@angular/core';

import { Http } from '@angular/http'

@Component({

    selector: 'app-root',

    templateUrl: './app.component.html',

    styleUrls: ['./app.component.css']

})

export class AppComponent implements OnInit {

    constructor(private _httpService: Http) { }

    apiValues: string[] = [];

    ngOnInit() {

        this._httpService.get('/api/values').subscribe(values => {

            this.apiValues = values.json() as string[];

        });

    }

}
app.module.ts
import { BrowserModule } from '@angular/platform-browser';

import { NgModule } from '@angular/core';

import { FormsModule } from '@angular/forms';

import { HttpModule } from '@angular/http';

import { AppComponent } from './app.component';

@NgModule({

   declarations: [

     AppComponent

   ],

   imports: [

       BrowserModule,

       FormsModule,

       HttpModule

   ],

   providers: [],

   bootstrap: [AppComponent]

})

export class AppModule { }
修改index.html
<div style="text-align:center">

  <h1>

    这是一个Asp.Net Core 1.1 With Angular4应用程序

  </h1>

  <h2>下面的信息是由Asp.Net Core WebAPI返回的</h2>

  <ul *ngFor="let value of apiValues">

    <li>{{value}}</li>

  </ul>

  <img width="300" src="data:image/svg+xml;base64,PD94bWwgdmVyc2lvbj0iMS4wIiBlbmNvZGluZz0idXRmLTgiPz4NCjwhLS0gR2VuZXJhdG9yOiBBZG9iZSBJbGx1c3RyYXRvciAxOS4xLjAsIFNWRyBFeHBvcnQgUGx1Zy1JbiAuIFNWRyBWZXJzaW9uOiA2LjAwIEJ1aWxkIDApICAtLT4NCjxzdmcgdmVyc2lvbj0iMS4xIiBpZD0iTGF5ZXJfMSIgeG1sbnM9Imh0dHA6Ly93d3cudzMub3JnLzIwMDAvc3ZnIiB4bWxuczp4bGluaz0iaHR0cDovL3d3dy53My5vcmcvMTk5OS94bGluayIgeD0iMHB4IiB5PSIwcHgiDQoJIHZpZXdCb3g9IjAgMCAyNTAgMjUwIiBzdHlsZT0iZW5hYmxlLWJhY2tncm91bmQ6bmV3IDAgMCAyNTAgMjUwOyIgeG1sOnNwYWNlPSJwcmVzZXJ2ZSI+DQo8c3R5bGUgdHlwZT0idGV4dC9jc3MiPg0KCS5zdDB7ZmlsbDojREQwMDMxO30NCgkuc3Qxe2ZpbGw6I0MzMDAyRjt9DQoJLnN0MntmaWxsOiNGRkZGRkY7fQ0KPC9zdHlsZT4NCjxnPg0KCTxwb2x5Z29uIGNsYXNzPSJzdDAiIHBvaW50cz0iMTI1LDMwIDEyNSwzMCAxMjUsMzAgMzEuOSw2My4yIDQ2LjEsMTg2LjMgMTI1LDIzMCAxMjUsMjMwIDEyNSwyMzAgMjAzLjksMTg2LjMgMjE4LjEsNjMuMiAJIi8+DQoJPHBvbHlnb24gY2xhc3M9InN0MSIgcG9pbnRzPSIxMjUsMzAgMTI1LDUyLjIgMTI1LDUyLjEgMTI1LDE1My40IDEyNSwxNTMuNCAxMjUsMjMwIDEyNSwyMzAgMjAzLjksMTg2LjMgMjE4LjEsNjMuMiAxMjUsMzAgCSIvPg0KCTxwYXRoIGNsYXNzPSJzdDIiIGQ9Ik0xMjUsNTIuMUw2Ni44LDE4Mi42aDBoMjEuN2gwbDExLjctMjkuMmg0OS40bDExLjcsMjkuMmgwaDIxLjdoMEwxMjUsNTIuMUwxMjUsNTIuMUwxMjUsNTIuMUwxMjUsNTIuMQ0KCQlMMTI1LDUyLjF6IE0xNDIsMTM1LjRIMTA4bDE3LTQwLjlMMTQyLDEzNS40eiIvPg0KPC9nPg0KPC9zdmc+DQo=">

</div>
十一、安装Angular所有依赖项
npm install
回到VS,显示全部文件,你会发现多出一个node_module的文件夹,并且依赖项中会出现npm依赖,这个文件夹里包含的就是包括Angular在内的所有依赖包。不要把他包含在项目中。否则会出错。
  十二、编译Angular程序
ng build
编译成功之后,回到VS中你会发现wwwroot文件夹下出现了编译好的JS文件和HTML文件等。不要在意wwwroot文件夹的图标从一个小地球变成了文件图标。
十三、使用DotNetCLI编译并运行Asp.NET Core应用程序,执行如下命令:
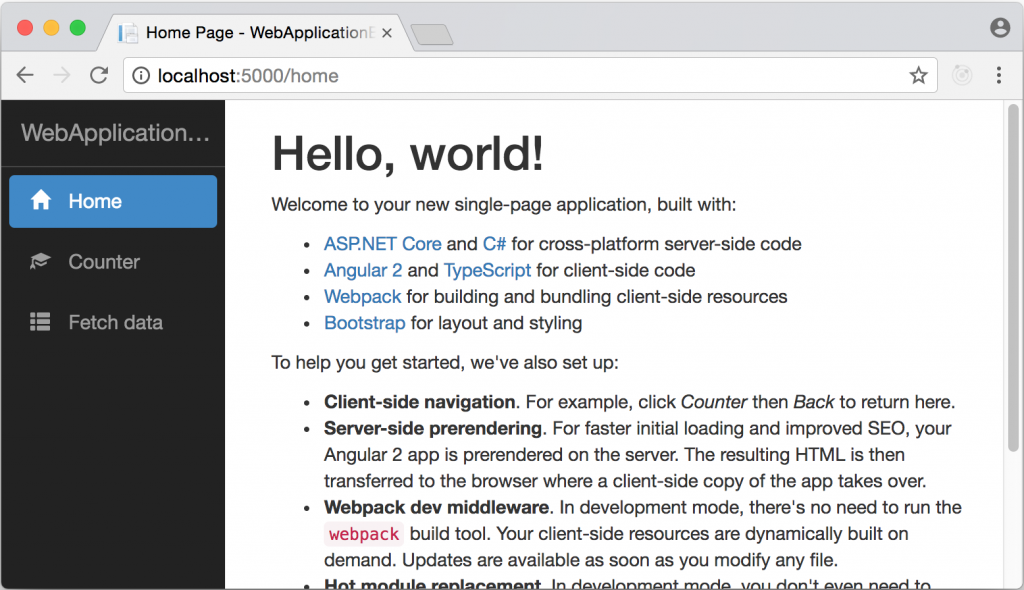
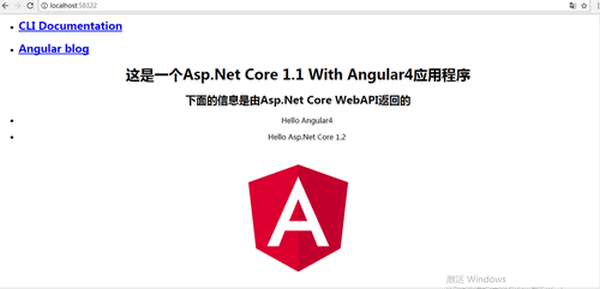
dotnet run打开浏览器,运行http://localhost:58322,得到如下结果
Visual Studio 2017使用Asp.Net Core构建Angular4应用程序的更多相关文章
- 在Visual Studio 2017中使用Asp.Net Core构建Angular4应用程序
前言 Visual Studio 2017已经发布了很久了.做为集成了Asp.Net Core 1.1的地表最强IDE工具,越来越受.NET系的开发人员追捧. 随着Google Angular4的发布 ...
- 【Asp.Net Core】在Visual Studio 2017中使用Asp.Net Core构建Angular4应用程序
前言 Visual Studio 2017已经发布了很久了.做为集成了Asp.Net Core 1.1的地表最强IDE工具,越来越受.NET系的开发人员追捧. 随着Google Angular4的发布 ...
- 使用Visual Studio 2019将ASP.NET Core发布为linux-arm64程序
前言 前段时间入手了一台树莓派4B,一直闲置未使用,最近工作需要,要在上面跑下.NET Core程序,由于树莓派4B使用的是ARM架构,并且支持64位操作系统,为了充分发挥树莓派性能,我的这台树莓派安 ...
- Net Core构建Angular4应用程序
在Visual Studio 2017中使用Asp.Net Core构建Angular4应用程序 前言 Visual Studio 2017已经发布了很久了.做为集成了Asp.Net Core 1 ...
- 【翻译】在Visual Studio中使用Asp.Net Core MVC创建你的第一个Web API应用(一)
HTTP is not just for serving up web pages. It's also a powerful platform for building APIs that expo ...
- 006.Adding a controller to a ASP.NET Core MVC app with Visual Studio -- 【在asp.net core mvc 中添加一个控制器】
Adding a controller to a ASP.NET Core MVC app with Visual Studio 在asp.net core mvc 中添加一个控制器 2017-2-2 ...
- [转]【翻译】在Visual Studio中使用Asp.Net Core MVC创建你的第一个Web API应用(一)
本文转自:https://www.cnblogs.com/inday/p/6288707.html HTTP is not just for serving up web pages. It’s al ...
- 配置visual studio code进行asp.net core rc2的开发
1.安装.net core sdk https://github.com/dotnet/cli#installers-and-binaries,根据你的系统选择下载. 2.下载vscode的C#扩展插 ...
- 使用Visual Studio Code开发Asp.Net Core WebApi学习笔记(八)-- 多环境开发
本篇将演示Asp.Net Core如何在多环境下进行开发适配. 在一个正规的开发流程里,软件开发部署将要经过三个阶段:开发.测试.上线,对应了三个环境:开发.测试.生产.在不同的环境里,需要编写不同的 ...
随机推荐
- SSM 整合 quartz JDBC方式实现job动态增删改查记录
虽然网上有很多资料,但是都不够系统,本文记录下自己的整合过程. 1. 搭建一个SSM项目,此处略. 2. 按照quartz官方要求,建立quartz相关的数据库和表,相关sql语句如下: /* Nav ...
- Mac 上安装maven
http://maven.apache.org/download.cgi 官网下载bin.tar 解压后放入某个目录: 配置环境变量: vim .bash_profile M2_HOME=/maven ...
- Linux 常见操作
grep -nr SEARCHTERM file1 file2 ...https://www.linuxnix.com/grep-command-usage-linux/ https://www.li ...
- centos 7 下的 service部署
在centos 7下部署service一般涉及到jar包部署, service脚本. 数据存贮路径, log存贮路径 jar包部署 /usr/local/app/app1/app1.jar servi ...
- pyCoreImage Learn
目录 PyCoreImage 安装 高斯模糊滤镜的例子 使用详细步骤说明 常见操作 滤镜操作 打印所有的滤镜列表 打印某个滤镜的详细信息 使用 zoomBlur 滤镜 使用 mono 滤镜 使用叠加率 ...
- GLSL版本的区别和对比
之前尝试将一个GLSL version 110的版本写成GLSL version 330的,在此将学习过程和收获记录下来. 参考链接 GLSL Versions 介绍 你可以使用#version命令作 ...
- java.exe和javaw.exe的区别
相同点:二者都是Java的虚拟机,用来执行Java程序 区别: 1. javaw.exe运行程序时不会输出控制台信息 (注:“w”就是window的意思). 使用案例 start.bat(y以下代码 ...
- C#.net mysql There is already an open datareader associated with this command引发的问题
[参考]There is already an open datareader associated with this command引发的问题 我在语句中并未使用 DataReader,未何也提示 ...
- Docker(一)Linux开启你的Docker之旅
前言 Docker容器最早受到RHEL完善的支持是从最近的CentOS 7.0开始的,官方说明是只能运行于64位架构平台, 内核版本为2.6.32-431及以上(即 >= CentOS 6.5, ...
- websocket Tomcat JSP Demo
<%@ page language="java" import="java.util.*" pageEncoding="UTF-8"% ...