
20155229--Java实验四《Android开发基础》
20155229 Java实验四《Android开发基础》
实验内容:
任务一:
Android Stuidio的安装测试: 参考《Java和Android开发学习指南(第二版)(EPUBIT,Java for Android 2nd)》第二十四章:
- 安装 Android Stuidio
- 完成Hello World, 要求修改res目录中的内容,Hello World后要显示自己的学号
- 学习Android Stuidio调试应用程序
修改res目录中的内容,显示自己的学号:
在res中,存在activity_main.xml这个布局文件,原布局文件为:
<?xml version="1.0" encoding="utf-8"?>

<android.support.constraint.ConstraintLayout

    xmlns:android="http://schemas.android.com/apk/res/android"

    xmlns:tools="http://schemas.android.com/tools"

    xmlns:app="http://schemas.android.com/apk/res-auto"

    android:layout_width="match_parent"

    android:layout_height="match_parent"

    tools:context="com.example.y50c.helloworld.MainActivity">

    <TextView

        android:layout_width="wrap_content"

        android:layout_height="wrap_content"

        android:text="Hello World!"

        app:layout_constraintBottom_toBottomOf="parent"

        app:layout_constraintLeft_toLeftOf="parent"

        app:layout_constraintRight_toRightOf="parent"

        app:layout_constraintTop_toTopOf="parent" />

</android.support.constraint.ConstraintLayout>
这时我们在
android:text="Hello World!"
这一行添加自己的学号
android:text="Hello World!20155229"

学习Android Stuidio调试应用程序
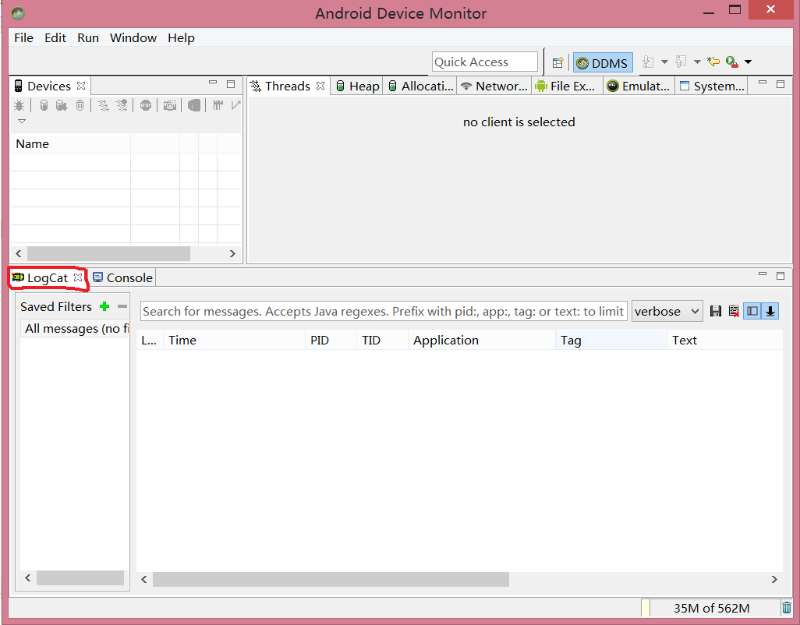
- 使用日志消息调试应用程序,选择
Tools→Android→Android Device Monitor会出现LogCat的信息。

- 设置断点
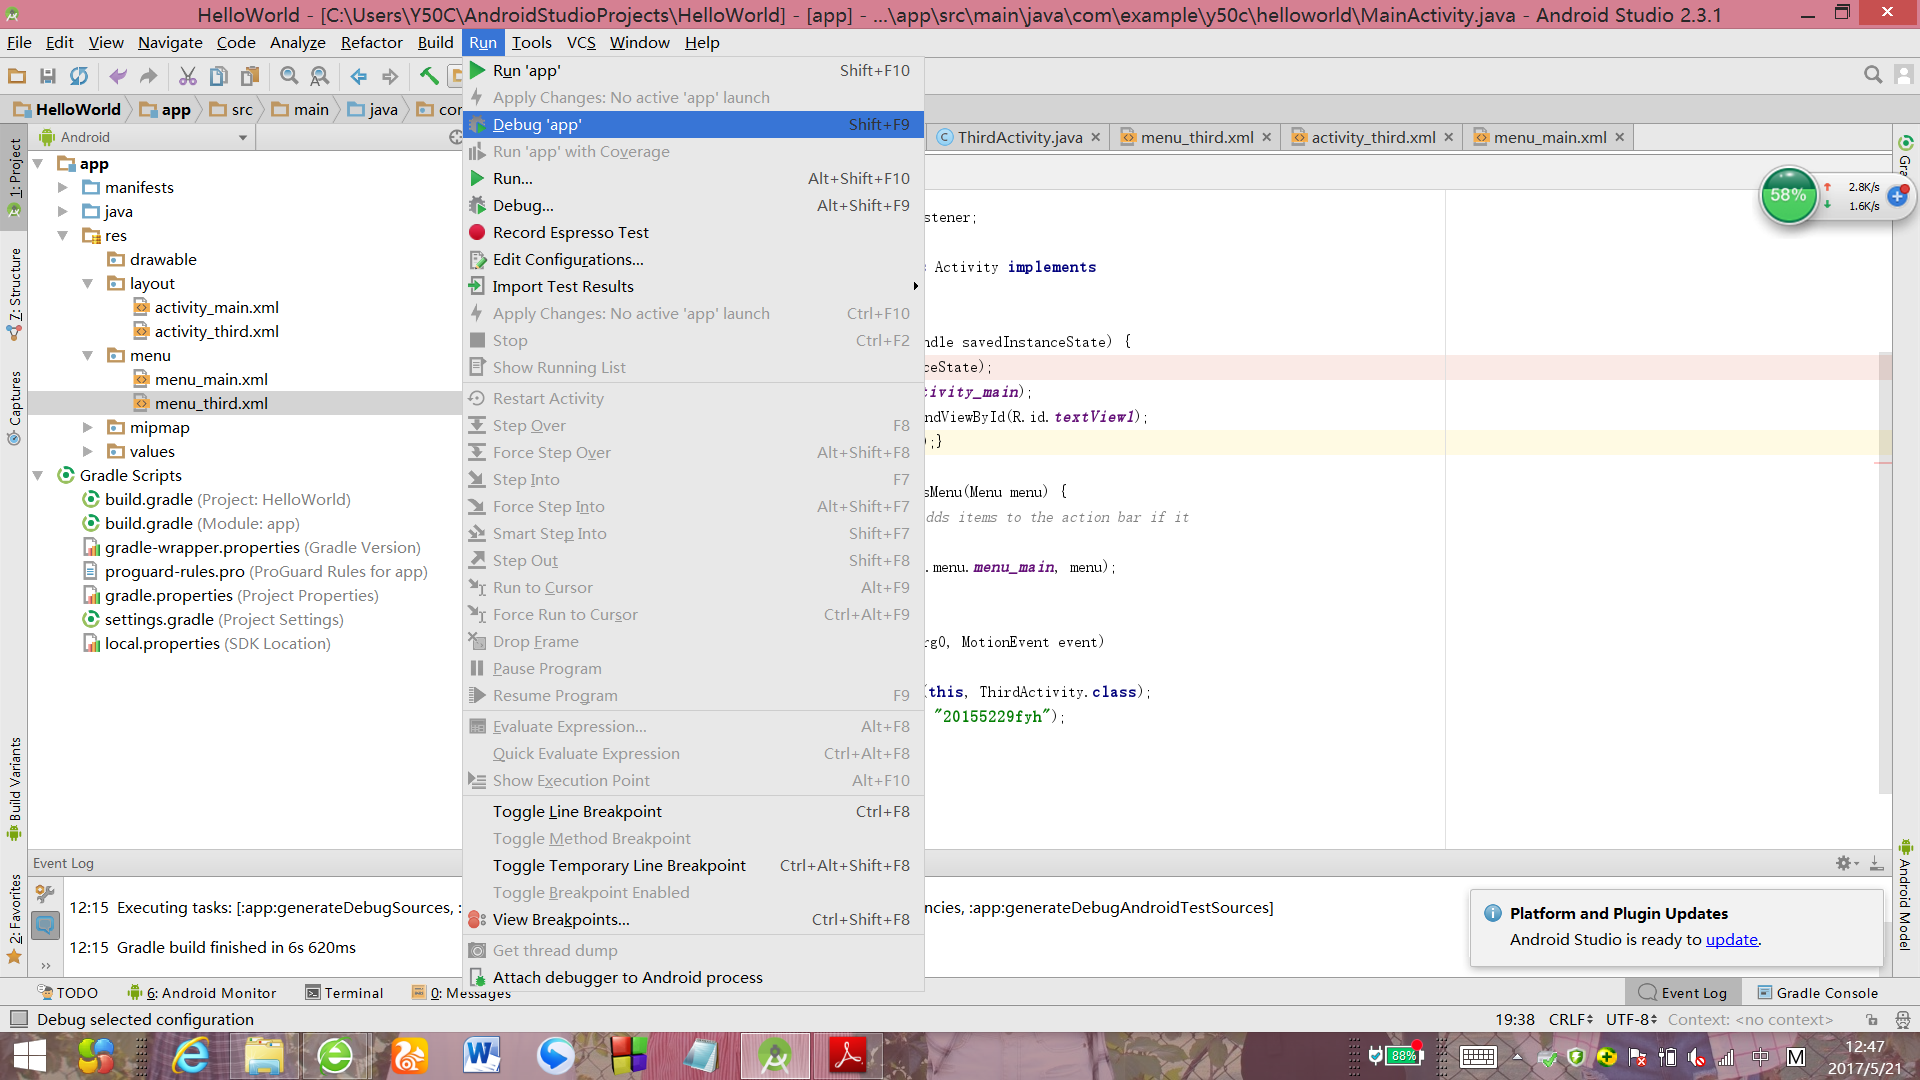
添加一行断点,选择Run→Toggle Line Breakpoint,然后选择Run→Debug app进行调试应用程序。

任务二
Activity测试: 参考《Java和Android开发学习指南(第二版)(EPUBIT,Java for Android 2nd)》第二十五章:
构建项目,运行教材相关代码
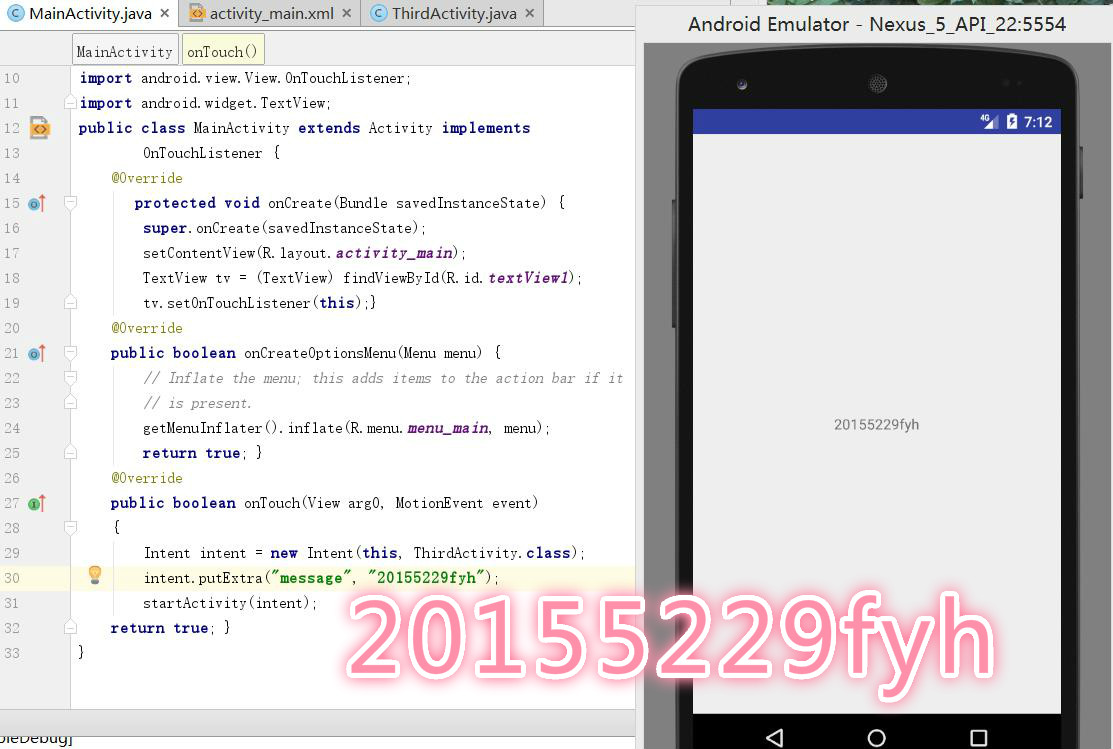
创建ThirdActivity,在ThirdActivity中显示自己的学号,修改代码让MainActivity启动ThirdActivity
教材中MainActivity的代码为(输入了自己学号的信息):
package com.example.y50c.helloworld;

import android.app.Activity;

import android.content.Intent;

import android.os.Bundle;

import android.view.Menu;

import android.view.MotionEvent;

import android.view.View;

import android.view.View.OnTouchListener;

import android.widget.TextView;

public class MainActivity extends Activity implements

        OnTouchListener {

    @Override

       protected void onCreate(Bundle savedInstanceState) {

        super.onCreate(savedInstanceState);

        setContentView(R.layout.activity_main);

        TextView tv = (TextView) findViewById(R.id.textView1);

        tv.setOnTouchListener(this);}

    @Override

    public boolean onCreateOptionsMenu(Menu menu) {

        // Inflate the menu; this adds items to the action bar if it

        // is present.

        getMenuInflater().inflate(R.menu.menu_main, menu);

        return true; }

    @Override

    public boolean onTouch(View arg0, MotionEvent event)

    {

        Intent intent = new Intent(this, ThirdActivity.class);

        intent.putExtra("message", "20155229fyh");

        startActivity(intent);

    return true; }

}
学习了SecondActivity的代码及布局文件,创建ThirdActivity的代码及布局文件为:
- ThirdActivity:
package com.example.y50c.helloworld;

/**

 * Created by Y50C on 2017/5/18.

 */

import android.app.Activity;

import android.content.Intent;

import android.os.Bundle;

import android.view.Menu;

import android.widget.TextView;

public class ThirdActivity extends Activity {

    @Override

    protected void onCreate(Bundle savedInstanceState) {

        super.onCreate(savedInstanceState);

        setContentView(R.layout.activity_third);

        Intent intent = getIntent();

        String message = intent.getStringExtra("message");

        ((TextView) findViewById(R.id.textView1)).setText(message);

    }

    @Override

    public boolean onCreateOptionsMenu(Menu menu) {

        getMenuInflater().inflate(R.menu.menu_third, menu);

        return true;

    }

}
- activity_third.xml
<?xml version="1.0" encoding="utf-8"?>

<LinearLayout

    xmlns:android="http://schemas.android.com/apk/res/android"

    xmlns:tools="http://schemas.android.com/tools"

    android:orientation="vertical"

    android:layout_width="match_parent"

    android:layout_height="match_parent"

    android:paddingBottom="10dp"

    android:paddingLeft="10dp"

    android:paddingRight="10dp"

    android:paddingTop="10dp"

    tools:context=".ThirdActivity" >

    <TextView

        android:id="@+id/textView1"

        android:layout_width="wrap_content"

        android:layout_height="wrap_content"

        />

</LinerLayout>
刚开始运行遇到的问题是:


然后对照已经做出来的同学的代码进行修改,最后成功的解决了问题
任务三
UI测试: 参考《Java和Android开发学习指南(第二版)(EPUBIT,Java for Android 2nd)》第二十六章:
构建项目,运行教材相关代码
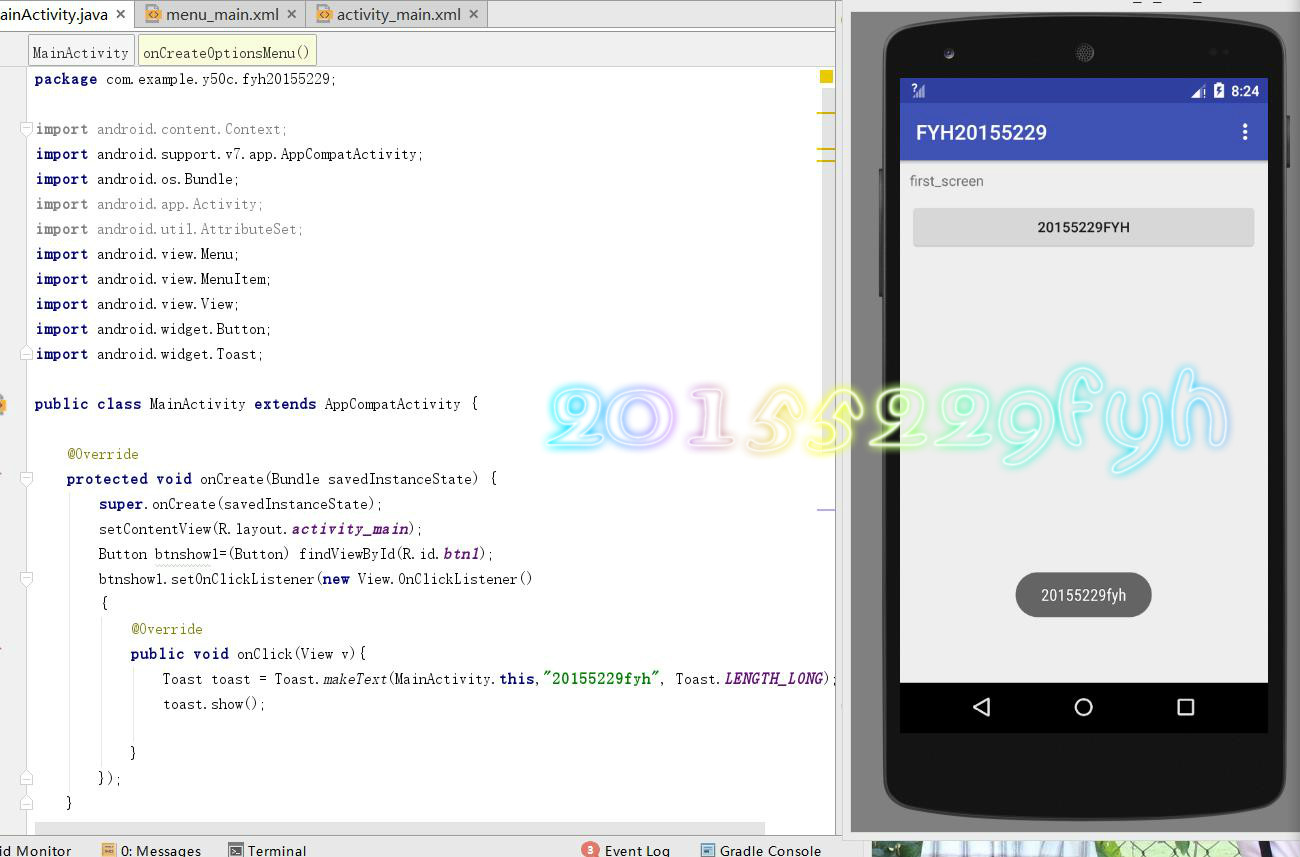
修改代码让Toast消息中显示自己的学号信息
Toast是一个小的弹出对话框,用于显示一条消息作为给用户的反馈
MainActivity代码:
package com.example.y50c.fyh20155229;

import android.content.Context;

import android.support.v7.app.AppCompatActivity;

import android.os.Bundle;

import android.app.Activity;

import android.util.AttributeSet;

import android.view.Menu;

import android.view.MenuItem;

import android.view.View;

import android.widget.Button;

import android.widget.Toast;

public class MainActivity extends AppCompatActivity {

    @Override

    protected void onCreate(Bundle savedInstanceState) {

        super.onCreate(savedInstanceState);

        setContentView(R.layout.activity_main);

        Button btnshow1=(Button) findViewById(R.id.btn1);

        btnshow1.setOnClickListener(new View.OnClickListener()

        {

            @Override

            public void onClick(View v){

                Toast toast = Toast.makeText(MainActivity.this,"20155229fyh", Toast.LENGTH_LONG);

                toast.show();

            }

        });

    }

    @Override

    public boolean onCreateOptionsMenu(Menu menu) {

        // Inflate the menu; this adds items to the action bar if it

        // is present.

        getMenuInflater().inflate(R.menu.menu_main, menu);

        return true;

    }
- activity_main
<?xml version="1.0" encoding="utf-8"?>

<RelativeLayout

    xmlns:android="http://schemas.android.com/apk/res/android"

    xmlns:tools="http://schemas.android.com/tools"

    android:layout_width="match_parent"

    android:layout_height="match_parent"

    android:paddingBottom="10dp"

    android:paddingLeft="10dp"

    android:paddingRight="10dp"

    android:paddingTop="10dp"

    tools:context=".MainActivity" >

    <TextView

        android:id="@+id/textView1"

        android:layout_width="wrap_content"

        android:layout_height="wrap_content"

        android:text="first_screen" />

    <Button

        android:layout_width="wrap_content"

        android:layout_height="wrap_content"

        android:text="20155229fyh"

        android:id="@+id/btn1"

        android:layout_alignParentTop="true"

        android:layout_marginTop="31dp"

        android:layout_alignParentRight="true"

        android:layout_alignParentEnd="true"

        android:layout_alignParentLeft="true"

        android:layout_alignParentStart="true" />

</RelativeLayout>
- menu_main
<?xml version="1.0" encoding="utf-8"?>

<menu xmlns:android="http://schemas.android.com/apk/res/android">

    xmlns:app="http://schemas.android.com/apk/res-auto">

    xmlns:tools="http://schemas.android.com/tools"

    tools:context="com.example.testmenu_xml.MainActivity" >

    <item android:id="@+id/id_action_add"

        android:title="增加"

        android:icon="@mipmap/ic_launcher"

        >

    </item>

    <item android:id="@+id/id_action_delete"

        android:title="删除"

        android:icon="@mipmap/ic_launcher"

        >

    </item>

</menu>
任务四
布局测试: 参考《Java和Android开发学习指南(第二版)(EPUBIT,Java for Android 2nd)》第二十七章:
构建项目,运行教材相关代码
修改布局让P290页的界面与教材不同
布局文件
<?xml version="1.0" encoding="utf-8"?>

<FrameLayout xmlns:android="http://schemas.android.com/apk/res/android"

    android:layout_width="fill_parent"

    android:layout_height="fill_parent"

    >

    <TextView

        android:layout_width="fill_parent"

        android:layout_height="wrap_content"

        android:textSize="20sp"

        android:textColor="#00ffff"

        android:text="20155229"/>

    <TextView

        android:layout_width="fill_parent"

        android:layout_height="wrap_content"

        android:textSize="30sp"

        android:textColor="#"

        android:gravity="right"

        android:text="fyh"/>

</FrameLayout>
android:textColor可以修改输出的颜色
- eg.

android:textSize可以修改输出的大小

任务五
事件处理测试: 参考《Java和Android开发学习指南(第二版)(EPUBIT,Java for Android 2nd)》第二十八章:
构建项目,运行教材相关代码
MainActivity
package com.example.y50c.renwusi;

import android.app.Activity;

import android.graphics.Color;

import android.os.Bundle;

import android.view.Menu;

import android.view.View;

import android.widget.AnalogClock;

public class MainActivity extends Activity {

    int counter = 0;

    int[] colors = {Color.BLACK, Color.BLUE, Color.CYAN, Color.DKGRAY, Color.GRAY, Color.GREEN, Color.LTGRAY, Color.MAGENTA, Color.RED, Color.WHITE, Color.YELLOW};

    @Override

    protected void onCreate(Bundle savedInstanceState) {

        super.onCreate(savedInstanceState);

        setContentView(R.layout.activity_main);

    }

    @Override

    public boolean onCreateOptionsMenu(Menu menu) {

        // Inflate the menu; this adds items to the action bar if it

        // is present.

        getMenuInflater().inflate(R.menu.menu_main, menu);

        return true;

    }

    public void changeColor(View view) {

        if (counter == colors.length) {

            counter = 0;

        }

        view.setBackgroundColor(colors[counter++]);

    }

}
- activity_main
<RelativeLayout xmlns:android="http://schemas.android.com/apk/res/android"

    xmlns:tools="http://schemas.android.com/tools"

    android:layout_width="match_parent"

    android:layout_height="match_parent"

    android:paddingBottom="20dp"

    android:paddingLeft="20dp"

    android:paddingRight="20dp"

    tools:context=".MainActivity">

    <TextView

        android:layout_width="wrap_content"

        android:layout_height="wrap_content"

        android:text="20155229fyh"></TextView>

    <AnalogClock

        android:id="@+id/analogClock1"

        android:layout_width="wrap_content"

        android:layout_height="wrap_content"

        android:layout_alignParentTop="true"

        android:layout_centerHorizontal="true"

        android:layout_marginTop="90dp"

        android:onClick="changeColor" />

</RelativeLayout>
- menu_main
<?xml version="1.0" encoding="utf-8"?>

<menu xmlns:android="http://schemas.android.com/apk/res/android">

    xmlns:app="http://schemas.android.com/apk/res-auto">

    xmlns:tools="http://schemas.android.com/tools"

    tools:context="com.example.testmenu_xml.MainActivity" >

    <item android:id="@+id/id_action_add"

        android:title="增加"

        android:icon="@mipmap/ic_launcher"

        >

    </item>

    <item android:id="@+id/id_action_delete"

        android:title="删除"

        android:icon="@mipmap/ic_launcher"

        >

    </item>

</menu>

实验体会
本次实验不同于之前的,运用AndroidStudio进行应用开发。不管是在安装中,还是做题中都遇到了问题,而且软件运行起来特别慢,特别是再使用虚拟机进行git代码上传的时候,电脑的运行内存能够到94%。从题目来看,五个实验任务都比较基础,在教材的帮助下能够将五个实验完成。
我的PSP时间
| 步骤 | 耗时 | 百分比 |
|---|---|---|
| 需求分析 | 20分钟 | 12.5 % |
| 设计 | 30分钟 | 18.75% |
| 代码实现 | 80分钟 | 50.0% |
| 测试 | 20分钟 | 12.5% |
| 分析总结 | 10分钟 | 6.25% |
参考资料
20155229--Java实验四《Android开发基础》的更多相关文章
- 2065212Java实验四android开发基础
20165212 Java实验四Android开发基础 实验内容: 1.基于Android Studio开发简单的Android应用并部署测试; 2.了解Android.组件.布局管理器的使用: 3. ...
- 20145213 《Java程序设计》实验四 Android开发基础
20145213 <Java程序设计>实验四 Android开发基础 说在前面的话 不同以往实验,对于这次实验具体内容我是比较茫然的.因为点我,打开实验四的链接居然能飘出一股熟悉的味道,这 ...
- 20145225《Java程序设计》 实验四 Android开发基础
20145225<Java程序设计> 实验四 Android开发基础 实验报告 实验内容 安装Android Studio 运行安卓AVD模拟器 使用安卓运行出虚拟手机并显示HelloWo ...
- 20155324 《Java程序设计》实验四 Android开发基础
20155324 <Java程序设计>实验四 Android开发基础 实验内容 1.基于Android Studio开发简单的Android应用并部署测试; 2.了解Android.组件. ...
- 20155227 《Java程序设计》实验四 Android开发基础设计实验报告
20155227 <Java程序设计>实验四 Android开发基础设计实验报告 任务一 Android Stuidio的安装测试: 参考<Java和Android开发学习指南(第二 ...
- 20155233 《Java程序设计》实验四 Android开发基础
20155233 <Java程序设计>实验四 Android开发基础 实验内容 1.基于Android Studio开发简单的Android应用并部署测试; 2.了解Android组件.布 ...
- 20155235 《Java程序设计》 实验四 Android开发基础
20155235 <Java程序设计> 实验四 Android开发基础 实验要求 基于Android Studio开发简单的Android应用并部署测试; 了解Android组件.布局管理 ...
- 20145219 《Java程序设计》实验四 Android开发基础设计实验报告
20145219 <Java程序设计>实验四 Android开发基础设计实验报告 实验内容 安装Andriod Studio并配置软件 使用Andriod Studio软件实现Hello ...
- 20145215实验四 Android开发基础
20145215实验四 Android开发基础 实验内容 基于Android Studio开发简单的Android应用并部署测试; 了解Android组件.布局管理器的使用: 掌握Android中事件 ...
- 20165223 实验四 Android开发基础
实验四 Android开发基础 目录 一.实验报告封面 二.具体实验内容 (一)Android Stuidio的安装测试 (二)Activity测试 (三)UI测试 (四)布局测试 (五)教材代码测试 ...
随机推荐
- 深入浅出WinDbg——利用快速定位错误
场景描述: Sharepoint代码的某方法LoadLines()中使用了SPSecurity.RunWithElevatedPrivileges(delegate() 此方法两次调用了Common. ...
- [EffectiveC++]item23:Prefer non-member non-friend functions to member functions
99页 导致较大封装性的是non-member non-friend函数,因为它并不增加“能否访问class内之private成分”的函数数量.
- 问题:android学习内容破碎,我个人关于如何学习android的一些个人经历
android学习两个月心得 我于大三下学期,开始准备学习android,在寒假期间,学了毕向东的java视频的前10天,觉得还不错,上网找评论,他们都说,只要学到多线程就可以学习android了, ...
- 绕过disable_functions执行命令实验
绕过disable_functions执行命令实验 看下disable函数,所有命令函数都被禁用: 编译64位共享库: 命令成功执行: 参考链接: https://www.freebuf.com/ar ...
- Odoo中要根据某字段值作为条件判断值,但又不想在界面显示
在视图标签中包含这个field(包含这个字段才可以使用该字段),但其invisible属性设置为1,即:该字段不可见. <field name="字段" invisible= ...
- Odoo中的模型
转载请注明原文地址:https://www.cnblogs.com/cnodoo/p/9280164.html [Odoo中,一切皆模型,连视图都是模型.Odoo将各种数据,如:权限数据 ...
- VIM在Win7上的安装教程
1.下载 目前VIM在其官网上的最新版本为7.4,Windows版本名称为GVIM,在百度软件中可以下载GVIM的最新版本,建议 在百度上下载,因为比较快.在百度上搜索"GVIM" ...
- e2fsprogs
开源文件系统ext2/ext3/ext4管理工具e2progs包含的工具组件: 1.debugfs: ext2/ext3/ext4文件系统调试工具.debugfs是一个交互式的文件系统调试工具,可以用 ...
- ios的framework合并
# 运行此脚本前 # 先编译一遍工程 确保正常运行 没有报错 # 作为Xcode Aggregate运行 # file-->new target-->cross-platform--> ...
- 数据库中间件mycat安装与使用
1.下载 # wget http://dl.mycat.io/1.6-RELEASE/Mycat-server-1.6-RELEASE-20161028204710-linux.tar.gz 2.安装 ...