
使用Spring和Tomcat发布CXF SOAP WebService
上一节中使用代理工厂JaxWsProxyFactoryBean来发布WebService, 这种方式必须指定运行的端口,如果端口被占用,就会发布失败。
cxf的WebService也可利用Tomcat来发布,并且使用8080端口。方法如下:
maven配置:
    <properties>

        <project.build.sourceEncoding>UTF-8</project.build.sourceEncoding>

        <spring.version>4.3.0.RELEASE</spring.version>

        <cxf.version>3.0.3</cxf.version>

    </properties>

    <dependencies>

        <!--Spring框架核心库 -->

        <dependency>

            <groupId>org.springframework</groupId>

            <artifactId>spring-context</artifactId>

            <version>${spring.version}</version>

        </dependency>

        <!-- Spring Web -->

        <dependency>

            <groupId>org.springframework</groupId>

            <artifactId>spring-web</artifactId>

            <version>${spring.version}</version>

        </dependency>

        <dependency>

            <groupId>javax.servlet</groupId>

            <artifactId>javax.servlet-api</artifactId>

            <version>3.0.1</version>

        </dependency>

        <!-- cxf -->

        <dependency>

            <groupId>org.apache.cxf</groupId>

            <artifactId>cxf-rt-frontend-jaxws</artifactId>

            <version>${cxf.version}</version>

        </dependency>

        <dependency>

            <groupId>org.apache.cxf</groupId>

            <artifactId>cxf-rt-transports-http</artifactId>

            <version>${cxf.version}</version>

        </dependency>

        <dependency>

            <groupId>org.apache.cxf</groupId>

            <artifactId>cxf-rt-frontend-jaxrs</artifactId>

            <version>${cxf.version}</version>

        </dependency>

        <!-- 客户端调用restFul服务需要导入的包 -->

        <dependency>

            <groupId>org.apache.cxf</groupId>

            <artifactId>cxf-rt-rs-client</artifactId>

            <version>${cxf.version}</version>

        </dependency>
---
在web.xml中加入以下配置(spring监听器和cxf的servlet):
    <listener>

        <description>SpringListener</description>

        <listener-class>org.springframework.web.context.ContextLoaderListener</listener-class>

    </listener>

    <context-param>

        <param-name>contextConfigLocation</param-name>

        <param-value>classpath*:applicationContext.xml</param-value>

    </context-param>

    <!--cxf的Servlet-->

    <servlet>

        <servlet-name>CXFServlet</servlet-name>

        <servlet-class>org.apache.cxf.transport.servlet.CXFServlet</servlet-class>

    </servlet>

    <servlet-mapping>

        <servlet-name>CXFServlet</servlet-name>

        <url-pattern>/ws/*</url-pattern>

    </servlet-mapping>
---
接口:
@WebService

public interface HelloService{

    public String helloCxf();

    public String hello(String name);

    public User getUser(int id);

    public void saveUser(User user);

}
实现类:
@WebService(serviceName = "helloService",

        endpointInterface = "cn.lg.ws.hellocxf.HelloService"

)

public class HelloServiceImpl implements HelloService{

    @Override

    public String helloCxf(){

        return "Hello CXF!";

    }

    @Override

    public String hello(String name)

    {

        return "Hello " + name;

    }

    @Override

    public User getUser(int id) {

        User user = new User();

        user.setId(id);

        user.setName("lg");

        user.setEmail("QQ");

        user.setAddress("hahaha");

        return user;

    }

    @Override

    public void saveUser(User user) {

        System.out.println(user.toString());

    }

}
cxf-bean.xml
<?xml version="1.0" encoding="UTF-8"?>

<beans xmlns="http://www.springframework.org/schema/beans"

       xmlns:xsi="http://www.w3.org/2001/XMLSchema-instance"

       xmlns:jaxws="http://cxf.apache.org/jaxws"

       xsi:schemaLocation="http://www.springframework.org/schema/beans

        http://www.springframework.org/schema/beans/spring-beans-4.3.xsd

        http://cxf.apache.org/jaxws

        http://cxf.apache.org/schemas/jaxws.xsd">

    <bean id="helloServiceBean" class="cn.lg.ws.hellocxf.HelloServiceImpl" />

    <jaxws:server id="helloServicej" serviceClass="cn.lg.ws.hellocxf.HelloService"

                  address="/hello">

        <jaxws:serviceBean>

            <ref bean="helloServiceBean" />

        </jaxws:serviceBean>

    </jaxws:server>

</beans>
该文件需添加到spring配置文件中: <import resource="cxf-bean.xml" />
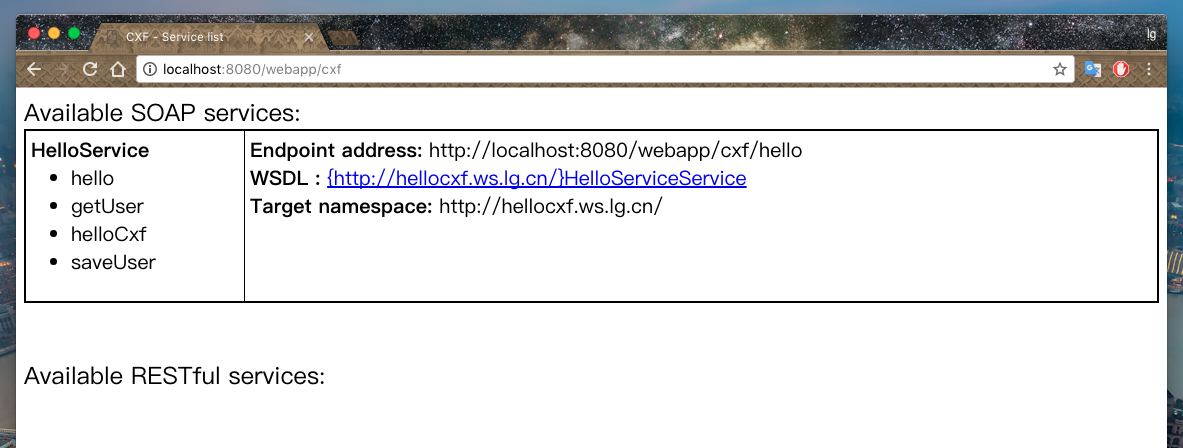
浏览器访问 http://localhost:8080/webapp/cxf ,若出现以下界面则表示发布成功:
使用Spring和Tomcat发布CXF SOAP WebService的更多相关文章
- 使用Spring和Tomcat发布CXF REST WebService
与发布SOAP WS一样, 同样需要在web.xml文件中配置CXFServlet: <!--cxf的Servlet--> <servlet> <servlet-name ...
- Webservice实践(七)CXF 与Spring结合+tomcat发布
上一节介绍了如何使用CXF 来发布服务,但是没有介绍使用web 容器来发布,很多项目需要用tomcat 这样的容器来发布.另外本节将介绍CXF 与spring 结合的方法. 一 目标: 1.利用spi ...
- WebService学习总结(六)--CXF 与Spring结合+tomcat发布
该项目在上文 WebService学习总结(四)--基于CXF的服务端开发 的基础上修改为spring上发布的webservice接口 1.新建web project 工程 2.导入spring ...
- Spring Boot SOAP Webservice例子
前言 本文将学习如何利用Spring boot快速创建SOAP webservice服务: 虽然目前REST和微服务越来越流行,但是SOAP在某些情况下,仍然有它的用武之地: 在本篇 spring b ...
- WebService—CXF整合Spring实现接口发布和调用过程
一.CXF整合Spring实现接口发布 发布过程如下: 1.引入jar包(基于maven管理) <!-- cxf --> <dependency> <groupId> ...
- Spring整合CXF,发布RSETful 风格WebService(转)
Spring整合CXF,发布RSETful 风格WebService 这篇文章是承接之前CXF整合Spring的这个项目示例的延伸,所以有很大一部分都是一样的.关于发布CXF WebServer和Sp ...
- Spring整合CXF,发布RSETful 风格WebService
原文地址:http://www.cnblogs.com/hoojo/archive/2012/07/23/2605219.html 这篇文章是承接之前CXF整合Spring的这个项目示例的延伸,所以有 ...
- cxf soap rest webservice spring
1. 导入 jar 包 2. 编写接口 3. 编写实现 4. 配置spring 配置文件 5. 配置web.xml servlet 6. 访问 package com.diancai.test; im ...
- Spring整合CXF发布及调用WebService
这几天终于把webService搞定,下面给大家分享一下发布webService和调用webService的方法 添加jar包 (官方下载地址:http://cxf.apache.org/downlo ...
随机推荐
- 20165332 预备作业三 Linux安装及命令入门
Linux安装及命令入门 一.安装Linux操作系统 由于做的比较晚,结合大多数同学的经验和娄老师的<基于VirtualBox虚拟机安装Ubuntu图文教程>,整个安装过程还算顺利,唯一遇 ...
- C#—序列化(Serialize)和反序列化(NonSerialize)
(转自:http://www.cnblogs.com/Abel-Zhang/p/Serialize.html) 一.概述 序列化是把对象转变成流.相反的过程就是反序列化. 哪些场合用到这项技术呢? 1 ...
- Ti CC2540蓝牙模块学习笔记整理
接触CC2540几天,终于有了初步的理解,现将笔记整理如下,只是皮毛,如有错误,还请指正,还有好多没闹明白的地方,以后应该还会继续向里面更新~ 一.整体 1.TI的蓝牙平台支持2种协议栈/应用配置:单 ...
- Ajax中的XMLHttpRequest对象详解(转)
XMLHttpRequest对象是Ajax技术的核心.在Internet Explorer 5中,XMLHttpRequest对象以ActiveX对象引入,被称之为XMLHTTP,它是一种支持异步请求 ...
- Node多进程相关
现状: 目前使用child_process.fork实现多进程,一个center.js负责任务分配及相关状态管理,一个worker.js负责任务执行. center.js结构: 1) 一个task_q ...
- Elasticsearch Painless语言(实现搜索打分基础)
With the release of Elasticsearch 5.x came Painless, Elasticsearch's answer to safe, secure, and per ...
- UI-UIScrollView
- (void)viewDidLoad { [super viewDidLoad]; scrollView = [[UIScrollView alloc] initWithFrame:CGRectMa ...
- head插件对elasticsearch 索引文档的增删改查
1.RESTful接口使用方法 为了方便直观我们使用Head插件提供的接口进行演示,实际上内部调用的RESTful接口. RESTful接口URL的格式: http://localhost:9200 ...
- Spring-Kafka 2.0.0发送API翻译
Kafka Template–2.2.0 api KafkaTemplate KafkaTemplate这个类包装了个生产者,来提供方便的发送数据到kafka的topic里面. 同步和异步的方法都有, ...
- debounce与throttle区别
在2011年,Twitter网站曾爆出一个问题:在主页往下滚动时,页面会变得缓慢以致没有响应.John Resig发表了一篇文章< a blog post about the problem&g ...