
Java-Maven-Runoob:Maven 构建配置文件
| ylbtech-Java-Maven-Runoob:Maven 构建配置文件 |
| 1.返回顶部 |
Maven 构建配置文件
构建配置文件是一系列的配置项的值,可以用来设置或者覆盖 Maven 构建默认值。使用构建配置文件,你可以为不同的环境,比如说生产环境(Producation)和开发(Development)环境,定制构建方式。
配置文件在 pom.xml 文件中使用 activeProfiles 或者 profiles 元素指定,并且可以通过各种方式触发。配置文件在构建时修改 POM,并且用来给参数设定不同的目标环境(比如说,开发(Development)、测试(Testing)和生产环境(Producation)中数据库服务器的地址)。
构建配置文件的类型
构建配置文件大体上有三种类型:
| 类型 | 在哪定义 |
|---|---|
| 项目级(Per Project) | 定义在项目的POM文件pom.xml中 |
| 用户级 (Per User) | 定义在Maven的设置xml文件中 (%USER_HOME%/.m2/settings.xml) |
| 全局(Global) | 定义在 Maven 全局的设置 xml 文件中 (%M2_HOME%/conf/settings.xml) |
配置文件激活
Maven的构建配置文件可以通过多种方式激活。
- 使用命令控制台输入显式激活。
- 通过 maven 设置。
- 基于环境变量(用户或者系统变量)。
- 操作系统设置(比如说,Windows系列)。
- 文件的存在或者缺失。
配置文件激活实例
假定项目结构如下:
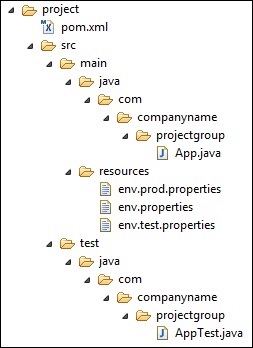
其中在src/main/resources文件夹下有三个用于测试文件:
| 文件名 | 描述 |
|---|---|
| env.properties | 如果未指定配置文件时默认使用的配置。 |
| env.test.properties | 当测试配置文件使用时的测试配置。 |
| env.prod.properties | 当生产配置文件使用时的生产配置。 |
注意:这三个配置文件并不是代表构建配置文件的功能,而是用于本次测试的目的;比如,我指定了构建配置文件为 prod 时,项目就使用 envprod.properties文件。
注意:下面的例子仍然是使用 AntRun 插件,因为此插件能绑定 Maven 生命周期阶段,并通过 Ant 的标签不用编写一点代码即可输出信息、复制文件等,经此而已。其余的与本次构建配置文件无关。
1、配置文件激活
profile 可以让我们定义一系列的配置信息,然后指定其激活条件。这样我们就可以定义多个 profile,然后每个 profile 对应不同的激活条件和配置信息,从而达到不同环境使用不同配置信息的效果。
以下实例,我们将 maven-antrun-plugin:run 目标添加到测试阶段中。这样我们可以在不同的 profile 中输出文本信息。我们将使用 pom.xml 来定义不同的 profile,并在命令控制台中使用 maven 命令激活 profile。
pom.xml 文件如下:
<project xmlns="http://maven.apache.org/POM/4.0.0" xmlns:xsi="http://www.w3.org/2001/XMLSchema-instance"

  xsi:schemaLocation="http://maven.apache.org/POM/4.0.0 http://maven.apache.org/maven-v4_0_0.xsd">

  <modelVersion>4.0.0</modelVersion>

  <groupId>com.jsoft.test</groupId>

  <artifactId>testproject</artifactId>

  <packaging>jar</packaging>

  <version>0.1-SNAPSHOT</version>

  <name>testproject</name>

  <url>http://maven.apache.org</url>

  <dependencies>

    <dependency>

      <groupId>junit</groupId>

      <artifactId>junit</artifactId>

      <version>3.8.1</version>

      <scope>test</scope>

    </dependency>

  </dependencies>

  <profiles>

      <profile>

          <id>test</id>

          <build>

              <plugins>

                 <plugin>

                    <groupId>org.apache.maven.plugins</groupId>

                    <artifactId>maven-antrun-plugin</artifactId>

                    <version>1.8</version>

                    <executions>

                       <execution>

                          <phase>test</phase>

                          <goals>

                             <goal>run</goal>

                          </goals>

                          <configuration>

                          <tasks>

                             <echo>Using env.test.properties</echo>

                             <copy file="src/main/resources/env.test.properties" tofile="${project.build.outputDirectory}/env.properties" overwrite="true"/>

                          </tasks>

                          </configuration>

                       </execution>

                    </executions>

                 </plugin>

              </plugins>

          </build>

      </profile>

      <profile>

          <id>normal</id>

          <build>

              <plugins>

                 <plugin>

                    <groupId>org.apache.maven.plugins</groupId>

                    <artifactId>maven-antrun-plugin</artifactId>

                    <version>1.8</version>

                    <executions>

                       <execution>

                          <phase>test</phase>

                          <goals>

                             <goal>run</goal>

                          </goals>

                          <configuration>

                          <tasks>

                             <echo>Using env.properties</echo>

                             <copy file="src/main/resources/env.properties" tofile="${project.build.outputDirectory}/env.properties" overwrite="true"/>

                          </tasks>

                          </configuration>

                       </execution>

                    </executions>

                 </plugin>

              </plugins>

          </build>

      </profile>

      <profile>

          <id>prod</id>

          <build>

              <plugins>

                 <plugin>

                    <groupId>org.apache.maven.plugins</groupId>

                    <artifactId>maven-antrun-plugin</artifactId>

                    <version>1.8</version>

                    <executions>

                       <execution>

                          <phase>test</phase>

                          <goals>

                             <goal>run</goal>

                          </goals>

                          <configuration>

                          <tasks>

                             <echo>Using env.prod.properties</echo>

                             <copy file="src/main/resources/env.prod.properties" tofile="${project.build.outputDirectory}/env.properties" overwrite="true"/>

                          </tasks>

                          </configuration>

                       </execution>

                    </executions>

                 </plugin>

              </plugins>

          </build>

      </profile>

   </profiles>

</project>
注意:构建配置文件采用的是 <profiles> 节点。
说明:上面新建了三个 <profiles>,其中 <id> 区分了不同的 <profiles> 执行不同的 AntRun 任务;而 AntRun 的任务可以这么理解,AntRun 监听 test 的 Maven 生命周期阶段,当 Maven 执行 test 时,就除了发 AntRun 的任务,任务里面为输出文本并复制文件到指定的位置;而至于要执行哪个 AntRun 任务,此时构建配置文件起到了传输指定的作用,比如,通过命令行参数输入指定的 <id>。
执行命令:
mvn test -Ptest
提示:第一个 test 为 Maven 生命周期阶段,第 2 个 test 为构建配置文件指定的 <id> 参数,这个参数通过 -P 来传输,当然,它可以是 prod 或者 normal 这些由你定义的<id>。
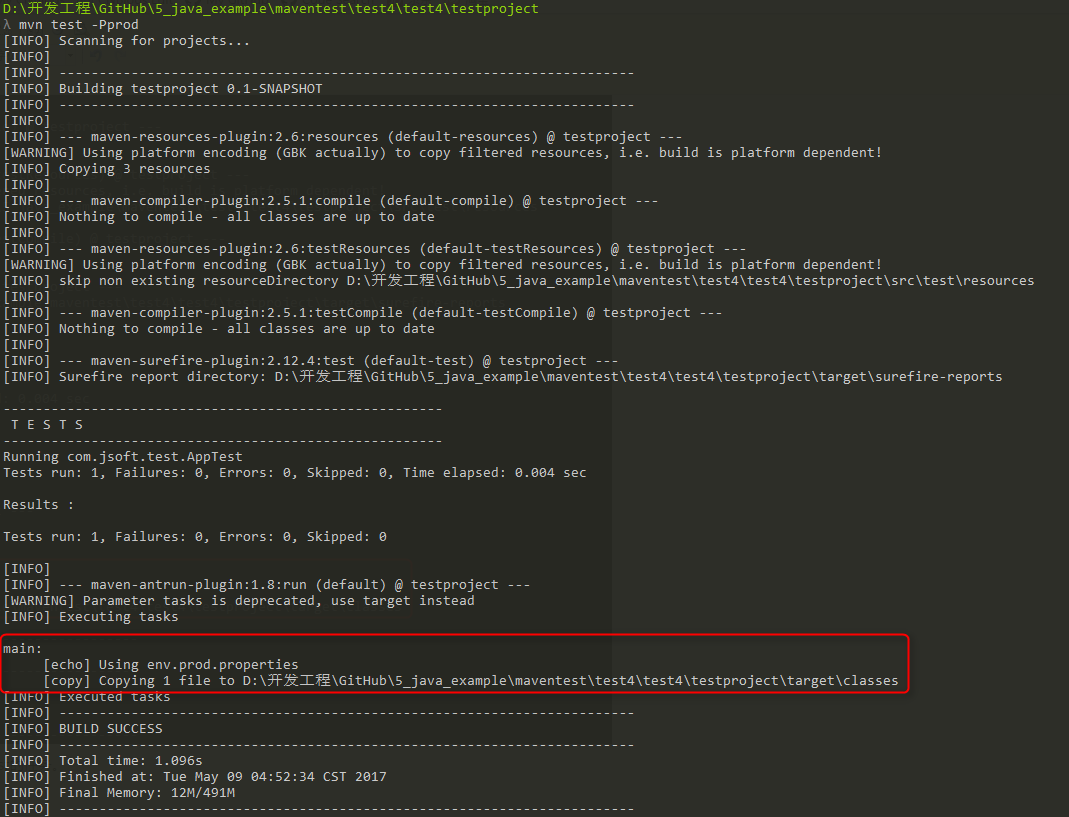
运行的结果如下:

可以看出成功的触发了AntRun的任务。并且是对应构建配置文件下的 <id> 为 test 的任务。
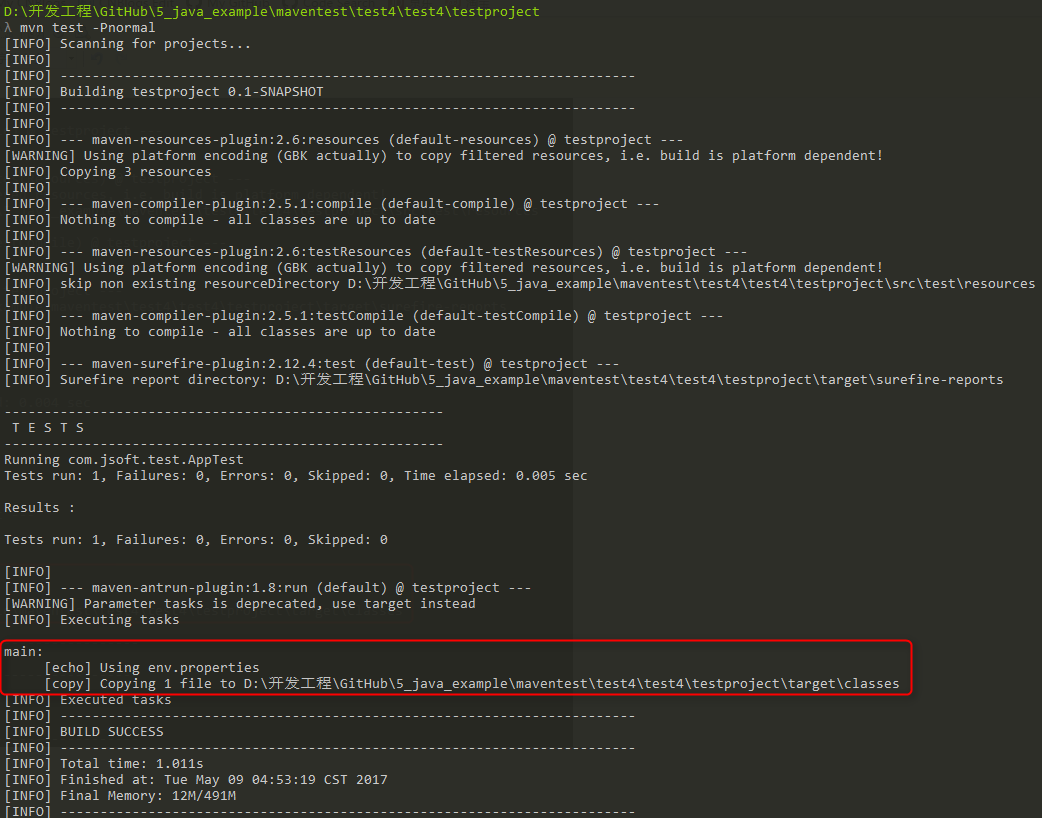
再测试其余两个命令,结果如下:
2、通过Maven设置激活配置文件
打开 %USER_HOME%/.m2 目录下的 settings.xml 文件,其中 %USER_HOME% 代表用户主目录。如果 setting.xml 文件不存在就直接拷贝 %M2_HOME%/conf/settings.xml 到 .m2 目录,其中 %M2_HOME% 代表 Maven 的安装目录。
配置 setting.xml 文件,增加 <activeProfiles>属性:
<settings xmlns="http://maven.apache.org/POM/4.0.0"

   xmlns:xsi="http://www.w3.org/2001/XMLSchema-instance"

   xsi:schemaLocation="http://maven.apache.org/POM/4.0.0

   http://maven.apache.org/xsd/settings-1.0.0.xsd">

   ...

   <activeProfiles>

      <activeProfile>test</activeProfile>

   </activeProfiles>

</settings>
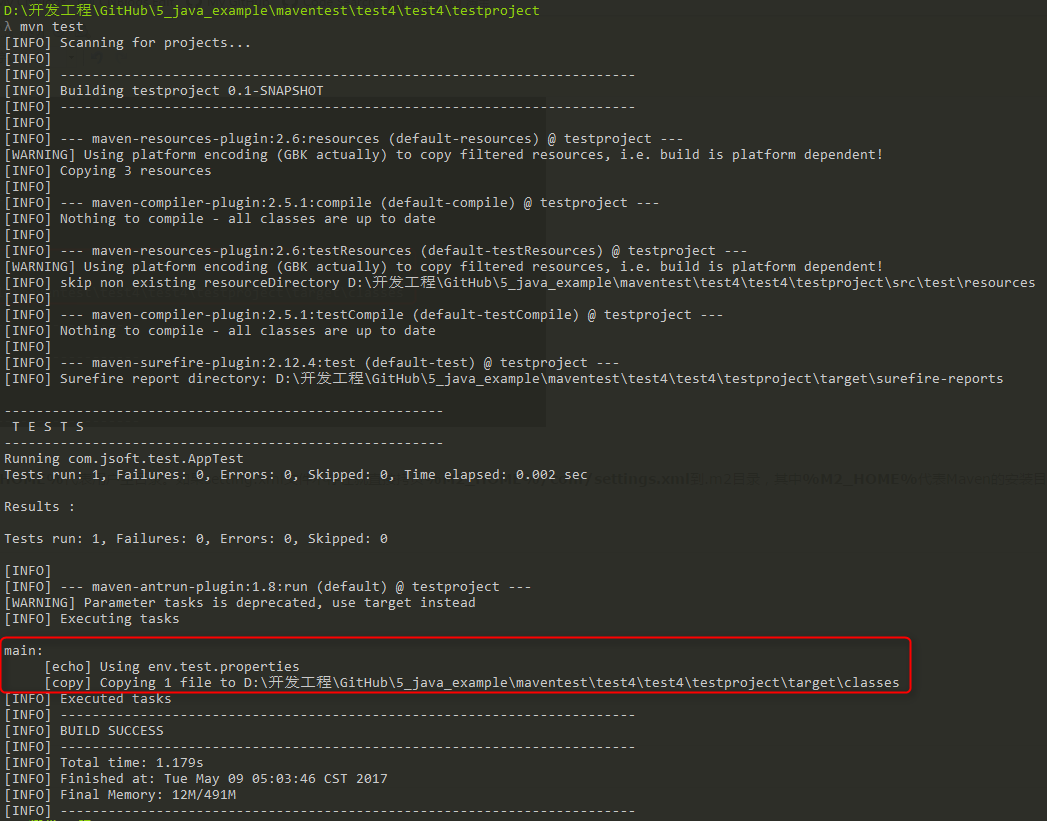
执行命令:
mvn test
提示 1:此时不需要使用 -Ptest 来输入参数了,上面的 setting.xml 文件的 <activeprofile> 已经指定了 test 参数代替了。
提示 2:同样可以使用在 %M2_HOME%/conf/settings.xml 的文件进行配置,效果一致。
执行结果:
3、通过环境变量激活配置文件
先把上一步测试的 setting.xml 值全部去掉。
然后在 pom.xml 里面的 <id> 为 test 的 <profile> 节点,加入 <activation> 节点:
<project xmlns="http://maven.apache.org/POM/4.0.0" xmlns:xsi="http://www.w3.org/2001/XMLSchema-instance"

  xsi:schemaLocation="http://maven.apache.org/POM/4.0.0 http://maven.apache.org/maven-v4_0_0.xsd">

  <modelVersion>4.0.0</modelVersion>

  <groupId>com.jsoft.test</groupId>

  <artifactId>testproject</artifactId>

  <packaging>jar</packaging>

  <version>0.1-SNAPSHOT</version>

  <name>testproject</name>

  <url>http://maven.apache.org</url>

  <dependencies>

    <dependency>

      <groupId>junit</groupId>

      <artifactId>junit</artifactId>

      <version>3.8.1</version>

      <scope>test</scope>

    </dependency>

  </dependencies>

  <profiles>

      <profile>

          <id>test</id>

          <activation>

            <property>

               <name>env</name>

               <value>test</value>

            </property>

          </activation>

          <build>

              <plugins>

                 <plugin>

                    <groupId>org.apache.maven.plugins</groupId>

                    <artifactId>maven-antrun-plugin</artifactId>

                    <version>1.8</version>

                    <executions>

                       <execution>

                          <phase>test</phase>

                          <goals>

                             <goal>run</goal>

                          </goals>

                          <configuration>

                          <tasks>

                             <echo>Using env.test.properties</echo>

                             <copy file="src/main/resources/env.test.properties" tofile="${project.build.outputDirectory}/env.properties" overwrite="true"/>

                          </tasks>

                          </configuration>

                       </execution>

                    </executions>

                 </plugin>

              </plugins>

          </build>

      </profile>

      <profile>

          <id>normal</id>

          <build>

              <plugins>

                 <plugin>

                    <groupId>org.apache.maven.plugins</groupId>

                    <artifactId>maven-antrun-plugin</artifactId>

                    <version>1.8</version>

                    <executions>

                       <execution>

                          <phase>test</phase>

                          <goals>

                             <goal>run</goal>

                          </goals>

                          <configuration>

                          <tasks>

                             <echo>Using env.properties</echo>

                             <copy file="src/main/resources/env.properties" tofile="${project.build.outputDirectory}/env.properties" overwrite="true"/>

                          </tasks>

                          </configuration>

                       </execution>

                    </executions>

                 </plugin>

              </plugins>

          </build>

      </profile>

      <profile>

          <id>prod</id>

          <build>

              <plugins>

                 <plugin>

                    <groupId>org.apache.maven.plugins</groupId>

                    <artifactId>maven-antrun-plugin</artifactId>

                    <version>1.8</version>

                    <executions>

                       <execution>

                          <phase>test</phase>

                          <goals>

                             <goal>run</goal>

                          </goals>

                          <configuration>

                          <tasks>

                             <echo>Using env.prod.properties</echo>

                             <copy file="src/main/resources/env.prod.properties" tofile="${project.build.outputDirectory}/env.properties" overwrite="true"/>

                          </tasks>

                          </configuration>

                       </execution>

                    </executions>

                 </plugin>

              </plugins>

          </build>

      </profile>

   </profiles>

</project>
执行命令:
mvn test -Denv=test
提示 1:上面使用 -D 传递环境变量,其中 evn 对应刚才设置的 <name> 值,test 对应<value>。
提示 2:在 Windows 10 上测试了系统的环境变量,但是不生效,所以,只能通过 -D 传递。
执行结果:

4、通过操作系统激活配置文件
activation 元素包含下面的操作系统信息。当系统为 windows XP 时,test Profile 将会被触发。
<profile>

   <id>test</id>

   <activation>

      <os>

         <name>Windows XP</name>

         <family>Windows</family>

         <arch>x86</arch>

         <version>5.1.2600</version>

      </os>

   </activation>

</profile>
现在打开命令控制台,跳转到 pom.xml 所在目录,并执行下面的 mvn 命令。不要使用 -P 选项指定 Profile 的名称。Maven 将显示被激活的 test Profile 的结果。
mvn test
5、通过文件的存在或者缺失激活配置文件
现在使用 activation 元素包含下面的操作系统信息。当 target/generated-sources/axistools/wsdl2java/com/companyname/group 缺失时,test Profile 将会被触发。
<profile>

   <id>test</id>

   <activation>

      <file>

         <missing>target/generated-sources/axistools/wsdl2java/

         com/companyname/group</missing>

      </file>

   </activation>

</profile>
现在打开命令控制台,跳转到 pom.xml 所在目录,并执行下面的 mvn 命令。不要使用 -P 选项指定 Profile 的名称。Maven 将显示被激活的 test Profile 的结果。
mvn test
参考:https://www.cnblogs.com/EasonJim/p/6828743.html
| 2.返回顶部 |
| 3.返回顶部 |
| 4.返回顶部 |
| 5.返回顶部 |
| 6.返回顶部 |
 |
作者:ylbtech 出处:http://ylbtech.cnblogs.com/ 本文版权归作者和博客园共有,欢迎转载,但未经作者同意必须保留此段声明,且在文章页面明显位置给出原文连接,否则保留追究法律责任的权利。 |
Java-Maven-Runoob:Maven 构建配置文件的更多相关文章
- IDEA + maven 零基础构建 java agent 项目
200316-IDEA + maven 零基础构建 java agent 项目 Java Agent(java 探针)虽说在 jdk1.5 之后就有了,但是对于绝大多数的业务开发 javaer 来说, ...
- 从零构建Java项目(Maven+SpringBoot+Git) #02 奥斯丁项目
前两天我说要写个项目来持续迭代,有好多小伙伴都表示支持和鼓励,项目的第一篇这不就来了么~我给项目取了个名字,英文名叫做:austin,中文名叫做:奥斯丁 名字倒没有什么特别的含义,我单纯觉得这个名字好 ...
- Maven 构建配置文件
什么是构建配置文件? 生成配置文件是一组可以用来设置或覆盖 Maven 构建配置值的默认值.使用生成配置文件,你可以针对不同的环境,如:生产V/S开发环境自定义构建. 配置文件中指定 pom.xml ...
- Maven学习(十四)-----Maven 构建配置文件
Maven 构建配置文件 什么是构建配置文件? 生成配置文件是一组可以用来设置或覆盖 Maven 构建配置值的默认值.使用生成配置文件,你可以针对不同的环境,如:生产V/S开发环境自定义构建. 配置文 ...
- Maven的构建配置文件(Build Profiles)
在命令行使用构建配置文件时,是-P,比如:mvn -Pinput 注意:这里的构建配置文件并不是一个真正的文件,而是通过指定参数来做特定的事. 以下内容引用自https://ayayui.gitboo ...
- maven 学习---Maven 构建配置文件
什么是构建配置文件? 构建配置文件是一组配置的集合,用来设置或者覆盖 Maven 构建的默认配置.使用构建配置文件,可以为不同的环境定制构建过程,例如 Producation 和 Developmen ...
- 【第五篇】-Maven 构建配置文件之Spring Cloud直播商城 b2b2c电子商务技术总结
Maven 构建配置文件 构建配置文件是一系列的配置项的值,可以用来设置或者覆盖 Maven 构建默认值. 使用构建配置文件,你可以为不同的环境,比如说生产环境(Production)和开发(Deve ...
- JAVA学习:maven开发环境快速搭建
转自:http://tech.it168.com/a2011/1204/1283/000001283307.shtml 最近,开发中要用到maven,所以对maven进行了简单的学习.因为有个mave ...
- 用 Maven 做项目构建
转自:http://www.ibm.com/developerworks/cn/java/j-lo-maven/index.html 本文将介绍基于 Apache Maven 3 的项目构建的基本概念 ...
随机推荐
- istringstream 用法
istringstream 类用于执行C++风格的串流的输入操作 istringstream用空格作为字符串分隔符 #include <iostream>#include <sstr ...
- JavaScript 兼容各大浏览器阻止冒泡事件
JavaScript 兼容各大浏览器阻止冒泡事件 function stopEvent(event) { //阻止冒泡事件 //取消事件冒泡 var e = arguments.callee.call ...
- 通过application.properties配置SpringBoot项目
application.properties可以自己新建,放在这里:(该文件可以放在4个地方,详情百度) 在文件中添加:file_path=E://Tools//apache-tomcat-9.0.1 ...
- git生成和检查秘钥操作
查看本地是否有git config的配置: git config --list 设置用户名和邮箱: $git config --global user.email "tanteng@gmai ...
- 《JavaScript高级程序设计》第7章 函数表达式
定义函数的方式有两种:函数声明和函数表达式 // 函数声明 function function_name(argument) { // body... } // 函数表达式 var function_ ...
- oracle: 分割字符串,或者查找字段里面的关键字(关键字1,关键字2,关键字3)
表中有一个字段:keyword, keyword里面的存储的字符一般是:[关键字1,关键字2,关键字3] 那么,在搜索的时候,不能用like 来模糊查询,因为这样会,多查询出一下不相干的关键字, hi ...
- Appium 自动化测试(2)--环境安装:安装Android模拟器
一.安装java 环境-JDK 略,自行百度安装. 二.安装Android SDK Android SDK提供给我们API库和开发工具构建,测试和调试应用程序,Android.简单来讲,Android ...
- JSON.parse()和JSON.stringify()以及stringify()字符串格式化
1. parse用于从一个字符串中解析出json对象,如var str = '{"name":"huangxiaojian","age":& ...
- eclipse启动Tomcat服务输入http://localhost:8080/报404解决方法
其实如果Tomcat能够正常启动,而就算输入http://localhost:8080时出现404错误,也不会影响Tomcat作为服务器运行.通过eclipse来启动tomcat会碰到“访问http: ...
- JavaScript JSON.parse()和JSON.stringify()
parse用于从一个字符串中解析出json对象,如 var str = '{"name":"huangxiaojian","age":&qu ...