
MVC5 网站开发之七 用户功能 3用户资料的修改和删除
这次主要实现管理后台界面用户资料的修改和删除,修改用户资料和角色是经常用到的功能,但删除用户的情况比较少,为了功能的完整性还是坐上了。主要用到两个action “Modify”和“Delete”。
目录
MVC5 网站开发之六 管理员 2、添加、删除、重置密码、修改密码、列表浏览
一、用户资料修改(Modify)
此功能分两个部分:
public ActionResult Modify(int id) 用于显示用户信息
[httppost]
public ActionResult Modify(FormCollection form)用户就收前台传来的信息并修改
1、显示用户信息
/// <summary>

        /// 修改用户信息

        /// </summary>

        /// <param name="id">用户主键</param>

        /// <returns>分部视图</returns>

        public ActionResult Modify(int id)

        {

            //角色列表

            var _roles = new RoleManager().FindList();

            List<SelectListItem> _listItems = new List<SelectListItem>(_roles.Count());

            foreach (var _role in _roles)

            {

                _listItems.Add(new SelectListItem() { Text = _role.Name, Value = _role.RoleID.ToString() });

            }

            ViewBag.Roles = _listItems;

            //角色列表结束

            return PartialView(userManager.Find(id));

        }
此action有一个参数id,接收传入的用户ID,在action中查询角色信息,并利用viewBage传递到视图,并通过return PartialView(userManager.Find(id))向视图传递用户模型返回分部视图。
视图代码如下:
@model Ninesky.Core.User

@using (Html.BeginForm())

{

    @Html.AntiForgeryToken()

    <div class="form-horizontal">

        @Html.ValidationSummary(true, "", new { @class = "text-danger" })

        @Html.HiddenFor(model => model.UserID)

        <div class="form-group">

            @Html.LabelFor(model => model.RoleID, htmlAttributes: new { @class = "control-label col-md-2" })

            <div class="col-md-10">

                @Html.DropDownListFor(model => model.RoleID, (IEnumerable<SelectListItem>)ViewBag.Roles, new { @class = "form-control" })

                @Html.ValidationMessageFor(model => model.RoleID, "", new { @class = "text-danger" })

            </div>

        </div>

        <div class="form-group">

            @Html.LabelFor(model => model.Username, htmlAttributes: new { @class = "control-label col-md-2" })

            <div class="col-md-10">

                @Html.EditorFor(model => model.Username, new { htmlAttributes = new { @class = "form-control", disabled = "disabled" } })

                @Html.ValidationMessageFor(model => model.Username, "", new { @class = "text-danger" })

            </div>

        </div>

        <div class="form-group">

            @Html.LabelFor(model => model.Name, htmlAttributes: new { @class = "control-label col-md-2" })

            <div class="col-md-10">

                @Html.EditorFor(model => model.Name, new { htmlAttributes = new { @class = "form-control" } })

                @Html.ValidationMessageFor(model => model.Name, "", new { @class = "text-danger" })

            </div>

        </div>

        <div class="form-group">

            @Html.LabelFor(model => model.Sex, htmlAttributes: new { @class = "control-label col-md-2" })

            <div class="col-md-10">

                @Html.RadioButtonFor(model => model.Sex, 1) 男

                @Html.RadioButtonFor(model => model.Sex, 0) 女

                @Html.RadioButtonFor(model => model.Sex, 2) 保密

                @Html.ValidationMessageFor(model => model.Sex, "", new { @class = "text-danger" })

            </div>

        </div>

        <div class="form-group">

            @Html.LabelFor(model => model.Password, htmlAttributes: new { @class = "control-label col-md-2" })

            <div class="col-md-10">

                @Html.EditorFor(model => model.Password, new { htmlAttributes = new { @class = "form-control" } })

                @Html.ValidationMessageFor(model => model.Password, "", new { @class = "text-danger" })

            </div>

        </div>

        <div class="form-group">

            @Html.LabelFor(model => model.Email, htmlAttributes: new { @class = "control-label col-md-2" })

            <div class="col-md-10">

                @Html.EditorFor(model => model.Email, new { htmlAttributes = new { @class = "form-control" } })

                @Html.ValidationMessageFor(model => model.Email, "", new { @class = "text-danger" })

            </div>

        </div>

        <div class="form-group">

            @Html.LabelFor(model => model.LastLoginTime, htmlAttributes: new { @class = "control-label col-md-2" })

            <div class="col-md-10">

                @Html.EditorFor(model => model.LastLoginTime, new { htmlAttributes = new { @class = "form-control", disabled = "disabled" } })

                @Html.ValidationMessageFor(model => model.LastLoginTime, "", new { @class = "text-danger" })

            </div>

        </div>

        <div class="form-group">

            @Html.LabelFor(model => model.LastLoginIP, htmlAttributes: new { @class = "control-label col-md-2" })

            <div class="col-md-10">

                @Html.EditorFor(model => model.LastLoginIP, new { htmlAttributes = new { @class = "form-control", disabled = "disabled" } })

                @Html.ValidationMessageFor(model => model.LastLoginIP, "", new { @class = "text-danger" })

            </div>

        </div>

        <div class="form-group">

            @Html.LabelFor(model => model.RegTime, htmlAttributes: new { @class = "control-label col-md-2" })

            <div class="col-md-10">

                @Html.EditorFor(model => model.RegTime, new { htmlAttributes = new { @class = "form-control", disabled = "disabled" } })

                @Html.ValidationMessageFor(model => model.RegTime, "", new { @class = "text-danger" })

            </div>

        </div>

    </div>

}
2、修改用户资料的后台处理
[HttpPost]

        [ValidateAntiForgeryToken]

        public ActionResult Modify(int id,FormCollection form)

        {

            Response _resp = new Auxiliary.Response();

            var _user = userManager.Find(id);

            if (TryUpdateModel(_user, new string[] { "RoleID", "Name", "Sex", "Email" }))

            {

                if (_user == null)

                {

                    _resp.Code = 0;

                    _resp.Message = "用户不存在,可能已被删除,请刷新后重试";

                }

                else

                {

                    if (_user.Password != form["Password"].ToString()) _user.Password = Security.SHA256(form["Password"].ToString());

                    _resp = userManager.Update(_user);

                }

            }

            else

            {

                _resp.Code = 0;

                _resp.Message = General.GetModelErrorString(ModelState);

            }

            return Json(_resp);

        }
此方法有两个参数id 和FormCollection form,不用User直接做模型的原因是因为user会把前台所有数据都接收过来,这里我并不想允许修改用户名,所以在方法中使用TryUpdateModel绑定允许用户修改的属性。TryUpdateModel在绑定失败时同样会在在ModelState中记录错误,可以利用自定义方法GetModelErrorString获取到错误信息并反馈给视图。
2、前台显示和处理
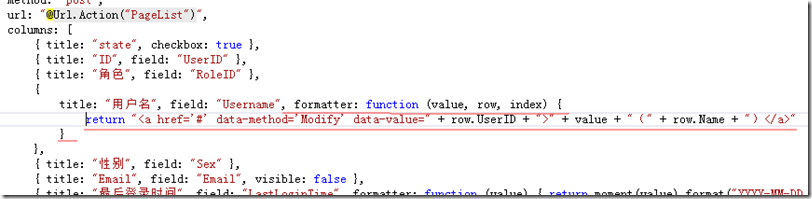
打开Index视图找到表格初始化方法,格式化列“Username”使其显示一个连接,代码红线部分。
使其看起来这个样子,当用户点击连接的时候可以显示修改对话框
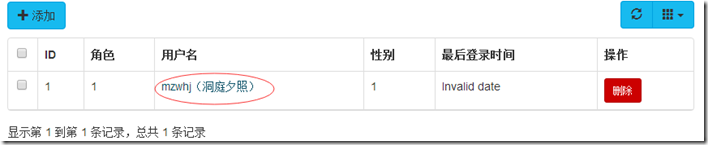
弹出窗口和发送到服务器的js代码写到表格的onLoadSuccess方法里
onLoadSuccess: function () {

                    //修改

                    $("a[data-method='Modify']").click(function () {

                        var id = $(this).attr("data-value");

                        var modifyDialog = new BootstrapDialog({

                            title: "<span class='glyphicon glyphicon-user'></span>修改用户",

                            message: function (dialog) {

                                var $message = $('<div></div>');

                                var pageToLoad = dialog.getData('pageToLoad');

                                $message.load(pageToLoad);

                                return $message;

                            },

                            data: {

                                'pageToLoad': '@Url.Action("Modify")/' + id

                            },

                            buttons: [{

                                icon: "glyphicon glyphicon-plus",

                                label: "保存",

                                action: function (dialogItself) {

                                    $.post($("form").attr("action"), $("form").serializeArray(), function (data) {

                                        if (data.Code == 1) {

                                            BootstrapDialog.show({

                                                message: data.Message,

                                                buttons: [{

                                                    icon: "glyphicon glyphicon-ok",

                                                    label: "确定",

                                                    action: function (dialogItself) {

                                                        $table.bootstrapTable("refresh");

                                                        dialogItself.close();

                                                        modifyDialog.close();

                                                    }

                                                }]

                                            });

                                        }

                                        else BootstrapDialog.alert(data.Message);

                                    }, "json");

                                    $("form").validate();

                                }

                            }, {

                                icon: "glyphicon glyphicon-remove",

                                label: "关闭",

                                action: function (dialogItself) {

                                    dialogItself.close();

                                }

                            }]

                        });

                        modifyDialog.open();

                    });

                    //修改结束

}
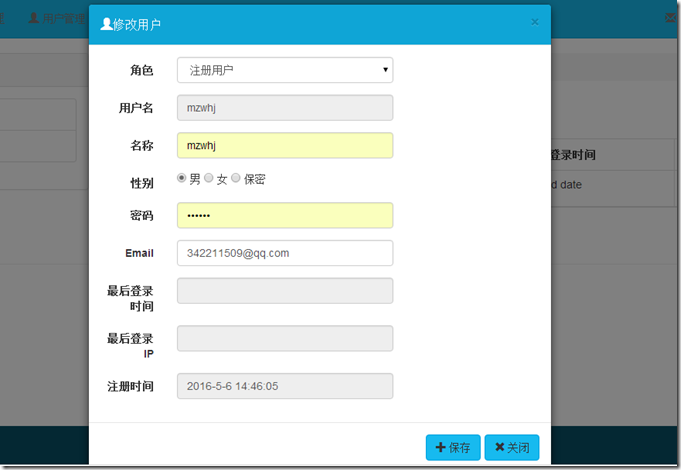
显示效果如下图
二、删除用户
UserController中添加删除方法
/// <summary>

        /// 删除

        /// </summary>

        /// <param name="id">用户ID</param>

        /// <returns></returns>

        [HttpPost]

        public ActionResult Delete(int id)

        {

            return Json(userManager.Delete(id));

        }
打开Index视图找到表格初始化方法,添加“操作”列格式化列使其显示一个删除按钮,代码红框部分。

前台显示效果

然后在表格的onLoadSuccess方法里刚写的修改用户信息的js代码后面写删除用户的js代码
//修改结束

                    //删除按钮

                    $("a[data-method='Delete']").click(function () {

                        var id = $(this).attr("data-value");

                        BootstrapDialog.confirm("你确定要删除" + $(this).parent().parent().find("td").eq(3).text() + "吗?\n 建议尽可能不要删除用户。", function (result) {

                            if (result) {

                                $.post("@Url.Action("Delete", "User")", { id: id }, function (data) {

                                    if (data.Code == 1) {

                                        BootstrapDialog.show({

                                            message: "删除用户成功",

                                            buttons: [{

                                                icon: "glyphicon glyphicon-ok",

                                                label: "确定",

                                                action: function (dialogItself) {

                                                    $table.bootstrapTable("refresh");

                                                    dialogItself.close();

                                                }

                                            }]

                                        });

                                    }

                                    else BootstrapDialog.alert(data.Message);

                                }, "json");

                            }

                        });

                    });

                    //删除按钮结束

                }

            });

            //表格结束
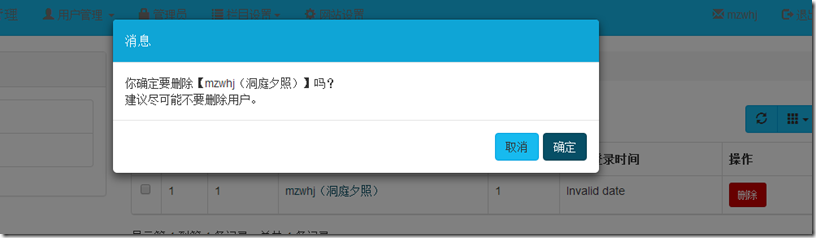
前台显示效果
==========================================
代码下载请见http://www.cnblogs.com/mzwhj/p/5729848.html
MVC5 网站开发之七 用户功能 3用户资料的修改和删除的更多相关文章
- MVC5 网站开发之七 用户功能 1、角色的后台管理
角色是网站中都有的一个功能,用来区分用户的类型.划分用户的权限,这次实现角色列表浏览.角色添加.角色修改和角色删除. 目录 奔跑吧,代码小哥! MVC5网站开发之一 总体概述 MVC5 网站开发之二 ...
- MVC5 网站开发之七 用户功能 2 用户添加和浏览
目录 MVC5网站开发之一 总体概述 MVC5 网站开发之二 创建项目 MVC5 网站开发之三 数据存储层功能实现 MVC5 网站开发之四 业务逻辑层的架构和基本功能 MVC5 网站开发之五 展示层架 ...
- MVC5 网站开发之八 栏目功能 添加、修改和删除
本次实现栏目的浏览.添加.修改和删除. 栏目一共有三种类型. 常规栏目-可以添加子栏目,也可以添加内容模型.当不选择内容模型时,不能添加内容. 单页栏目-栏目只有一个页面,可以设置视图. 链接栏目-栏 ...
- ASP.NET MVC5 网站开发实践(二) Member区域 - 用户部分(1)用户注册
上一次把基本框架搭建起来了,这次开始整Web部分,终于可以看到界面了小激动一下.web项目部分从用户功能开始,基本有注册,登录.注销.查找.查看.删除等涉及Member区域和Manage区域. 目录: ...
- ASP.NET MVC5 网站开发实践(二) Member区域 - 用户部分(3)修改资料、修改密码
在上一篇博客中实现了用户的注销和登录,其实代码里落了点东西,就是用户登录要更新最后一次登录时间和登录IP,这次补上.今天做修改资料和修改密码,TryUpdateModel是新用到的东西. 目录: AS ...
- ASP.NET MVC5 网站开发实践(二) Member区域 - 用户部分(2)用户登录、注销
上次实现了用户注册,这次来实现用户登录,用到IAuthenticationManager的SignOut.SignIn方法和基于声明的标识.最后修改用户注册代码实现注册成功后直接登录. 目录: ASP ...
- ASP.NET MVC5 网站开发实践(二) Member区域–管理列表、回复及删除
本来想接着上次把这篇写完的,没想到后来工作的一些事落下了,放假了赶紧补上. 目录: ASP.NET MVC5 网站开发实践 - 概述 ASP.NET MVC5 网站开发实践(一) - 项目框架 ASP ...
- MVC5 网站开发之三 数据存储层功能实现
数据存储层在项目Ninesky.DataLibrary中实现,整个项目只有一个类Repository. 目录 奔跑吧,代码小哥! MVC5网站开发之一 总体概述 MVC5 网站开发之二 创建项目 ...
- MVC5 网站开发之四 业务逻辑层的架构和基本功能
业务逻辑层在Ninesky.Core中实现,主要功能封装一些方法通过调用数据存储层,向界面层提供服务. 目录 奔跑吧,代码小哥! MVC5网站开发之一 总体概述 MVC5 网站开发之二 创建项目 ...
随机推荐
- Asp.Net Mvc 使用WebUploader 多图片上传
来博客园有一个月了,哈哈.在这里学到了很多东西.今天也来试着分享一下学到的东西.希望能和大家做朋友共同进步. 最近由于项目需要上传多张图片,对于我这只菜鸟来说,以前上传图片都是直接拖得控件啊,而且还是 ...
- 查看w3wp进程占用的内存及.NET内存泄露,死锁分析
一 基础知识 在分析之前,先上一张图: 从上面可以看到,这个w3wp进程占用了376M内存,启动了54个线程. 在使用windbg查看之前,看到的进程含有 *32 字样,意思是在64位机器上已32位方 ...
- .Net多线程编程—System.Threading.Tasks.Parallel
System.Threading.Tasks.Parallel类提供了Parallel.Invoke,Parallel.For,Parallel.ForEach这三个静态方法. 1 Parallel. ...
- 散列表(hash table)——算法导论(13)
1. 引言 许多应用都需要动态集合结构,它至少需要支持Insert,search和delete字典操作.散列表(hash table)是实现字典操作的一种有效的数据结构. 2. 直接寻址表 在介绍散列 ...
- 在 SAE 上部署 ThinkPHP 5.0 RC4
缘起 SAE 和其他的平台有些不同,不能在服务器上运行 Composer 来安装各种包,必须把源码都提交上去.一般的做法,可能是直接把源码的所有文件复制到目录中,添加到版本库.不过,这样就失去了与上游 ...
- Windows下Visual studio 2013 编译 Audacity
编译的Audacity版本为2.1.2,由于实在windows下编译,其源代码可以从Github上取得 git clone https://github.com/audacity/audacity. ...
- 验证管理员权限(C#)
参考页面: http://www.yuanjiaocheng.net/webapi/test-webapi.html http://www.yuanjiaocheng.net/webapi/web-a ...
- springmvc SSM 多数据源 shiro redis 后台框架 整合
A集成代码生成器 [正反双向(单表.主表.明细表.树形表,开发利器)+快速构建表单 下载地址 ; freemaker模版技术 ,0个代码不用写,生成完整的一个模块,带页面.建表sql脚本,处理类 ...
- 发布APP到app store
好久好久没写博客了,主要是 都在学习新东西,忙不赢啊. 近段时间在用AC平台学习开发移动APP, 今天开始发布应用. 在ac云控制台编译成ipa后,使用apple提供的Application Load ...
- (转) 从0开始搭建SQL Server AlwaysOn 第三篇(配置AlwaysOn)
原文地址: http://www.cnblogs.com/lyhabc/p/4682986.html 这一篇是从0开始搭建SQL Server AlwaysOn 的第三篇,这一篇才真正开始搭建Alwa ...