Apache CXF实现Web Service(5)—— GZIP使用
Apache CXF实现Web Service(5)—— GZIP使用
参考来源:
- CXF WebService整合Spring
- Apache CXF实现Web Service(1)——不借助重量级Web容器和Spring实现一个纯的JAX-WS web service
- Apache CXF实现Web Service(4)——Tomcat容器和Spring实现JAX-RS(RESTful) web service
首先参照
Apache CXF实现Web Service(4) 创建一个WTP项目,并参照(1) 新建一个测试的Web Service:HelloWorld.java和其实现HelloWorldImpl.java
HelloWorld.java
package com.cnblog.richaaaard.cxftest.spring.ws.helloworld.services;

import javax.jws.WebMethod;

import javax.jws.WebParam;

import javax.jws.WebResult;

import javax.jws.WebService;

import org.apache.cxf.annotations.GZIP;

//@GZIP(threshold=128)

@GZIP

@WebService

public interface HelloWorld {

	@WebMethod

	@WebResult String sayHi(@WebParam String text);

}
HelloWorldImpl.java
package com.cnblog.richaaaard.cxftest.spring.ws.helloworld.services;

import javax.jws.WebService;

@WebService(endpointInterface="com.cnblog.richaaaard.cxftest.spring.ws.helloworld.services.HelloWorld",serviceName="helloService")

public class HelloWorldImpl implements HelloWorld {

	public String sayHi(String name) {

    	String msg = "Hello " + name + "!";

    	return msg;

	}

}
在Spring的配置中需要注意的是,我们需要引入jarws的schema
	http://cxf.apache.org/jaxws

	http://cxf.apache.org/schemas/jaxws.xsd
完整的配置文件如下:
<beans xmlns="http://www.springframework.org/schema/beans"

	xmlns:xsi="http://www.w3.org/2001/XMLSchema-instance"

	xmlns:jaxws="http://cxf.apache.org/jaxws"

	xsi:schemaLocation="

		http://www.springframework.org/schema/beans

    	http://www.springframework.org/schema/beans/spring-beans-3.0.xsd

    	http://www.springframework.org/schema/context

    	http://www.springframework.org/schema/context/spring-context-3.0.xsd

    	http://cxf.apache.org/jaxws http://cxf.apache.org/schemas/jaxws.xsd"

    default-lazy-init="true">

	<import resource="classpath:META-INF/cxf/cxf.xml"/>

	<import resource="classpath:META-INF/cxf/cxf-servlet.xml"/>

	<bean id="helloService" 	class="com.cnblog.richaaaard.cxftest.spring.ws.helloworld.services.HelloWorldImpl">

	</bean>

	<jaxws:endpoint implementor="#helloService" address="/HelloService"/>

</beans>
web.xml文件保持不变
<beans xmlns="http://www.springframework.org/schema/beans"

	xmlns:xsi="http://www.w3.org/2001/XMLSchema-instance"

	xmlns:jaxws="http://cxf.apache.org/jaxws"

	xsi:schemaLocation="

		http://www.springframework.org/schema/beans

    	http://www.springframework.org/schema/beans/spring-beans-3.0.xsd

    	http://www.springframework.org/schema/context

    	http://www.springframework.org/schema/context/spring-context-3.0.xsd

    	http://cxf.apache.org/jaxws http://cxf.apache.org/schemas/jaxws.xsd"

    default-lazy-init="true">

	<import resource="classpath:META-INF/cxf/cxf.xml"/>

	<import resource="classpath:META-INF/cxf/cxf-servlet.xml"/>

	<bean id="helloService" class="com.cnblog.richaaaard.cxftest.spring.ws.helloworld.services.HelloWorldImpl">

	</bean>

	<jaxws:endpoint implementor="#helloService" address="/HelloService"/>

</beans>
项目结构如图

下面需要测试几个问题
- @GZIP如何工作的?
- @GZIP有两个属性 force 和 threshold 怎么用?
- @GZIP加在接口上是否可行?(我们用Spring实例化bean是用的HelloWorldImpl)
测试
@GZIP如何工作的?
第一步
在Eclipse中Run As... -> Run on Server,然后在浏览器中验证是否发布成功:

我们Tomcat本地运行的端口是8080。
第二步
运行TCPMon,新建监听端口8081,目标端口8080:

第三步
新建客户端测试代码,并将address设置成"http://localhost:8081/cxf/services/HelloService"
package com.cnblog.richaaaard.cxftest.spring.ws.helloworld.client;

import org.apache.cxf.jaxws.JaxWsProxyFactoryBean;

import org.apache.cxf.transport.common.gzip.GZIPInInterceptor;

import org.apache.cxf.transport.common.gzip.GZIPOutInterceptor;

import com.cnblog.richaaaard.cxftest.spring.ws.helloworld.services.HelloWorld;

public class Client {

	public static void main(String[] args) {

    	JaxWsProxyFactoryBean client = new JaxWsProxyFactoryBean();

//        factory.getInInterceptors().add(new LoggingInInterceptor());

//        factory.getOutInterceptors().add(new LoggingOutInterceptor());

//        factory.getInInterceptors().add(new GZIPInInterceptor());

//        factory.getOutInterceptors().add(new GZIPOutInterceptor());

    	client.setServiceClass(HelloWorld.class);

    	client.setAddress("http://localhost:8081/cxf/services/HelloService");

    	HelloWorld helloworld = (HelloWorld) client.create();

    	System.out.println(helloworld.sayHi("Richard"));

    	System.exit(0);

	}

}
第一个测试,运行Client.java
Run As... -> Java Application
在TCPMon(关于如何使用TCPMon请查看http://www.cnblogs.com/richaaaard/p/5019438.html)中查看结果
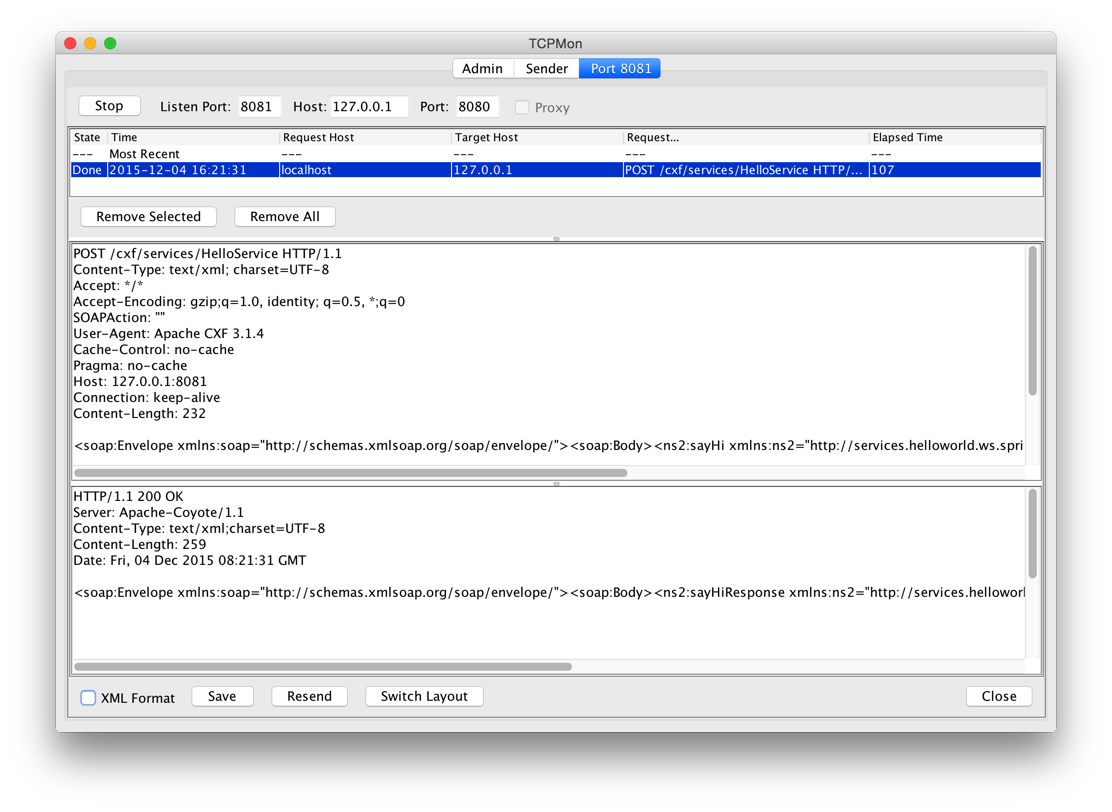
发现并没有像预料中的那样发生GZIP压缩

怀疑出现问题
- 服务器不支持GZIP?
- CXF有BUG?
- 使用方式有问题?
打开@GZIP Annotation的源码查看
@Documented

@Retention(RetentionPolicy.RUNTIME)

@Target({ ElementType.TYPE })

@Inherited

public @interface GZIP {

	int threshold() default -1;

	boolean force() default false;

}
这个标注有两个属性:threshold 与 force
然后查看Apache CXF 关于@GZIP的文档 (CXF Features http://cxf.apache.org/docs/featureslist.html) 与 (CXF Annotations http://cxf.apache.org/docs/annotations.html)
细心的同学会发现“CXF Features文档中关于GZIPFeature的说明中仍然出现了FastInfoset”这个错误


- threshold - the threshold under which messages are not gzipped
- force - force GZIP compression instead of negotiating via the Accept-Encoding header
GZIP is a negotiated enhancement. An initial request from a client will not be gzipped, but an Accept header will be added and if the server supports it, the response will be gzipped and any subsequent requests will be.
上面一段话的意思是:第一次请求不会发生GZIP,但是如果服务器支持,会加如到Accept头上,返回的消息会发生GZIP然后,后面发生的请求也会有GZIP。
关于threshold的定义:可以发现我们测试中的请求(request)长度(Content-Length)是232,返回(response)长度是259。
这里猜想
@GZIP应该有一个自己的默认threshold,如果修改默认实现,也就能发生GZIP了
我们将threshold修改成256介于232和259之间
@GZIP(threshold=256)

//@GZIP

@WebService

public interface HelloWorld {

	@WebMethod

	@WebResult String sayHi(@WebParam String text);

}
重启服务器,运行程序
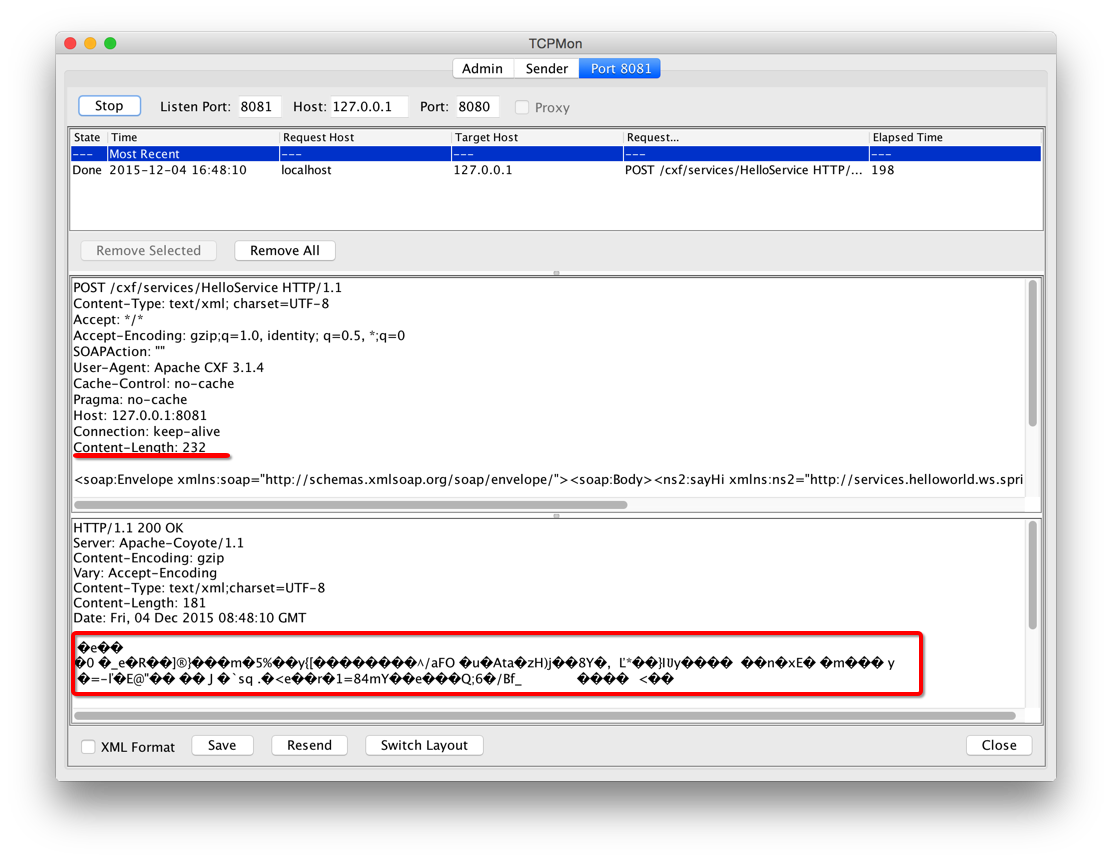
请求没有发生GZIP,而响应端有GZIP
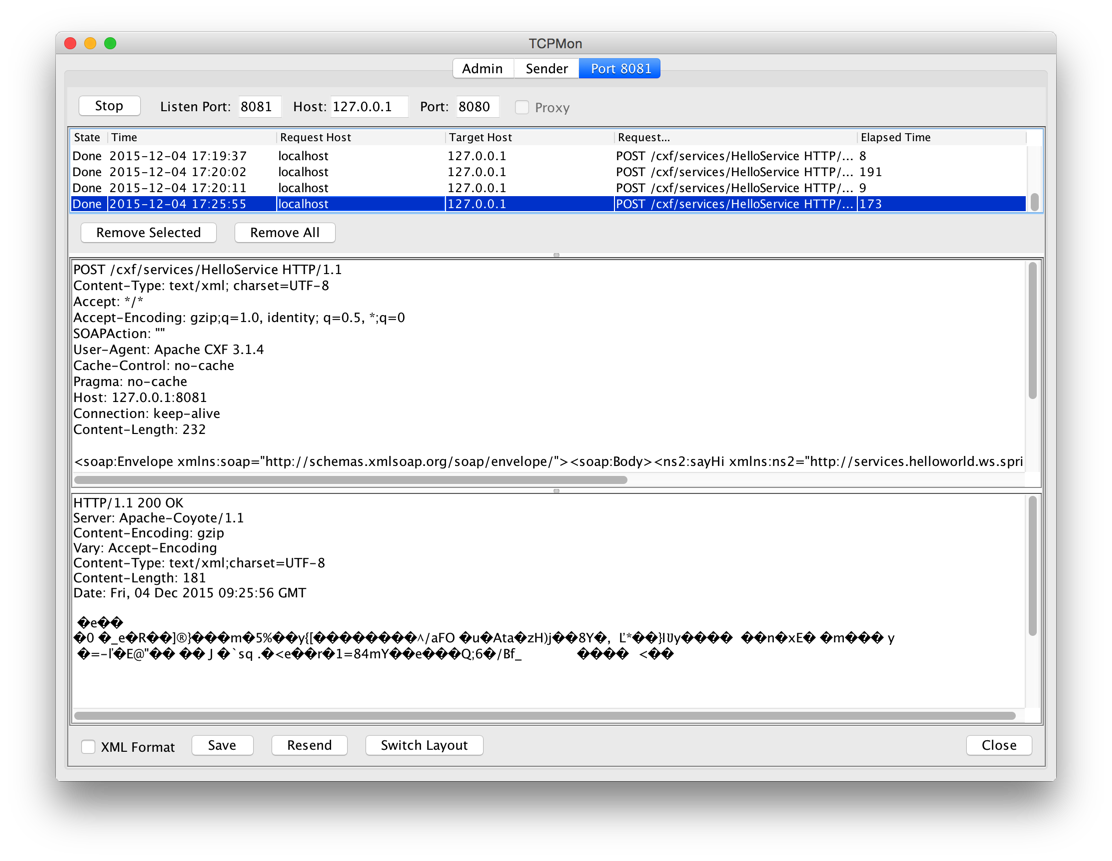
再次运行Client(不重启服务器)
我们发现,请求(request)并没有像Apache官方文档那样说的,也会有GZIP。
这是为什么呢?是不是和我们的客户端有关?
将代码增加一次请求试试
发现连续的两次请求仍然没有发生GZIP。再仔细查看关于GZIP的解释,"...如果服务器支持..."
package com.cnblog.richaaaard.cxftest.spring.ws.helloworld.client;

import org.apache.cxf.jaxws.JaxWsProxyFactoryBean;

import org.apache.cxf.transport.common.gzip.GZIPInInterceptor;

import org.apache.cxf.transport.common.gzip.GZIPOutInterceptor;

import com.cnblog.richaaaard.cxftest.spring.ws.helloworld.services.HelloWorld;

public class Client {

	public static void main(String[] args) {

    	JaxWsProxyFactoryBean client = new JaxWsProxyFactoryBean();

//        factory.getInInterceptors().add(new LoggingInInterceptor());

//        factory.getOutInterceptors().add(new LoggingOutInterceptor());

//        factory.getInInterceptors().add(new GZIPInInterceptor());

//        factory.getOutInterceptors().add(new GZIPOutInterceptor());

    	client.setServiceClass(HelloWorld.class);

    	client.setAddress("http://localhost:8081/cxf/services/HelloService");

    	HelloWorld helloworld = (HelloWorld) client.create();

    	System.out.println(helloworld.sayHi("Richard"));

    	System.out.println(helloworld.sayHi("Kobe Bryant"));

    	System.exit(0);

	}

}
这里猜想
是不是我们服务器的设置问题,不支持GZIP呢?
修改Tomcat的Connector配置,增加
	compressionMinSize="256"

	compression="on"

	noCompressionUserAgents="gozilla, traviata"

	compressableMimeType="text/html,text/xml"
然后重启服务器,再运行客户端
发现请求(request)仍然没有发生GZIP
如何才能使请求也提交GZIP格式呢?
我们暂且放下这个问题,先将Tomcat配置文件关于compression的配置还原
来看看force如何工作的
在HelloWorld.java的头上修改@GZIP增加force属性,threshold仍然为256
@GZIP(force=true, threshold=256)

@WebService

public interface HelloWorld {

	@WebMethod

	@WebResult String sayHi(@WebParam String text);

}
请求仍然没有被压缩
修改成128呢?因为请求的Content-Length是232
在次运行,发现请求成功压缩了(这是请求压缩的一种情景)
好像漏了什么东西
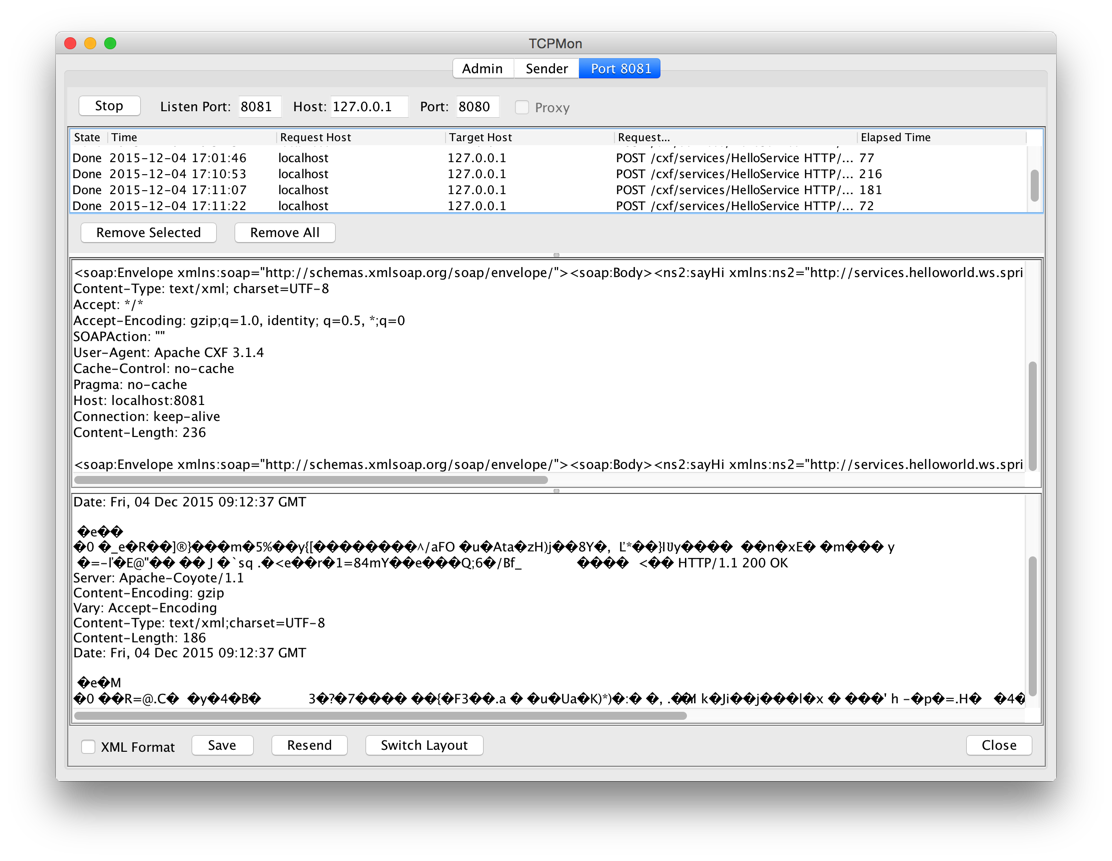
之前我们反复测试,期望第二次请求(request)可以根据服务端返回的Accept-Encoding header 自行进行GZIP压缩,我们测试代码当时设置的threhold是256,而请求的Content-Length=232。我们将threshold调整到128,去掉force属性,重启服务器再试一下(这时的Tomcat没有配置compression相关属性)。
- 当我们单次运行的时候(每次客户端运行结束,进程退出)
先后运行两次独立的请求,请求(request)没有发生GZIP,这是因为客户端是不同进程的缘故

- 当我加入一行代码,在统一进程中连续两次请求服务器时,我们会发现第二次请求会自行GZIP压缩,而此时Tomcat上没有对compression进行特别配置

由此可见
Tomcat是内置支持GZIP的服务器
Tomcat上的compression是服务器自己独立的压缩机制,与Apache CXF无关,但是服务器级别的配置会影响我们使用的CXF Web Service
那么问题来了
Tomcat服务器配置的压缩机制是怎么工作的呢?
*扩展
StackOverflow上关于GZIPInInterceptor和GZIPOutInterceptor的回答是否正确?
通过上面的所有测试就能得出结论,这个Interceptor并不对服务端响应消息的GZIP起任何作用,读者可以自行测试
Apache CXF实现Web Service(5)—— GZIP使用的更多相关文章
- Apache CXF实现Web Service(4)——Tomcat容器和Spring实现JAX-RS(RESTful) web service
准备 我们仍然使用 Apache CXF实现Web Service(2)——不借助重量级Web容器和Spring实现一个纯的JAX-RS(RESTful) web service 中的代码作为基础,并 ...
- Apache CXF实现Web Service(3)——Tomcat容器和不借助Spring的普通Servlet实现JAX-RS(RESTful) web service
起步 参照这一系列的另外一篇文章: Apache CXF实现Web Service(2)——不借助重量级Web容器和Spring实现一个纯的JAX-RS(RESTful) web service 首先 ...
- Apache CXF实现Web Service(2)——不借助重量级Web容器和Spring实现一个纯的JAX-RS(RESTful) web service
实现目标 http://localhost:9000/rs/roomservice 为入口, http://localhost:9000/rs/roomservice/room为房间列表, http: ...
- Apache CXF实现Web Service(1)——不借助重量级Web容器和Spring实现一个纯的JAX-WS web service
废话少说,先在Eclipse中新建一个Java Project (可以不是WTP的Dynamic Web Project) 选择Java Project 再看pom.xml 我们使用cxf 3.1.4 ...
- 基于Apache CXF的Web Service服务端/客户端
转自:https://www.aliyun.com/zixun/wenji/1263190.html CXF服务端: package com.sean.server; import javax.jws ...
- Web Service学习-CXF开发Web Service实例demo(一)
Web Service是什么? Web Service不是框架.更甚至不是一种技术. 而是一种跨平台,跨语言的规范 Web Service解决什么问题: 为了解决不同平台,不同语言所编写的应用之间怎样 ...
- 使用CXF开发Web Service服务
1.使用CXF开发Web Service服务端 1.1 开发一个Web Service业务接口,该接口要用@WebService修饰 (1)创建一个Java项目MyServer (2)在MyServe ...
- Web Service学习-CXF开发Web Service的权限控制(二)
Web Service怎样进行权限控制? 解决思路:server端要求input消息总是携带实username.password信息,假设没实username和password信息.直接拒绝调用 解决 ...
- 应用Apache Axis进行Web Service开发
转自(http://tscjsj.blog.51cto.com/412451/84813) 一.概述 SOAP原意为Simple Object Access Protocol(简单对象访问协议),是一 ...
随机推荐
- SQLite数据库管理的相关命令
1.创建数据库 启动命令行,通过输入如下命令打开Shell模式的CLP: sqlite3 test.db 虽然我们提供了数据库名称,但如果该数据库不存在,SQLite实际上就未创建该数据库,直到在数据 ...
- c++大数模板
自己写的大数模板,参考了小白书上的写法,只是实现了加减乘法,不支持负数,浮点数.. 除法还没写o(╯□╰)o以后再慢慢更吧.. 其实除法我用(xie)的(bu)少(lai),乘法写过fft,这模板还是 ...
- bzoj 1862/1056 [HAOI2008]排名系统
原题链接:http://www.lydsy.com/JudgeOnline/problem.php?id=1862 很恶心的 一道题,我也不晓得自己是第几次写这题了%>_<%. 写了两种方 ...
- 切换两个activity
下面是一个切换两个activity是过度动画效果实例:(注意里面的overridePendingTransition()方法)Java代码 1. @Override public void onCre ...
- golang的nil
golang中什么样的类型可以赋值nil? 类型文档中有注定"uninitialized value is nil"的类型都可以赋值nil. golang的基本类型不能赋值nil: ...
- 将meteor部署在自己服务器上的简易方法
有meteor-up等众多工具,如果你不喜欢它们,可以尝试如下方法,自由控制. 1,创建及打包项目 meteor create newapp meteor build . 2,上传 将bunder.t ...
- SqlBulkCopy与触发器,批量插入表(存在则更新,不存在则插入)
临时表:Test /****** 对象: Table [dbo].[Test] 脚本日期: 05/10/2013 11:42:07 ******/ SET ANSI_NULLS ON GO SET Q ...
- TFS使用指南
上一篇文章已经简略介绍过TFS的安装与管理,本篇文章主要描述一下我个人在工作过程中使用TFS的一些指南与建议.本章内容预览: 1. 项目计划与跟踪 经常有很多朋友在日常聊天中抱怨做计划很无畏,因为计 ...
- Django+Nginx+MongoDB+Mysql+uWsgi的搭建
搭建目标如下: 图:系统架构图 这个系统可以提供web服务及其它查询应用服务,我用其做一个二手房信息搜集.处理及分发的系统,可以通过浏览器访问,也可以通过定制的客户端进行访问. 一.安装篇 1.下载安 ...
- find用法
find - 递归地在层次目录中处理文件 总 find [path...] [expression] 描 这个文档是GNU版本 find 命令的使用手册. find 搜索目录树上的每一个文件名,它从左 ...