Netty学习摘记 —— 单元测试
本文参考
本篇文章是对《Netty In Action》一书第九章"单元测试"的学习摘记,主要内容为使用特殊的 Channel 实现——EmbeddedChannel来测试ChannelHandler
EmbeddedChannel概述
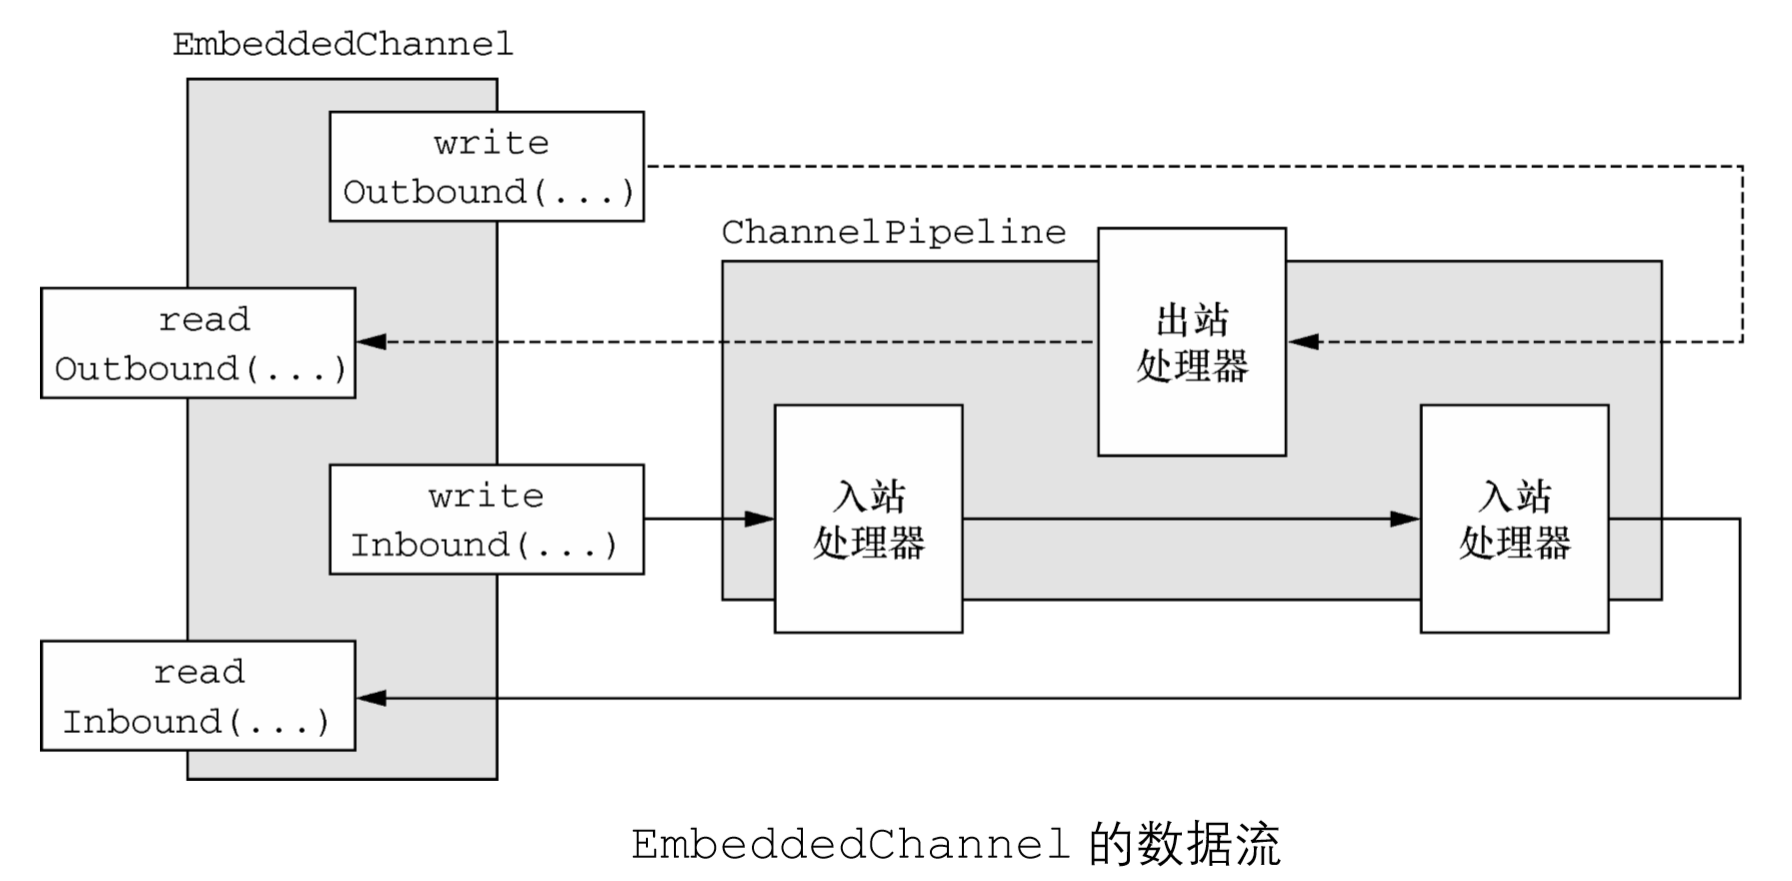
将入站数据或者出站数据写入到 EmbeddedChannel 中,然后检查是否有任何东西到达了 ChannelPipeline 的尾端。以这种方式,你便可以确定消息是否已经被编码或者被解码过了,以及是否触发了任何的ChannelHandler动作
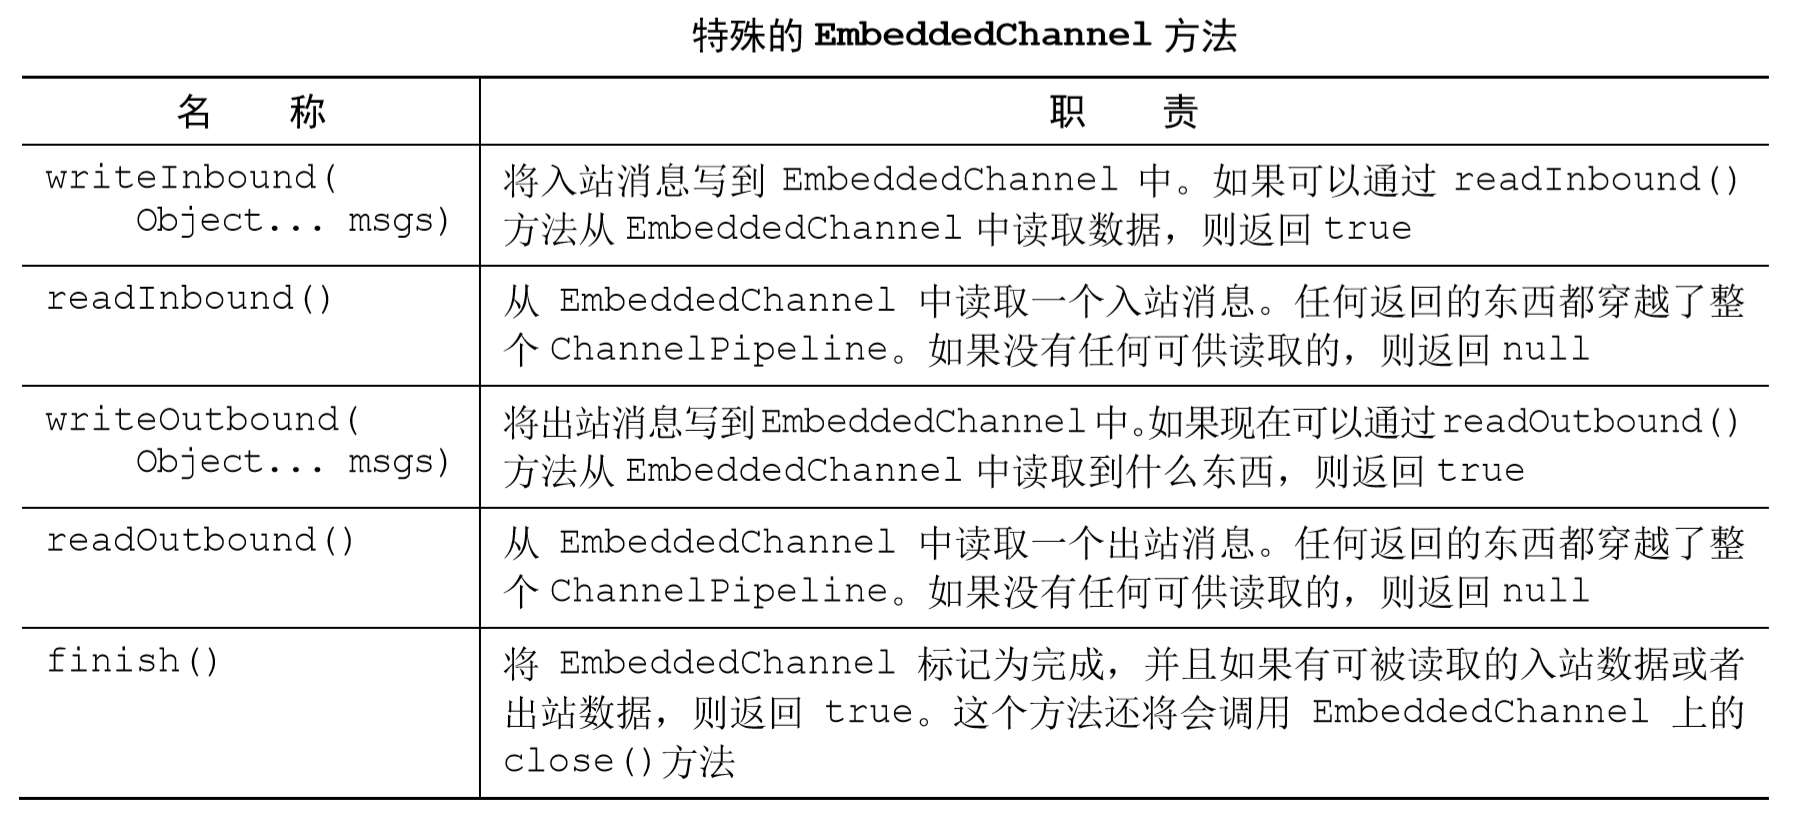
从上表的API描述中我们可以看到,writeInbound()和readInbound()方法、writeOutbound()和readOutbound()方法成对使用,他们的流程是十分简单的
使用EmbeddedChannel测试入站消息
我们设计一个解码器,每次读取固定字节大小的帧
public class FixedLengthFrameDecoder extends ByteToMessageDecoder {
private final int frameLength;
//指定要生成的帧的长度
public FixedLengthFrameDecoder(int frameLength) {
if (frameLength <= 0) {
throw new IllegalArgumentException("frameLength must be a positive integer: " + frameLength);
}
this.frameLength = frameLength;
}
@Override
protected void decode(ChannelHandlerContext ctx, ByteBuf in, List<Object> out)
throws Exception {
//检查是否有足够的字节可以被读取,以生成下一个帧
while (in.readableBytes() >= frameLength) {
//从 ByteBuf 中读取一个新帧
ByteBuf buf = in.readBytes(frameLength);
//将该帧添加到已被解码的消息列表中
out.add(buf);
}
}
}
使用EmbeddedChannel对解码器进行单元测试
@Test
//第一个测试方法:testFramesDecoded()
public void testFramesDecoded() {
//创建一个 ByteBuf,并存储 9 字节
ByteBuf buf = Unpooled.buffer();
for (int i = 0; i < 9; i++) {
buf.writeByte(i);
}
ByteBuf input = buf.duplicate();
//创建一个EmbeddedChannel,并添加一个FixedLengthFrameDecoder
//其将以 3 字节的帧长度被测试
EmbeddedChannel channel = new EmbeddedChannel(new FixedLengthFrameDecoder(3));
// write bytes
//将数据写入EmbeddedChannel
assertTrue(channel.writeInbound(input.retain()));
//标记 Channel 为已完成状态
assertTrue(channel.finish());
// read messages
//读取所生成的消息,并且验证是否有 3 帧(切片),其中每帧(切片)都为 3 字节
ByteBuf read = (ByteBuf) channel.readInbound();
assertEquals(buf.readSlice(3), read);
read.release();
read = (ByteBuf) channel.readInbound();
assertEquals(buf.readSlice(3), read);
read.release();
read = (ByteBuf) channel.readInbound();
assertEquals(buf.readSlice(3), read);
read.release();
assertNull(channel.readInbound());
buf.release();
}
该 testFramesDecoded()方法验证了,一个包含 9 个可读字节的 ByteBuf 被解码为 3 个ByteBuf,每个都包含了 3 字节,,通过调用readInbound()方法,从Embedded- Channel中正好读取了3 个帧和一个null
下面测试入站ByteBuf通过两个步骤来写入
@Test
//第二个测试方法:testFramesDecoded2()
public void testFramesDecoded2() {
ByteBuf buf = Unpooled.buffer();
for (int i = 0; i < 9; i++) {
buf.writeByte(i);
}
ByteBuf input = buf.duplicate();
EmbeddedChannel channel = new EmbeddedChannel(
new FixedLengthFrameDecoder(3));
//返回 false,因为没有一个完整的可供读取的帧
assertFalse(channel.writeInbound(input.readBytes(2)));
assertTrue(channel.writeInbound(input.readBytes(7)));
assertTrue(channel.finish());
ByteBuf read = (ByteBuf) channel.readInbound();
assertEquals(buf.readSlice(3), read);
read.release();
read = (ByteBuf) channel.readInbound();
assertEquals(buf.readSlice(3), read);
read.release();
read = (ByteBuf) channel.readInbound();
assertEquals(buf.readSlice(3), read);
read.release();
assertNull(channel.readInbound());
buf.release();
}
当writeInbound(input.readBytes(2))被调用时,返回了false,这也应证了前面API表中的描述,如果对 readInbound()的后续调用将会返回数据,那么 write- Inbound()方法将会返回true,或者用源码的注释来说,当只有不足3个字节可供读取时,没有生成新的帧添加到已被解码的消息队列中
return true if the write operation did add something to the inbound buffer
使用EmbeddedChannel测试出站消息
和测试入站消息相反,在测试出站消息中,我们用到了编码器,将一种消息格式转换为另一种,我们设计的编码器功能如下:
- 持有AbsIntegerEncoder的EmbeddedChannel将会以 4 字节的负整数的形式写出 站数据
- 编码器将从传入的 ByteBuf 中读取每个负整数,并将会调用 Math.abs()方法来获取 其绝对值
- 编码器将会把每个负整数的绝对值写到ChannelPipeline中
//扩展 MessageToMessageEncoder 以将一个消息编码为另外一种格式
public class AbsIntegerEncoder extends MessageToMessageEncoder<ByteBuf> {
@Override
protected void encode(ChannelHandlerContext channelHandlerContext,
ByteBuf in, List<Object> out) throws Exception {
//检查是否有足够的字节用来编码
while (in.readableBytes() >= 4) {
//从输入的 ByteBuf中读取下一个整数,并且计算其绝对值
int value = Math.abs(in.readInt());
//将该整数写入到编码消息的 List 中
out.add(value);
}
}
}
下面是测试代码
@Test
public void testEncoded() {
//创建一个 ByteBuf,并且写入 9 个负整数
ByteBuf buf = Unpooled.buffer();
for (int i = 1; i < 10; i++) {
buf.writeInt(i * -1);
}
//创建一个EmbeddedChannel,并安装一个要测试的 AbsIntegerEncoder
EmbeddedChannel channel = new EmbeddedChannel(new AbsIntegerEncoder());
//写入 ByteBuf,并断言调用 readOutbound()方法将会产生数据
assertTrue(channel.writeOutbound(buf));
//将该 Channel 标记为已完成状态
assertTrue(channel.finish());
// read bytes
//读取所产生的消息,并断言它们包含了对应的绝对值
for (int i = 1; i < 10; i++) {
assertEquals(i, channel.readOutbound());
}
assertNull(channel.readOutbound());
}
使用EmbeddedChannel测试异常处理
我们指定最大的帧大小设置为3字节,如果一个帧的大小超出了该限制,那么程序将会丢弃它的字节,并抛出一个 TooLongFrameException。位于 ChannelPipeline 中的其他 ChannelHandler可以选择在exceptionCaught()方法中处理该异常或者忽略它
//扩展 ByteToMessageDecoder以将入站字节解码为消息
public class FrameChunkDecoder extends ByteToMessageDecoder {
private final int maxFrameSize;
//指定将要产生的帧的最大允许大小
public FrameChunkDecoder(int maxFrameSize) {
this.maxFrameSize = maxFrameSize;
}
@Override
protected void decode(ChannelHandlerContext ctx, ByteBuf in, List<Object> out)
throws Exception {
int readableBytes = in.readableBytes();
if (readableBytes > maxFrameSize) {
// discard the bytes
//如果该帧太大,则丢弃它并抛出一个 TooLongFrameException……
in.clear();
throw new TooLongFrameException();
}
//否则,从 ByteBuf 中读取一个新的帧
ByteBuf buf = in.readBytes(readableBytes);
//将该帧添加到解码 读取一个新的帧消息的 List 中
out.add(buf);
}
}
下面是测试代码
@Test
public void testFramesDecoded() {
//创建一个 ByteBuf,并向它写入 9 字节
ByteBuf buf = Unpooled.buffer();
for (int i = 0; i < 9; i++) {
buf.writeByte(i);
}
ByteBuf input = buf.duplicate();
//创建一个 EmbeddedChannel,并向其安装一个帧大小为 3 字节的 FixedLengthFrameDecoder
EmbeddedChannel channel = new EmbeddedChannel(new FrameChunkDecoder(3));
//向它写入 2 字节,并断言它们将会产生一个新帧
assertTrue(channel.writeInbound(input.readBytes(2)));
try {
//写入一个 4 字节大小的帧,并捕获预期的TooLongFrameException
channel.writeInbound(input.readBytes(4));
//如果上面没有抛出异常,那么就会到达这个断言,并且测试失败
Assert.fail();
} catch (TooLongFrameException e) {
// expected exception
}
//写入剩余的2字节,并断言将会产生一个有效帧
assertTrue(channel.writeInbound(input.readBytes(3)));
//将该 Channel 标记为已完成状态
assertTrue(channel.finish());
// Read frames
//读取产生的消息,并且验证值
ByteBuf read = (ByteBuf) channel.readInbound();
assertEquals(buf.readSlice(2), read);
read.release();
read = (ByteBuf) channel.readInbound();
assertEquals(buf.skipBytes(4).readSlice(3), read);
read.release();
buf.release();
}
注意,如果该类实现了exceptionCaught()方法并处理了该异常,那么它将不会被catch 块所捕获
Netty学习摘记 —— 单元测试的更多相关文章
- Netty学习摘记 —— 初步认识Netty核心组件
本文参考 我在博客内关于"Netty学习摘记"的系列文章主要是对<Netty in action>一书的学习摘记,文章中的代码也大多来自此书的github仓库,加上了一 ...
- Netty学习摘记 —— 初识编解码器
本文参考 本篇文章是对<Netty In Action>一书第十章"编解码器框架"的学习摘记,主要内容为解码器和编码器 编解码器实际上是一种特殊的ChannelHand ...
- Netty学习摘记 —— ByteBuf详解
本文参考 本篇文章是对<Netty In Action>一书第五章"ByteBuf"的学习摘记,主要内容为JDK 的ByteBuffer替代品ByteBuf的优越性 你 ...
- Netty学习摘记 —— UDP广播事件
本文参考 本篇文章是对<Netty In Action>一书第十三章"使用UDP广播事件"的学习摘记,主要内容为广播应用程序的开发 消息POJO 我们将日志信息封装成名 ...
- Netty学习摘记 —— 简单WEB聊天室开发
本文参考 本篇文章是对<Netty In Action>一书第十二章"WebSocket"的学习摘记,主要内容为开发一个基于广播的WEB聊天室 聊天室工作过程 请求的 ...
- Netty学习摘记 —— 心跳机制 / 基于分隔符和长度的协议
本文参考 本篇文章是对<Netty In Action>一书第十一章"预置的ChannelHandler和编解码器"的学习摘记,主要内容为通过 SSL/TLS 保护 N ...
- Netty学习摘记 —— 预置SSL / HTTP / WebSocket编解码器
本文参考 本篇文章是对<Netty In Action>一书第十一章"预置的ChannelHandler和编解码器"的学习摘记,主要内容为通过 SSL/TLS 保护 N ...
- Netty学习摘记 —— 再谈引导
本文参考 本篇文章是对<Netty In Action>一书第八章"引导"的学习摘记,主要内容为引导客户端和服务端.从channel内引导客户端.添加ChannelHa ...
- Netty学习摘记 —— 再谈EventLoop 和线程模型
本文参考 本篇文章是对<Netty In Action>一书第七章"EventLoop和线程模型"的学习摘记,主要内容为线程模型的概述.事件循环的概念和实现.任务调度和 ...
随机推荐
- 案例二:shell脚本获取当前日期和时间及磁盘使情况
习题分析 本题有两个核心知识点: 1. 如何自动表示当天的日期 2. 磁盘使用情况 打印日期的命令为 date,示例命令如下: # date 2017 年 12 月 20 日 星期三 16:26:55 ...
- Nullable<T> 结构 |T? 可为空的值类型
参考链接:https://www.cnblogs.com/tdfblog/p/Nullable-Types-in-Csharp-Net.html https://www.cnblogs.com/min ...
- WPF中RichTextBox中添加文字的两种方法
RichTextBox控件不同于TextBox控件,后者可以直接通过其Text属性绑定或者在后台动态添加文字. (一)使用数据绑定 <RichTextBox FontSize="12& ...
- 在shell脚本里使用sftp批量传送文件
转至:https://blog.csdn.net/istronger/article/details/52141530?utm_medium=distribute.pc_relevant.none-t ...
- 自动启动WebLogic系统的服务脚本
转至:http://blog.chinaunix.net/uid-20164485-id-1973841.html 自动启动WebLogic系统的服务脚本 2010.10.25 TsengYia# ...
- C语言刷二叉树(一)基础部分
二叉树基础部分 144. 二叉树的前序遍历 方法一:递归 /** * Definition for a binary tree node. * struct TreeNode { * int val; ...
- 串口通讯之rs232 c++版本
rs232.cpp #ifndef kranfix_rs232_rs232_cc #define kranfix_rs232_rs232_cc #include "rs232.h" ...
- 怎么在linux上安装部署jenkins
怎么在linux上安装部署jenkins 作为一个非科班出身自学的小白,踩过很多的坑,特此留下记录 以下在虚拟机上示例 系统:linux(centos7) 操作方式:xshell连接终端操作 教程之前 ...
- php 23种设计模型 - 访问者模式
访问者模式是一种行为型模式,访问者表示一个作用于某对象结构中各元素的操作.它可以在不修改各元素类的前提下定义作用于这些元素的新操作,即动态的增加具体访问者角色. 访问者模式利用了双重分派.先将访问者传 ...
- JS类型判断&原型链
JS类型检测主要有四种 1.typeof Obj 2.L instanceof R 3.Object.prototype.toString.call/apply(); 4.Obj.constructo ...