框架入门经典项目TodoMVC
一、项目介绍
①地址:http://todomvc.com/
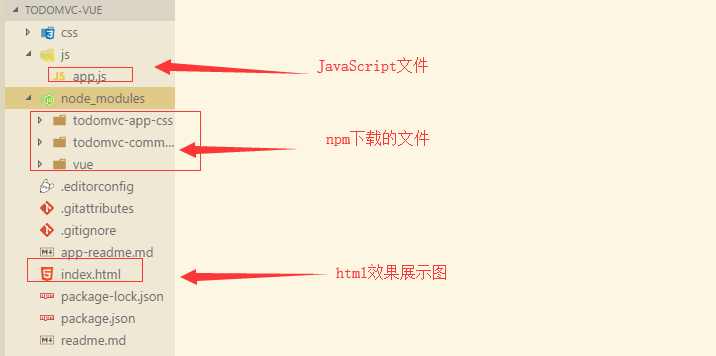
②GitHub下载模板
③通过npm下载模板的样式

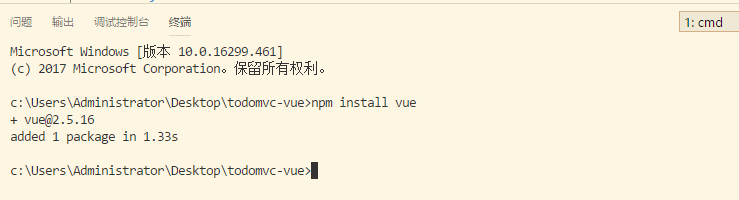
④通过npm下载Vuejs
⑤项目文件,主要修改app.js和index.html两个文件
二、使用Vuejs需求实现(主体思路)
①列表渲染
- 有数据的时候展示出来:v-if 的使用
(function (Vue) {
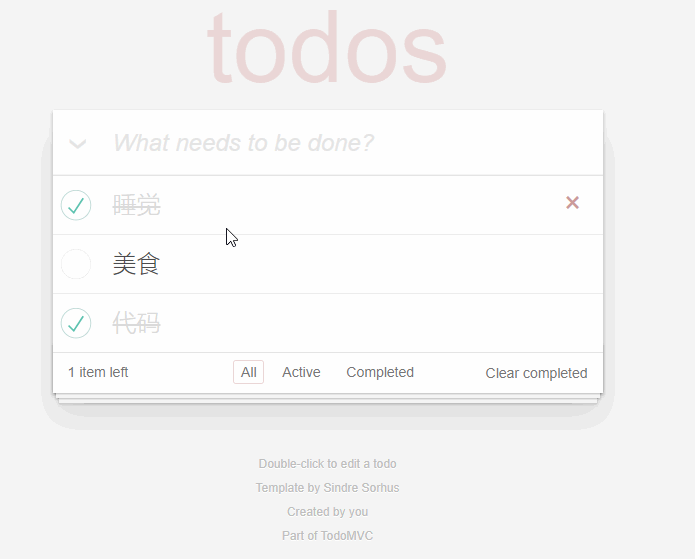
let todos=[
{id:1,title:'睡觉',completed:true},
{id:2,title:'美食',completed:false},
{id:3,title:'代码',completed:true}
]
new Vue({
el:'#todoapp',
data:{
todos:todos,
},
})(Vue);
                    <li v-for="item of todos" v-bind:class='{completed:item.completed}'>

                        <div class="view">

                            <input class="toggle" type="checkbox" v-model='item.completed'>

                            <label>{{item.title}}</label>

                            <button class="destroy"></button>

                        </div>

                        <input class="edit" value="Create a TodoMVC template">

                    </li>
- 没有数据的时候隐藏main部分:添加一个不会出现在页面的template模板,并且使用v-if,当todos没有数据的时候,长度为0
            <template v-if='todos.length'>

            <!-- This section should be hidden by default and shown when there are todos -->

            <section class="main"> ..... </section>

            <!-- This footer should hidden by default and shown when there are todos -->

            <footer class="footer"> .... </footer>

            </template>
②添加任务
- 页面初始化获得焦点:自定义指令,注册一个全局自定义指令 `v-focus`,然后在input里直接使用
    // 自定义指令,自动获取焦点

    Vue.directive('focus', {

        inserted: function (el) {

              el.focus();

        }

      });
<input class="new-todo" placeholder="What needs to be done?" @keyup.enter='addTodo' v-focus>
- 敲回车添加到任务列表:鼠标抬起注册addTodo事件,追加数据
- 不允许有非空数据:为空时,return返回
- 添加完成后清空文本框:令event.target.value= ' '
<header class="header">

     <h1>todos</h1>

     <input class="new-todo" placeholder="What needs to be done?" @keyup.enter='addTodo'>

</header>
        methods:{

            // 添加任务

            addTodo(event){

                let todoText=event.target.value.trim();

                if(!todoText.length){

                    return

                }

                let id=this.todos[this.todos.length-1].id+1;

                this.todos.push({

                    id:id,

                    title:todoText,

                    completed:false,

                });

                event.target.value='';

            },
③标记所有任务完成或者未完成:点击的时候注册toggleAll事件处理函数
<input @click='toggleAll' id="toggle-all" class="toggle-all" type="checkbox">
            toggleAll(event){

                let checked=event.target.checked;

                this.todos.forEach(todo => todo.completed=checked);

            },
④任务项
- 切换任务完成状态:v-bind绑定一个class=“{类名:布尔值}”,当布尔值为true,作用这个类名,当布尔值为false,则去除这个类名
<li v-for="item of todos" v-bind:class='{completed:item.completed}'>
- 删除单个任务项:@click=‘ removeTodo(index,$event) ’ ,传入两个参数,删除的索引index和事件$event(传参以后,正常的event获取不到),然后处理函数利用数组方法splice操作
<button class="destroy" @click='removeTodo(index,$event)' ></button>
            removeTodo(delIndex,event){

                this.todos.splice(delIndex,1);

            },
- 双击label进入编辑模式:这里使用一个中间变量currentEditing,默认为null,也就是所有的任务项都没有editing样式,editing的样式取决于中间变量是否等价于当前任务项,当双击的时候,手动把中间量等于双击的当前任务项,这样editing样式就为true,也就是起作用了。
<li v-for="(item,index) of todos" v-bind:class='{completed:item.completed,editing:item===currentEditing}'>
<label @dblclick="currentEditing=item">{{item.title}}</label>
        data:{

            todos:todos,

            currentEditing:null,
⑤编辑任务项
- 编辑文本框自动获得焦点:局部自定义指令,自动获取焦点‘ editing-focus ’
<input class="edit" :value='item.title' @blur='saveEdit(item,index,$event)' @keyup.enter='saveEdit(item,index,$event)' @keyup.esc='currentEditing=null' v-editing-focus="item===currentEditing">
        directives:{

            // 局部自定义属性

            editingFocus:{

                update(el,binding){

                    if(binding.value){

                        el.focus();

                    }

                },

            },

        },
- 在编辑文本框敲回车后者失去焦点后,如果为空,则直接删除这个item,如果不为空,保存这个数据,并去除editing样式:saveEdit处理函数,传入参数
- 输入状态按下esc取消编辑:设置默认value属性是item的title,按下esc抬起的时候,令中间变量为null,去除editing样式
<input class="edit" :value='item.title' @blur='saveEdit(item,index,$event)' @keyup.enter='saveEdit(item,index,$event)' @keyup.esc='currentEditing=null'>
            saveEdit(item,index,event){

                var editText=event.target.value.trim();

                // 如果为空,直接删除这个item

                if(!editText.length){

                    return this.todos.splice(index,1);

                }

                // 如果不为空,修改title的值,然后去除eiditing样式

                item.title=editText;

                this.currentEditing=null;

            },
⑥其他(footer部分)
- 显示所有未完成任务数:@click=‘ removeAllDone ’ ,处理事件利用数组方法filter过滤未完成数据,然后重新赋值给数据列表
<button class="clear-completed" @click='removeAllDone'>Clear completed</button>
            removeAllDone(){

                this.todos=this.todos.filter((item,index)=>{

                    return !item.completed;//return true,即item.completed为false

                });

            },
- 清除所有的已完成任务:利用计算属性computed的自定义方法leftCount(参考vue教程--计算属性),还有一种方法就是模板中调用处理函数,处理函数使用for循环来删除,但是删完需要把循环索引i--,但是这种方法没有缓存,每一次使用都要重新调用,推荐使用计算属性,效率更高。
<span class="todo-count"><strong>{{leftCount}}</strong> item left</span>
        computed:{

            leftCount:function(){

                return this.todos.filter(item => !item.completed).length

            }

        },
- 将数据持久化到localStorage中(待完成):利用watch功能(配置deep,深度监视),计算属性用于需要在模板中绑定输出值,而watch观察者则用于根据需要数据的改变从而定制特殊功能业务
- 路由状态切换:data里添加属性filterState默认为‘all’;计算属性computed增加filtertodos方法,过滤不同状态的路由;同时修改列表渲染为遍历filterTodos;在window里添加路由改变事件onhashchange,并且每次页面进来需要执行一次保持上一次的状态;改变点击时的样式,添加属性selected当为true时作用,即filterState会等于路由的时候,样式生效。
        data:{

            todos:todos,

            currentEditing:null,

            filterState:'all',

        },
        computed:{

            leftCount:function(){

                return this.todos.filter(item => !item.completed).length

            },

            filterTodos:function(){

                switch(this.filterState){

                    case 'active':

                        return this.todos.filter(item=>!item.completed);

                        break;

                    case 'completed':

                        return this.todos.filter(item=>item.completed);

                        break;

                    default:

                        return this.todos;

                        break;

                };

            },
<li v-for="(item,index) of filterTodos" v-bind:class='{completed:item.completed,editing:item===currentEditing}'>
    // 路由状态切换

    window.onhashchange=function(){

        var hash=window.location.hash.substr(2) || 'all';

        window.app.filterState=hash;

    };

    // 页面第一次进来,保持状态

    window.onhashchange();
                <ul class="filters">

                    <li>

                        <a :class="{selected:filterState==='all'}" href="#/">All</a>

                    </li>

                    <li>

                        <a :class="{selected:filterState==='active'}" href="#/active">Active</a>

                    </li>

                    <li>

                        <a :class="{selected:filterState==='completed'}" href="#/completed">Completed</a>

                    </li>

                </ul>
三、项目完整代码和效果展示
<!doctype html>

<html lang="en">

    <head>

        <meta charset="utf-8">

        <meta name="viewport" content="width=device-width, initial-scale=1">

        <title>Template • TodoMVC</title>

        <link rel="stylesheet" href="node_modules/todomvc-common/base.css">

        <link rel="stylesheet" href="node_modules/todomvc-app-css/index.css">

        <!-- CSS overrides - remove if you don't need it -->

        <link rel="stylesheet" href="css/app.css">

    </head>

    <body>

        <!-- id="todoapp"vue管理模块入口 -->

        <section id="todoapp" class="todoapp">

            <header class="header">

                <h1>todos</h1>

                <input class="new-todo" placeholder="What needs to be done?" @keyup.enter='addTodo' v-focus>

            </header>

            <template v-if='todos.length'>

            <!-- This section should be hidden by default and shown when there are todos -->

            <section class="main">

                <!-- @click='toggleAll'点击事件 -->

                <input @click='toggleAll' id="toggle-all" class="toggle-all" type="checkbox" v-bind:checked='toggleState'>

                <label for="toggle-all">Mark all as complete</label>

                <ul class="todo-list">

                    <!-- These are here just to show the structure of the list items -->

                    <!-- List items should get the class `editing` when editing and `completed` when marked as completed -->

                    <!-- vue列表渲染 -->

                    <li v-for="(item,index) of filterTodos" v-bind:class='{completed:item.completed,editing:item===currentEditing}'>

                        <div class="view">

                            <input class="toggle" type="checkbox" v-model='item.completed'>

                            <label @dblclick="currentEditing=item">{{item.title}}</label>

                            <button class="destroy" @click='removeTodo(index,$event)' ></button>

                        </div>

                        <input class="edit" :value='item.title' @blur='saveEdit(item,index,$event)' @keyup.enter='saveEdit(item,index,$event)' @keyup.esc='currentEditing=null' v-editing-focus="item===currentEditing">

                    </li>

                </ul>

            </section>

            <!-- This footer should hidden by default and shown when there are todos -->

            <footer class="footer">

                <!-- This should be `0 items left` by default -->

                <span class="todo-count"><strong>{{leftCount}}</strong> item left</span>

                <!-- Remove this if you don't implement routing -->

                <ul class="filters">

                    <li>

                        <a :class="{selected:filterState==='all'}" href="#/">All</a>

                    </li>

                    <li>

                        <a :class="{selected:filterState==='active'}" href="#/active">Active</a>

                    </li>

                    <li>

                        <a :class="{selected:filterState==='completed'}" href="#/completed">Completed</a>

                    </li>

                </ul>

                <!-- Hidden if no completed items are left ↓ -->

                <button class="clear-completed" @click='removeAllDone'>Clear completed</button>

            </footer>

            </template>

        </section>

        <footer class="info">

            <p>Double-click to edit a todo</p>

            <!-- Remove the below line ↓ -->

            <p>Template by <a href="http://sindresorhus.com">Sindre Sorhus</a></p>

            <!-- Change this out with your name and url ↓ -->

            <p>Created by <a href="http://todomvc.com">you</a></p>

            <p>Part of <a href="http://todomvc.com">TodoMVC</a></p>

        </footer>

        <!-- Scripts here. Don't remove ↓ -->

        <script src="node_modules/todomvc-common/base.js"></script>

        <script src="node_modules/vue/dist/vue.js"></script>

        <script src="js/app.js"></script>

    </body>

</html>
index.html
(function (Vue) {

    // 数据

    let todos=[

        {id:1,title:'睡觉',completed:true},

        {id:2,title:'美食',completed:false},

        {id:3,title:'代码',completed:true}

    ];

    // 全局自定义指令,自动获取焦点

    Vue.directive('focus', {

        inserted: function (el) {

              el.focus();

        }

    });

    // vue实例

    window.app=new Vue({

        el:'#todoapp',

        data:{

            todos:todos,

            currentEditing:null,

            filterState:'all',

            toggleAllstate:true,

        },

        computed:{

            leftCount:function(){

                return this.todos.filter(item => !item.completed).length

            },

            filterTodos:function(){

                switch(this.filterState){

                    case 'active':

                        return this.todos.filter(item=>!item.completed);

                        break;

                    case 'completed':

                        return this.todos.filter(item=>item.completed);

                        break;

                    default:

                        return this.todos;

                        break;

                };

            },

            // 全选的联动效果

            toggleState:function(){

                return this.todos.every(item=>item.completed);

            },

        },

        methods:{

            // 添加任务

            addTodo(event){

                let todoText=event.target.value.trim();

                if(!todoText.length){

                    return

                }

                const lastTodo=this.todos[this.todos.length-1];

                const id=lastTodo?lastTodo.id+1:1;

                this.todos.push({

                    id:id,

                    title:todoText,

                    completed:false,

                });

                event.target.value='';

            },

            // 点击全部完成或者未完成

            toggleAll(event){

                let checked=event.target.checked;

                this.todos.forEach(todo => todo.completed=checked);

            },

            // 删除单个任务项

            removeTodo(delIndex,event){

                this.todos.splice(delIndex,1);

            },

            // 显示所有未完成任务数(删除所有已完成)

            removeAllDone(){

                this.todos=this.todos.filter((item,index)=>{

                    return !item.completed;//return true,即item.completed为false

                });

            },

            // 保存编辑项

            saveEdit(item,index,event){

                var editText=event.target.value.trim();

                // 如果为空,直接删除这个item

                if(!editText.length){

                    return this.todos.splice(index,1);

                }

                // 如果不为空,修改title的值,然后去除eiditing样式

                item.title=editText;

                this.currentEditing=null;

            },

        },

        directives:{

            // 局部自定义属性

            editingFocus:{

                update(el,binding){

                    if(binding.value){

                        el.focus();

                    }

                },

            },

        },

    });

    // 路由状态切换

    window.onhashchange=function(){

        var hash=window.location.hash.substr(2) || 'all';

        window.app.filterState=hash;

    };

    // 页面第一次进来,保持状态

    window.onhashchange();

})(Vue);
app.js
框架入门经典项目TodoMVC的更多相关文章
- openjpa框架入门_项目框架搭建(二)
Openjpa2.2+Mysql+Maven+Servlet+JSP 首先说明几点,让大家更清楚整体结构: 官方source code 下载:http://openjpa.apache.org/dow ...
- openjpa框架入门_项目 database 启动project 初始化(三)
mysql数据库安装好,这里不多说,现在来执行sql脚本 http://download.csdn.net/detail/shenhonglei1234/6019677 将下载好的脚本后缀名“open ...
- openjpa框架入门_openbooks项目Overview(四)
- 『Scrapy』爬虫框架入门
框架结构 引擎:处于中央位置协调工作的模块 spiders:生成需求url直接处理响应的单元 调度器:生成url队列(包括去重等) 下载器:直接和互联网打交道的单元 管道:持久化存储的单元 框架安装 ...
- Taurus.MVC 微服务框架 入门开发教程:项目集成:2、客户端:ASP.NET Core(C#)项目集成:应用中心。
系列目录: 本系列分为项目集成.项目部署.架构演进三个方向,后续会根据情况调整文章目录. 本系列第一篇:Taurus.MVC V3.0.3 微服务开源框架发布:让.NET 架构在大并发的演进过程更简单 ...
- 【无私分享:从入门到精通ASP.NET MVC】从0开始,一起搭框架、做项目 目录索引
索引 [无私分享:从入门到精通ASP.NET MVC]从0开始,一起搭框架.做项目(1)搭建MVC环境 注册区域 [无私分享:从入门到精通ASP.NET MVC]从0开始,一起搭框架.做项目(2)创建 ...
- ThinkJS框架入门详细教程(二)新手入门项目
一.准备工作 参考前一篇:ThinkJS框架入门详细教程(一)开发环境 安装thinkJS命令 npm install -g think-cli 监测是否安装成功 thinkjs -v 二.创建项目 ...
- SpringMVC框架入门配置 IDEA下搭建Maven项目(zz)
SpringMVC框架入门配置 IDEA下搭建Maven项目 这个不错哦 http://www.cnblogs.com/qixiaoyizhan/p/5819392.html
- Newbe.Claptrap 框架入门,第二步 —— 创建项目
接上一篇 Newbe.Claptrap 框架入门,第一步 -- 开发环境准备 ,我们继续了解如何创建一个 Newbe.Claptrap 项目. Newbe.Claptrap 是一个用于轻松应对并发问题 ...
随机推荐
- Linux中的数据重定向
重定向即指:将数据传送输出到别的地方,如设备.文件等等.那就涉及到将什么数据传送到什么地方的问题. 在linux中命令执行的起源和结果说起,看下图: Standard input和Standard e ...
- SpringBoot引入第三方jar包或本地jar包的处理方式
在开发过程中有时会用到maven仓库里没有的jar包或者本地的jar包,这时没办法通过pom直接引入,那么该怎么解决呢 一般有两种方法 第一种是将本地jar包安装在本地maven库 第二种是将本地ja ...
- css3中的calc的使用
最近在布局的时候遇到一个问题,在页面中的左侧是侧边栏,右边是内容区域,内容区域中有一个固定定位的标签页,在设置固定定位的标签设置宽度的时候应该是内容区域的宽度,而固定定位的时候相对于是窗口的宽度,所以 ...
- Java 之 Collection 接口
一.Collection 集合 Collection:单列集合类的根接口,用于存储一系列符合某种规则的元素,它有两个重要的子接口,分别是 java.util.List 和 java.util.Set. ...
- Unity手游汉化笔记②:使用UABE替换TTF字体
总的笔记:https://www.cnblogs.com/guobaoxu/p/12055930.html 目录 一.分析 二.思路 三.具体实践 四.总结 Unity版本:2018.4.5f1 工具 ...
- kbmmw 中使用带验证的REST 服务
前面介绍的rest 服务,虽然很方便,但是存在任何人都可以访问的安全问题. 今天说一下,如何在kbmmw 中使用带验证的REST 服务? 首先我们在工程中放一个 认证控件TkbmMWAuthoriza ...
- easyui datagrid Column Group 列组、 复杂表头 嵌套表头 组合表头 (转载)
核心: rowspan:2 //占两行 colspan:3 //占三列 所有的colspan下的二级列表头,统一放在一个数组里. 文章一: 转载来源:https://blog.csdn.ne ...
- PHP的SPL标准库
1,简介 SPL,全称 Standard PHP Library 中文是 标准PHP类库.是php内置的一些拓展类和拓展接口,其内容包含数据结构.迭代器.接口.异常.SPL函数,文件处理等内容.SPL ...
- Redhat6.5安装oracle11g
Redhat6.5安装oracle11g 一. 安装环境 linux服务器:Redhat 6.5 64位 oracle版本:oracle11gR2 远程windows服务器:已安装Xmanage ...
- virsh console 登录CentOS7系统
一.在kvm虚拟机中执行如下命令 systemctl start serial-getty@ttyS0.service systemctl enable serial-getty@ttyS0.serv ...