redis单机多节点集群
# ##安装Redis
redis安装参考 https://www.cnblogs.com/renxixao/p/11442770.html
Reids安装包里有个集群工具,要复制到/usr/local/bin里去
[root@hdp-01 ~]# cp redis-4.0.12/src/redis-trib.rb /usr/local/bin/
# ##修改配置 创建节点
我们现在要搞六个节点,三主三从,端口规定分别是7001,7002,7003,7004,7005,7006
先在root目录下新建一个redis_cluster目录,然后该目录下再创建6个目录,
分别是7001,7002,7003,7004,7005,7006,用来存在redis配置文件;
要使用redis集群,要先修改redis的配置文件redis.conf
[root@hdp-01 ~]# cp redis-4.0.12/src/redis-trib.rb /usr/local/bin

[root@hdp-01 ~]# mkdir redis_cluster

[root@hdp-01 ~]# cd redis_cluster/

[root@hdp-01 redis_cluster]# mkdir 7001 7002 7003 7004 7005 7006
[root@hdp-01 redis_cluster]# cd ..

[root@hdp-01 ~]#  cp redis-4.0.12/redis.conf redis_cluster/7001/
我们修改下这个配置文件
[root@hdp-01 ~]# vi redis_cluster/7001/redis.conf
修改一下几个地方
显示行号:命令行模式下输入set nu 回车
命令行模式下输入/port 回车 查找下一个 按n
前面有注释的一定要把注释删掉
port 7001 //六个节点配置文件分别是7001-7006

daemonize yes //redis后台运行

pidfile /var/run/redis_7001.pid //pidfile文件对应7001-7006
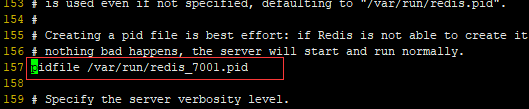
cluster-enabled yes //开启集群

cluster-config-file nodes_7001.conf //保存节点配置,自动创建,自动更新对应7001-7006

cluster-node-timeout 5000 //集群超时时间,节点超过这个时间没反应就断定是宕机
appendonly yes //存储方式,aof,将写操作记录保存到日志中

7001下的修改完后,把7001下的配置分别复制到7002-7006 然后对应的再修改下配置即可;
[root@hdp-01 ~]#  cp redis_cluster/7001/redis.conf redis_cluster/7002

[root@hdp-01 ~]#  cp redis_cluster/7001/redis.conf redis_cluster/7003

[root@hdp-01 ~]#  cp redis_cluster/7001/redis.conf redis_cluster/7004

[root@hdp-01 ~]#  cp redis_cluster/7001/redis.conf redis_cluster/7005

[root@hdp-01 ~]#  cp redis_cluster/7001/redis.conf redis_cluster/7006
编辑5个目录下相应redis.conf 配置文件,把 port ,pidfile,cluster-config-file 分别修改下即可
启动六个节点的redis
[root@hdp-01 ~]# /usr/local/redis/bin/redis-server redis_cluster/7001/redis.conf

[root@hdp-01 ~]# /usr/local/redis/bin/redis-server redis_cluster/7002/redis.conf

[root@hdp-01 ~]# /usr/local/redis/bin/redis-server redis_cluster/7003/redis.conf

[root@hdp-01 ~]# /usr/local/redis/bin/redis-server redis_cluster/7004/redis.conf

[root@hdp-01 ~]# /usr/local/redis/bin/redis-server redis_cluster/7005/redis.conf

[root@hdp-01 ~]# /usr/local/redis/bin/redis-server redis_cluster/7006/redis.conf
[root@localhost ~]# ps -ef | grep redis
查找下redis进程
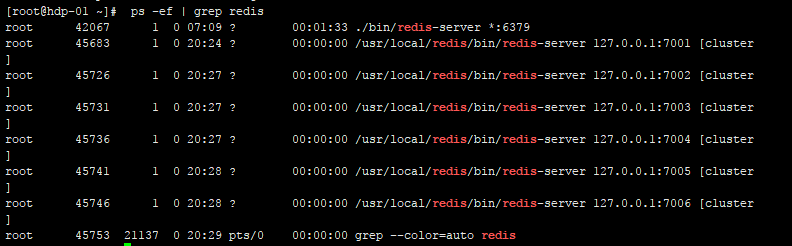
说明都启动成功了
# ##创建集群
redis官方提供了redis-trib.rb工具 第一步里已经房到里bin下
但是在使用之前 需要安装ruby,以及redis和ruby连接
[root@hdp-01 ~]# yum -y install ruby ruby-devel rubygems rpm-build
gem install redis
redis-trib.rb create --replicas 1 127.0.0.1:7001 127.0.0.1:7002 127.0.0.1:7003 127.0.0.1:7004 127.0.0.1:7005 127.0.0.1:7006
创建集群
[root@localhost ~]# redis-trib.rb create --replicas 1 127.0.0.1:7001 127.0.0.1:7002 127.0.0.1:7003 127.0.0.1:7004 127.0.0.1:7005 127.0.0.1:7006
>>> Creating cluster
>>> Performing hash slots allocation on 6 nodes...
Using 3 masters:
127.0.0.1:7001
127.0.0.1:7002
127.0.0.1:7003
Adding replica 127.0.0.1:7004 to 127.0.0.1:7001
Adding replica 127.0.0.1:7005 to 127.0.0.1:7002
Adding replica 127.0.0.1:7006 to 127.0.0.1:7003
M: bfcfcdc304b011023fa568e044ea23ea6bc03c3c 127.0.0.1:7001
slots:0-5460 (5461 slots) master
M: d61e66e49e669b99d801f22f6461172696fdd1c9 127.0.0.1:7002
slots:5461-10922 (5462 slots) master
M: aa6bc3f1e1174c3a991c01882584707c2408ec18 127.0.0.1:7003
slots:10923-16383 (5461 slots) master
S: 7908a60306333c5d7c7c5e7ffef44bdf947ef0a4 127.0.0.1:7004
replicates bfcfcdc304b011023fa568e044ea23ea6bc03c3c
S: 1d2341fd3b79ef0fccb8e3a052bba141337c6cdd 127.0.0.1:7005
replicates d61e66e49e669b99d801f22f6461172696fdd1c9
S: f25b35f208dc96605ee4660994d2ac52f39ac870 127.0.0.1:7006
replicates aa6bc3f1e1174c3a991c01882584707c2408ec18
Can I set the above configuration? (type 'yes' to accept):
从运行结果看 主节点就是7001 7002 7003 从节点分别是7004 7005 7006
7001分配到的哈希槽是 0-5460
7002分配到的哈希槽是 5461-10922
7003分配到的哈希槽是 10923-16383
最后问我们是否接受上面的设置,输入yes 就表示接受,我们输入yes
然后显示:
>>> Nodes configuration updated
>>> Assign a different config epoch to each node
>>> Sending CLUSTER MEET messages to join the cluster
Waiting for the cluster to join......
>>> Performing Cluster Check (using node 127.0.0.1:7001)
M: bfcfcdc304b011023fa568e044ea23ea6bc03c3c 127.0.0.1:7001
slots:0-5460 (5461 slots) master
1 additional replica(s)
S: f25b35f208dc96605ee4660994d2ac52f39ac870 127.0.0.1:7006
slots: (0 slots) slave
replicates aa6bc3f1e1174c3a991c01882584707c2408ec18
M: d61e66e49e669b99d801f22f6461172696fdd1c9 127.0.0.1:7002
slots:5461-10922 (5462 slots) master
1 additional replica(s)
S: 1d2341fd3b79ef0fccb8e3a052bba141337c6cdd 127.0.0.1:7005
slots: (0 slots) slave
replicates d61e66e49e669b99d801f22f6461172696fdd1c9
M: aa6bc3f1e1174c3a991c01882584707c2408ec18 127.0.0.1:7003
slots:10923-16383 (5461 slots) master
1 additional replica(s)
S: 7908a60306333c5d7c7c5e7ffef44bdf947ef0a4 127.0.0.1:7004
slots: (0 slots) slave
replicates bfcfcdc304b011023fa568e044ea23ea6bc03c3c
[OK] All nodes agree about slots configuration.
>>> Check for open slots...
>>> Check slots coverage...
[OK] All 16384 slots covered.
显示配置哈希槽,以及集群创建成功,可以用了;
第五步:集群数据测试
我们先连接任意一个节点,然后添加一个key:
redis-cli是redis默认的客户端工具,启动时加上`-c`参数,`-p`指定端口,就可以连接到集群。
连接任意一个节点端口:
[root@localhost ~]# /usr/local/redis/bin/redis-cli -c -p 7002
127.0.0.1:7002>
我们连接7002
127.0.0.1:7002> set xxx 'fdafda'
-> Redirected to slot [4038] located at 127.0.0.1:7001
OK
前面说过Redis Cluster值分配规则,所以分配key的时候,它会使用CRC16(‘my_name’)%16384算法,来计算,将这个key 放到哪个节点,这里分配到了4038slot 就分配到了7001(0-5460)这个节点上。所以有:
Redirected to slot [4038] located at 127.0.0.1:7001
我们从其他集群节点 ,都可以获取到数据
127.0.0.1:7001> exit
[root@localhost ~]# /usr/local/redis/bin/redis-cli -c -p 7005
127.0.0.1:7005> get xxx
-> Redirected to slot [4038] located at 127.0.0.1:7001
"fdafda"
127.0.0.1:7001>
第六步:集群宕机测试
假如我们干掉一个节点,比如7002 这个主节点
[root@localhost ~]# ps -ef | grep redis
root 9501 1 0 17:38 ? 00:00:02 /usr/local/redis/bin/redis-server 127.0.0.1:7001 [cluster]
root 9512 1 0 17:45 ? 00:00:01 /usr/local/redis/bin/redis-server 127.0.0.1:7002 [cluster]
root 9516 1 0 17:45 ? 00:00:01 /usr/local/redis/bin/redis-server 127.0.0.1:7003 [cluster]
root 9520 1 0 17:45 ? 00:00:02 /usr/local/redis/bin/redis-server 127.0.0.1:7004 [cluster]
root 9524 1 0 17:45 ? 00:00:01 /usr/local/redis/bin/redis-server 127.0.0.1:7005 [cluster]
root 9528 1 0 17:45 ? 00:00:01 /usr/local/redis/bin/redis-server 127.0.0.1:7006 [cluster]
root 9601 2186 0 18:12 pts/0 00:00:00 grep --color=auto redis
[root@localhost ~]# kill -9 9512
[root@localhost ~]# ps -ef | grep redis
root 9501 1 0 17:38 ? 00:00:02 /usr/local/redis/bin/redis-server 127.0.0.1:7001 [cluster]
root 9516 1 0 17:45 ? 00:00:01 /usr/local/redis/bin/redis-server 127.0.0.1:7003 [cluster]
root 9520 1 0 17:45 ? 00:00:02 /usr/local/redis/bin/redis-server 127.0.0.1:7004 [cluster]
root 9524 1 0 17:45 ? 00:00:01 /usr/local/redis/bin/redis-server 127.0.0.1:7005 [cluster]
root 9528 1 0 17:45 ? 00:00:01 /usr/local/redis/bin/redis-server 127.0.0.1:7006 [cluster]
root 9603 2186 0 18:12 pts/0 00:00:00 grep --color=auto redis
[root@localhost ~]#
然后再来看下集群的情况
redis-trib.rb check 127.0.0.1:7001
>>> Performing Cluster Check (using node 127.0.0.1:7001)
M: bfcfcdc304b011023fa568e044ea23ea6bc03c3c 127.0.0.1:7001
slots:0-5460 (5461 slots) master
1 additional replica(s)
S: f25b35f208dc96605ee4660994d2ac52f39ac870 127.0.0.1:7006
slots: (0 slots) slave
replicates aa6bc3f1e1174c3a991c01882584707c2408ec18
M: 1d2341fd3b79ef0fccb8e3a052bba141337c6cdd 127.0.0.1:7005
slots:5461-10922 (5462 slots) master
0 additional replica(s)
M: aa6bc3f1e1174c3a991c01882584707c2408ec18 127.0.0.1:7003
slots:10923-16383 (5461 slots) master
1 additional replica(s)
S: 7908a60306333c5d7c7c5e7ffef44bdf947ef0a4 127.0.0.1:7004
slots: (0 slots) slave
replicates bfcfcdc304b011023fa568e044ea23ea6bc03c3c
[OK] All nodes agree about slots configuration.
>>> Check for open slots...
>>> Check slots coverage...
[OK] All 16384 slots covered.
我们发现 7005本来是从节点,由于他对应的主节点挂了,就自动变成主节点master,所有会有最后一个说明
All 16384 slots covered. 所有哈希槽都可覆盖了; 集群可以正常使用;
假如我们把7005也干掉,试试看
[root@localhost ~]# kill -9 9524
[root@localhost ~]# ps -ef | grep redis
root 9501 1 0 17:38 ? 00:00:03 /usr/local/redis/bin/redis-server 127.0.0.1:7001 [cluster]
root 9516 1 0 17:45 ? 00:00:02 /usr/local/redis/bin/redis-server 127.0.0.1:7003 [cluster]
root 9520 1 0 17:45 ? 00:00:03 /usr/local/redis/bin/redis-server 127.0.0.1:7004 [cluster]
root 9528 1 0 17:45 ? 00:00:02 /usr/local/redis/bin/redis-server 127.0.0.1:7006 [cluster]
root 9610 2186 0 18:16 pts/0 00:00:00 grep --color=auto redis
[root@localhost ~]#
查看下集群情况
redis-trib.rb check 127.0.0.1:7001
这里我们发现 出事了,因为主从节点都挂了 所以有一部分哈希槽没得分配,最后一句
[ERR] Not all 16384 slots are covered by nodes. 没有安全覆盖;
所以不能正常使用集群;
redis单机多节点集群的更多相关文章
- redis 安装和单机多节点集群
环境: centOs系统 一.安装redis: 1.下载安装(先装c编译器yum -y install gcc) $ wget http://download.redis.io/releases/re ...
- Redis单机安装以及集群搭建
今天主要来看一下Redis的安装以及集群搭建(我也是第一次搭建). 环境:CentOS 7.1,redis-5.0.7 一.单机安装 1.将Redis安装包放置服务器并解压 2.进入redis安装目录 ...
- Redis单机多节点集群实验
第一步:安装Redis 前面已经安装过了 不解释, Reids安装包里有个集群工具,要复制到/usr/local/bin里去 cp redis-3.2.9/src/redis-trib.rb /usr ...
- redis 单机模拟 cluster集群
一.redis-cluster设计 Redis集群搭建的方式有多种,例如使用zookeeper等,但从redis 3.0之后版本支持redis-cluster集群,Redis-Cluster采用无中心 ...
- redis单节点集群
一.概念 redis是一种支持Key-Value等多种数据结构的存储系统.可用于缓存.事件发布或订阅.高速队列等场景.该数据库使用ANSI C语言编写,支持网络,提供字符串.哈希.列表.队列.集合结构 ...
- Redis单机配置以及集群(sentinel、jediscluster)配置
最近一直在使用Redis作为缓存数据库,在使用当中,刚开始没有注意配置问题. 1.纯粹的注入单机模式 <bean id="jedisPoolConfig" class=&qu ...
- redis单机上部署集群
一.安装单机redis redis的安装:版本至少是3.2.8及其以上,这里以3.2.8版本为例说明 1.安装redis wget http://download.redis.io/releases ...
- Hyperledger Fabric 1.0 从零开始(六)——创建Fabric多节点集群
4:创建Fabric多节点集群 4.1.配置说明 首先可以根据官方Fabric自带的e2e_cli列子中的集群方案来生成我们自己的集群,与案例不同的是我们需要把容器都分配到不同的服务器上,彼此之间通过 ...
- ELK日志框架(1):安装Elasticsearch组建单服务器多节点集群
ELK简介 最近有个需求搭建一套日志系统用于集成几个业务系统的日志提供快速的检索功能,目前是用Log4net存数据库+Error级别发邮件方式,也算简单暴力好用,但历史日志的模糊查询确实很慢,所以使用 ...
随机推荐
- LeetCode 1062. Longest Repeating Substring
原题链接在这里:https://leetcode.com/problems/longest-repeating-substring/ 题目: Given a string S, find out th ...
- linux学习12 bash的常见特性及文本查看命令实战
一.回顾 1.FHS,命令及bash命令历史 a.FHS: /bin,/sbin,/lib,/lib64,/etc /home,/root /boot /media,/mnt /proc,/sys / ...
- Linux后台开发工具箱-葵花宝典
Linux后台开发工具箱-葵花宝典 一见 2016/11/4 目录 目录 1 1. 前言 4 2. 脚本类工具 4 2.1. 双引号和单引号 4 2.2. 取脚本完整文件路径 5 2.3. 环境变量和 ...
- GoCN每日新闻(2019-11-08)
GoCN每日新闻(2019-11-08) GoCN每日新闻(2019-11-08) 1. Go Modules: v2及更高版本使用 https://blog.golang.org/v2-go-mod ...
- Android Studio 之 SharedPrefences 数据持久性保存
SharedPreferences 会在应用包目录中生成一个xml文件,将数据保存在里面 可以实现数据持久性保存. 创建的数据,保存在 Data -> Data -> 包名 -> s ...
- IO多路复用之select poll epoll
参考文档: http://blog.csdn.net/tennysonsky/article/details/45745887 select(),poll(),epoll()都是I/O多路复用的机制. ...
- JS字符串转换为JSON的四种方法
转自:https://www.cnblogs.com/hgmyz/p/7451461.html 1.jQuery插件支持的转换方式: 示例: $.parseJSON( jsonstr ); //jQ ...
- 【Beta】“北航社团帮”测试报告——小程序v2.0与网页端v1.0
目录 测试计划.过程和结果 后端测试--单元测试与覆盖率 后端测试--压力测试 展示部分数据 平均数据 前端测试--小程序v2.0 授权登录与权限检查 新功能的测试 兼容性测试 性能测试 前端测试-- ...
- [源码分析]HashSet 和LinkedHashSet
特性 HashSet是一个可存储不重复元素的容器,底层实现依赖 HashMap,所以在添加,删除,查找元素时的时间复杂度均为 O(1). 构造方法,初始化内部的HashMap public HashS ...
- element UI中的select选择器的change方法需要传递多个值
如果直接调用change事件,不传任何参数,则可以获取到当前选中的值(因为默认会将event参数传递过去) 场景: 你需要将select选择器 ”选中的当前元素“ 和 ”其他你需要的值“ 一起传递过去 ...