VMware内CentOS7虚拟机硬盘扩容
转自:https://blog.csdn.net/Wang_Xin_SH/article/details/77872885
简介
CentOS7虚拟机原硬盘空间只分配了10GB,需要扩容到20GB。
环境:VMware 10
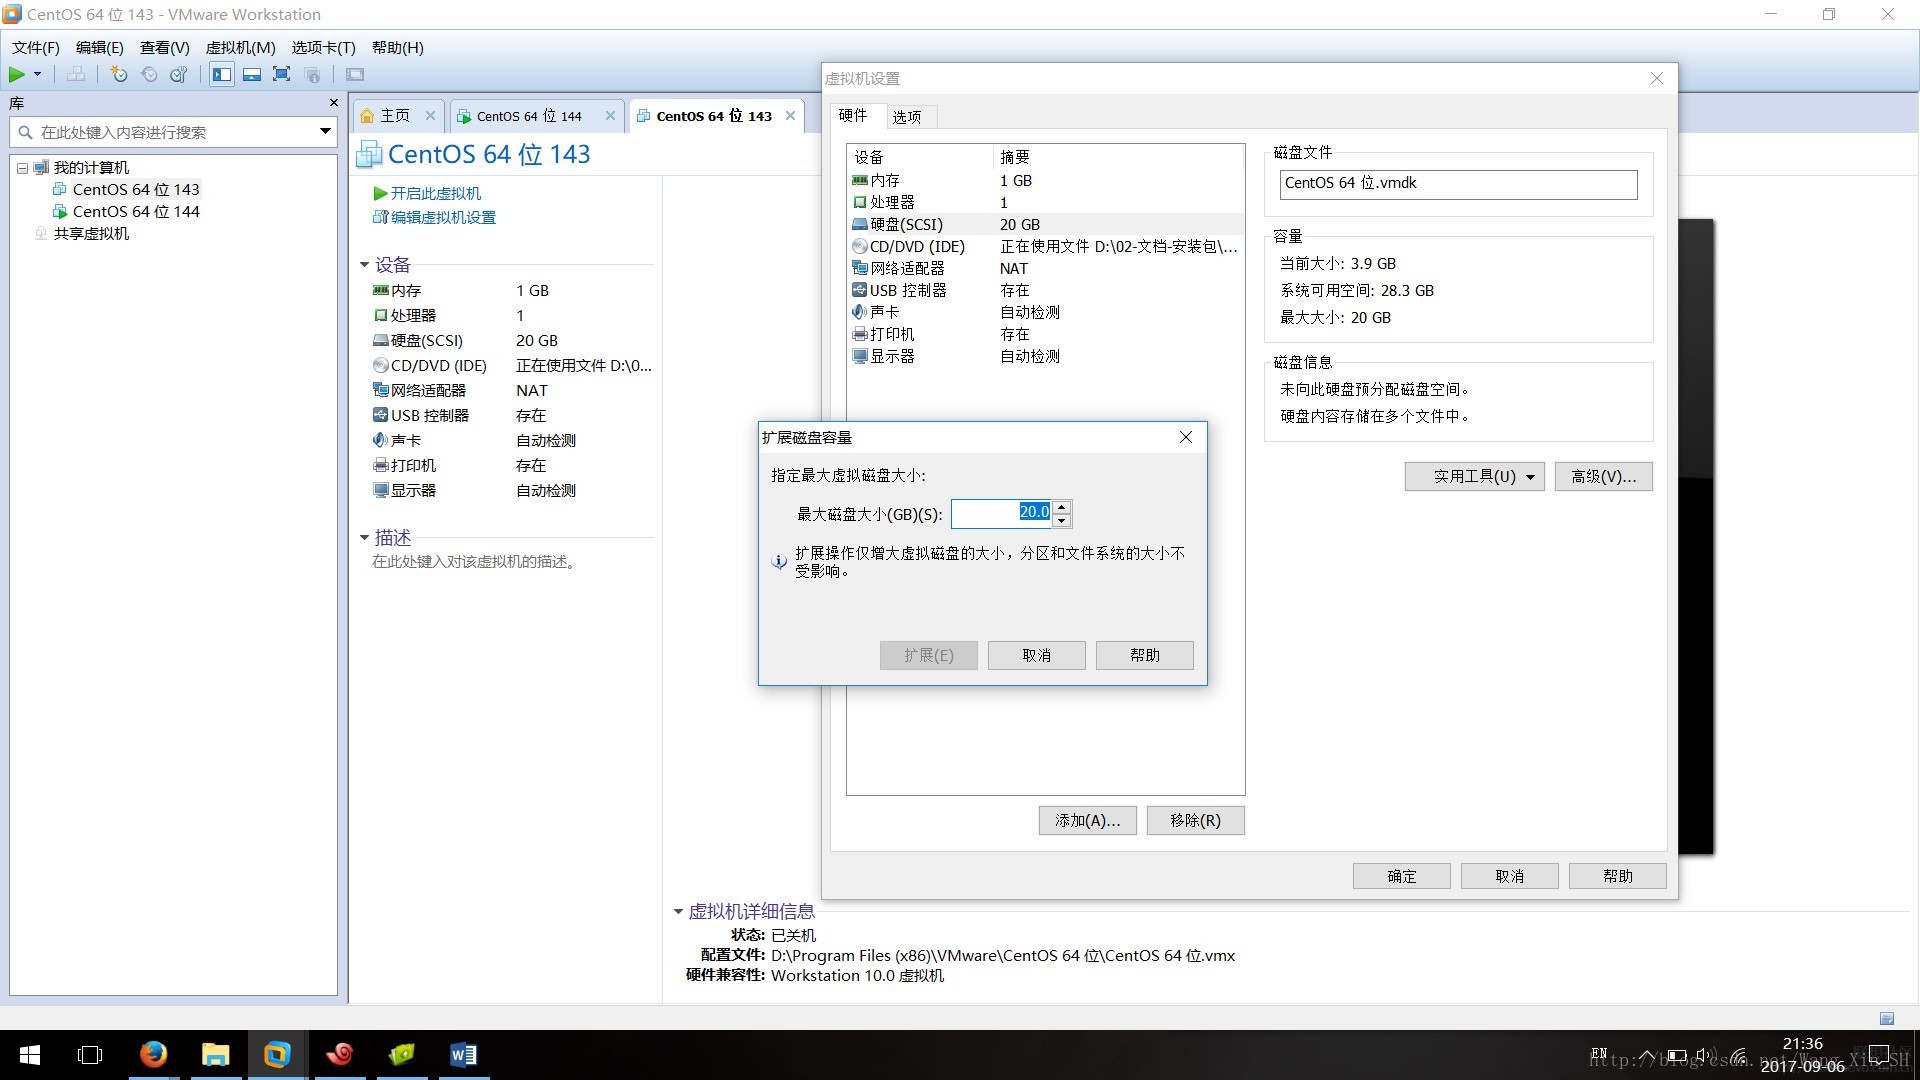
VMware分配空间
选中虚拟机->虚拟机设置->硬盘->实用工具->扩展->设置最大磁盘大小->点击扩展
CentOS7内部分配
可以参考:http://jingyan.baidu.com/article/54b6b9c0fc8b0b2d583b47c6.html
- 查看当前磁盘空间,/dev/mapper/cl-root硬盘空间只有8GB,打算扩容:
# df -h

Filesystem           Size  Used Avail Use% Mounted on

/dev/mapper/cl-root  8.0G  3.8G  4.3G  47% /

devtmpfs             482M     0  482M   0% /dev

tmpfs                493M     0  493M   0% /dev/shm

tmpfs                493M  6.7M  486M   2% /run

tmpfs                493M     0  493M   0% /sys/fs/cgroup

/dev/sda1           1014M  184M  831M  19% /boot

tmpfs 99M 0 99M 0% /run/user/0- 对新增的硬盘空间做新增分区(硬盘数没有增加,增加的是空间)
#  fdisk /dev/sda

Welcome to fdisk (util-linux 2.23.2).

Changes will remain in memory only, until you decide to write them.

Be careful before using the write command.

Command (m for help): n

Partition type:

   p   primary (2 primary, 0 extended, 2 free)

   e   extended

Select (default p): p

Partition number (3,4, default 3): 3

First sector (20971520-41943039, default 20971520):

Using default value 20971520

Last sector, +sectors or +size{K,M,G} (20971520-41943039, default 41943039):

Using default value 41943039

Partition 3 of type Linux and of size 10 GiB is set

Command (m for help): t

Partition number (1-3, default 3): 3

Hex code (type L to list all codes): 8e

Changed type of partition 'Linux' to 'Linux LVM'

Command (m for help): p

Disk /dev/sda: 21.5 GB, 21474836480 bytes, 41943040 sectors

Units = sectors of 1 * 512 = 512 bytes

Sector size (logical/physical): 512 bytes / 512 bytes

I/O size (minimum/optimal): 512 bytes / 512 bytes

Disk label type: dos

Disk identifier: 0x000bc924

   Device Boot      Start         End      Blocks   Id  System

/dev/sda1   *        2048     2099199     1048576   83  Linux

/dev/sda2         2099200    20971519     9436160   8e  Linux LVM

/dev/sda3        20971520    41943039    10485760   8e  Linux LVM

Command (m for help): w

The partition table has been altered!

Calling ioctl() to re-read partition table.

WARNING: Re-reading the partition table failed with error 16: Device or resource busy.

The kernel still uses the old table. The new table will be used at

the next reboot or after you run partprobe(8) or kpartx(8)

Syncing disks.- 重启系统 reboot
- 查看当前分区类型,本例类型为xfs
# df -T /dev/sda1

Filesystem     Type 1K-blocks   Used Available Use% Mounted on

/dev/sda1 xfs 1038336 188240 850096 19% /boot- 1
- 2
- 3
- 在新磁盘上创建xfs文件系统
# mkfs.xfs /dev/sda3

meta-data=/dev/sda3              isize=512    agcount=4, agsize=655360 blks

         =                       sectsz=512   attr=2, projid32bit=1

         =                       crc=1        finobt=0, sparse=0

data     =                       bsize=4096   blocks=2621440, imaxpct=25

         =                       sunit=0      swidth=0 blks

naming   =version 2              bsize=4096   ascii-ci=0 ftype=1

log      =internal log           bsize=4096   blocks=2560, version=2

         =                       sectsz=512   sunit=0 blks, lazy-count=1

realtime =none extsz=4096 blocks=0, rtextents=0- 创建PV
# pvcreate /dev/sda3

WARNING: xfs signature detected on /dev/sda3 at offset 0. Wipe it? [y/n]: y

  Wiping xfs signature on /dev/sda3.

  Physical volume "/dev/sda3" successfully created.

# pvdisplay

  --- Physical volume ---

  PV Name               /dev/sda2

  VG Name               cl

  PV Size               9.00 GiB / not usable 3.00 MiB

  Allocatable           yes (but full)

  PE Size               4.00 MiB

  Total PE              2303

  Free PE               0

  Allocated PE          2303

  PV UUID               MlRwjY-TmVF-H8PV-heSz-ALGL-Q7sp-jFU6Al

  "/dev/sda3" is a new physical volume of "10.00 GiB"

  --- NEW Physical volume ---

  PV Name               /dev/sda3

  VG Name

  PV Size               10.00 GiB

  Allocatable           NO

  PE Size               0

  Total PE              0

  Free PE               0

  Allocated PE          0

PV UUID 0hmgH0-0wVg-jWUW-65WX-1TYb-sUGH-6jF1qm- PV加入VG,vgextend后接VG Name,本例中为cl
# vgdisplay

  --- Volume group ---

  VG Name               cl

  System ID

  Format                lvm2

  Metadata Areas        1

  Metadata Sequence No  3

  VG Access             read/write

  VG Status             resizable

  MAX LV                0

  Cur LV                2

  Open LV               2

  Max PV                0

  Cur PV                1

  Act PV                1

  VG Size               9.00 GiB

  PE Size               4.00 MiB

  Total PE              2303

  Alloc PE / Size       2303 / 9.00 GiB

  Free  PE / Size       0 / 0

  VG UUID               dYdb4l-wMUh-e2xv-WiaJ-Oa52-NvdF-s5ICJC

# vgextend cl /dev/sda3- VG加入LV
# lvextend -l +2559 /dev/cl/root

  Size of logical volume cl/root changed from 8.00 GiB (2047 extents) to 17.99 GiB (4606 extents).

  Logical volume cl/root successfully resized.
后两个参数“+2559”和“/dev/cl/root”来源详解:
“+2559”来自于vgdisplay命令的Free PE/Size字段
# vgdisplay

  --- Volume group ---

  VG Name               cl

  ...

  VG Size               18.99 GiB

  PE Size               4.00 MiB

  Total PE              4862

  Alloc PE / Size       2303 / 9.00 GiB

  Free  PE / Size       2559 / 10.00 GiB

  VG UUID               dYdb4l-wMUh-e2xv-WiaJ-Oa52-NvdF-s5ICJC
“/dev/cl/root”来自于lvdisplay命令的LV Path字段。
# lvdisplay

  ...

  --- Logical volume ---

  LV Path                /dev/cl/root

...- 调整文件系统大小,本例中是xfs文件系统使用xfs_growfs命令调整,若其他文件系统,如ext4使用resize2fs命令,注意区分。
# xfs_growfs /dev/cl/root

meta-data=/dev/mapper/cl-root    isize=512    agcount=4, agsize=524032 blks

         =                       sectsz=512   attr=2, projid32bit=1

         =                       crc=1        finobt=0 spinodes=0

data     =                       bsize=4096   blocks=2096128, imaxpct=25

         =                       sunit=0      swidth=0 blks

naming   =version 2              bsize=4096   ascii-ci=0 ftype=1

log      =internal               bsize=4096   blocks=2560, version=2

         =                       sectsz=512   sunit=0 blks, lazy-count=1

realtime =none                   extsz=4096   blocks=0, rtextents=0

data blocks changed from 2096128 to 4716544
结果
/dev/mapper/cl-root从8G增加到了18G
# df -h

Filesystem           Size  Used Avail Use% Mounted on

/dev/mapper/cl-root   18G  3.8G   15G  21% /

devtmpfs             482M     0  482M   0% /dev

tmpfs                493M     0  493M   0% /dev/shm

tmpfs                493M  6.7M  486M   2% /run

tmpfs                493M     0  493M   0% /sys/fs/cgroup

/dev/sda1           1014M  184M  831M  19% /boot

tmpfs                 99M     0   99M   0% /run/user/0
VMware内CentOS7虚拟机硬盘扩容的更多相关文章
- Oracle VM VirtualBox虚拟机内Linux系统硬盘扩容步骤(CentOS6.5)
1.首先获取要扩容的虚拟机的 UUID VBoxManage 改命令在C:\Program Files\Oracle\VirtualBox目录内,可先添加该目录到环境变量.C:\Users\yzkj- ...
- Macbook中VMWare的Centos7虚拟机配置静态IP并允许上网的配置方法
一.检查Macbook本身的配置 1.打开[系统偏好设置]-[网络]- 选中[Wi-Fi]项(如果您是WIFI上网请选择此项)- 点右侧[高级] 选择[TCP/IP]选项卡,记录好[子网掩码].[路由 ...
- 手把手教你vmware导入centos7虚拟机
安装vmware 安装vmware15:https://www.cnblogs.com/uncleyong/p/10740005.html 可能遇到的问题:VMware提示此主机支持Intel VT- ...
- VMWare ESX/ESXi 虚拟机硬盘的厚置备(Thick Provision)与精简置备(Thin Provision)的转换
VMWare ESX/ESXi 有两种硬盘置备方式,厚制备(thick)和精简置备(Thin) 有时可能会由于性能问题或磁盘空间需要将虚拟机磁盘在两种模式间进行互转,虽然在虚拟机配置页面是没有办法修改 ...
- VMware安装Centos7虚拟机
首先安装虚拟机很简单,所以呢,具体的安装过程就引用别人的博客,这篇文字很详细,引用之后会在后面加上一些遇到的问题: 原文:https://blog.csdn.net/babyxue/article/d ...
- virtualBox中的centOS虚拟机硬盘扩容
1. 在virtualBox中给虚拟机添加虚拟硬盘 此时. 已经将yanwu_disk1.vdi 虚拟硬盘添加到了虚拟机中, 接下来就是进行硬盘的挂载 https://www.cnblogs.com/ ...
- VMWARE下CentOS7虚拟机网络配置
注:本文仅针对新装的虚拟机,#ip addr 获取不到ip信息,无法连接网络的情况提供一种参考解决方案. 1.左上角点击“编辑”->“虚拟网络编辑器”.新建一个NAT模式的网络. 2.配置虚拟机 ...
- virutalbox虚拟机硬盘扩容
大小改变为30GB VBoxManage modifyhd d:\newxp.vdi --resize 30000 然后用diskgenius扩从容量
- virtualbox 虚拟机硬盘扩容
转自: http://jingyan.baidu.com/article/425e69e6aeede8be14fc1675.html
随机推荐
- Http请求中请求头Content-Type讲解
在Http请求中,我们每天都在使用Content-type来指定不同格式的请求信息,但是却很少有人去全面了解content-type中允许的值有多少,这里将讲解Content-Type的可用值 Med ...
- 【功能】返回数据类型、字节长度和在内部的存储位置.DUMP(w[,x[,y[,z]]])
DUMP(w[,x[,y[,z]]]) [功能]返回数据类型.字节长度和在内部的存储位置. [参数] w为各种类型的字符串(如字符型.数值型.日期型--) x为返回位置用什么方式表达,可为:8,10, ...
- 11:django 模板 内建标签
django 内建标签 autoescape 控制当前自动转义的行为,有on和off两个选项 {% autoescape on %} {{ body }} {% endautoescape %} bl ...
- ctype
original:http://www.runoob.com/cprogramming/c-standard-library-ctype-h.html 下面列出了头文件 ctype.h 中定义的函数: ...
- Java NIO系列教程(一)java NIO简介
这个系列的文章,我们开始玩一玩IO方面的知识,对于IO和NIO,我们经常会接触到,了解他们的基本内容,对于我们的工作会有特别大的帮助.这篇博文我们仅仅是介绍IO和NIO的基本概念,以及一些关键词. 基 ...
- 《剑指offer》-表示数值的字符串
请实现一个函数用来判断字符串是否表示数值(包括整数和小数).例如,字符串"+100","5e2","-123","3.1416&q ...
- struts2使用拦截器完成登陆显示用户信息操作和Struts2的国际化
其实学习框架,就是为了可以很好的很快的完成我们的需求,而学习struts2只是为了替代之前用的servlet这一层,框架使开发更加简单,所以作为一个小菜鸟,特别感谢那些超级无敌变态开发的框架供我们使用 ...
- 【Restful】三分钟彻底了解Restful最佳实践
REST是英文representational state transfer(表象性状态转变)或者表述性状态转移;Rest是web服务的一种架构风格;使用HTTP,URI,XML,JSON,HTML等 ...
- Codeforces Round #319 (Div. 2) D - Invariance of Tree
Invariance of Tree 题目大意:给你一个有1-n组成的序列p,让你构造一棵树,如果节点a和b之间有一条边,则p[a]和p[b]之间也有一条边. 思路:没啥思路,看了题解菜爆. 我们可以 ...
- 035 HDFS的联盟Federation
一:概述 1.单个namenode的局限性 namespace的限制 单个namenode所能存储的对象受到JVM中的heap size的限制 namenode的扩张性 不可以水平扩张 隔离性 单个n ...