Https:创建部署SSL证书进行双向认证
一、前言
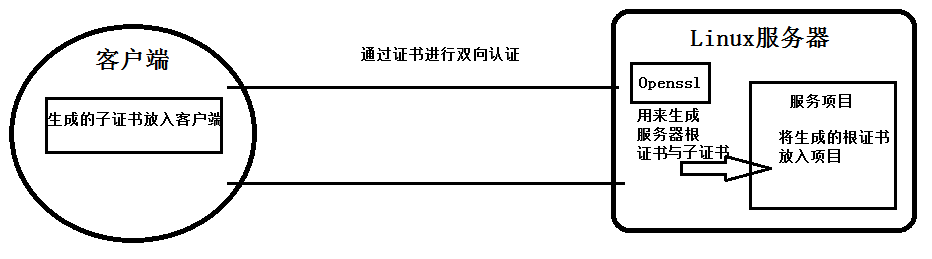
建立客户端与服务器的Https的连接需要证书进行双向验证后,才可访问。
二、证书类型

不同数字证书部署在服务器上后,用户浏览器访问网站时,展示如下:
1、无证书时
显示不安全标识。

2、域名型(DV)SSL
可以显示安全连接标识,证书无法显示组织信息。
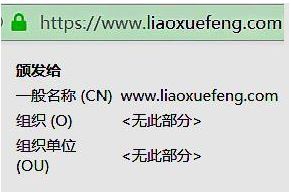
3、企业型(OV)SSL
可以显示安全连接标识,证书详细内显示组织信息。

4、增强型(EV)SSL
地址栏绿色,可以显示安全连接标识,地址栏直接显示组织信息。

三、生成SSL证书
证书的创建与作用
生成环境:
Linux: CentOS_7(及以上)
Tomcat: Apache Tomcat_8.5.42(及以上)
OpenSSL: OpenSSL 1.1.0c 下载路径:https://www.openssl.org/source/openssl-1.1.0c.tar.gz
- 制作服务器根证书
1.解压安装
#解压tar包

tar -xzvf openssl-1.1.0c.tar.gz

#进入加压后的文件夹内

cd openssl-1.1.0c

#安装openssl到  /usr/local/openssl 目录,安装之后,编译;这个时候执行需要有耐心,可以查看命令行一直在滚屏,等到滚屏结束,安装编译完成

./config --prefix=/usr/local/openssl && make && make install

#重命名

mv /usr/bin/openssl /usr/bin/openssl.ori

mv /usr/include/openssl /usr/include/openssl.ori

#将安装好的openssl命令软连到对应位置

ln -s /usr/local/ssl/bin/openssl /usr/bin/openssl

ln -s /usr/local/openssl/include/openssl /usr/include/openssl

#在/etc/ld.so.conf文件中写入openssl库文件的搜索路径

echo /usr/local/openssl/lib >> /etc/ld.so.conf

ldconfig -v

openssl version -a
2.生成证书
2.1 创建根证书密钥文件(自己做CA) root.key
#生成命令

openssl genrsa -des3 -out root.key 2048

#输出日志

Generating RSA private key, 2048 bit long modulus

.....................................................................................................................+++

..........................+++

e is 65537 (0x010001)

Enter pass phrase for root.key: ← #在这输入一个新密码

Verifying – Enter pass phrase for root.key: ← 在这重新输入一遍密码
2.2 创建根证书的申请文件 root.csr
#生成命令

openssl req -new -key root.key -out root.csr

#输出日志

Enter pass phrase for root.key: ← 在这输入前面创建的密码

You are about to be asked to enter information that will be incorporated

into your certificate request.

What you are about to enter is what is called a Distinguished Name or a DN.

There are quite a few fields but you can leave some blank

For some fields there will be a default value,

If you enter ‘.’, the field will be left blank.

—–

Country Name (2 letter code) [AU]:CN ← 国家代号,中国输入CN

State or Province Name (full name) [Some-State]:BeiJing ← 省的全名,拼音

Locality Name (eg, city) []:BeiJing ← 市的全名,拼音

Organization Name (eg, company) [Internet Widgits Pty Ltd]:MyCompany Corp. ← 公司英文名

Organizational Unit Name (eg, section) []: ← 可以不输入

Common Name (eg, YOUR name) []: ← 此时不输入

Email Address []:admin@mycompany.com ← 电子邮箱,可随意填

Please enter the following ‘extra’ attributes

to be sent with your certificate request

A challenge password []: ← 可以不输入

An optional company name []: ← 可以不输入
2.3 创建一个自当前日期起为期十年的根证书 root.crt
#生成命令

openssl x509 -req -days 3650 -sha256 -extfile /usr/local/openssl/ssl/openssl.cnf -extensions v3_ca -signkey root.key -in root.csr -out root.crt

#输出日志

Signature ok

subject=/C=CN/ST=BeiJing/L=BeiJing/O=MyCompany Corp./emailAddress=admin@mycompany.com

Getting Private key

Enter pass phrase for root.key: ← 在这输入前面创建的密码
2.4 根据CA证书生成truststore JKS文件 root.truststore
这一步只针对双向认证,单向不需要
#生成命令

keytool -keystore root.truststore -keypass 123456 -storepass 123456 -alias ca -import -trustcacerts -file /tmp/ca/root.crt
#键入回车后,提示是否信任此证书,输入yes, 则生成truststore成功
- 制作service服务器端证书
1.创建服务器证书密钥 server.key
#生成命令

openssl genrsa -des3 -out server.key 2048

#输出内容为:

Generating RSA private key, 2048 bit long modulus

...........................+++

...............+++

e is 65537 (0x010001)

Enter pass phrase for server.key: ←在这输入前面创建的密码

Verifying - Enter pass phrase for server.key: ← 在这重新输入一遍密码

#运行时会提示输入密码,此密码用于加密key文件(参数des3便是指加密算法,当然也可以选用其他你认为安全的算法.),以后每当需读取此文件(通过openssl提供的命令或API)都需输入口令(密码).如果觉得不方便,也可以去除这个口令,但一定要采取其他的保护措施!

#去除口令的命令

openssl rsa -in server.key -out server.key
2.创建服务器证书的申请文件 server.csr
#生成命令

openssl req -new -key server.key -out server.csr

#输出内容为:

Enter pass phrase for server.key: ← 输入前面创建的密码

You are about to be asked to enter information that will be incorporated

into your certificate request.

What you are about to enter is what is called a Distinguished Name or a DN.

There are quite a few fields but you can leave some blank

For some fields there will be a default value,

If you enter ‘.’, the field will be left blank.

—–

Country Name (2 letter code) [AU]:CN ← 国家名称,中国输入CN

State or Province Name (full name) [Some-State]:BeiJing ← 省名,拼音

Locality Name (eg, city) []:BeiJing ← 市名,拼音

Organization Name (eg, company) [Internet Widgits Pty Ltd]:MyCompany Corp. ← 公司英文名

Organizational Unit Name (eg, section) []: ← 可以不输入

Common Name (eg, YOUR name) []:www.xxx.com ← 服务器主机名(或者IP),若填写不正确,浏览器会报告证书无效,但并不影响使用

Email Address []:admin@mycompany.com ← 电子邮箱,可随便填

Please enter the following ‘extra’ attributes

to be sent with your certificate request

A challenge password []: ← 可以不输入

An optional company name []: ← 可以不输入
3.创建自当前日期起有效期为期十年的服务器证书 server.crt
#生成命令

openssl x509 -req -days 3650 -sha256 -extfile /usr/local/openssl/ssl/openssl.cnf -extensions v3_req -CA root.crt -CAkey root.key -CAcreateserial -in server.csr -out server.crt

#输出内容为:

Signature ok

subject=/C=CN/ST=BeiJing/L=BeiJing/O=MyCompany Corp./CN=www.mycompany.com/emailAddress=admin@mycompany.com

Getting CA Private Key

Enter pass phrase for root.key: ← 输入前面创建的密码
4.导出.p12文件 server.p12
#生成命令

openssl pkcs12 -export -in /tmp/ca/server.crt -inkey /tmp/ca/server.key -out  /tmp/ca/server.p12 -name "server"

根据命令提示,输入server.key密码,创建p12密码。
5.将.p12 文件导入到keystore JKS文件 server.keystore
#生成命令

keytool -importkeystore -v -srckeystore  /tmp/ca/server.p12 -srcstoretype pkcs12 -srcstorepass 123456 -destkeystore /tmp/ca/server.keystore -deststoretype jks -deststorepass 123456

这里srcstorepass后面的123456为server.p12的密码deststorepass后的123456为keyStore的密码
- 制作Client客户端证书
1.创建客户端证书密钥文件 client.key
#生成命令

openssl genrsa -des3 -out client.key 2048

#输出内容为:

Generating RSA private key, 2048 bit long modulus

...............................+++

.........................+++

e is 65537 (0x010001)

Enter pass phrase for client.key: ← 输入新密码

Verifying – Enter pass phrase for client.key: ← 重新输入一遍密码
2.创建客户端证书的申请文件 client.csr
#生成命令

openssl req -new -key client.key -out client.csr

#输出内容为:

Enter pass phrase for client.key: ← 输入上一步中创建的密码

You are about to be asked to enter information that will be incorporated

into your certificate request.

What you are about to enter is what is called a Distinguished Name or a DN.

There are quite a few fields but you can leave some blank

For some fields there will be a default value,

If you enter ‘.’, the field will be left blank.

—–

Country Name (2 letter code) [AU]:CN ← 国家名称,中国输入CN

State or Province Name (full name) [Some-State]:BeiJing ← 省名称,拼音

Locality Name (eg, city) []:BeiJing ← 市名称,拼音

Organization Name (eg, company) [Internet Widgits Pty Ltd]:MyCompany Corp. ← 公司英文名

Organizational Unit Name (eg, section) []: ← 可以不填

Common Name (eg, YOUR name) []:Lenin ← 自己的英文名,可以随便填

Email Address []:admin@mycompany.com ← 电子邮箱,可以随便填

Please enter the following ‘extra’ attributes

to be sent with your certificate request

A challenge password []: ← 可以不填

An optional company name []: ← 可以不填
3.创建一个自当前日期起有效期为十年的客户端证书 client.crt
#生成命令

openssl x509 -req -days 3650 -sha256 -extfile /usr/local/openssl/ssl/openssl.cnf -extensions v3_req -CA root.crt -CAkey root.key -CAcreateserial -in client.csr -out client.crt

#输出内容为:

Signature ok

subject=/C=CN/ST=BeiJing/L=BeiJing/O=MyCompany Corp./CN=www.mycompany.com/emailAddress=admin@mycompany.com

Getting CA Private Key

Enter pass phrase for root.key: ← 输入上面创建的密码
4.导出.p12文件 client.p12
#生成命令

openssl pkcs12 -export -in /tmp/ca/client.crt -inkey /tmp/ca/client.key -out  /tmp/ca/client.p12 -name "client"

根据命令提示,输入client.key密码,创建p12密码。
四、配置Tomcat
1.关闭tomcat
tomcat的bin目录下执行
shutdown.sh
2.将证书放入web服务器
 #将keystore文件(server.keystore) 放在web服务器上

cp /tmp/ca/server.keystore /你的tomcat根目录/conf

  #将truststore文件(root.truststore) 放在web服务器上

cp /tmp/ca/root.truststore /你的tomcat根目录/conf
3.修改server.xml配置文件
cd /你的tomcat根目录/conf

vi server.xml
找到下面被注释的代码,删除注释符并修改内容(vi命令操作)
<Connector port="8443" protocol="org.apache.coyote.http11.Http11Protocol"

               maxThreads="150" SSLEnabled="true" scheme="https" secure="true"

               keystoreFile="/你的路径/apache-tomcat-8.5.42/conf/server.keystore"

               keystorePass="******"

               truststoreFile="/你的路径/apache-tomcat-8.5.42/conf/root.truststore"

               truststorePass="******"

               clientAuth="false" sslEnabledProtocols="TLSv1.2"

                />

    <!-- Define an AJP 1.3 Connector on port 8009 -->

    <Connector port="8011" protocol="AJP/1.3" redirectPort="8443" />
4.启动tomcat
tomcat的bin目录下执行
startup.sh
5.访问https服务
测试访问连接
https://localhost:8443/
https://192.168.1.1:8443/ 你的IP
Https:创建部署SSL证书进行双向认证的更多相关文章
- SSL使用windows证书库中证书实现双向认证
前一段时间对OpenSSL库中的SSL通讯稍微琢磨了一下,在百度文库中找了个示例程序,然后在机器上跑,哇塞,运行成功!那时那个惊喜啊,SSL蛮简单的嘛.前几天,老板要我整一个SSL通讯,要使用wind ...
- 在IIS下部署SSL证书实现HTTPS
在IIS下部署SSL证书实现HTTPS HTTPS是以安全为目标的HTTP通道,简单讲是HTTP的安全版.谷歌已经制定了一项长远的计划,它的最终目标是将所有通过HTTP协议呈现的网页标为“不安全” ...
- 基于SSL协议的双向认证 - 双向认证 [3]
1 SSL双向认证的实现 这里是基于SSL和Tomcat配置实现的,配置方法如下: 1.1 生成CA数字证书 首先需要配置OPENSSL环境变量. 我的OPENSSL配置文件路径是“D ...
- Centos 7 环境下,如何使用 Apache 实现 SSL 虚拟主机 双向认证 的详细教程:
1. testing ! ... 1 1 原文参考链接: http://showerlee.blog.51cto.com/2047005/1266712 很久没有更新LAMP的相关文档了,刚好最近单位 ...
- 让网站永久拥有HTTPS - 申请免费SSL证书并自动续期 Let’s Encrypt
让网站永久拥有HTTPS - 申请免费SSL证书并自动续期 Let’s Encrypt 为什么要用HTTPS 网站没有使用HTTPS的时候,浏览器一般会报不安全,而且在别人访问这个网站的时候,很有可 ...
- Requests对HTTPS请求验证SSL证书
SSL证书通过在客户端浏览器和Web服务器之间建立一条SSL安全通道(Secure socket layer(SSL)安全协议是由Netscape Communication公司设计开发.该安全协议主 ...
- Resin 4.0 部署SSL证书
前言 Resin目前最新的版本还是4.0 (4.0.49),使用Java EE6,在Resin上部署证书,一般有两种方式,首先我们推荐采用Openssl方式,不仅因为Openssl模式下的速度更快,而 ...
- Tomcat部署SSL证书过程中遇到的问题
在CentOS7中Tomcat部署SSL证书时遇到的问题 1.配置servlet.xml 配置tomcat/conf/server.xml 加入以下代码 <Connector port=&quo ...
- CentOS系统Tomcat 8.5或9部署SSL证书
本文档介绍了CentOS系统下Tomcat 8.5或9部署SSL证书的操作说明. 环境准备 操作系统:CentOS 7.6 64位 Web服务器:Tomcat 8.5或9 前提条件 已从阿里云SSL证 ...
随机推荐
- 克隆并编译otter
源码编译: git clone 项目到本地,用IDEA打开,等待Maven下载完jar包,打开命令行,进入当前项目的lib目录 执行install.bat命令,该批处理文件会将缺失的jar包安装到你本 ...
- ssh安全优化免密登陆
ssh协议 为什么使用ssh协议? 在进行传输时,会对数据进行加密,保证会话安全:telnet协议不是加密传输,在传输过程中如果被抓包,就会造成信息泄露,telnet默认不支持root远程. # 常用 ...
- 趣谈网络协议-第3讲 | ifconfig:最熟悉又陌生的命令行
如何查看IP地址呢? windows 查看IP地址命令 IPCONFIG LINUX 查看IP 命令 IFCONFIG IP ADDR ifconfig 和ADDR的区别 这是一个 ...
- 去除HTML中的标签内容
采集后的数据都带有'<>'html标签: <img src="http://i4.hdfimg.com/www/images/giftrans/3d/da/7b/18414 ...
- 『动善时』JMeter基础 — 30、JMeter中JSON断言详解
目录 1.JSON断言组件界面详解 2.JSON断言组件的使用 (1)测试计划内包含的元件 (2)登陆接口请求界面内容 (3)JSON断言界面内容 (4)查看运行结果 (5)断言结果组件说明 3.JS ...
- Django(49)drf解析模块源码分析
前言 上一篇分析了请求模块的源码,如下: def initialize_request(self, request, *args, **kwargs): """ Retu ...
- 国内操作系统OS分析(下)
国内操作系统OS分析(下) 3.2 Android/iOS移动互联网时代 Android是一种基于Linux的自由及开放源代码的操作系统.主要使用于移动设备,如智能手机和平板电脑,由Google公司和 ...
- VB 老旧版本维护系列---读取xml某个节点的值
读取xml某个节点的值 '定义xml字符串内容地址 Dim xmlFileStr As String = "" '定义所需读取节点的名称 Dim readNodeName As S ...
- GVS智能照明再下一城,前方到站贵阳地铁2号线!
近期,"新基建"又频频刷屏,也为城轨交通建设快速发展提供了广阔的想象空间. 在新基建的导向作用下,越来越多城市加入地铁阵营.如果说普铁和高铁作为城市的发展窗口,那么地铁则是城市交通 ...
- 1-3. SpringBoot基础,Java配置(全注解配置)取代xml配置
最近突发奇想,整合一下以前一些学习笔记,分享自己这几年爬过的坑,逐步更新文章,谢谢大家的关注和支持. 这节讲一下SpringBoot的学习必须的一些基础,Java配置.其实在Spring2.0时代就已 ...