Ory Kratos 用户认证
Ory Kratos 为用户认证与管理系统。本文将动手实现浏览器(React+AntD)的完整流程,实际了解下它的 API 。
了解 Kratos
获取代码
git clone -b v0.7.0-alpha.1 --depth 1 https://github.com/ory/kratos.git
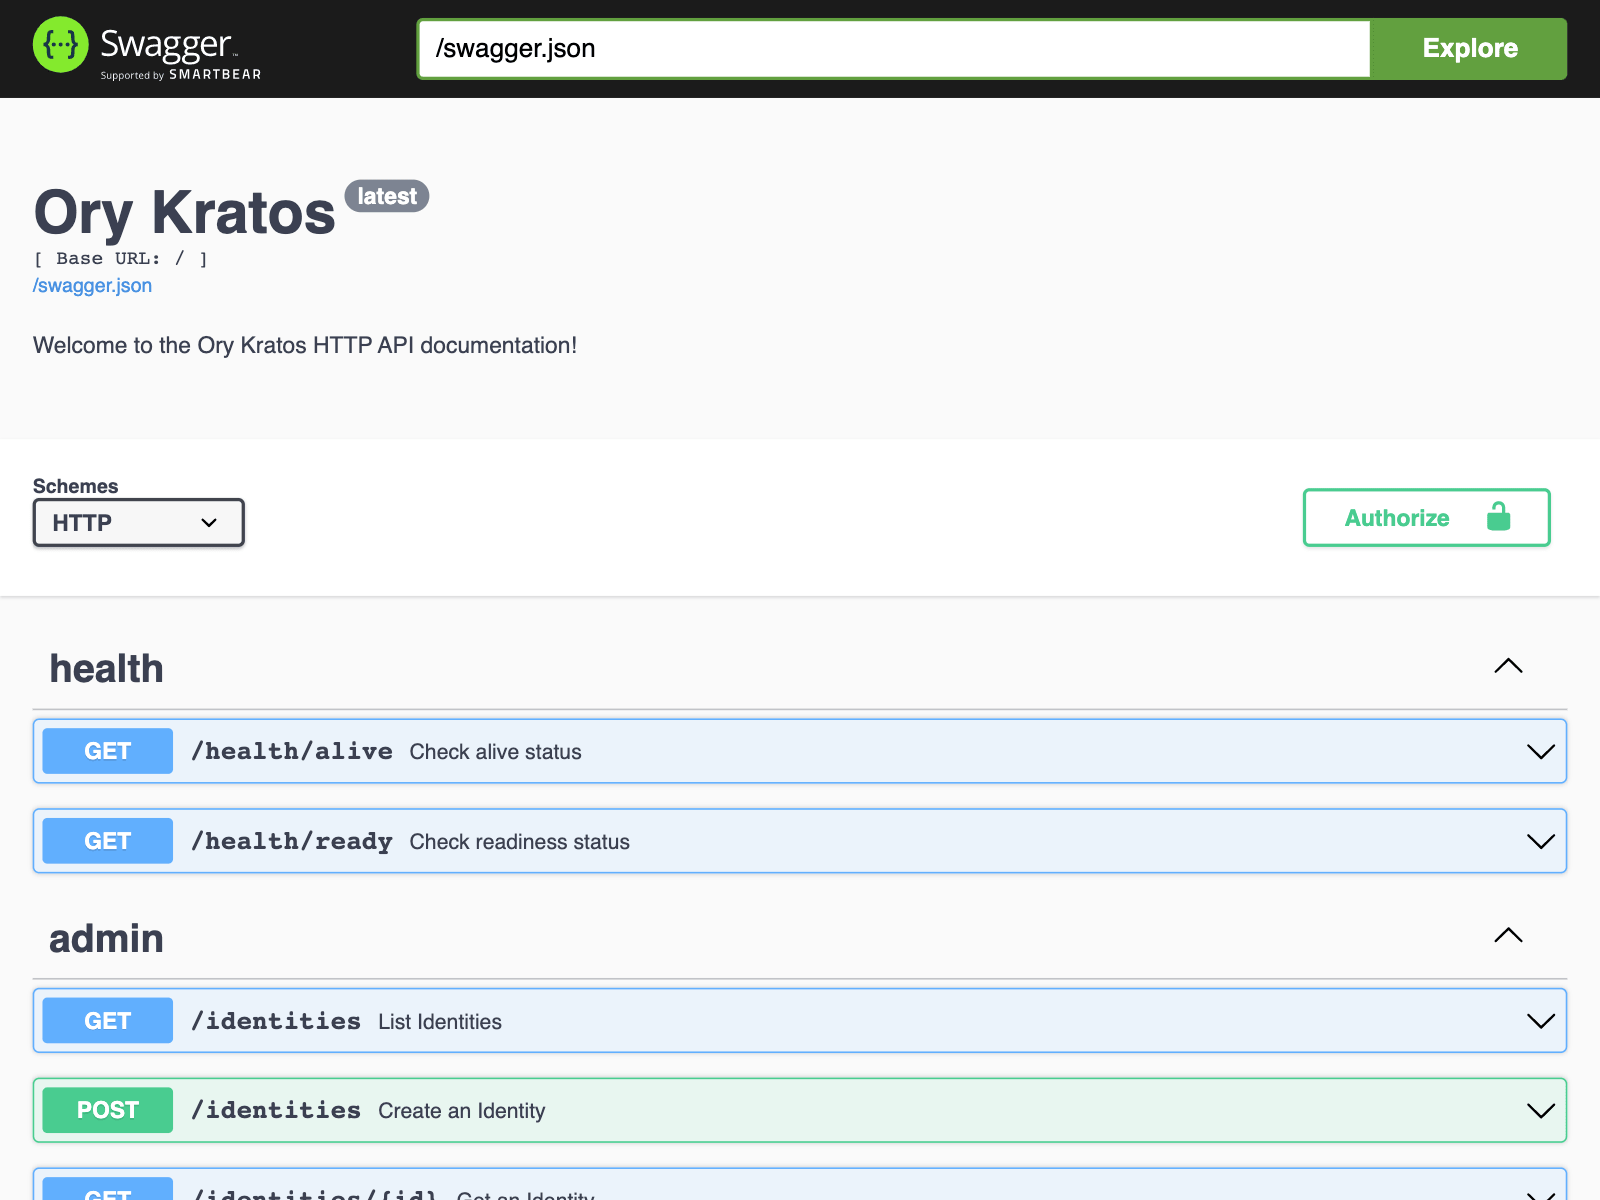
查看 API
go-swagger 查看:
cd kratos

swagger serve -F=swagger ./spec/swagger.json
运行服务
docker-compose 运行:
cd kratos

docker-compose -f quickstart.yml -f quickstart-postgres.yml -f quickstart-standalone.yml up --build --force-recreate

# If you have SELinux, run: -f quickstart-selinux.yml
运行了官方 Quickstart 例子,可以访问 http://127.0.0.1:4455/dashboard 体验。
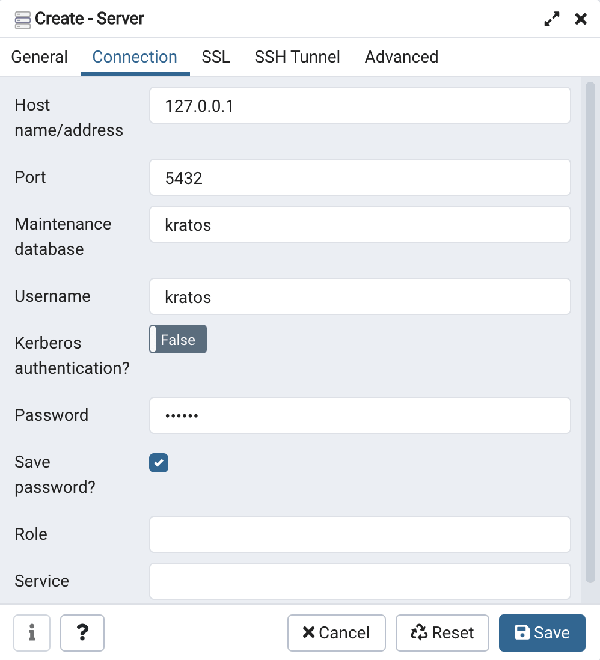
查看 DB
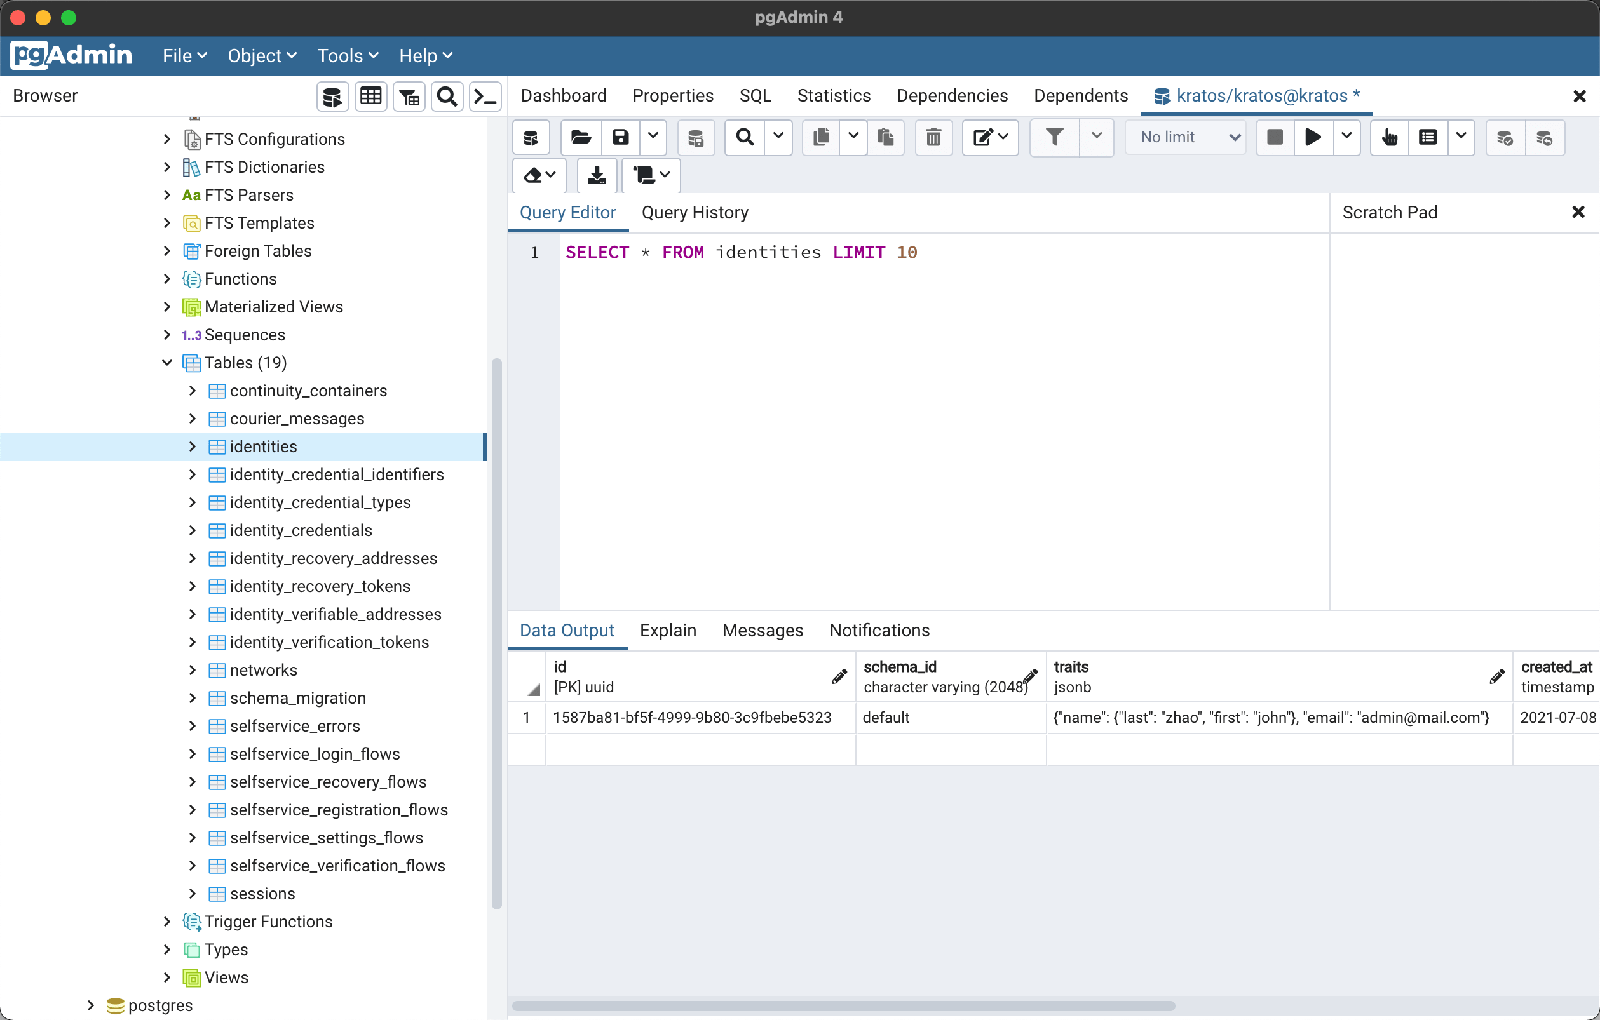
pgAdmin 打开(DB 信息见 quickstart-postgres.yml):
查看表:
查看配置
cd kratos

cat contrib/quickstart/kratos/email-password/kratos.yml
设置环境变量可以覆盖。以 _ 表示层级,如 SELFSERVICE_FLOWS_SETTINGS_UI_URL=<value> 覆盖 selfservice.flows.settings.ui_url。
Self-Service 流程
- Registration
- Login
- Logout
- User Settings
- Account Recovery
- Address Verification
- User-Facing Error
- 2FA / MFA
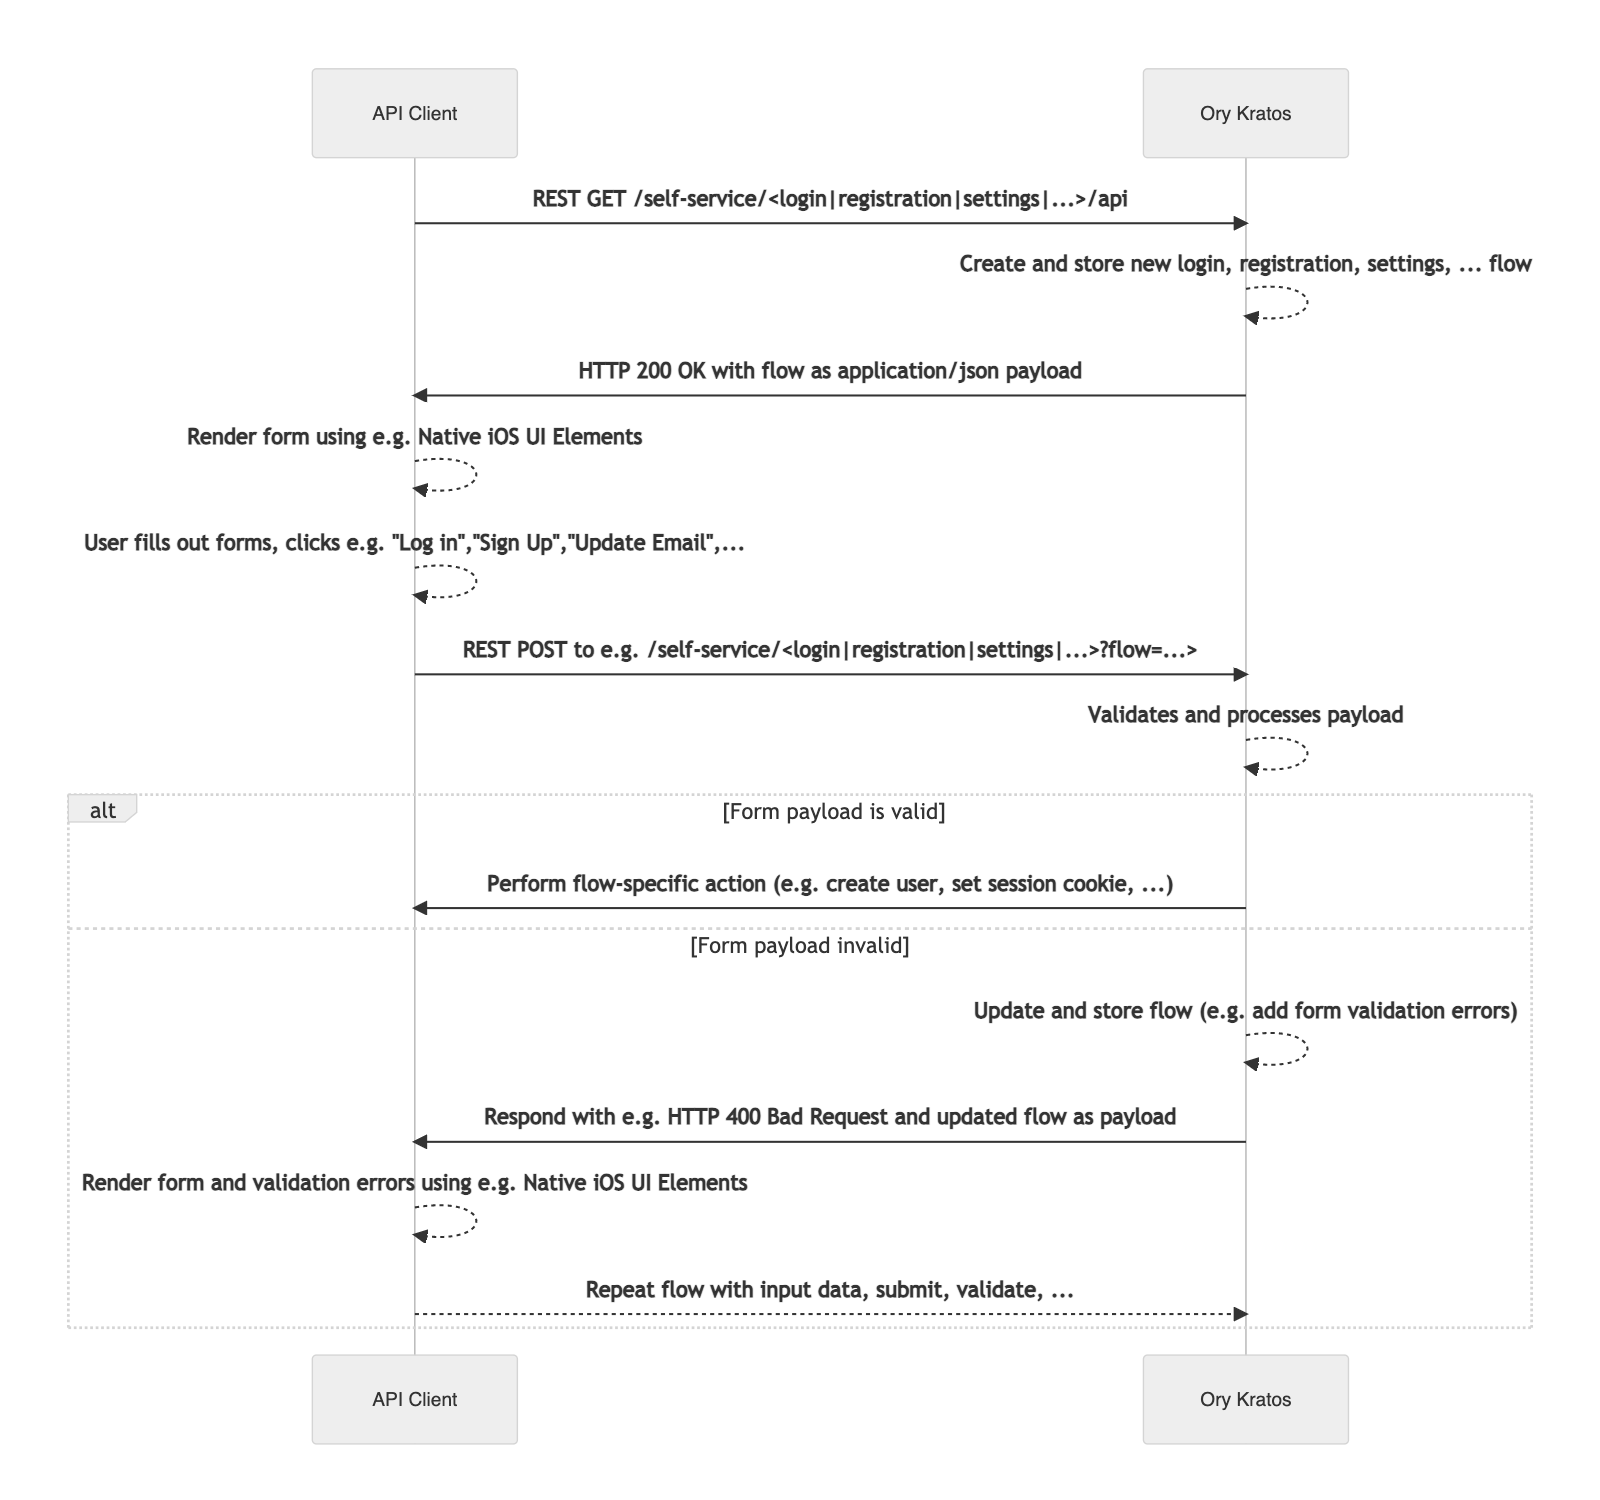
浏览器流程

客户端流程
动手配置:Kratos 服务
- Ory Kratos
- Public API (port 4433)
- Admin API (port 4434)
- Postgres DB (port 5432)
- Browser Return URL (port 3000)
- MailSlurper: a development SMTP server
- Server UI (port 4436)
配置文件
- ory-kratos/config/kratos.yml: 配置文件
- ory-kratos/config/identity.schema.json: 认证 JSON 模式
启动文件
- ory-kratos/start.yml: Docker Compose 文件
运行服务
cd ory-kratos

docker-compose -f start.yml up --build --force-recreate
如果想运行官方 Self-Service UI 例子,那么:
docker-compose -f start.yml -f start-ui-node.yml up --build --force-recreate
之后,访问 http://127.0.0.1:3000/ 体验。在 Register new account / Reset password 时,可访问虚拟 SMTP 服务 http://127.0.0.1:4436 接收邮件。
动手实现:浏览器流程
新建 React 应用
yarn create react-app my-web --template typescript

cd my-web

yarn start
访问 http://localhost:3000/ ,可见 React 欢迎页。
引入 AntD
yarn add antd
修改 src/App.tsx,引入 antd 组件:
import React, { Component } from 'react'

import { Button } from 'antd';

import logo from './logo.svg';

import './App.css';

class App extends Component {

  render() {

    return (

      <div className="App">

        <header className="App-header">

          <img src={logo} className="App-logo" alt="logo" />

          <Button type="primary">Button</Button>

        </header>

      </div>

    );

  }

}

export default App;
修改 src/App.css,引入 antd 样式:
@import '~antd/dist/antd.css';
可见 antd 蓝色按钮组件。

引入 Sass
yarn add node-sass
后缀 css 改为 scss ,tsx 里的 import 也改下。
引入 Router
yarn add react-router-dom @types/react-router-dom
于 pages 目录下实现如下页面 UI:
src/pages               功能        路由

├── dashboard.tsx       主页        /, /dashboard

├── error.tsx           错误        /error

├── login.tsx           登录        /auth/login

├── recovery.tsx        恢复        /recovery

├── registration.tsx    注册        /auth/registration

├── settings.tsx        设置        /settings

└── verification.tsx    验证        /verify
引入 SDK
yarn add @ory/kratos-client@0.7.0-alpha.1
注册
APIs:
GET/self-service/registration/browser: 初始化注册流程GET/self-service/registration/flows: 获取注册流程POST/self-service/registration: 提交注册流程
页面加载后的处理流程:
componentDidMount() {

  // 获取 flow id 参数

  const flowId = utils.parseUrlQuery("flow", this.props.location) as string;

  // 没有 flow id,初始化注册流程

  if (!flowId || !utils.isString(flowId)) {

    console.log("No flow ID found in URL, initializing registration flow.");

    utils.redirectToSelfService("/self-service/registration/browser");

    return;

  }

  // 根据 flow id,获取注册流程信息

  authPublicApi

    .getSelfServiceRegistrationFlow(flowId, undefined, {

      withCredentials: true,

    })

    .then((res: AxiosResponse<SelfServiceRegistrationFlow>) => {

      if (utils.assertResponse(res)) {

        utils.redirectToSelfService("/self-service/registration/browser");

        return;

      }

      this.setState({ flowId: flowId, flow: res.data });

    })

    .catch(utils.redirectOnError);

}
流程信息 this.state.flow,如下:
{

  "id": "74c643a1-f302-45c9-a760-1ad7b1157e1c",

  "type": "browser",

  "expires_at": "2021-07-20T05:22:30.958717Z",

  "issued_at": "2021-07-20T05:12:30.958717Z",

  "request_url": "http://127.0.0.1:4433/self-service/registration/browser",

  "ui": {

    "action": "http://127.0.0.1:4433/self-service/registration?flow=74c643a1-f302-45c9-a760-1ad7b1157e1c",

    "method": "POST",

    "nodes": [{

      "type": "input",

      "group": "default",

      "attributes": {

        "name": "csrf_token",

        "type": "hidden",

        "value": "QQyUDHa4KJ3M6mowHHN4pboN4iaUOZL+4gYVtKYRWzSdWjSNcW5dG/SNzocyqqqAtV48KzQVMIC6X+Pv3tNPNw==",

        "required": true,

        "disabled": false

      },

      "messages": [],

      "meta": {}

    }, {

      "type": "input",

      "group": "password",

      "attributes": {

        "name": "traits.email",

        "type": "email",

        "disabled": false

      },

      "messages": [],

      "meta": {

        "label": {

          "id": 1070002,

          "text": "E-Mail",

          "type": "info"

        }

      }

    }, {

    ...

    }]

  }

}
之后,依据流程信息创建表单:
<Card title="Register new account" bordered={false}>

  {/* 流程消息展示 */}

  {this.state.flow.ui.messages &&

    this.state.flow.ui.messages.map((m: UiText, index) => (

      <Alert

        key={index}

        message={m.text}

        type={m.type as AlertProps["type"]}

        style={{ marginBottom: 16 }}

        showIcon

      />

    ))}

  {/* 流程表单创建 */}

  <Form

    name="register"

    ref={this.formRef}

    encType="application/x-www-form-urlencoded"

    action={this.state.flow.ui.action}

    method={this.state.flow.ui.method}

    onFinish={onFinish}

  >

    {this.state.flow.ui.nodes.map((node, index) => {

      return React.cloneElement(ui.toUiNodeAntd(node)!, {

        key: index,

      });

    })}

  </Form>

</Card>
其中表单 onFinish 里处理提交:
const onFinish = (values: any) => {

  // 因 AntD Form 不提交原 HTML form,所以自己创建 from 提交

  // - 不能直接 find form 提交,此时值已清空

  // - 创建 from 提交,与 AntD From 相互无影响

  ui.submitViaForm(this.state.flow!.ui, values);

  // 或者,用 `/self-service/registration/api` 提交

  // this.submitViaApi(values);

};
登录
GET/self-service/login/browser: 初始化登录流程GET/self-service/login/flows: 获取登录流程POST/self-service/login: 提交登录流程
与注册流程一样。
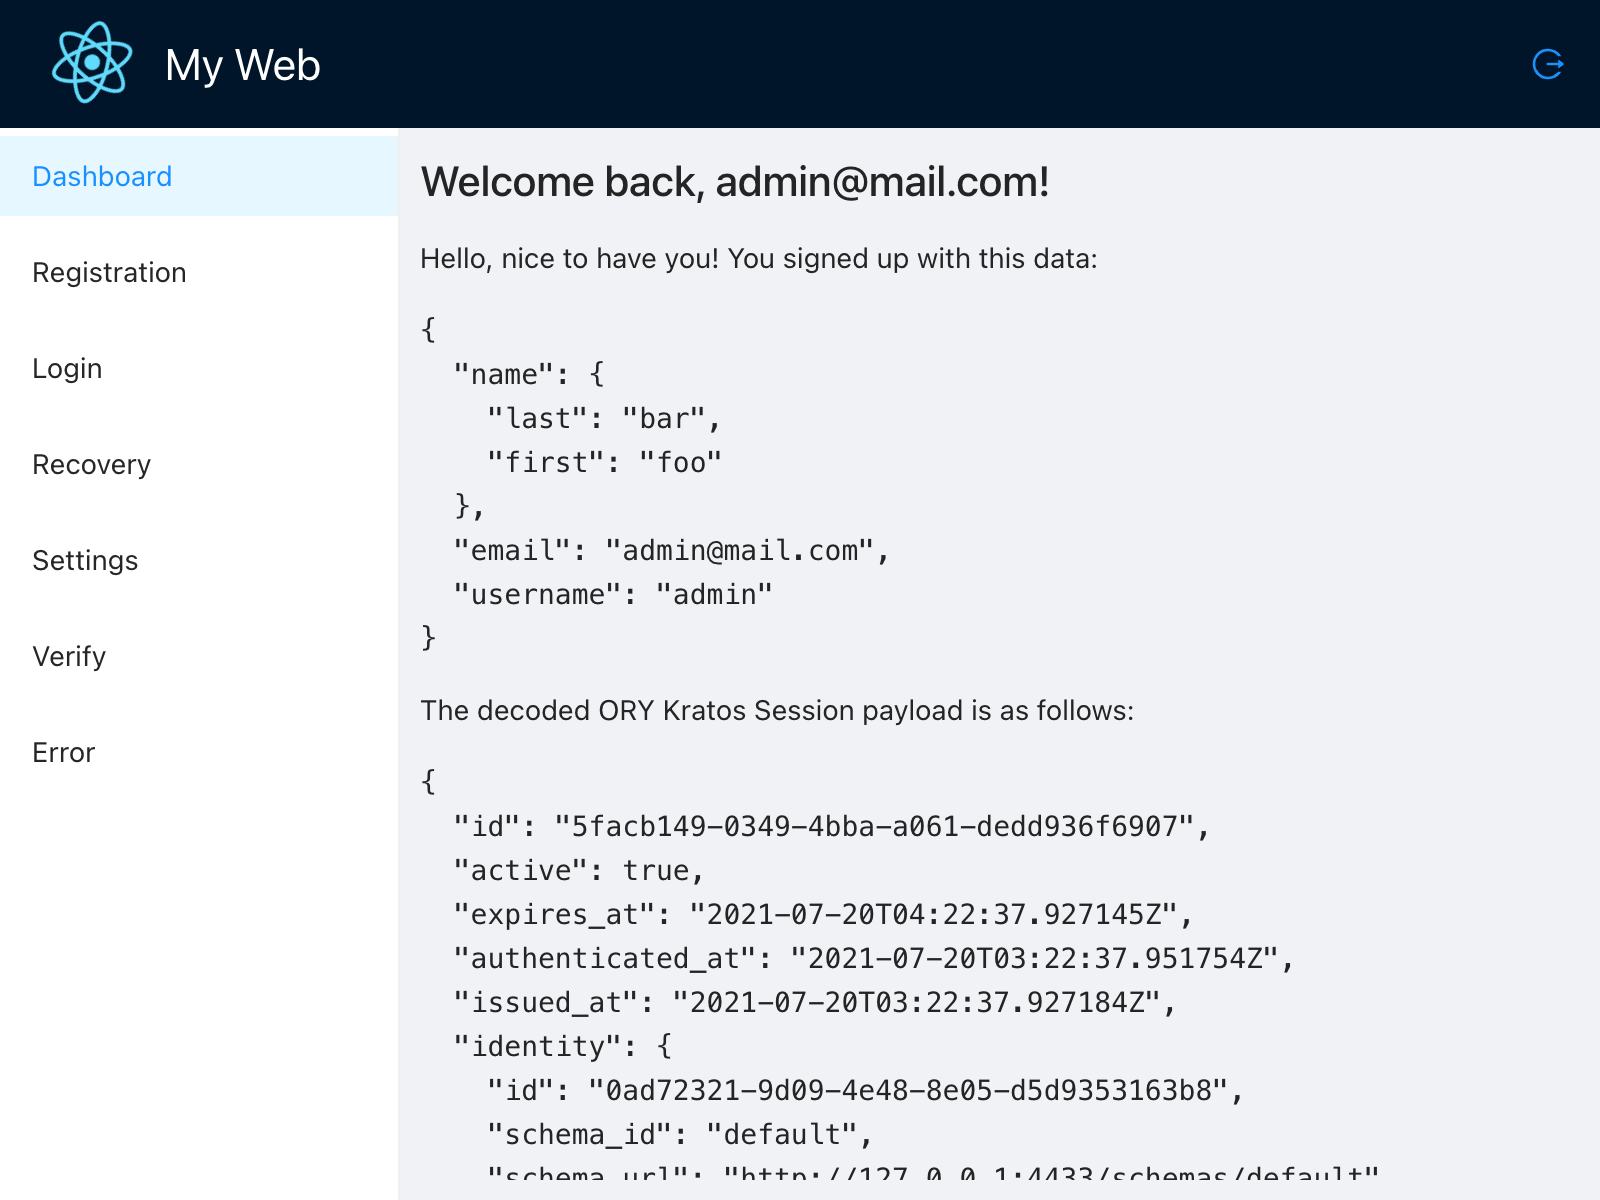
登录后,可通过 whoami 获取授权信息:
GET/sessions/whoami: 获取授权信息
authPublicApi

  .toSession(undefined, undefined, {

    withCredentials: true,

  })

  .then((res: AxiosResponse<Session>) => {

    if (utils.assertResponse(res)) {

      utils.redirectToSelfService("/self-service/login/browser");

      return;

    }

    this.setState({ session: res.data });

  })

  .catch((err: AxiosError) => utils.redirectOnError(err, "/auth/login"));
Dashboard 页展示了授权信息:
验证
GET/self-service/verification/browser: 初始化验证流程GET/self-service/verification/flows: 获取验证流程POST/self-service/verification: 提交验证流程
与注册流程一样。
恢复
GET/self-service/recovery/browser: 初始化恢复流程GET/self-service/recovery/flows: 获取恢复流程POST/self-service/recovery: 提交恢复流程
与注册流程一样。
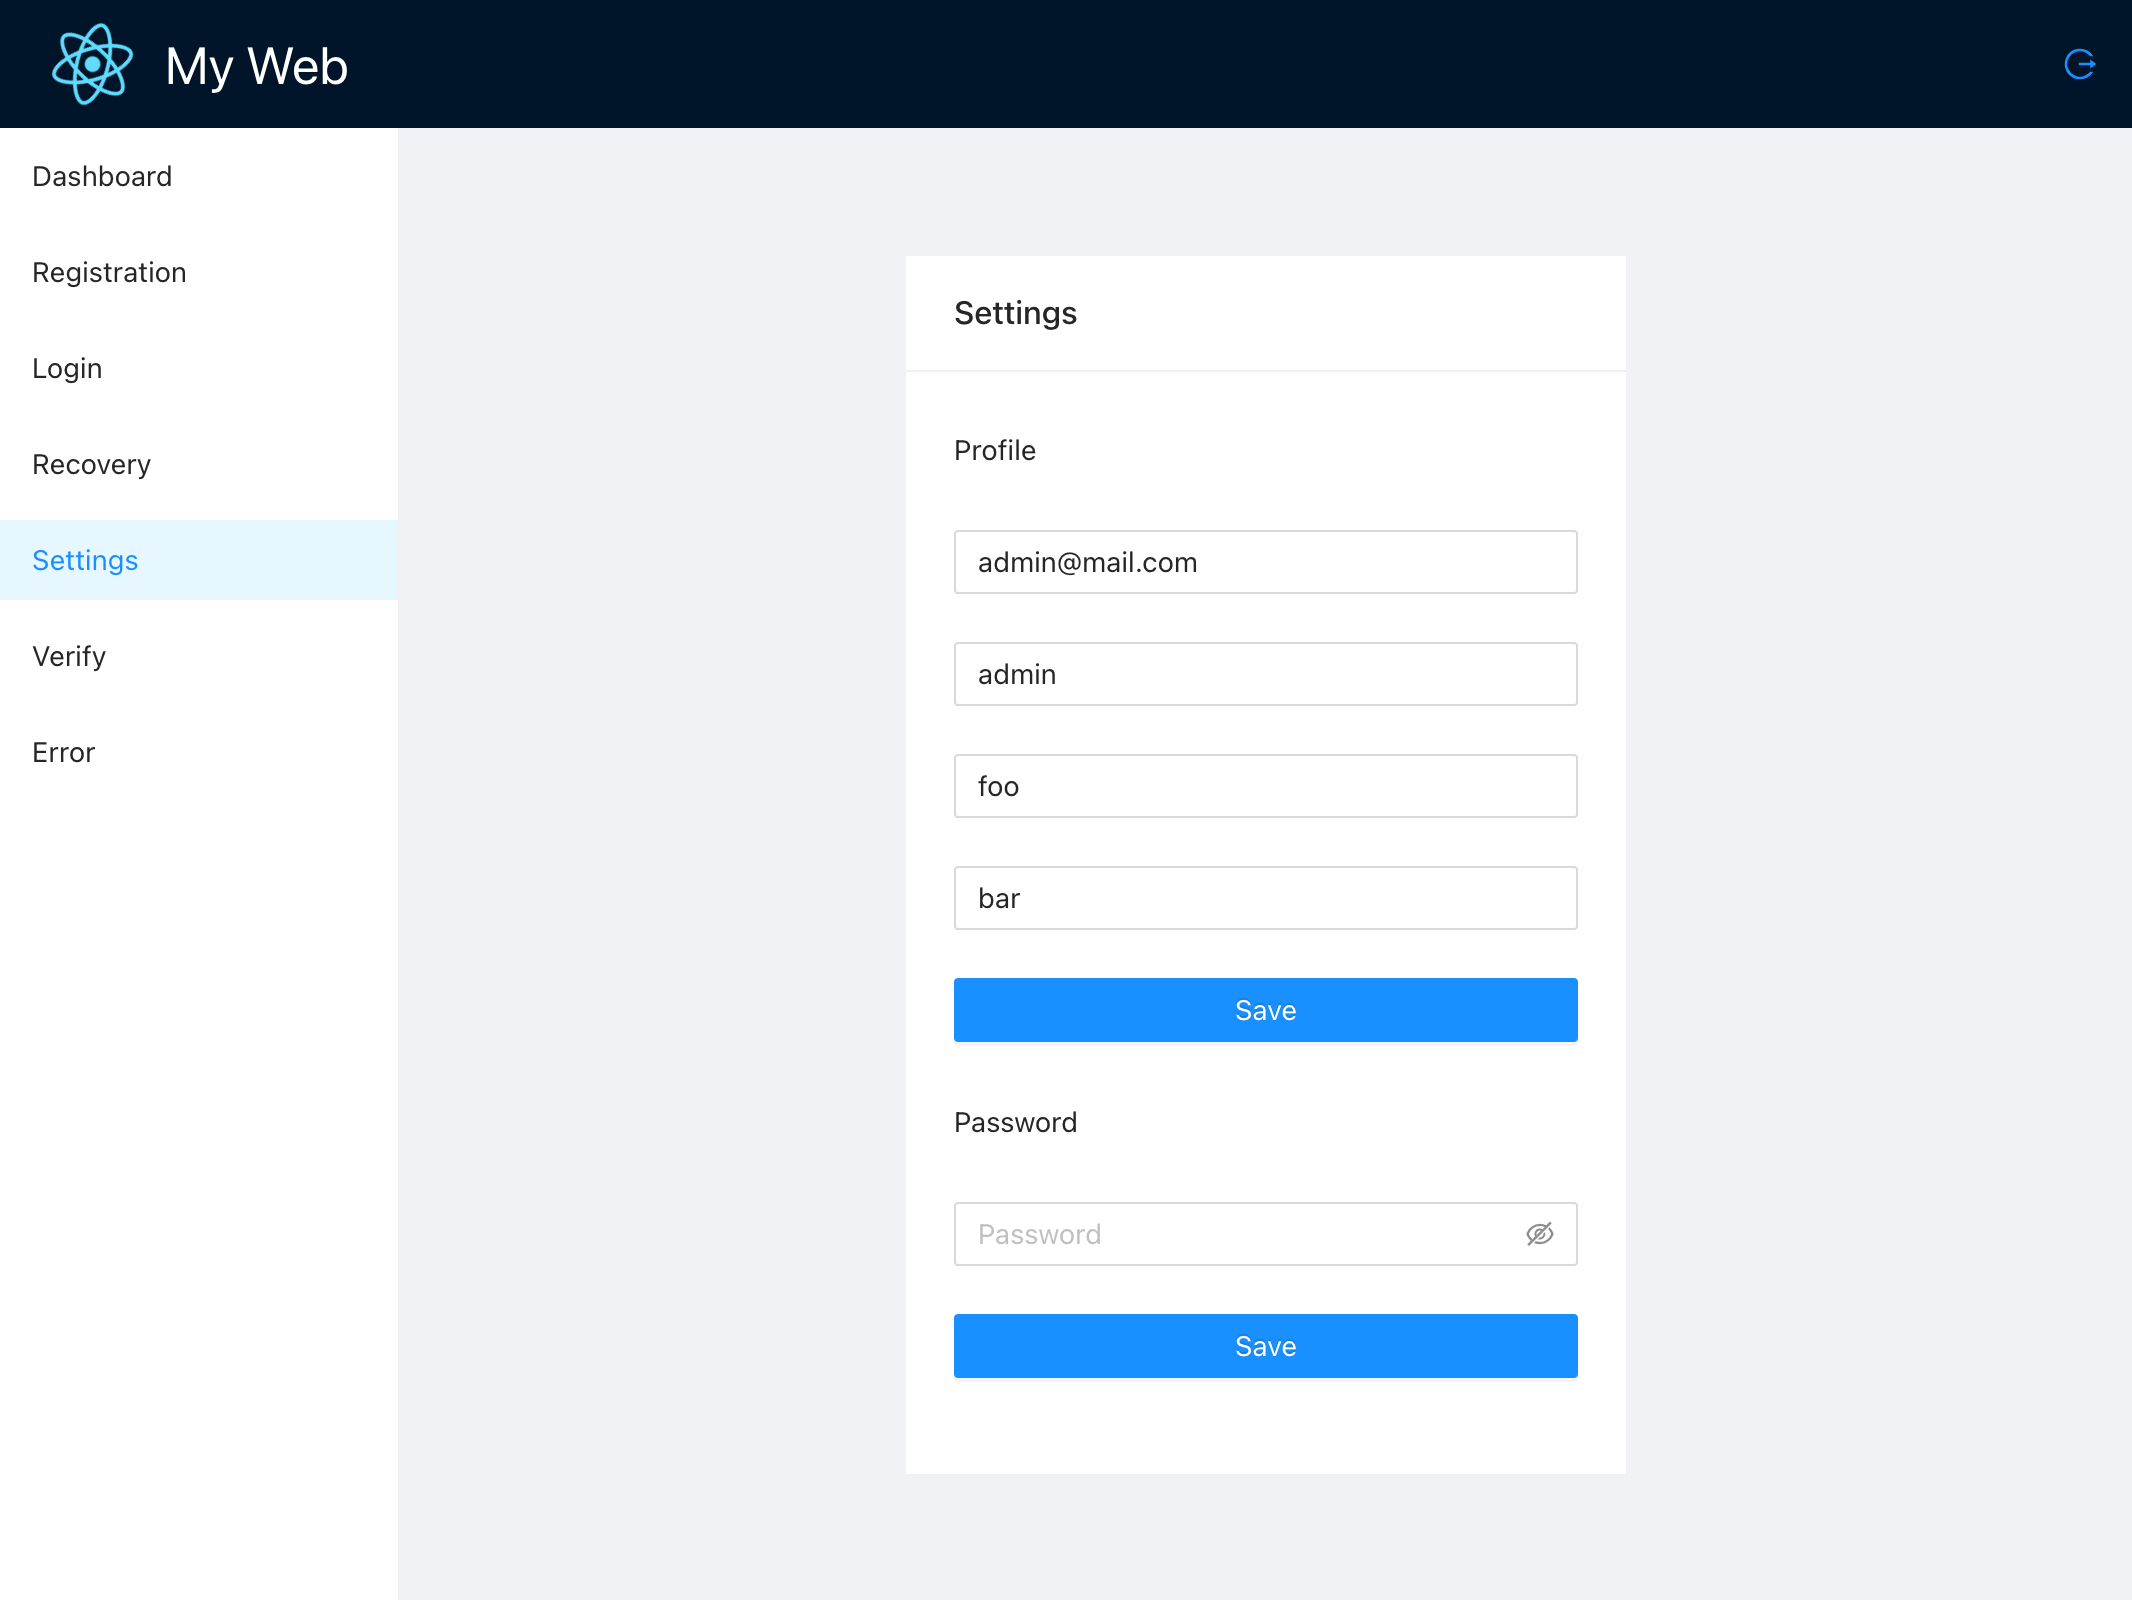
设置
GET/self-service/settings/browser: 初始化设置流程GET/self-service/settings/flows: 获取设置流程POST/self-service/settings: 完成设置流程
与注册流程一样。
但要注意的是,依据流程信息创建表单时,请区分 group 构建多个表单:
const nodesGroup: Record<

  string,

  {

    title?: string;

    nodes?: Array<UiNode>;

  }

> = {

  default: {},

  profile: { title: "Profile" },

  password: { title: "Password" },

  oidc: { title: "Social Sign In" },

};

for (const [k, v] of Object.entries(nodesGroup)) {

  nodesGroup[k] = {

    title: v.title,

    nodes: ui.onlyNodes(this.state.flow!.ui.nodes, k),

  };

}
<Card title="Settings" bordered={false}>

  {this.state.flow.ui.messages &&

    this.state.flow.ui.messages.map((m: UiText, index) => (

      <Alert

        key={index}

        message={m.text}

        type={m.type as AlertProps["type"]}

        style={{ marginBottom: 16 }}

        showIcon

      />

    ))}

  {/* Split Form by group here. Otherwise, one AntD Form method conflicts. */}

  {Object.entries(nodesGroup)

    .filter(([k, v]) => k !== "default" && v && v.nodes!.length > 0)

    .map(([k, v], index) => (

      <Form

        key={index}

        name={k}

        encType="application/x-www-form-urlencoded"

        action={this.state.flow!.ui.action}

        method={this.state.flow!.ui.method}

        onFinish={onFinish}

      >

        <Form.Item>

          <div>{v.title}</div>

        </Form.Item>

        {v

          .nodes!.concat(nodesGroup["default"].nodes!)

          .map((node, index) => {

            return React.cloneElement(ui.toUiNodeAntd(node)!, {

              key: index,

            });

          })}

      </Form>

    ))}

</Card>
登出
GET/self-service/logout/browser: 创建登出 URLPOST/self-service/logout: 完成登出流程
页面加载后创建登出 URL ,
authPublicApi

  .createSelfServiceLogoutFlowUrlForBrowsers(undefined, {

    withCredentials: true,

  })

  .then((res: AxiosResponse<SelfServiceLogoutUrl>) => {

    this.setState({ logoutUrl: res.data.logout_url });

  })

  .catch((err) => {

    // console.log(err);

  });
之后,页面加上登出按钮:
{this.state.logoutUrl && (

  <Button

    type="link"

    shape="circle"

    href={this.state.logoutUrl}

    icon={<LogoutOutlined />}

  />

)}
参考
GoCoding 个人实践的经验分享,可关注公众号!
Ory Kratos 用户认证的更多相关文章
- Nodejs之MEAN栈开发(八)---- 用户认证与会话管理详解
用户认证与会话管理基本上是每个网站必备的一个功能.在Asp.net下做的比较多,大体的思路都是先根据用户提供的用户名和密码到数据库找到用户信息,然后校验,校验成功之后记住用户的姓名和相关信息,这个信息 ...
- Django--自定义用户认证
Django自带的用户认证 以前都是用Django自带的用户认证,用户名字段一对一关系对应Django--User表(其实它也是继承了abstractbaseuser). 1 2 3 from dja ...
- linux(十二)___Apache服务器用户认证、虚拟主机的配置
创建xiangkejin zhangsan两个用户 可看见文件中创建的两个用户: 建立虚拟目录并配置用户认证 ①建立虚拟目录 /xiangkejin ②在Apache的主配置文件httpd.conf ...
- [django]用户认证中只允许登陆用户访问(网页安全问题)
当设计一个重要网页时,一般要求未从登陆界面访问的用户不能进入其他页面,那么需要如何设置呢? 如下 django中的url.py urlpatterns = [ url(r'^$', 'login ...
- 使用JDBC实现Oracle用户认证
两天时间写的小品,以前的J2EE环境基本使用框架.现在使用JDBC配合Oracle存储过程模拟了一下用户注册和用户认证. 一.添加必须的jar包 需要JDBC连接Oracle的包和shiro-core ...
- ldap实现用户认证
LDAP的用户认证类. public class LDAPHelper { private DirectoryEntry _objDirectoryEntry; /// <summary> ...
- auth用户认证库
关于auth库,建议如下:1. ion_auth,基于Redux重写而成,非常不错的认证库,国外用的很多,几个最新的ci2.0.2基础上的开源系统(如doveforum)都用它,支持ci 2.0和以上 ...
- 禅道PMS兼容redmine用户认证接口
项目地址:https://github.com/web3d/zentao-redmine-userauth zentao-redmine-userauth 做了一个基本的用户认证接口,兼容redmin ...
- 使用Autodesk OAuth服务在用户认证的示例
大家知道以Autodesk 360为核心的Autodesk 云服务已经陆续发布,ReCap API.InfraWorks API和PLM 360 REST API已经开始的Pilot项目供第三方开发者 ...
随机推荐
- Qt项目ui文件中新添加的控件在代码中不识别的问题解决
今天在学Qt框架的信号槽,然后发现在ui中加的控件,通过ui-> 找不到,没有识别,于是上网查找了一下问题 解决方法 添加ui控件后,执行程序,退出程序,将debug目录下的ui_XXXX.h拷 ...
- 一文带你了解.Net自旋锁
本文主要讲解.Net基于Thread实现自旋锁的三种方式 基于Thread.SpinWait实现自旋锁 实现原理:基于Test--And--Set原子操作实现 使用一个数据表示当前锁是否已经被获取 0 ...
- 【NX二次开发】多种变换
变换的种类: uf5942 矩阵乘积变换 uf5943 平移变换 uf5944 缩放变换 uf5945 旋转变换 uf5946 镜像变换 最后使用 uf5947 实现uf5942-uf5946的变换. ...
- Jetpack Compose和View的互操作性
Jetpack Compose Interoperability Compose风这么大, 对于已有项目使用新技术, 难免会担心兼容性. 对于Compose来说, 至少和View的结合是无缝的. (目 ...
- Golang超时机制--2秒内某个函数没被调用就认为超时
Golang超时机制--2秒内某个函数没被调用就认为超时 需求描述 当一整套流程需要其他程序来调用函数完成时通常需要一个超时机制,防止别人程序故障不调你函数导致你的程序流程卡死 实现demo pack ...
- jQuery获取标签信息
<!DOCTYPE html><html><head> <meta charset="utf-8"/> <titl ...
- Unix、Linux 软件包管理快速入门对照:apt、brew、pkg、yum
请访问原文链接:https://sysin.org/blog/apt-brew-pkg-yum/,查看最新版.原创作品,转载请保留出处. 作者:gc(at)sysin.org,主页:www.sysin ...
- Redis big key处理
bigkey是指key对应的value所占的内存空间比较大,例如一个字符串类型的value 可以最大存到512MB,-个列表类型的value最多可以存储2^32-1个元素.如果按照数据结构来细分的话, ...
- Linux-ELK日志收集
1.ELK简介 ELK是三个开源软件的缩写,分别表示:Elasticsearch , Logstash, Kibana , 它们都是开源软件.新增了一个FileBeat,它是一个轻量级的日志收集处理工 ...
- 解决CentOS下service 功能 不能使用 bash: service: command not found
首先检查自己是否 使用的是root用户 在centos系统中,如果/sbin目录下没有service这个命令,就会出现 bash: service: command not found 解决步骤如下: ...