Angular 4 组件间的通信
一、输入属性(父组件与子组件通信)
1. 创建工程
ng new demo1
2.创建order组件
ng g component order
3. 在order组件里定义输入属性
order组件的html

4. 父组件
app.component.ts中定义stock

app.component.html, 采用双向绑定
效果图

最终父组件IBM的值,通过输入属性,把值传递给了子组件
二、输出属性(子组件与父组件通信)
1. ng g component priceQutoe 创建报价组件
2. 定义报价组件控制器
import {Component, EventEmitter, OnInit, Output} from '@angular/core';

@Component({

  selector: 'app-price-quote',

  templateUrl: './price-quote.component.html',

  styleUrls: ['./price-quote.component.css']

})

export class PriceQuoteComponent implements OnInit {

  stockCode: string = 'IBM';

  price: number;

  @Output('priceChange')

  lastPrice: EventEmitter<PriceQuote> = new EventEmitter();

  constructor() {

    setInterval(() => {

      let priceQuote: PriceQuote = new PriceQuote(this.stockCode, 100 * Math.random());

      this.price = priceQuote.lastPrice;

      this.lastPrice.emit(priceQuote);

    }, 1000);

  }

  ngOnInit() {

  }

}

export class PriceQuote {

  constructor(public  stockCode: string,

              public  lastPrice: number) {

  }

}
3. 定义报价组件html
<p>

  这里是报价组件

</p>

<div>

  股票代码是{{stockCode}}, 股票价格是{{price | number:'2.2-2'}}

</div>
4. 父组件控制器
import { Component } from '@angular/core';

import {PriceQuote} from './price-quote/price-quote.component';

@Component({

  selector: 'app-root',

  templateUrl: './app.component.html',

  styleUrls: ['./app.component.css']

})

export class AppComponent {

  stock = '';

  title = 'app';

  priceQuote: PriceQuote = new PriceQuote('', 0);

  priceQutoehandler(event: PriceQuote){

    this.priceQuote = event;

  }

}
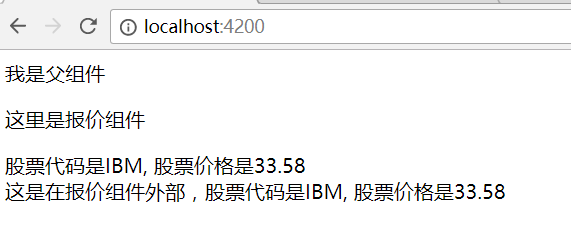
5. 父组件html
<div>

  我是父组件

</div>

<app-price-quote (priceChange)="priceQutoehandler($event)"></app-price-quote>

<div>

  这是在报价组件外部,股票代码是{{priceQuote.stockCode}},

  股票价格是{{priceQuote.lastPrice | number:'2.2-2'}}

</div>
6.效果图
三、中间人模式
当另个组件不是父子组件关系时,需要两个共同的父组件,这个父组件就是中间人模式
中间人模式同时使用了输入属性和输出属性
1. 报价组件定义
import {Component, EventEmitter, OnInit, Output} from '@angular/core';

@Component({

  selector: 'app-price-quote',

  templateUrl: './price-quote.component.html',

  styleUrls: ['./price-quote.component.css']

})

export class PriceQuoteComponent implements OnInit {

  stockCode: string = 'IBM';

  price: number;

  //@Output('priceChange')

  //lastPrice: EventEmitter<PriceQuote> = new EventEmitter()

  @Output()

  buy: EventEmitter<PriceQuote> = new EventEmitter();

  constructor() {

    setInterval(() => {

      const priceQuote: PriceQuote = new PriceQuote(this.stockCode, 100 * Math.random());

      this.price = priceQuote.lastPrice;

      //this.lastPrice.emit(priceQuote);

    }, 1000);

  }

  buyStock(event) {

      this.buy.emit(new PriceQuote(this.stockCode, this.price));

  }

  ngOnInit() {

  }

}

export class PriceQuote {

  constructor(public  stockCode: string,

              public  lastPrice: number) {

  }

}
2. 报价组件html
<p>

  这里是报价组件

</p>

<div>

  股票代码是{{stockCode}}, 股票价格是{{price | number:'2.2-2'}}

</div>

<div>

  <input type='button' value='立即购买' (click)="buyStock($event)">

</div>
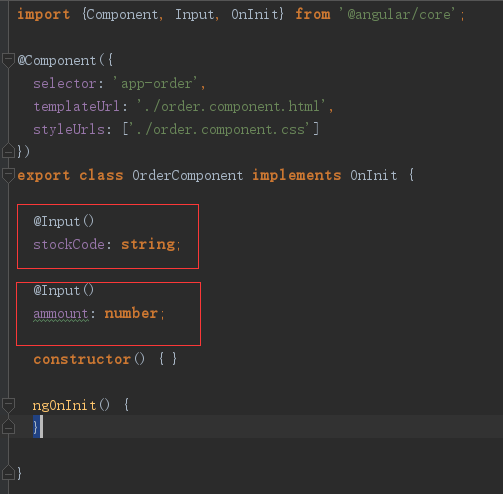
3.订单组件控制器
import {Component, Input, OnInit} from '@angular/core';

import {PriceQuote} from "../price-quote/price-quote.component";

@Component({

  selector: 'app-order',

  templateUrl: './order.component.html',

  styleUrls: ['./order.component.css']

})

export class OrderComponent implements OnInit {

  @Input()

  priceQutoe: PriceQuote;

  constructor() { }

  ngOnInit() {

  }

}
4. 订单组件html
<div>

  我下单组件

</div>

<div>

  买100手{{priceQutoe.stockCode}}股票,买入价为{{priceQutoe.lastPrice | number:'2.2-2'}}

</div>
5. 父组件的控制器
import { Component } from '@angular/core';

import {PriceQuote} from './price-quote/price-quote.component';

@Component({

  selector: 'app-root',

  templateUrl: './app.component.html',

  styleUrls: ['./app.component.css']

})

export class AppComponent {

  stock = '';

  priceQuote: PriceQuote = new PriceQuote('', 0);

  priceQutoehandler(event: PriceQuote){

    this.priceQuote = event;

  }

  buyHandler(event: PriceQuote) {

    this.priceQuote = event;

  }

}
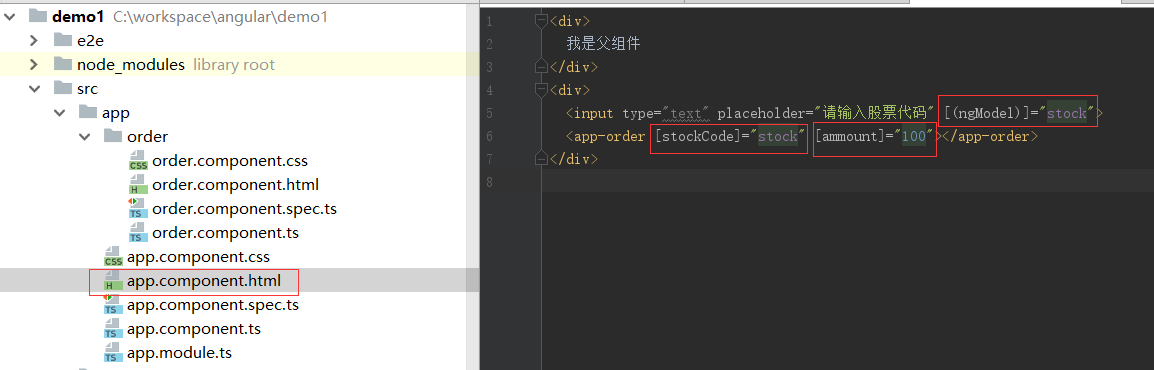
6.父组件的html
<div>

  我是父组件

</div>

<app-price-quote (buy)="buyHandler($event)"></app-price-quote>

<app-order [priceQutoe]="priceQuote"></app-order>
7.效果图
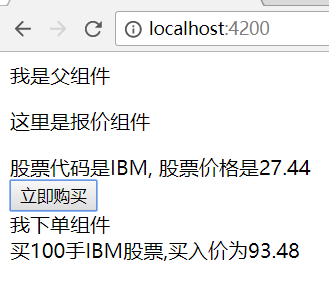
当点击“立即购买”时,显示当时的显示价格。
Angular 4 组件间的通信的更多相关文章
- angular组件间的通信(父子、不同组件的数据、方法的传递和调用)
angular组件间的通信(父子.不同组件的数据.方法的传递和调用) 一.不同组件的传值(使用服务解决) 1.创建服务组件 不同组件相互传递,使用服务组件,比较方便,简单,容易.先将公共组件写在服务的 ...
- 第四节:Vue表单标签和组件的基本用法,父子组件间的通信
vue表单标签和组件的基本用法,父子组件间的通信,直接看例子吧. <!DOCTYPE html> <html> <head> <meta charset=&q ...
- ZeroMQ(java)之I/O线程的实现与组件间的通信
算是开始读ZeroMQ(java)的代码实现了吧,现在有了一个大体的了解,看起来实现是比较的干净的,抽象什么的不算复杂... 这里先来看看它的I/O线程的实现吧,顺带看看是如何实现组件的通信的.... ...
- vuejs单一事件管理组件间的通信
<!DOCTYPE html> <html lang="en"> <head> <meta charset="UTF-8&quo ...
- React中父子组件间的通信问题
1.https://blog.csdn.net/sinat_17775997/article/details/59103173 (React中父子组件间的通信问题)
- Vue2不使用Vuex如何实现兄弟组件间的通信
在一些正规的大型项目的企业级开发过程中我们一般会引入Vuex来对Vue所有组件进行状态管理,可以轻松实现各组件间的通信.但是有时候做做自己的小项目,没有必要使用Vuex时,如何简单的实现组件间的通信? ...
- (尚033)Vue_案例_slot(组件间的通信4:slot)
1.组件间的通信4:slot(slot:插槽,就是一个占位) slot用于标签反复使用很多次 1.1理解 此方式用于父组件向子组件传递标签数据, 其他为数据通信 外面组件向里面组件传递标签进去,直接拿 ...
- 后端学 Angular 2 —— 组件间通信
1. 父组件向子组件传递信息 使用@Input 子组件的属性用 @Input 进行修饰,在父组件的模板中绑定变量 例子: import { Component, OnInit, Input } fro ...
- vue组件间的通信
组件的定义: 组件(Component)是 Vue.js 最强大的功能之一.组件可以扩展 HTML 元素,封装可重用的代码.在较高层面上,组件是自定义元素, Vue.js 的编译器为它添加特殊功能.v ...
随机推荐
- Executors类的newFixedThreadPool, newCachedThreadPool, newScheduledThreadPool
Executors 类对 ThreadPoolExecutor 的构造函数进行了封装,使用该类可方便地创建线程池. 1. newFixedThreadPool public static Execut ...
- qt +ChartDirector 绘制图表
自从开发由c#转入Qt后一直寻找一款Qt下的图形控件库,最后ChartDirector控件映入眼球.ChartDirector控件使用方便,快捷,灵活,功能强大,交互性强.在web服务器以及嵌入式应用 ...
- 关于Ubuntu 常用的简单指令
这几天工作强度不算太高,就自己学了一下linux,我就把一些简单的指令整理了一下,希望以后有参考: 我是用的VMware 安装的Ubuntu 虚拟机: 下面直接贴出我整理的简单的日常使用的指令 创建文 ...
- Spring MVC和Spring Data JPA之获取数据表数据放在List集合,显示在JSP页面
涉及到很多xml配置没写:只写具体实现的所有类 1.实体类 对应数据表SYS_SBGL, 主键是SBBM,主键是自动生成的uuid 数据表内容如下(有图有真相): package com.jinhet ...
- > ch05-01
这是<<shaders for game programmers and artists>> 第五章中第一个shader例子--RTT..一直没弄出结果,今天记下来,主要是操作 ...
- chrome安装HostAdmin app
之前在chrome应用商店搜索HostAdmin App就可以搜到,最近发现搜不到了:可以按照下面的步骤进行安装. 1.找个安装有HostAdmin App的电脑,然后在chrome的扩展程序中找到它 ...
- anu - component
import { extend, isFn, options, clearArray, noop } from "./util"; import { CurrentOwner } ...
- Ubuntu:搜狗输入法不能输入中文
搜狗输入法不能输入中文 问题描述 可以打开搜狗输入法,可以打英文,但是不能切换成中文. 其他输入法正常使用(这个可以判断是不是fcitx是不是出现错误). 有一个关于sogou的内部错误提示 解决方法 ...
- Influxdb简单实用操作
新的infludb版本已经取消了页面的访问方式,只能使用客户端来查看数据 一.influxdb与传统数据库的比较 库.表等比较: influxDB 传统数据库中的概念 database 数据库 mea ...
- 详解基本TCP套接字函数
以下讲解基本TCP套接字函数. 1.socket 函数 指定期望的通信协议类型. #include <sys/types.h> /* See NOTES */ #include ...