小峰servlet/jsp(7)jstl国际化标签库、sql标签库等
一、jstl国际化标签库:
fmt:setLocale 设定用户所在的区域;
fmt:formatDate 对日期进行格式化
fmt:requestEncoding 设置所有的请求编码;
fmt:bundle fmt:message 读取国际化资源;
fmt:formatNumber 格式化数字;
fmt:timeZone 设置临时时区
fmt:setLocale:
 <body>

 <%

     pageContext.setAttribute("date",new Date());

 %>

 中文日期:

 <fmt:setLocale value="zh_CN"/>

 <fmt:formatDate value="${date }"/>

 <hr/>

 英文日期:

 <fmt:setLocale value="en_US"/>

 <fmt:formatDate value="${date }"/>

 </body>
fmt:requestEncoding:
 <body>

 <fmt:requestEncoding value="UTF-8"/>

 </body>
fmt:bundle; fmt:message:
资源文件:
info_en_US.properties:
 name=xiaofeng

 info=Current user{0}:Welcome to use our system
info_zh_CN.properties:
 name=\u5c0f\u950b

 info=\u5f53\u524d\u7528\u6237{0}:\u6b22\u8fce\u4f7f\u7528\u672c\u7cfb\u7edf
 <body>

 <fmt:setLocale value="zh_CN"/>

 <fmt:bundle basename="info">

     <fmt:message key="name" var="userName"/>

 </fmt:bundle>

 <h2>姓名:${userName }</h2>

 <fmt:bundle basename="info">

     <fmt:message key="info" var="infomation">

         <fmt:param value="<font color='red'>小锋</font>"/>

     </fmt:message>

 </fmt:bundle>

 <h2>信息:${infomation }</h2>

 <hr/>

 <fmt:setLocale value="en_US"/>

 <fmt:bundle basename="info">

     <fmt:message key="name" var="userName"/>

 </fmt:bundle>

 <h2>姓名:${userName }</h2>

 <fmt:bundle basename="info">

     <fmt:message key="info" var="infomation">

         <fmt:param value="<font color='red'>小锋</font>"/>

     </fmt:message>

 </fmt:bundle>

 <h2>信息:${infomation }</h2>

 </body>
//<fmt:param value="<font color='red'>小锋</font>"/>是为properties中的占位符动态塞数据;
fmt:formatNumber:
 <body>

 <!-- value:数值 ;  type:数值类型;  pattern:格式 -->

 <fmt:formatNumber value="12" type="currency" pattern="$.00"/>

 <fmt:formatNumber value="12" type="currency" pattern="$.0#"/>

 <fmt:formatNumber value="1234567890" type="currency"/>

 <fmt:formatNumber value="123456.7891" pattern="#,#00.0#"/>

 </body>

fmt:formatDate:
 <body>

 <!-- value:数值 ;  type:数值类型;  pattern:格式 -->

 <%

     Date date=new Date();

     pageContext.setAttribute("date",date);

 %>

 <fmt:formatDate value="${date }" pattern="yyyy-MM-dd HH:mm:ss"/>

 <hr/>

 <fmt:formatDate value="${date }" pattern="yyyy-MM-dd"/>

 </body>
fmt:timeZone:
<body>
<!-- value:数值 ; type:数值类型; pattern:格式 -->
<%
Date date=new Date();
pageContext.setAttribute("date",date);
%>
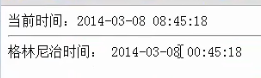
当前时间:<fmt:formatDate value="${date }" pattern="yyyy-MM-dd HH:mm:ss"/>
<hr/>
格林尼治时间:
<fmt:timeZone value="GMT">
<fmt:formatDate value="${date }" pattern="yyyy-MM-dd HH:mm:ss"/>
</fmt:timeZone>
</body>
二、jstl SQL标签库:
sql:setDataSource 设置JDBC连接;
sql:query 数据库查询操作
sql:update 数据库添加、修改、删除操作;
sql:transaction 数据库事务
sql:setDataSource/sql:query:
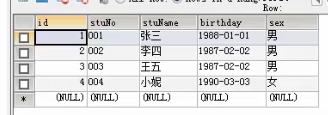
数据库中存在这样的表:t_student:
jsp页面要引入:<%@ taglib uri="http://java.sun.com/jsp/jstl/sql" prefix="sql" %>
<%@ page language="java" contentType="text/html; charset=UTF-8" pageEncoding="UTF-8"%>
<%@ taglib uri="http://java.sun.com/jsp/jstl/sql" prefix="sql" %>
<%@ taglib uri="http://java.sun.com/jsp/jstl/core" prefix="c"%>
<!DOCTYPE html PUBLIC "-//W3C//DTD HTML 4.01 Transitional//EN" "http://www.w3.org/TR/html4/loose.dtd">
<html>
<head>
<meta http-equiv="Content-Type" content="text/html; charset=UTF-8">
<title>Insert title here</title>
</head>
<body>
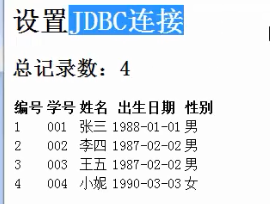
<h1>设置JDBC连接</h1>
<sql:setDataSource driver="com.mysql.jdbc.Driver" url="jdbc:mysql://localhost:3306/db_jstl" user="root" password="123456" />
<sql:query var="result">
select * from t_student;
</sql:query>
<h2>总记录数:${result.rowCount }</h2>
<table>
<tr>
<th>编号</th>
<th>学号</th>
<th>姓名</th>
<th>出生日期</th>
<th>性别</th>
</tr>
<c:forEach var="student" items="${result.rows }">
<tr>
<td>${student.id }</td>
<td>${student.stuNo }</td>
<td>${student.stuName }</td>
<td>${student.birthday }</td>
<td>${student.sex }</td>
</tr>
</c:forEach>
</table>
</body>
</html>
访问展示:
sql:update:
增:
 <body>

 <h1>设置JDBC连接</h1>

 <sql:setDataSource driver="com.mysql.jdbc.Driver" url="jdbc:mysql://localhost:3306/db_jstl" user="root" password="123456"/>

 <h1>添加数据</h1>

 <sql:update var="result" >

     insert into t_student values(null,"008","草泥马","1991-1-1","男");

 </sql:update>

 </body>
改:
 <body>

 <h1>设置JDBC连接</h1>

 <sql:setDataSource driver="com.mysql.jdbc.Driver" url="jdbc:mysql://localhost:3306/db_jstl" user="root" password="123456"/>

 <h1>修改数据</h1>

 <sql:update var="result" >

     update t_student set stuNo="010",sex="未知" where id=6

 </sql:update>

 </body>
删:
 <body>

 <h1>设置JDBC连接</h1>

 <sql:setDataSource driver="com.mysql.jdbc.Driver" url="jdbc:mysql://localhost:3306/db_jstl" user="root" password="123456"/>

 <h1>删除数据</h1>

 <sql:update var="result" >

     delete from t_student where id=6

 </sql:update>

 </body>
sql:transcation:
 <body>

 <h1>设置JDBC连接</h1>

 <sql:setDataSource driver="com.mysql.jdbc.Driver" url="jdbc:mysql://localhost:3306/db_jstl" user="root" password="123456"/>

 <h1>事务</h1>

 <sql:transaction>

     <sql:update var="result" >

         insert into t_student values(null,"008","草泥马","1991-1-1","男");

     </sql:update>

 </sql:transaction>

 </body>
三、jstl xml标签库:
x:parse 解析xml;
x:out 输出xml文件的内容
x:set 把xml读取的内容保存到指定的属性范围
x:if 判断指定路径的内容是否符合判断的条件;
x:choose/x:when/x:otherwise 多条件判断
x:forEach 遍历
需要引入xalan.jar;
jsp文件需要引入:<%@ taglib uri="http://java.sun.com/jsp/jstl/xml" prefix="x"%>
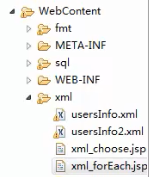
有这样两个xml文件,usersInfo.xml; usersInfo2.xml:
usersInfo.xml:
 <?xml version="1.0" encoding="UTF-8"?>

 <users>

     <user>

         <name id="n1">张三</name>

         <birthday>2011-1-1</birthday>

     </user>

 </users>
usersInfo2.xml:
 <?xml version="1.0" encoding="UTF-8"?>

 <users>

     <user>

         <name id="n1">张三</name>

         <birthday>2011-1-1</birthday>

     </user>

     <user>

         <name id="n2">王五</name>

         <birthday>2011-1-2</birthday>

     </user>

     <user>

         <name id="n3">赵六</name>

         <birthday>2011-1-3</birthday>

     </user>

 </users>
文件存放路径:
1)x:parse x:out
<%@ page language="java" contentType="text/html; charset=UTF-8" pageEncoding="UTF-8"%>
<%@ taglib uri="http://java.sun.com/jsp/jstl/core" prefix="c"%>
<%@ taglib uri="http://java.sun.com/jsp/jstl/xml" prefix="x"%>
<!DOCTYPE html PUBLIC "-//W3C//DTD HTML 4.01 Transitional//EN" "http://www.w3.org/TR/html4/loose.dtd">
<html>
<head>
<meta http-equiv="Content-Type" content="text/html; charset=UTF-8">
<title>Insert title here</title>
</head>
<body>
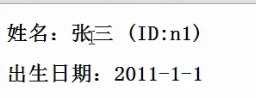
<c:import var="usersInfo" url="usersInfo.xml" charEncoding="UTF-8"/>
<x:parse var="usersInfoXml" doc="${usersInfo }"/> <h2>姓名:<x:out select="$usersInfoXml/users/user/name"/>
(ID:<x:out select="$usersInfoXml/users/user/name/@id"/>)</h2>
<h2>出生日期:<x:out select="$usersInfoXml/users/user/birthday"/></h2>
</body>
</html>
2) x:set
 <body>

 <c:import var="usersInfo" url="usersInfo.xml" charEncoding="UTF-8"/>

 <x:parse var="usersInfoXml" doc="${usersInfo }"/>

 <x:set var="userInfoXml" select="$usersInfoXml/users/user"/>

 <h2>姓名:<x:out select="$userInfoXml/name"/></h2>

 </body>
3) x:if
 <body>

 <c:import var="usersInfo" url="usersInfo.xml" charEncoding="UTF-8"/>

 <x:parse var="usersInfoXml" doc="${usersInfo }"/>

 <x:if select="$usersInfoXml/users/user/name/@id='n1'">

     <h2>有编号是n1的user信息</h2>

 </x:if>

 </body>
4) x:choose/x:when/x:otherwise
 <body>

 <c:import var="usersInfo" url="usersInfo.xml" charEncoding="UTF-8"/>

 <x:parse var="usersInfoXml" doc="${usersInfo }"/>

 <x:choose>

     <x:when select="$usersInfoXml/users/user/name/@id='n2'">

         <h2>有编号是n2的user信息</h2>

     </x:when>

     <x:otherwise>

         <h2>没有编号是n2的user信息</h2>

     </x:otherwise>

 </x:choose>

 </body>
5) x:forEach:
<body>
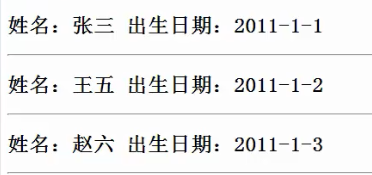
<c:import var="usersInfo" url="usersInfo2.xml" charEncoding="UTF-8"/>
<x:parse var="usersInfoXml" doc="${usersInfo }"/>
<x:forEach select="$usersInfoXml/users/user" var="userInfoXml">
<h2>姓名:<x:out select="$userInfoXml/name"/> 出生日期:<x:out select="$userInfoXml/birthday"/></h2>
<hr/>
</x:forEach>
</body>
四、jstl函数标签库:
jsp页面需要引入:
<%@ taglib uri="http://java.sun.com/jsp/jstl/functions" prefix="fn"%>
<%@ page language="java" contentType="text/html; charset=UTF-8" pageEncoding="UTF-8"%>
<%@ taglib uri="http://java.sun.com/jsp/jstl/functions" prefix="fn"%>
<!DOCTYPE html PUBLIC "-//W3C//DTD HTML 4.01 Transitional//EN" "http://www.w3.org/TR/html4/loose.dtd">
<html>
<head>
<meta http-equiv="Content-Type" content="text/html; charset=UTF-8">
<title>Insert title here</title>
</head>
<body>
<%
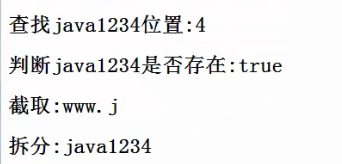
pageContext.setAttribute("info","www.java1234.com");
%>
<h2>查找java1234位置:${fn:indexOf(info,"java1234")}</h2>
<h2>判断java1234是否存在:${fn:contains(info,"java1234")}</h2>
<h2>截取:${fn:substring(info,0,5)}</h2>
<h2>拆分:${fn:split(info,".")[1]}</h2>
</body>
</html>
页面展示:
函数标签一些:
<c:if test="${fun:length(operation.rangeList) > 0}">
小峰servlet/jsp(7)jstl国际化标签库、sql标签库等的更多相关文章
- 小峰servlet/jsp(5)jsp自定义标签
一.自定义标签helloworld: 二.自定义有属性的标签: HelloWorldTag.java:继承TagSupport: package com.java1234.tag; import ja ...
- 小峰servlet/jsp(1)
一.scriptlet标签: 通过scriptlet标签我们可以可以在jsp理嵌入java代码: 第一种:<%! %> 可以在里面定义全局变量.方法.类: 第二种:<% %> ...
- 小峰servlet/jsp(6)jstl核心标签库
一.引入jstl 需要jstl.jar;standard.jar; 二.jstl核心标签库: c:out 内容输出标签; c:set 用来设置4种属性范围值的标签: c:re ...
- 小峰servlet/jsp(3)登陆功能实现
一.User模型: User.java: package com.java1234.model; public class User { private int id; private String ...
- 小峰servlet/jsp(4)EL表达式
一.EL表达式内置对象: 二.EL表达式访问4种范围属性: 寻找值的顺序: page-->request-->session-->application; 三.EL表达式接收请求参数 ...
- 小峰servlet/jsp(2)
一.jsp javaBean组件引入 <jsp:useBean id="实例化对象名称" scope="保存范围" class="类完整名称&q ...
- JSP中 JSTL和EL标签的使用
使用JSTL前的准备 想要使用JSTL,首先需要给工程导入JSTL的包(JSTL.jar和standard.jar). JSTL简介 JSP标准标签库(JSTL)是一个JSP标签集合,它封装了JSP应 ...
- Java Servlet(十):JSTL核心标签库
JSTL全名称:JaveServer Pages Standard Tag Library.JSTL是由JCP(Java Community Process)所定制的标准规范,它主要提供给Java W ...
- servlet&jsp高级:第三部分
声明:原创作品,转载时请注明文章来自SAP师太技术博客( 博/客/园www.cnblogs.com):www.cnblogs.com/jiangzhengjun,并以超链接形式标明文章原始出处,否则将 ...
随机推荐
- [转载]oracle建表语句大全
原文URL:http://blog.csdn.net/haiross/article/details/11772847 Oracle创建表语句(Create table)语法详解及示例 创建表(C ...
- myeclipse设置jvm参数的三种方式
方法一: 打开eclipse,选择Window--Preferences...在对话框左边的树上双击Java,再双击Installed JREs,在右边选择前面有对勾的JRE,再单击右边的“Edit” ...
- 玩转X-CTR100 l STM32F4 l CAN通信
我造轮子,你造车,创客一起造起来!塔克创新资讯[塔克社区 www.xtark.cn ][塔克博客 www.cnblogs.com/xtark/ ] X-CTR100控制器STM32F4处理器内置CAN ...
- C++基础:什么是命名空间
命名空间是类的逻辑分组,它组织成一个层次结构——逻辑树.这个树的根是System.名字空间是为了防止名字污染在标准C++中引入的.它可以将其中定义的名字隐藏起来,不同的名字空间中可以有相同的名字而互不 ...
- PowerShell基础
1. 一些命令像Get-SPSite有不同的参数变量.这些变量通过-?展示出来. Get-SPSite -? 2. F3 在当前行显示最近的一条命令结果 3. F7 显示之前执行过的命令列表 4. 显 ...
- try catch finally return运行顺序
首先让我们搞懂两组概念:try catch finally和return 1.try catch finally 首先说try catch, (1)try语句 ,try语句用来包围可能出现异常的代码片 ...
- 【linux】如何退出shell终端
退出shell终端: exit + 回车即可 清除当前屏幕信息 clear 不过clear只是将之前的命令向上隐藏啦...
- iPhone/iPad被停用怎么办 3招轻松解锁
家中小孩玩电脑游戏,自己拿了iPad,随便输入密码,结果造成平板电脑无法使用,相信这是许多家长都将面对或是早已发生的事情.本文整理当iPhone或是iPad被停用时的处理方法. iPhone被停用 为 ...
- HDU - 6311:Cover(欧拉回路,最少的一笔画覆盖无向图)
The Wall has down and the King in the north has to send his soldiers to sentinel. The North can be r ...
- MVC 模型 视图, 控制器 写 三级联动
<!DOCTYPE html><html> <head> <meta charset="UTF-8"> <title>& ...