【第四章】 springboot + swagger
注:本文参考自
http://www.jianshu.com/p/0465a2b837d2
swagger用于定义API文档。
好处:
- 前后端分离开发
- API文档非常明确
- 测试的时候不需要再使用URL输入浏览器的方式来访问Controller
- 传统的输入URL的测试方式对于post请求的传参比较麻烦(当然,可以使用postman这样的浏览器插件)
- spring-boot与swagger的集成简单的一逼
1、项目结构
和上一节一样,没有改变。
2、pom.xml
引入了两个jar。
<dependency>
           <groupId>io.springfox</groupId>
           <artifactId>springfox-swagger2</artifactId>
           <version>2.2.2</version>
        </dependency>
        <dependency>
           <groupId>io.springfox</groupId>
           <artifactId>springfox-swagger-ui</artifactId>
           <version>2.2.2</version>
        </dependency>
3、Application.java
package com.xxx.firstboot;

import org.springframework.boot.SpringApplication;
import org.springframework.boot.autoconfigure.SpringBootApplication;

import springfox.documentation.swagger2.annotations.EnableSwagger2;

@SpringBootApplication        //same as @Configuration+@EnableAutoConfiguration+@ComponentScan
@EnableSwagger2             //启动swagger注解
public class Application {

    public static void main(String[] args) {
        SpringApplication.run(Application.class, args);
    }

}
说明:
- 引入了一个注解@EnableSwagger2来启动swagger注解。(启动该注解使得用在controller中的swagger注解生效,覆盖的范围由@ComponentScan的配置来指定,这里默认指定为根路径"com.xxx.firstboot"下的所有controller)
4、UserController.java
package com.xxx.firstboot.web;

import org.springframework.beans.factory.annotation.Autowired;
import org.springframework.web.bind.annotation.RequestHeader;
import org.springframework.web.bind.annotation.RequestMapping;
import org.springframework.web.bind.annotation.RequestMethod;
import org.springframework.web.bind.annotation.RequestParam;
import org.springframework.web.bind.annotation.RestController;

import com.xxx.firstboot.domain.User;
import com.xxx.firstboot.service.UserService;

import io.swagger.annotations.Api;
import io.swagger.annotations.ApiImplicitParam;
import io.swagger.annotations.ApiImplicitParams;
import io.swagger.annotations.ApiOperation;
import io.swagger.annotations.ApiResponse;
import io.swagger.annotations.ApiResponses;

@RestController
@RequestMapping("/user")
@Api("userController相关api")
public class UserController {

    @Autowired
    private UserService userService;

//    @Autowired
//    private MyRedisTemplate myRedisTemplate;

    @ApiOperation("获取用户信息")
    @ApiImplicitParams({
        @ApiImplicitParam(paramType="header",name="username",dataType="String",required=true,value="用户的姓名",defaultValue="zhaojigang"),
        @ApiImplicitParam(paramType="query",name="password",dataType="String",required=true,value="用户的密码",defaultValue="wangna")
    })
    @ApiResponses({
        @ApiResponse(code=400,message="请求参数没填好"),
        @ApiResponse(code=404,message="请求路径没有或页面跳转路径不对")
    })
    @RequestMapping(value="/getUser",method=RequestMethod.GET)
    public User getUser(@RequestHeader("username") String username, @RequestParam("password") String password) {
        return userService.getUser(username,password);
    }

//    @RequestMapping("/testJedisCluster")
//    public User testJedisCluster(@RequestParam("username") String username){
//        String value =  myRedisTemplate.get(MyConstants.USER_FORWARD_CACHE_PREFIX, username);
//        if(StringUtils.isBlank(value)){
//            myRedisTemplate.set(MyConstants.USER_FORWARD_CACHE_PREFIX, username, JSON.toJSONString(getUser()));
//            return null;
//        }
//        return JSON.parseObject(value, User.class);
//    }

}
说明:
- @Api:用在类上,说明该类的作用
- @ApiOperation:用在方法上,说明方法的作用
- @ApiImplicitParams:用在方法上包含一组参数说明
- @ApiImplicitParam:用在@ApiImplicitParams注解中,指定一个请求参数的各个方面
- paramType:参数放在哪个地方
- header-->请求参数的获取:@RequestHeader
- query-->请求参数的获取:@RequestParam
- path(用于restful接口)-->请求参数的获取:@PathVariable
- body(不常用)
- form(不常用)
- name:参数名
- dataType:参数类型
- required:参数是否必须传
- value:参数的意思
- defaultValue:参数的默认值
- paramType:参数放在哪个地方
- @ApiResponses:用于表示一组响应
- @ApiResponse:用在@ApiResponses中,一般用于表达一个错误的响应信息
- code:数字,例如400
- message:信息,例如"请求参数没填好"
- response:抛出异常的类
- @ApiModel:描述一个Model的信息(这种一般用在post创建的时候,使用@RequestBody这样的场景,请求参数无法使用@ApiImplicitParam注解进行描述的时候)
- @ApiModelProperty:描述一个model的属性
以上这些就是最常用的几个注解了。
需要注意的是:
- ApiImplicitParam这个注解不只是注解,还会影响运行期的程序,例子如下:

如果ApiImplicitParam中的phone的paramType是query的话,是无法注入到rest路径中的,而且如果是path的话,是不需要配置ApiImplicitParam的,即使配置了,其中的value="手机号"也不会在swagger-ui展示出来。
具体其他的注解,查看:
https://github.com/swagger-api/swagger-core/wiki/Annotations#apimodel
测试:
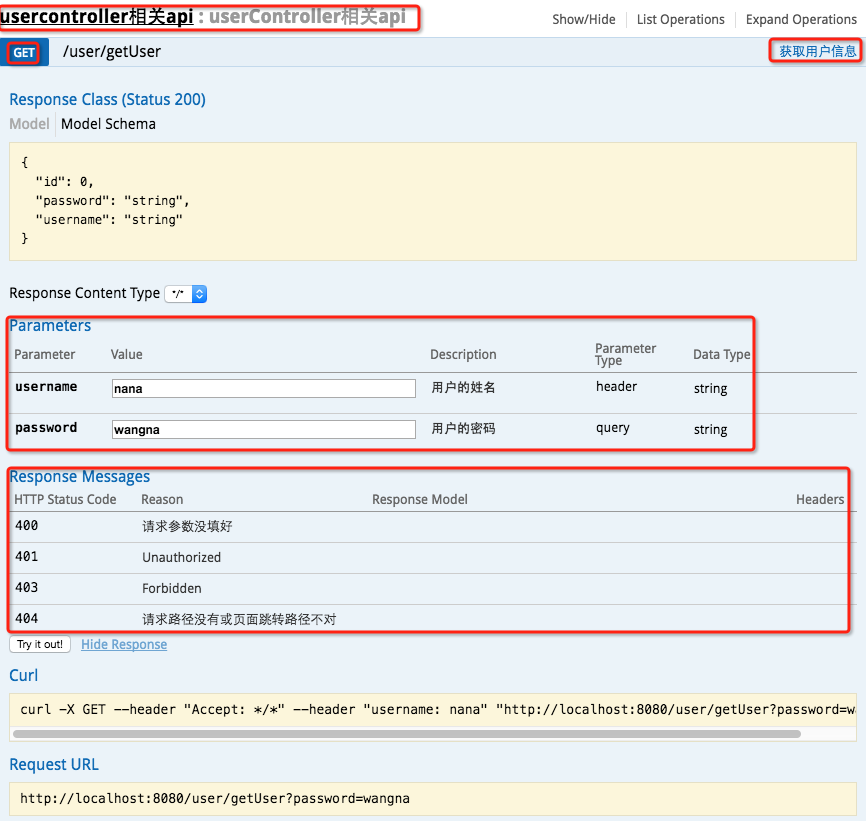
启动服务,浏览器输入"http://localhost:8080/swagger-ui.html"

最上边一个红框:@Api
GET红框:method=RequestMethod.GET
右边红框:@ApiOperation
parameter红框:@ApiImplicitParams系列注解
response messages红框:@ApiResponses系列注解
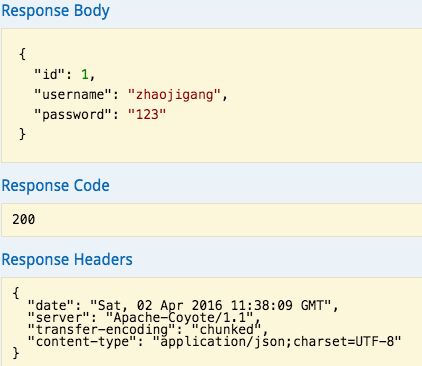
输入参数后,点击"try it out!",查看响应内容:

【第四章】 springboot + swagger的更多相关文章
- 第四章 springboot + swagger(转载)
此篇博客转发自:http://www.cnblogs.com/java-zhao/p/5348113.html swagger用于定义API文档. 好处: 前后端分离开发 API文档非常明确 测试的时 ...
- 第四章 springboot + swagger
http://www.cnblogs.com/java-zhao/p/5348113.html
- 第二十四章 springboot注入servlet
问:有了springMVC,为什么还要用servlet?有了servlet3的注解,为什么还要使用ServletRegistrationBean注入的方式? 使用场景:在有些场景下,比如我们要使用hy ...
- 第十四章 springboot + profile(不同环境读取不同配置)
具体做法: 不同环境的配置设置一个配置文件,例如:dev环境下的配置配置在application-dev.properties中:prod环境下的配置配置在application-prod.prope ...
- 第二十五章 springboot + hystrixdashboard
注意: hystrix基本使用:第十九章 springboot + hystrix(1) hystrix计数原理:附6 hystrix metrics and monitor 一.hystrixdas ...
- 第十六章 springboot + OKhttp + String.format
模拟浏览器向服务器发送请求四种方式: jdk原生的Http包下的一些类 httpclient(比较原始,不怎么用了):第一章 HttpClient的使用 Okhttp(好用,推荐) retrofit( ...
- 第十二章 springboot + mongodb(复杂查询)
简单查询:使用自定义的XxxRepository接口即可.(见 第十一章 springboot + mongodb(简单查询)) 复杂查询:使用MongoTemplate以及一些查询条件构建类(Bas ...
- springboot+swagger接口文档企业实践(下)
目录 1.引言 2. swagger接口过滤 2.1 按包过滤(package) 2.2 按类注解过滤 2.3 按方法注解过滤 2.4 按分组过滤 2.4.1 定义注解ApiVersion 2.4.2 ...
- springboot+swagger接口文档企业实践(上)
目录 1.引言 2.swagger简介 2.1 swagger 介绍 2.2 springfox.swagger与springboot 3. 使用springboot+swagger构建接口文档 3. ...
- 第四章 Sentinel--服务容错
我们接着承接上篇继续讲下去 : 第三章 Nacos Discovery–服务治理,开始第四篇的学习 第四章 Sentinel–服务容错 4.1 高并发带来的问题 在微服务架构中,我们将业务拆分成一个个 ...
随机推荐
- 第五课 JAVA反射获取对象属性和方法
package com.hero; import java.lang.reflect.Field; public class TestReflction5 { public static void m ...
- SQL SERVER 事务执行情况跟踪分析
[sql] view plain copy ---查看现在所有的事务 select '正在运行事务的会话的 ID'=session_id, --session_id与transaction_id的对应 ...
- 仿照hibernate封装的一个对数据库操作的jdbc工具类
package project02_Order_management.util; import java.io.IOException; import java.lang.reflect.Field; ...
- Python绘图工具matplotlib的使用(图形并茂)
matplotlib官网文档: http://matplotlib.org/gallery.html 支持win7_64_bit的matplotlib库下载网址: http://www.lfd.uci ...
- vue-watch
<template> <div> <!-- 监听值的改变: --> <button class="th" @click="add ...
- SeaJS 与 RequireJS 的差异对比
这篇文章主要介绍了SeaJS 与 RequireJS 的差异对比,本文主要对CMD规范和AMD规范的弊端做了对比,并做出了一个总结,需要的朋友可以参考下 “历史不是过去,历史正在上演.随着 W3C 等 ...
- Linux中Readlink命令
原文地址:http://blog.csdn.net/liangxiaozhang/article/details/7356829 readlink是Linux系统中一个常用工具,主要用来找出符号链接所 ...
- [LeetCode] 225. Implement Stack using Queues_Easy tag: Design
Implement the following operations of a stack using queues. push(x) -- Push element x onto stack. po ...
- 自动生产jason的工具
EnjoySR/ESJsonFormat-Xcode
- Python做接口自动化测试框架
框架结构如下: Test_Api_Project||---base.py|---base_api| |---register_api.py | |---send_sms_code_api.py|--- ...
