C扩展 C++回顾到入门
引言
C扩展也称C++, 是一个复(za)杂(ji)优(ken)秀(die)的语言. 本文通过开发中常用C++方式
来了解和回顾C++这么语言. C++看了较多的书但还是觉得什么都不会. 只能说自己还付出太少,哎.
在引言部分我们先感受C++类的设计.
有个如下需求, 设计一个简单的日志系统. 先看下面 LogSimple.hpp
#ifndef _HPP_LOGSIMPLE

#define _HPP_LOGSIMPLE

#include <iostream>

using namespace std;

// 特殊技巧构建类构造器

class LogInit {

    // 设置LogSimple为友员, 可以访问当前私有属性

    friend class LogSimple;

    // _log写普通文件, _wf写级别高的文件

    static FILE* _log;

    static FILE* _wf;

    // 私有的构造器, 证明这个类是私有类

    LogInit() {

        const char* log = "rpc.log";

        const char* wf = "rpc.log.wf";

        _log = fopen(log, "ab");

        if (NULL == _log) {

            fprintf(stderr, "fopen is error : %s\n", log);

            exit(EXIT_FAILURE);

        }

        _wf = fopen(wf, "ab");

        if (NULL == _wf) {

            fclose(_log);

            fprintf(stderr, "fopen is error : %s\n", wf);

            exit(EXIT_FAILURE);

        }

    }

    // 析构打开的句柄

    ~LogInit() {

        fclose(_wf);

        fclose(_log);

    }

};

// 定义静态变量

FILE* LogInit::_log = NULL;

FILE* LogInit::_wf = NULL;

// 基础的日志系统

class LogSimple {

protected:

    // 只能在当前类和继承类中使用的单例对象, 这个只是声明

    static LogInit _li;

protected:

    // 打印普通信息

    void LogWrite(string msg) {

        fprintf(LogSimple::_li._log, msg.c_str());

    }

    // 打印等级高信息

    void WfWrite(string msg) {

        fprintf(LogSimple::_li._wf, msg.c_str());

    }

public:

    virtual void Log(string msg) = ;

};

// 定义在 LogSimple 中声明的静态量

LogInit LogSimple::_li;

// Debug 模式日志

class LogDebug : public LogSimple {

public:

    // 重写Log输出内容

    void Log(string msg) {

#if defined(_DEBUG)

        this->LogWrite(msg);

#endif

    }

};

// Debug 模式日志

class LogFatal : public LogSimple {

public:

    // 重写Log输出内容

    void Log(string msg) {

        this->LogWrite(msg);

        this->WfWrite(msg);

    }

};

#endif // !_HPP_LOGSIMPLE
这里使用了 *.hpp 文件,也称C++的充血模型. 当使用 hpp头文件时候表示当前代码是开源的, 头文件和实现都在一起.
并且不使用全局变量和全局函数.
还有这段代码
    // 设置LogSimple为友员, 可以访问当前私有属性

    friend class LogSimple;

......

    // 只能在当前类和继承类中使用的单例对象, 这个只是声明

    static LogInit _li;
是构建上层语言的 类的构造器. "只会在第一次使用这个类的时候构建这个对象". C++中通过技巧能够完成一切, 是一个强调技巧,强混乱约束的语言.
测试代码如下 main.cpp
#include "LogSimple.hpp"

/*

 * 主函数, 测试简单的日志系统

 * 快速熟悉C++类的使用方法.

 */

int main(void) {

    LogSimple *log;

    LogDebug debug;

    LogFatal fatal;

    // 简单测试

    log = &debug;

    log->Log("debug 日志测试!\n");

    log = &fatal;

    log->Log("fatal 日志测试\n");

    // 测试完毕

    puts("测试完毕!");

    system("pause");

    return ;

}
运行结果

生成日志文件图

再扯一点, C++类中静态变量, 分两步构造,先在类中声明, 再在外面定义分配实际空间. 好,这里关于C++的类回顾完毕.
前言
前言部分回顾一下C++中模板用法.
开始先回顾了解函数模板, 看下面测试文件 main.cpp
#include <iostream> using namespace std; /*
* 快速排序递归核心, 当前是从小到大排序
*/
template <typename T> static void
_sortquick(T a[], int si, int ei) {
// 递归结束条件
if (si >= ei) return; int low = si, high = ei;
T axle = a[low];
while (low < high) {
// 找最右边不合适点
while (low < high && a[high] > axle)
--high;
if (low >= high) break;
a[low++] = a[high]; //找最左边不合适点
while (low < high && a[low] < axle)
++low;
if (low >= high) break;
a[high--] = a[low];
}
// 分界点找好了, 归位 此时low == high
a[low] = axle; //新一轮递归
_sortquick(a, si, low - );
_sortquick(a, high + , ei);
} // 包装对外使用的快排接口
template<typename T> inline void
sortquick(T a[], int len) {
_sortquick(a, , len - );
} /*
* 这里温故函数模板,以快速排序为例
*/
int main(void) {
// 开始测试, 模板函数
int a[] = {, , , , , , , , , , }; // 开始调用测试 是 sortquick<int> 自动推导
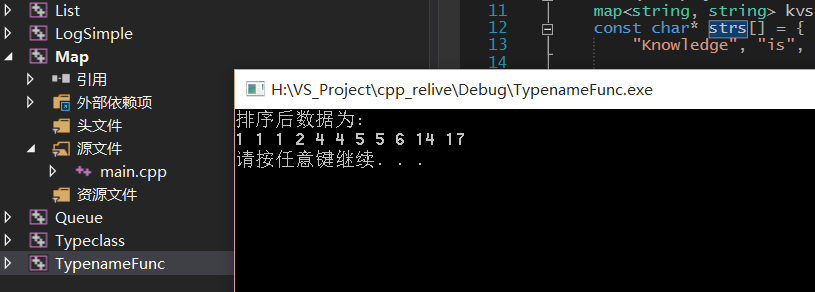
sortquick(a, sizeof(a) / sizeof(*a)); puts("排序后数据为:");
for (int i = ; i < sizeof(a) / sizeof(*a); ++i)
printf("%d ", a[i]);
putchar('\n'); system("pause");
return ;
}
通过 template<typename T> 构建一个模板的快排函数. 测试结果如下
再来回顾一下 模板类用法 我们构建一个 简单的 智能指针类 AutoPtr.hpp
#ifndef _HPP_AUTOPTR

#define _HPP_AUTOPTR

#include <cstring>

#include <cstdlib>

/**

 *简单的智能指针,支持创建基本类型 基本类型数组

 *支持智能管理对象类型,对象数组类型

 *不允许赋值构造,复制构造,不允许new创建

 */

template<typename T> class AutoPtr {

    T *_ptr;

    unsigned _len;

    AutoPtr<T>(const AutoPtr<T> &autoPtr);

    AutoPtr<T> &operator=(const AutoPtr<T> &autoPtr);

    void *operator new(unsigned s);

public:

    AutoPtr(unsigned len = 1U)

    {

        this->_len = len;

        this->_ptr = !len ? NULL : (T*)calloc(len, sizeof(T));

    }

    ~AutoPtr(void)

    {

        for (unsigned u = this->_len; u > 0U; --u)

            this->_ptr[u - ].~T();//delete的本质

        free(this->_ptr);

    }

    inline T& operator*(void) const

    {

        return *this->_ptr;

    }

    inline T* operator->(void) const

    {

        return this->_ptr;

    }

    inline T& operator[](unsigned idx) const

    {

        return this->_ptr[idx];

    }

    inline T* operator+(unsigned idx) const

    {

        return this->_ptr + idx;

    }

    //获取智能托管资源的长度,在数组中有用

    inline unsigned size(void)

    {

        return this->_len;

    }

};

#endif // !_HPP_AUTOPTR
测试代码如下 main.cpp
#include <iostream>

#include "AutoPtr.hpp"

using namespace std;

struct abx {

    int a;

    float b;

    char *c;

};

/*

 *  这里将处理 泛型类的使用讲解

 * 泛型还是在开发中少用.这里只是初级熟悉篇.

 */

int main(void) {

    // 先使用基础的用法

    AutoPtr<int> iptr;

    *iptr = ;

    printf("*iptr = %d\n", *iptr);

    // 使用 数组类型

    AutoPtr<abx> abs();

    printf("abs[6].c = %s\n", abs[].c);

    system("pause");

    return ;

}
演示结果

通过上面两个例子, 练习一下基本熟悉泛型语法简易用法了.高级的用法, 那还得春夏秋冬......
正文
这里简单讲解STL中开发中用到的容器类.使用一些简单例子,方便上手使用.
先看list 链表使用案子
同样通过代码开始 main.cpp, 通过list处理随机业务.
#include <iostream>
#include <cassert>
#include <ctime>
#include <list> using namespace std; /*
* 主函数 - 熟悉STL list 用法
* 业务需求如下:
* 有一堆这样数据
* 标识 权重
* 1 100
* 2 200
* 3 100
* ... ...
* 需要随机出一个数据.
*/ class RandGoods {
list<int> idxs; //存所有索引的
list<int> weights; //存所有权重的
int sum; //计算总的权重和
public:
RandGoods(void) {
this->sum = ;
// 初始化随机种子
srand((unsigned)time(NULL));
} /*
* 添加数据
*/
void Add(int idx, int weidth) {
// 简单检测一下参数
assert(idx>= && weidth > ); this->idxs.push_front(idx);
this->weights.push_front(weidth);
this->sum += weidth;
} // 得到一个随机数据
int Get(void) {
int ns = ;
int rd = rand() % sum;
int len = this->weights.size();
list<int>::iterator it = this->idxs.begin();
list<int>::iterator wt = this->weights.begin(); while (wt != this->weights.end()) {
ns += *wt;
if (ns > rd)
return *it;
++it;
++wt;
} return -;
} // 输出所有数据
void Print(void) {
list<int>::iterator it = this->idxs.begin();
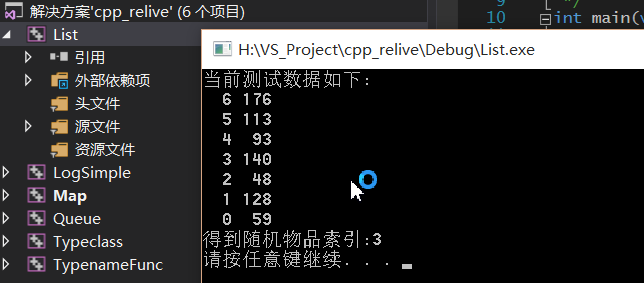
list<int>::iterator wt = this->weights.begin(); puts("当前测试数据如下:");
while (wt != this->weights.end()) {
printf("%3d %3d\n", *it, *wt);
++it;
++wt;
}
}
}; /*
* 温故 list用法, C++ STL 没有上层语言封装的好用
*/
int main(void) {
// 随机对象
RandGoods rg;
int len = rand() % + ; // 返回是 [5, 24] //添加数据
for (int i = ; i < len; ++i) {
int weight = rand() % + ;
rg.Add(i, weight);
} // 这里测试 得到数据
rg.Print(); // 得到一个数据
int idx = rg.Get(); printf("得到随机物品索引:%d\n", idx); system("pause");
return ;
}
对于STL 库有很多功能, 这里就是最简单的使用方式. 工作中需要用到高级的用法, 可以及时查. 关键是有思路.
演示结果
C++ 的list 没有 java和C#的List好用. 差距太大. 或者说STL相比上层语言提供的容器, 显得不那么自然. 估计是C++是开创者,
后面的语言知道坑在那, 简化创新了. 也可以用vector可变数组代替list. 如果在C中直接用语法层提供的可变数组 int max = 10; int a[max];
在栈上声明可变数组就可以了.
再看queue 队列使用方式
关于stl 容器用法都是比较基础例子, 重点能用, 高级的需要看专门介绍的书籍. 关于队列底层库中常用. 和多线程一起配合.
流程很绕, 这里简单写个容易的例子如下main.cpp
#include <iostream>

#include <queue>

using namespace std;

/*

 * 这里使用 queue队列, 简单使用了解

 * 最简单的生产后, 直接消耗

 */

int main(void) {

    queue<double> qds;

    int i, len = rand() %  + ;

    double c;

    int a, b;

    puts("生产的数据如下:");

    // 先生产 队列是尾巴插, 头出来

    for (i = ; i < len; ++i) {

        a = rand();

        b = rand();

        if (a >= b)

            c = a + 1.0 * b / a;

        else

            c = (double)-b - 1.0 * a / b;

        // 队列中添加数据

        printf("%f ", c);

        qds.push(c);

    }

    puts("\n释放的数据如下:");

    while (!qds.empty()) {

        c = qds.front();

        printf("%f ", c);

        qds.pop();

    }

    putchar('\n');

    system("pause");

    return ;

}
运行截图如下
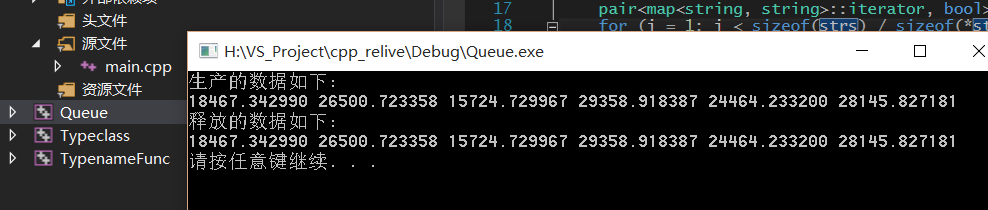
注意的是C++队列是尾查头出.
后看map 键值对使用例子
先看 main.cpp
#include <iostream>
#include <map>
#include <string> using namespace std; /*
* 这里是使用 map. 简单的熟悉map的使用方法
*/
int main(void) {
map<string, string> kvs;
const char* strs[] = { "Sweet", "are", "the", "uses", "of", "adversity",
"Knowledge", "is", "one", "thing", "but", "faith", "is", "another" }; // 先添加数据
int i;
pair<map<string, string>::iterator, bool> pit;
for (i = ; i < sizeof(strs) / sizeof(*strs); ++i) {
pit = kvs.insert(pair<string, string>(strs[i - ], strs[i]));
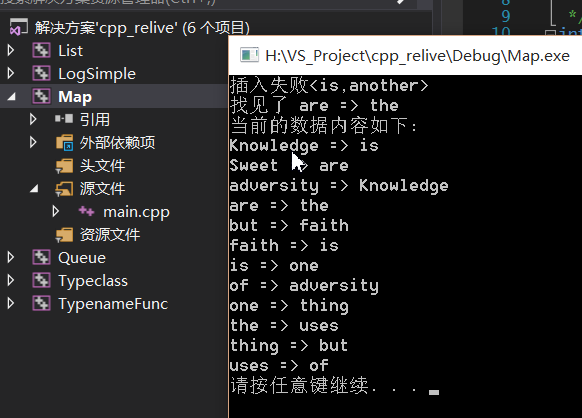
if (!pit.second) {
printf("插入失败<%s,%s>\n", strs[i-], strs[i]);
}
} // 这里开始查找处理
map<string, string>::iterator it = kvs.find("are");
if (it != kvs.end())
printf("找见了 %s => %s\n", it->first.c_str(), it->second.c_str());
else
printf("没有找见 are => NULL\n"); // 全局输出
puts("当前的数据内容如下:");
for (it = kvs.begin(); it != kvs.end(); ++it) {
printf("%s => %s\n", it->first.c_str(), it->second.c_str());
} system("pause");
return ;
}
运行结果
到这里基本上C++ 语言中常用的语法规则, 基本都回顾熟悉完毕了. 后面随着开发, 慢慢了解突破. 最快的熟悉手段还是大量看专业书籍和敲代码.
后记
错误是难免, 这里纯属回顾C++基础语法. 有问题随时交流, 接受任何C++高玩的批评. 拜~~
C扩展 C++回顾到入门的更多相关文章
- [.NET] C# 知识回顾 - 事件入门
C# 知识回顾 - 事件入门 [博主]反骨仔 [原文]http://www.cnblogs.com/liqingwen/p/6057301.html 序 之前通过<C# 知识回顾 - 委托 de ...
- 8、web入门回顾/ Http
1 web入门回顾 web入门 1)web服务软件作用: 把本地资源共享给外部访问 2)tomcat服务器基本操作 : 启动: %tomcat%/bin/startup.bat 关闭: % ...
- [.NET] C# 知识回顾 - Event 事件
C# 知识回顾 - Event 事件 [博主]反骨仔 [原文]http://www.cnblogs.com/liqingwen/p/6060297.html 序 昨天,通过<C# 知识回顾 - ...
- Batch入门教程丨第二章:认识变量相关概念
在前两期的学习内容中,我们已经了解了Batch入门教程有关的知识和编程方法,如何编写和运行Windows Batch程序,脚本语言的入门方式等,今天我们将继续深入学习Batch入门教程之认识变量相关概 ...
- Batch入门教程丨第一章:部署与Hello World!(下)
在上期分享的内容中,我们已经掌握了基础理论知识,今天我们将继续了解和学习与Windows Batch有关的知识和编程方法,如何编写和运行Windows Batch程序,脚本语言的入门方式等,从而能够更 ...
- [C#] C# 基础回顾 - 匿名方法
C# 基础回顾 - 匿名方法 目录 简介 匿名方法的参数使用范围 委托示例 简介 在 C# 2.0 之前的版本中,我们创建委托的唯一形式 -- 命名方法. 而 C# 2.0 -- 引进了匿名方法,在 ...
- [C#] C# 知识回顾 - 你真的懂异常(Exception)吗?
你真的懂异常(Exception)吗? 目录 异常介绍 异常的特点 怎样使用异常 处理异常的 try-catch-finally 捕获异常的 Catch 块 释放资源的 Finally 块 一.异常介 ...
- [C#] C# 知识回顾 - 学会处理异常
学会处理异常 你可以使用 try 块来对你觉得可能会出现异常的代码进行分区. 其中,与之关联的 catch 块可用于处理任何异常情况. 一个包含代码的 finally 块,无论 try 块中是否在运行 ...
- [C#] C# 知识回顾 - 学会使用异常
学会使用异常 在 C# 中,程序中在运行时出现的错误,会不断在程序中进行传播,这种机制称为“异常”. 异常通常由错误的代码引发,并由能够更正错误的代码进行 catch. 异常可由 .NET 的 CLR ...
随机推荐
- TesCase-GUI(图形用户界面)测试
GUI测试是功能测试的一种表现形式.不仅要考虑GUI本身的测试,也要考虑GUI所表现的系统功能的测试. GUI应具有的要素 1.符合标准和规范 2.直观性 (1)用户界面是否洁净.不唐突.不拥挤? ...
- Deviceone:站在移动互联时代的十字路口上
最近总能看到类似“App已死,服务永生”.“App必死,web永生” .“App已死,微信建站已生”这样的文章.不晓得这些网络写手到底是想代表某些公司的立场.还是想要表达怎么样的一个情结,文章中语气都 ...
- Django中级篇之Model专题
ORM 就是用面向对象的方式去操作数据库的创建表以及增删改查等操作 到目前为止,当我们的程序涉及到数据库相关操作时,我们一般都会这么搞: 创建数据库,设计表结构和字段 使用 MySQLdb 来连接数据 ...
- 洛谷P1211 [USACO1.3]牛式 Prime Cryptarithm
P1211 [USACO1.3]牛式 Prime Cryptarithm 187通过 234提交 题目提供者该用户不存在 标签USACO 难度普及- 提交 讨论 题解 最新讨论 题面错误 题目描述 ...
- 洛谷P2320 鬼谷子的钱袋
P2320 06湖南 鬼谷子的钱袋 171通过 480提交 题目提供者xmyzwls 标签各省省选 难度普及+/提高 提交该题 讨论 题解 记录 最新讨论 题目有误 数据需要特判 评测系统太神了 题目 ...
- XML Namespace 命名空间
根据 Namespaces in XML W3C 推荐标准的定义,XML 命名空间 是由国际化资源标识符 (IRI) 标识的 XML 元素和属性集合:该集合通常称作 XML“词汇”. 定义 XML 命 ...
- javascript代码复用模式
代码复用有一个著名的原则,是GoF提出的:优先使用对象组合,而不是类继承.在javascript中,并没有类的概念,所以代码的复用,也并不局限于类式继承.javascript中创建对象的方法很多,有构 ...
- 图说苹果工作站-MAC PRO
图说苹果工作站-MACPRO MacPro是苹果电脑公司(Apple)推出的高阶桌上型电脑(上一代产品叫做PowerMacG5),搭载英特尔(Intel)"Xeon"微处理器以及& ...
- ln: creating hard link 问题
其实很简单: chattr -R -i xxxxx #xxxxx为你需要修改的文件,这样就可以了... 下面全不是重点,扯淡.... ln: creating hard link ...
- Linux之磁盘管理
本章重点提示: 1):理解基础命令,df,fdisk. 2):磁盘分区的理论基础. 1:查看当前系统分区与挂载情况: [root@localhost ~]# df Filesystem 1K-bloc ...