
OpenCASCADE Make Primitives-Box
OpenCASCADE Make Primitives-Box
Abstract. By making a simple box to demonstrate the BRep data structure of the OpenCASCADE. The construction method is different from BRepPrimAPI_MakeBox. In the paper construct the box from vertex, edge to solid, while in BRepPrimAPI_MakeBox from solid, shell to vertex. From the construction, the BRep data structure in OpenCASCADE also can be called the Winged-Edge data structure.
Key Words. OpenCASCADE, BRep, Box, The Winged-Edge Structure
1. Introduction
OpenCASCADE的Toolit TKPrim中提供了基本图元的创建功能,像Box, Cylinder, Sphere等等。直接使用Package BRepPrimAPI中的功能,可以方便地创建出基本图元,而不用关心其内部的数据结构。
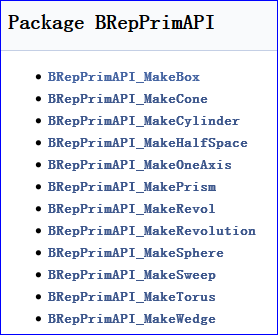
Figure 1. BRepPrimAPI Package classes
为 了理解ModelingData模块中OpenCASCADE的边界表示法BRep数据结构,决定参考其实现,自己来创建出基本图元,进而理解其中的 BRep数据结构。本文以最简单的长方体Box入手,从点、边到体的创建出一个形状。并将构造的形状在Draw Test Harness中进行显示,且进行布尔运算,来验证构造结果的正确性。
2.Make a Face of the Box
在OpenCASCADE的包BRepPrim中,构造长方体的方式是形状的根结点出发到叶子结点,即从Shell到Face到Wire最后到Vertex,如下图所示:
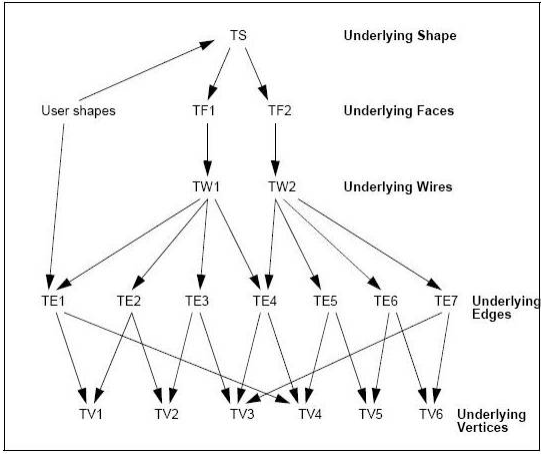
Figure 2.1 Data structure of a Shape
为了程序演示的清晰,本文中采用与OpenCASCADE中相反的方式,即先从叶子结点出发,逐步回到根结点,即先构造出顶点、边最后到实体。长方体由六个面构成,所以先从一个面开始来构造。将一个面构造成功后,其他六个面的构造方法就相同了。
构造使用了BRep_Builder,在创建相应的拓朴的同时可以将其相关的几何信息设置进去。如创建顶点Vertex时,可以将点的坐标信息及容差值设置进去,代码如下所示:
BRep_Builder aBuilder;

// make vertex of the box.

aBuilder.MakeVertex(aVertices[], aPoints[], Precision::Confusion());

aBuilder.MakeVertex(aVertices[], aPoints[], Precision::Confusion());

aBuilder.MakeVertex(aVertices[], aPoints[], Precision::Confusion());

aBuilder.MakeVertex(aVertices[], aPoints[], Precision::Confusion());

aBuilder.MakeVertex(aVertices[], aPoints[], Precision::Confusion());

aBuilder.MakeVertex(aVertices[], aPoints[], Precision::Confusion());

aBuilder.MakeVertex(aVertices[], aPoints[], Precision::Confusion());

aBuilder.MakeVertex(aVertices[], aPoints[], Precision::Confusion());
创建边的同时,将其边中的三维曲线信息也设置进去,代码如下所示:
// make edges of the box.

aBuilder.MakeEdge(aEdges[], new Geom_Line(aLines[]), Precision::Confusion());

aBuilder.MakeEdge(aEdges[], new Geom_Line(aLines[]), Precision::Confusion());

aBuilder.MakeEdge(aEdges[], new Geom_Line(aLines[]), Precision::Confusion());

aBuilder.MakeEdge(aEdges[], new Geom_Line(aLines[]), Precision::Confusion());

aBuilder.MakeEdge(aEdges[], new Geom_Line(aLines[]), Precision::Confusion());

aBuilder.MakeEdge(aEdges[], new Geom_Line(aLines[]), Precision::Confusion());

aBuilder.MakeEdge(aEdges[], new Geom_Line(aLines[]), Precision::Confusion());

aBuilder.MakeEdge(aEdges[], new Geom_Line(aLines[]), Precision::Confusion());

aBuilder.MakeEdge(aEdges[], new Geom_Line(aLines[]), Precision::Confusion());

aBuilder.MakeEdge(aEdges[], new Geom_Line(aLines[]), Precision::Confusion());

aBuilder.MakeEdge(aEdges[],new Geom_Line(aLines[]),Precision::Confusion());

aBuilder.MakeEdge(aEdges[],new Geom_Line(aLines[]),Precision::Confusion());
创建的边Edge还需要与顶点Vertex关联上,且需要注意顶点的反向,示例代码如下所示:
// set the vertex info of the edges.

// edge 0:

{

    TopoDS_Vertex V1 = aVertices[];

    TopoDS_Vertex V2 = aVertices[];

    V2.Reverse();

    aBuilder.Add(aEdges[], V1);

    aBuilder.Add(aEdges[], V2);

  aBuilder.UpdateVertex(V1, ElCLib::Parameter(aLines[], aPoints[]),

      aEdges[], Precision::Confusion());

  aBuilder.UpdateVertex(V2, ElCLib::Parameter(aLines[], aPoints[]),

      aEdges[], Precision::Confusion());

    BRepTools::Update(aEdges[]);

}
接着创建Wire,创建Wire时需要注意边的反向,从而构造成一个闭合的Wire,代码如下所示:
// make wires of the box.

aBuilder.MakeWire(aWires[]);

// wire 1: bottom

{

    TopoDS_Edge E1 = aEdges[];

    TopoDS_Edge E2 = aEdges[];

    TopoDS_Edge E3 = aEdges[];

    TopoDS_Edge E4 = aEdges[];

    E3.Reverse();

    E4.Reverse();

    aBuilder.Add(aWires[], E1);

    aBuilder.Add(aWires[], E2);

    aBuilder.Add(aWires[], E3);

    aBuilder.Add(aWires[], E4);

    BRepTools::Update(aWires[]);

}
关键是面的创建及面创建后,设置边与面的关联信息,即PCurve的信息。如果没有PCurve的信息,可视化显示就不能正确显示出面,即网格化算法会失败。长方体底面的创建及PCurve设置代码如下所示:
// make faces of the box.

aBuilder.MakeFace(aFaces[],new Geom_Plane(aPlanes[]),Precision::Confusion());

aBuilder.Add(aFaces[], aWires[]);

// set bottom pcurve info of between the edge and surface.

{

    // pcurve 0:

    double u = 0.0;

    double v = 0.0;

    double du = 0.0;

    double dv = 0.0;

    gp_Dir DX = aPlanes[].XAxis().Direction();

    gp_Dir DY = aPlanes[].YAxis().Direction();

    ElSLib::Parameters(aPlanes[], aLines[].Location(), u, v);

    du = aLines[].Direction() * DX;

    dv = aLines[].Direction() * DY;

    aBuilder.UpdateEdge(aEdges[], new Geom2d_Line(gp_Lin2d(gp_Pnt2d(u, v),

        gp_Dir2d(du, dv))), aFaces[], Precision::Confusion());

    // pcurve 1:

    ElSLib::Parameters(aPlanes[], aLines[].Location(), u, v);

    du = aLines[].Direction() * DX;

    dv = aLines[].Direction() * DY;

    aBuilder.UpdateEdge(aEdges[], new Geom2d_Line(gp_Lin2d(gp_Pnt2d(u, v),

        gp_Dir2d(du, dv))), aFaces[], Precision::Confusion());

    // pcurve 2:

    ElSLib::Parameters(aPlanes[], aLines[].Location(), u, v);

    du = aLines[].Direction() * DX;

    dv = aLines[].Direction() * DY;

    aBuilder.UpdateEdge(aEdges[], new Geom2d_Line(gp_Lin2d(gp_Pnt2d(u, v),

        gp_Dir2d(du, dv))), aFaces[], Precision::Confusion());

    // pcurve 3:

    ElSLib::Parameters(aPlanes[], aLines[].Location(), u, v);

    du = aLines[].Direction() * DX;

    dv = aLines[].Direction() * DY;

    aBuilder.UpdateEdge(aEdges[], new Geom2d_Line(gp_Lin2d(gp_Pnt2d(u, v),

        gp_Dir2d(du, dv))), aFaces[], Precision::Confusion());

}
历经艰辛,最后终于将一个面创建出来了,且可以在Draw Test Harness中显示,如下图所示:
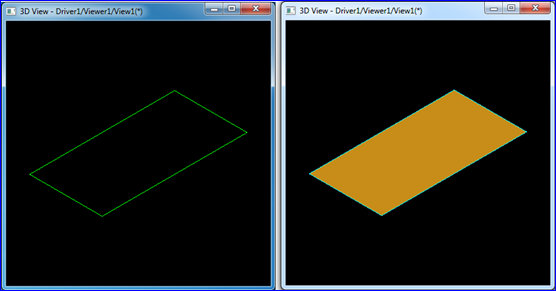
Figure 2.2 A Face of the Box in Draw Test Harness
如上图所示,在Darw Test Harness中,边的颜色是有讲究的,说明如下:
In Draw Test Harness, shapes are displayed using isoparametric curves. There is color coding for the Edges:
v A red edge is an isolated edge, which belongs to no faces;
v A green edge is a free boundary edge, which belongs to one face;
v A yello edge is shared edge, which belongs to at least two faces;
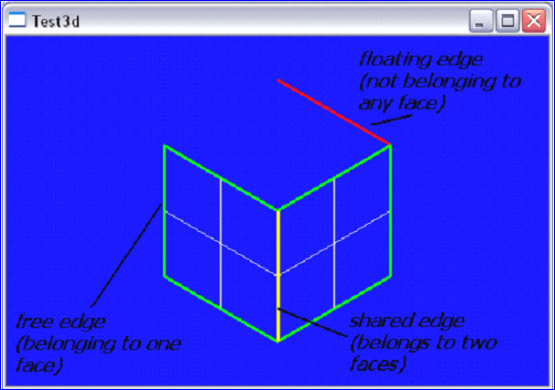
Figure 2.3 Color Coding for Edges in Draw Test Harness
如上图所示,红色的边表示此边不属于任何一个面;绿色的边表示此边只属于一个面;黄色的面表示此面至少属于两个面。
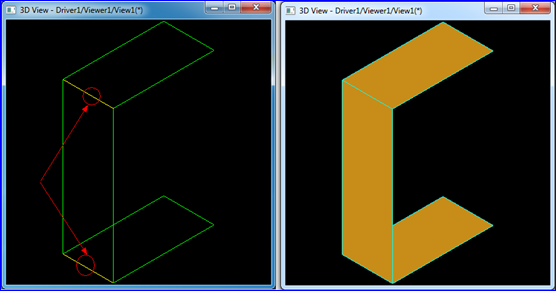
Figure 2.4 Shared Edges of the Box
如上图所示,当创建出长方体的三个面时,侧面与上下两个底面相连的边显示成了黄色。其他边都是绿色。
3.Finish the Box
将长方体的六个面按上述方式创建完毕后,需要验证其正确性。于是将生成的数据导出为Brep格式,并与其他基本体进行布尔运算。
当导出的长方体为Shell时进行布尔运算会得到的也是壳体,如下图所示的结果:
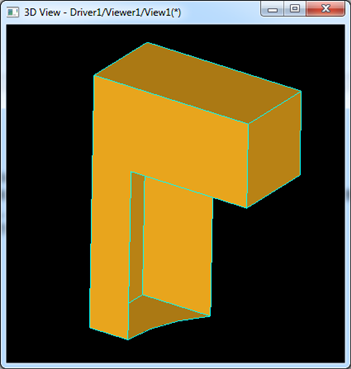
Figure 3.1 Box Shell Cut a Cylinder
当导出的长方体为Solid时,若面的方式未正确设置,则布尔运算会失败,如下图所示:
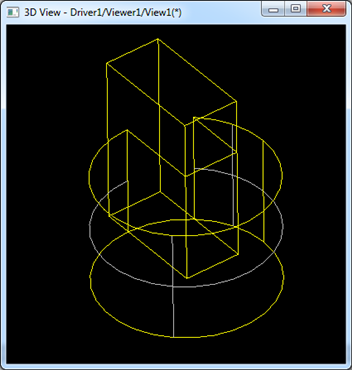
Figure 3.2 Box Solid Cut a Cylinder
如上图所示,长方体与圆柱体的交线都已经计算出来了,但由于面的方向不对,不知道去除哪些面,保留哪些面。
将面的方向正确设置后,导出为Solid,进行布尔运算,结果正确,如下图所示:
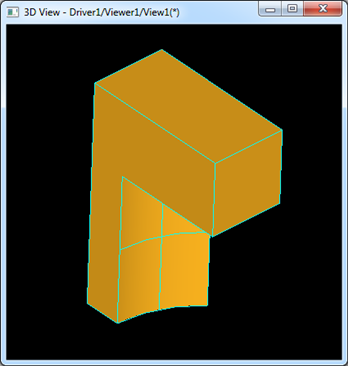
Figure 3.3 Box Cut Cylinder
测试用的Tcl脚本代码如下所示:
#

# Tcl script to test the box BRep data.

# eryar@163.com

# 2014-11-16 21:55

# OpenCASCADE6.8.0

#

pload ALL

restore d:/box.brep b

pcylinder c 1.5

bop b c

bopcut r

vdisplay r
4.Conclusion
通过创建基本图元,从而进一步来理解OpenCASCADE中的边界表示BRep的数据结构。需要注意的事项有:
v 创建边时,需要设置边中几何曲线的范围;
v 创建边时,需要设置正确与边相关顶点的方向;
v 创建环时,需要确保环中边的参数曲线PCurve能在参数空间中闭合;
v 创建面后,需要在边中设置与面相关的几何信息;
v 创建体时,需要所有面的方向正确;
注:
最后发现前不久写的一篇文章有误,说OpenCASCADE的BRep不是翼边结构。其实从边出发是可以找到与点、面相关的信息的。因为
OpenCASCADE中拓朴结构中有包含关系,所以顶点信息已经包含在边中了,直接遍历边即可得到与此边相关的顶点信息。所以,这样看来
OpenCASCADE中的BRep表示法也是翼边的数据结构。
原文如下:
边界表示方式比较。因为一般的书籍上都详细重
点描述了边界表示中以为边为核心的翼边数据结构,所以有人想从这方面来给OpenCASCADE中的Brep表示法来给个说法。结合上面的类图可知,从边
出发并不能访问到与这条边相关的其他信息,如顶点的信息。如果硬是想在这里给个名分,倒是从点出发可以找到边及面的几何信息,所以OpenCASCADE
中的Brep表示法应该更像是以点为基础的表示方法。OpenNURBS中通过ON_BrepTrim,可以访问其他的信息,而ON_BrepTrim与
边ON_BrepEdge的意义有些相似,所以应该是以边为核心的翼边结构了。
5. References
1. OpenCASCADE BRep vs. OpenNURBS Brep. OpenCASCADE BRep vs. OpenNURBS BRep
PDF Version and Source Code: OpenCASCADE Make Primitives-Box
OpenCASCADE Make Primitives-Box的更多相关文章
- OpenCascade Primitives BRep - Box
OpenCascade Primitives BRep - Box eryar@163.com Abstract. BRep is short for Boundary Representation. ...
- OpenCASCADE Make Primitives-Sphere
OpenCASCADE Make Primitives-Sphere eryar@163.com Abstract. The sphere is the simplest topology shape ...
- OpenCascade Primitives BRep - Sphere
OpenCascade Primitives BRep - Sphere eryar@163.com Abstract. BRep is short for Boundary Representati ...
- OpenCascade Primitives BRep-Cone
OpenCascade Primitives BRep-Cone eryar@163.com Abstract. BRep is short for Boundary Representation. ...
- OpenCascade Primitives BRep-Torus
OpenCascade Primitives BRep-Torus eryar@163.com Abstract. BRep is short for Boundary Representation. ...
- OpenCascade Primitives BRep-Cylinder
OpenCascade Primitives BRep-Cylinder eryar@163.com Abstract. BRep is short for Boundary Representati ...
- A Simple OpenCASCADE Qt Demo-occQt
A Simple OpenCASCADE Qt Demo-occQt eryar@163.com Abstract. OpenCASCADE have provided the Qt samples ...
- OpenCASCADE Shape Location
OpenCASCADE Shape Location eryar@163.com Abstract. The TopLoc package of OpenCASCADE gives resources ...
- OpenCASCADE Camera
OpenCASCADE Camera eryar@163.com Abstract. OpenCASCADE introduce a new class Graphic3d_Camera for th ...
随机推荐
- 同步机制 note
1.信号量与互斥体的不同之处: 不需要由最初获取它的那个线程来释放. 信号量可以用来调停对资源池的访问. 2. 条件变量: 允许任意复杂的条件表达式作为等待条件,允许更复杂的调度策略.
- bzoj3631树链剖分
虽然是水题1A的感觉太爽了O(∩_∩)O~ 题意相当于n-1次树上路径上每个点权值+1,最后问每个点的权值 本来想写线段树,写好了change打算框架打完了再来补,结果打完发现只是区间加和单点查 前缀 ...
- JavaScript解惑记之Array.prototype.sort()
前言 看JS红宝书的5.2.5章节关于sort()方法,如何用一个compare函数,让数组顺序,倒序,有点云里雾里的.在网上度娘了一下,发现更迷糊了.走投无路的情况下,只能发动神技能,去 stack ...
- UNP环境配置
最近在学习<UNIX网络编程>,书上将常用的头文件都放在unp.h里,需要自己编译一下代码搭建环境. UNP环境配置过程 下载源码 http://www.unpbook.com/src.h ...
- weex逻辑控制
在WEEX中,有if 和 repeat 两种逻辑运算,需要注意的是,逻辑控制不能够作用于<template>这样的根节点. if 控制判断条件true/false直接对节点进行操作,if= ...
- 使用 Graphviz 画拓扑图
使用 Graphviz 画拓扑图 0)前述 本文着重讲一下 Graphviz 的风格控制,基础一些的就不在这里讲啦. graphviz 的主页是http://www.graphviz.org/. Gr ...
- smack 4.1创建群聊
smack 4.1.1版本对群聊修改了很多,MultUserChat的构造函数修改成了私有,以前通过new MultUserChat创建聊天室,现在通过MultUserChatMananger先通过r ...
- socket.io安装部署
需要node.js环境 创建package.json npm init 下载相关依赖 npm install --save express@4.10.2npm会在当前目录下载所需要的依赖到node_m ...
- 移动端click时间延迟300
解决移动端click延迟事件方法,,引入fastclick.js 然后在script标签里面写上FastClick.attach(document.body); <!DOCTYPE html& ...
- perl 切换 dnspod 域名记录
提供域名,dnspod 账户密码(毕竟dns密码比较重要 不能谁 cat一下都可以看到 需要base64加密),原IP,切换目标IP, #!/bin/perl use warnings; use MI ...