
Dockerfile镜像的制作
Dockerfile镜像的制作
如果学习Docker,那么制作镜像这一步肯定不能少的,别人给你的是环境,而你自己做的才是你最终需要的东西,接下来就记录一下如何制作一个满足自己的镜像,我们使用docker一般就是部署我们的应用,那么我就制作一个镜像来发布我们的应用,制作方式我们就选择Dockerfile的方式
Dockerfile:
docker其实就像是一个脚本文件,或者你可以直接把他看成一个脚本或者就是看成一条条命令的集合,在Dockerfile文件中我们一般分为四个部分:基础镜像、创建者信息(可省略)、制作镜像过程(操作镜像指令)、启动容器的命令
接下来我们先了解一下这四部分分别是什么?
准备:获取基础镜像
我们可以从镜像仓库中获取适合我们的基础镜像使用docker search <镜像名>查询镜像,使用docker pull <镜像名>获取,如:我要获取一个jdk8的镜像那么我们
#查询镜像仓库中jdk8相关的镜像

docker search java8

#获取名字是corvis/java8的镜像

docker pull corvis/java8
如下图:这个镜像我已经下载过了所以显示的已经存在

全部下载完成之后我们可以查一下我们的本地会有一个名字是corvis/java8的镜像
#查询本地镜像

docker images

到这里我们的基础镜像已经获取到了,我们把创建的Dockerfile文件放到一个单独的目录下,并把我们的项目打好的包也放在该目录下,接下里我们开始写我们的Dockerfile文件

制作的步骤
指定基础镜像
#指定基础镜像(我们所有的操作都是在这个镜像的基础上做的)

FROM corvis/java8
写入创建者信息
MAINTAINER SunArmy
把我们的项目copy到镜像中,并暴露端口,这里我直接用springBoot写了一个空的项目打包test.jar,端口开的80
#从本地copy到镜像的/usr/local目录下,使用ADD和COPY都可以

ADD test.jar /usr/local/

#暴露项目端口到宿主机
EXPOSE 80
4. 启动容器我们需要执行的命令(启动项目的命令)
使用CMD和ENTRYPOINT都可以
CMD ["java","-jar","/usr/local/test.jar"]
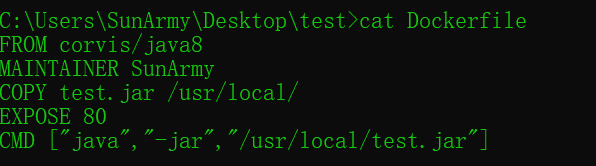
~~~python
FROM corvis/java8
MAINTAINER SunArmy
COPY test.jar /usr/local/
EXPOSE 80
CMD ["java","-jar","/usr/local/test.jar"]
我们已经写好了Dockerfile文件那么我们直接在当前目录下执行命令来生成镜像
#根据Dockerfile文件制作镜像

docker build -t test:1.0 .

#查看本地镜像

docker images

至此,我们的镜像已经做好了
Dockerfile常用指令,语法
1、FROM <镜像名image>:<版本号tag>

   一般是Dockerfile的第一行,指定基础镜像

2、MAINTAINET <创建者信息>

   指明该镜像的创建者信息

3、RUN <命令>

   容器中需要执行的命令,如:在容器创建之后需要在根目录创建一个logs目录

   RUN mkdir /logs

4、COPY <本地文件> <容器路径>

   复制本地文件到镜像中,本地路径是以Dockkerfile所在目录为根目录 如:把test.jar复制到/usr/local目录

   COPY test.jar /usr/local

5、ADD <本地文件> <容器路径>

   复制本地文件到镜像中,本地路径是以Dockkerfile所在目录为根目录,区别与COPY的可以从URL复制,可以直接解压.tar.gz并把解压之后的文件复制到镜像

   如:把test.jar复制到/usr/local目录

   ADD test.jar /usr/local

   从URL复制到/usr/local

   ADD URL /usr/local

   解压test.tar.gz复制到镜像/usr/local

   ADD test.tar.gz /usr/local

6、ENV <key> <value>

   设置环境变量,可以直接用的环境变量有如下

   $HOME 用户主目录

   $HOMENAME 容器主机名

   $PATH 容器环境变量(这个会经常用到)

   如:我们要把/usr/bin添加到环境变量中

   ENV PATH $PATH:/usr/bin

7、EXPOSE [<port>...]

   Docker服务端暴露端口,如:我们镜像中有8080和8081两个端口需要暴露出去

   EXPOSE 8080 8081

8、CMD ["",""]

   括号中的是需要执行的命令

   指定启动容器时执行的命令,每个Dockerfile只能有一条CMD指令,如果指定了多条指令,则最后一条执行(如果启动的时候指定了命令会被启动时指定的命令覆盖)

9、ENTRYPOINT ["",""]

   和CMD指令一样,唯一不同的是即使启动的时候指定了命令,该命令也不会被覆盖

10、VOLUME ["/data"]

   作用是创建在本地主机或其他容器可以挂载的数据卷,用来存放数据。

11、USER username

   指定容器运行时的用户名或UID,后续的RUN也会使用指定的用户。要临时使用管理员权限可以使用sudo。在USER命令    之前可以使用RUN命令创建需要的用户。

12、WORKDIR /path

   为后续的RUN CMD ENTRYPOINT指定配置工作目录,可以使用多个WORKDIR指令,若后续指令用得是相对路径,则会基 于之前的命令指定路径。

13.ONBUILD [INSTRUCTION]

   该配置指定当所创建的镜像作为其他新建镜像的基础镜像时所执行的指令。
以上就是写Dockerfile文件所需要的基本指指令
写好之后我们切入Dockerfile目录下执行 docker build 即可制成我们自己的镜像,如:使用当前目录的Dockerfile文件创建镜像并设置标签,-t参数设置标签
docker build -t test:1.0 .
Usage:  docker build [OPTIONS] PATH | URL | -

Build an image from a Dockerfile

Options:

      --add-host list           Add a custom host-to-IP mapping (host:ip)

      --build-arg list          Set build-time variables

      --cache-from strings      Images to consider as cache sources

      --cgroup-parent string    Optional parent cgroup for the container

      --compress                Compress the build context using gzip

      --cpu-period int          Limit the CPU CFS (Completely Fair

                                Scheduler) period

      --cpu-quota int           Limit the CPU CFS (Completely Fair

                                Scheduler) quota

  -c, --cpu-shares int          CPU shares (relative weight)

      --cpuset-cpus string      CPUs in which to allow execution (0-3, 0,1)

      --cpuset-mems string      MEMs in which to allow execution (0-3, 0,1)

      --disable-content-trust   Skip image verification (default true)

  -f, --file string             Name of the Dockerfile (Default is

                                'PATH/Dockerfile')

      --force-rm                Always remove intermediate containers

      --iidfile string          Write the image ID to the file

      --isolation string        Container isolation technology

      --label list              Set metadata for an image

  -m, --memory bytes            Memory limit

      --memory-swap bytes       Swap limit equal to memory plus swap:

                                '-1' to enable unlimited swap

      --network string          Set the networking mode for the RUN

                                instructions during build (default "default")

      --no-cache                Do not use cache when building the image

      --pull                    Always attempt to pull a newer version of

                                the image

  -q, --quiet                   Suppress the build output and print image

                                ID on success

      --rm                      Remove intermediate containers after a

                                successful build (default true)

      --security-opt strings    Security options

      --shm-size bytes          Size of /dev/shm

  -t, --tag list                Name and optionally a tag in the

                                'name:tag' format

      --target string           Set the target build stage to build.

      --ulimit ulimit           Ulimit options (default [])
把镜像保存到本地
docker save <保存到本地的文件> <镜像>
如:把test:1.0这个镜像保存到本地
docker save -o test_1.0.tar test:1.0
Usage:  docker build [OPTIONS] PATH | URL | -

Build an image from a Dockerfile

Options:

      --add-host list           Add a custom host-to-IP mapping (host:ip)

      --build-arg list          Set build-time variables

      --cache-from strings      Images to consider as cache sources

      --cgroup-parent string    Optional parent cgroup for the container

      --compress                Compress the build context using gzip

      --cpu-period int          Limit the CPU CFS (Completely Fair

                                Scheduler) period

      --cpu-quota int           Limit the CPU CFS (Completely Fair

                                Scheduler) quota

  -c, --cpu-shares int          CPU shares (relative weight)

      --cpuset-cpus string      CPUs in which to allow execution (0-3, 0,1)

      --cpuset-mems string      MEMs in which to allow execution (0-3, 0,1)

      --disable-content-trust   Skip image verification (default true)

  -f, --file string             Name of the Dockerfile (Default is

                                'PATH/Dockerfile')

      --force-rm                Always remove intermediate containers

      --iidfile string          Write the image ID to the file

      --isolation string        Container isolation technology

      --label list              Set metadata for an image

  -m, --memory bytes            Memory limit

      --memory-swap bytes       Swap limit equal to memory plus swap:

                                '-1' to enable unlimited swap

      --network string          Set the networking mode for the RUN

                                instructions during build (default "default")

      --no-cache                Do not use cache when building the image

      --pull                    Always attempt to pull a newer version of

                                the image

  -q, --quiet                   Suppress the build output and print image

                                ID on success

      --rm                      Remove intermediate containers after a

                                successful build (default true)

      --security-opt strings    Security options

      --shm-size bytes          Size of /dev/shm

  -t, --tag list                Name and optionally a tag in the

                                'name:tag' format

      --target string           Set the target build stage to build.

      --ulimit ulimit           Ulimit options (default [])

C:\Users\SunArmy\Desktop\demo>docker save --help

Usage:  docker save [OPTIONS] IMAGE [IMAGE...]

Save one or more images to a tar archive (streamed to STDOUT by default)

Options:

  -o, --output string   Write to a file, instead of STDOUT
Dockerfile镜像的制作的更多相关文章
- Docker 镜像的制作和使用
镜像 Layer(层) 镜像里的内容是按「层」来组织的,「层」可以复用,一个完整的镜像也可以看做是一个「层」.多个「层」叠加在一起就形成了一个新的镜像,这个镜像也可以作为别的镜像的基础「层」进行更加复 ...
- NGINX镜像的制作
NGINX镜像的制作 # mkdir -pv /opt/nginx # cd /opt/nginx/ # cat index.html www.dexter.com 编写Dockerfile # ...
- 基于url-to-pdf-api构建docker镜像,制作一个网页另存服务
基于url-to-pdf-api构建docker镜像,制作一个网页另存服务 业务背景: 需要根据一个url路径打印这个网页的内容 解决方案: 1.使用wkhtml2pdf 2.使用puppeteer ...
- 封装win7系统、制作win7GHO镜像、制作一个自定义的镜像文件具体步骤、制作Win10镜像gho
作者:导演你让灰太狼吃只羊 来源:CSDN 原文:https://blog.csdn.net/qq_35057426/article/details/83015516 版权声明:本文为博主原创文章,转 ...
- dockerfile镜像设置中文
一.dockerfile镜像设置中文 centos镜像默认不支持中文,把下面的内容加到dockerfile即可 # 修改时区 RUN rm -rf /etc/localtime && ...
- Dockerfile镜像实例
Dockerfile镜像实例 目录 Dockerfile镜像实例 一.构建SSH镜像 1. 建立工作目录 2. 生成镜像 3. 启动容器并修改root密码 二.systemctl镜像 1. 建立工作目 ...
- 7.云原生之Docker容器Dockerfile镜像构建浅析与实践
转载自:https://www.bilibili.com/read/cv15220707/?from=readlist Dockerfile 镜像构建浅析与实践 描述:Dockerfile是一个文本格 ...
- 基于Dockerfile镜像制作的基本操作
一.使用Dockerfile制作镜像 前面的博客中已经介绍了如何基于容器制作镜像,此方法的原理是使用一个正在运行的容器,根据生产所需进行配置更改等操作后,使其满足生产环境,再将这个容器打包制作为镜像, ...
- Dockerfile镜像制作时间同步
1.问题描述 宿主机与容器时间相差8小时 2.原因 宿主机采用了CST时区,CST应该是指(China Shanghai Time,东八区时间)容器采用了UTC时区,UTC应该是指(Coordinat ...
随机推荐
- Oracle 参数文件
参数文件(10g中的参数文件) 主要用来记录数据库的配置文件,在数据库启动时,Oracle读取参数文件,并根据参数文件中的参数设置来配置数据库. 如内存池的分配,允许打开的进程数和会话数等. 两类参数 ...
- Linux学习笔记记录(六)
- chrome浏览器安装网页测试插件postman的图文介绍
用户在开发或者调试网络程序或者是网页B/S模式的程序的时候是需要一些方法来跟踪网页请求的,用户可以使用一些网络的监视工具比如著名的Firebug等网页调试工具.今天给大家介绍的这款网页调试工具不仅可以 ...
- SocketServer 网络服务框架
SocketServer简化了网络服务器的编写.它有4个类:TCPServer,UDPServer,UnixStreamServer,UnixDatagramServer.这4个类是同步进行处理的,另 ...
- Leetcode 95.不同的二叉搜索树II
不同的二叉搜索树2 给定一个整数 n,生成所有由 1 ... n 为节点所组成的二叉搜索树. 示例: 输入: 3 输出: [ [1,null,3,2], [3,2,null,1], [3,1,null ...
- 最接近的点配对(分治问题理解) && HDU 1007代码
题目大意: 给定一堆点集,在这一堆点集中找到一组点集它们之间的距离达到最短 对于HDU1007因为求圆的半径,所以距离还要除以2 普通情况下,可以将nge点,将任意两个点之间的距离都算一遍,在循环过程 ...
- hdu 3062 2-sat
#include<stdio.h> #include<string.h> #define N 2100 struct node { int u,v,next; }bian[N* ...
- 总结懒加载的解决方法(全)org.hibernate.LazyInitializationException: could not initialize proxy - no Session
如下错误:org.hibernate.LazyInitializationException: could not initialize proxy - no Session 原因是懒加载的问题,因为 ...
- Project导入错误 36D27C48
做后台系统导出Project时,部署到服务器提示:检索 COM 类工厂中 CLSID 为 {36D27C48-A1E8-11D3-BA55-00C04F72F325} 的组件失败,原因是出现以下错误: ...
- jq页面提示或者页面牵引浏览--页面的指引向导插件
1.看看插件效果吧 2. html 文件 :index.html <!DOCTYPE html> <html lang="en"> <head> ...