携程Apollo(阿波罗)配置中心在Spring Boot项目快速集成
前提:先搭建好本地的单机运行项目:http://www.cnblogs.com/EasonJim/p/7643630.html
说明:下面的示例是基于Spring Boot搭建的,对于Spring项目基本通用。迁移旧项目的配置下一篇说明,这里先就如何快速的集成Client和获取配置的值进行实践。
0、下面的示例都是基于官方提供的教程去实践的,可以参考如下网址:
1、先新建好Spring Boot项目,这里使用了Web做测试,所以引用了Thymeleaf模板。
搭建参考:http://www.cnblogs.com/EasonJim/p/7519854.html
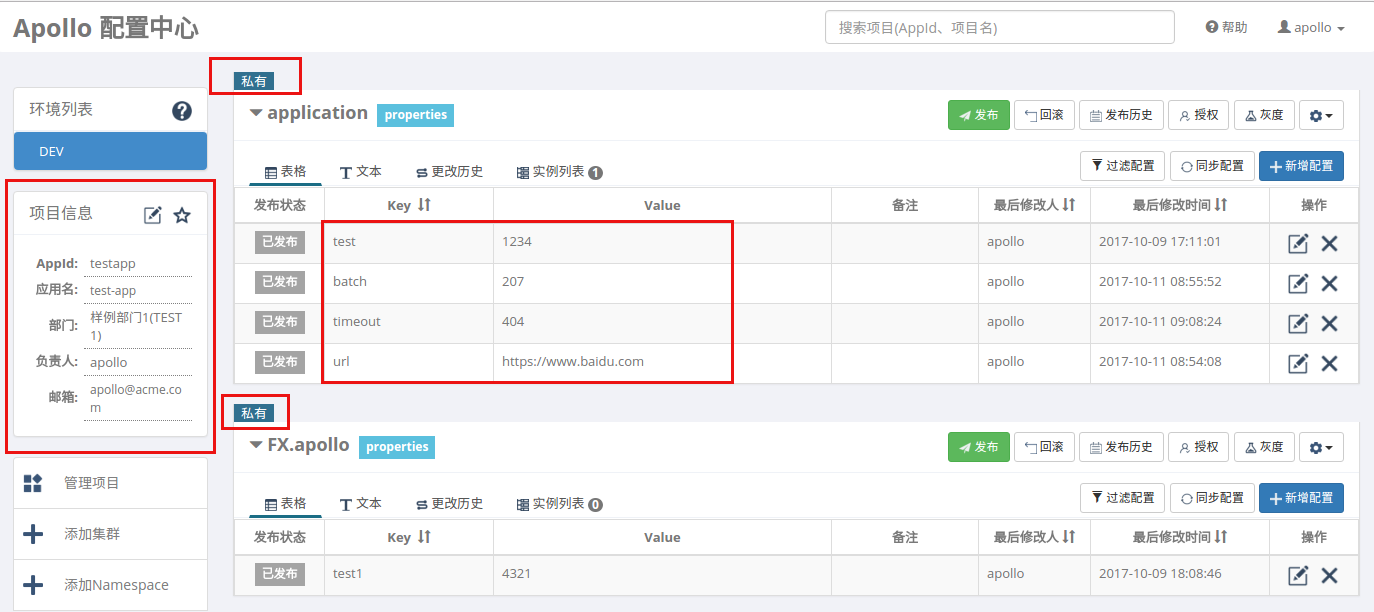
2、登录Apollo上新建App和相关的配置项,可以参考如下配置:
3、在POM上引入Client的依赖,此时会有两个包引入Client和Core。
        <dependency>

            <groupId>com.ctrip.framework.apollo</groupId>

            <artifactId>apollo-client</artifactId>

            <version>0.8.0</version>

        </dependency>
4、在项目上配置上面设置的app.id,注意此时是通过新建META-INF/app.properties文件实现的。

5、代码实现
实现的功能是通过配置中心修改后,再次刷新页面而不重启应用的情况下能看到值的改变。
实现方式主要几种在两种,1为通过API的形式增加监听回调函数来监听值的改变后直接修改,2为通过注入Bean的方式使用Bean下的专用监听注解实现回调监听。
5.1、通过API的方式
代码实现如下:
package com.jsoft.springboottest.springboottest1.controller;

import org.slf4j.Logger;

import org.slf4j.LoggerFactory;

import org.springframework.beans.factory.annotation.Value;

import org.springframework.stereotype.Controller;

import org.springframework.ui.Model;

import org.springframework.web.bind.annotation.RequestMapping;

import org.springframework.web.bind.annotation.RequestMethod;

import com.ctrip.framework.apollo.Config;

import com.ctrip.framework.apollo.ConfigChangeListener;

import com.ctrip.framework.apollo.ConfigService;

import com.ctrip.framework.apollo.model.ConfigChange;

import com.ctrip.framework.apollo.model.ConfigChangeEvent;

import com.ctrip.framework.apollo.spring.annotation.EnableApolloConfig;

@Controller

public class IndexController {

    private static final Logger logger = LoggerFactory.getLogger(IndexController.class);

    private Config config;

   private int timeout;

    private int batch;

    private String url;

    @RequestMapping(value = "/index", method = RequestMethod.GET)

    public String index(Model model) {

        Entry entry = new Entry();

        entry.setText("Text");

        entry.setTitle("Title");

        model.addAttribute("entries", entry);

        model.addAttribute("entry", new Entry());

        model.addAttribute("url", url);

        model.addAttribute("timeout",timeout);

        model.addAttribute("batch",batch);

        logger.info("timeout:{}", timeout);

        logger.info("batch:{}", batch);

        logger.info("url:{}", url);

        return "index";

    }

    public IndexController() {

        config = ConfigService.getAppConfig();

        config.addChangeListener(new ConfigChangeListener() {

            @Override

            public void onChange(ConfigChangeEvent changeEvent) {

                logger.info("Changes for namespace {}", changeEvent.getNamespace());

                for (String key : changeEvent.changedKeys()) {

                    ConfigChange change = changeEvent.getChange(key);

                    logger.info("Change - key: {}, oldValue: {}, newValue: {}, changeType: {}", change.getPropertyName(), change.getOldValue(), change.getNewValue(), change.getChangeType());

                    if (key.equals("url")) {

                        url = change.getNewValue();

                    }

                    if(key.equals("batch")) {

                        batch = Integer.valueOf(change.getNewValue());

                    }

                    if (key.equals("timeout")) {

                        timeout = Integer.valueOf(change.getNewValue());

                    }

                }

            }

        });

    }

}
说明:
通过新建Config对象,使用的是ConfigService.getAppConfig()获取默认配置,也就是配置中心中的application.properties的,当然,getAppConfig可以指定不能的namespage。
通过获取Config对象增加监听回调函数addChangeListener。监听指定的值变化后,重新赋值变量。
这种方式应该是最简单的,不用写特殊的注解去实现,但是可能在运行时也会发现,程序在一启动时不会去获取默认的配置值,比如timeout这些是空的,要解决这个问题时需要在Class上增加@EnableApolloConfig的注解,然后在属性上增加@Value的值即可,改动如下:
package com.jsoft.springboottest.springboottest1.controller;

import org.slf4j.Logger;

import org.slf4j.LoggerFactory;

import org.springframework.beans.factory.annotation.Value;

import org.springframework.stereotype.Controller;

import org.springframework.ui.Model;

import org.springframework.web.bind.annotation.RequestMapping;

import org.springframework.web.bind.annotation.RequestMethod;

import com.ctrip.framework.apollo.Config;

import com.ctrip.framework.apollo.ConfigChangeListener;

import com.ctrip.framework.apollo.ConfigService;

import com.ctrip.framework.apollo.model.ConfigChange;

import com.ctrip.framework.apollo.model.ConfigChangeEvent;

import com.ctrip.framework.apollo.spring.annotation.EnableApolloConfig;

@Controller

@EnableApolloConfig

public class IndexController {

    private static final Logger logger = LoggerFactory.getLogger(IndexController.class);

    private Config config;

    @Value("${timeout:200}")

    private int timeout;

    @Value("${batch:200}")

    private int batch;

    @Value("${url:http://easonjim.com}")

    private String url;

    @RequestMapping(value = "/index", method = RequestMethod.GET)

    public String index(Model model) {

        Entry entry = new Entry();

        entry.setText("Text");

        entry.setTitle("Title");

        model.addAttribute("entries", entry);

        model.addAttribute("entry", new Entry());

        model.addAttribute("url", url);

        model.addAttribute("timeout",timeout);

        model.addAttribute("batch",batch);

        logger.info("timeout:{}", timeout);

        logger.info("batch:{}", batch);

        logger.info("url:{}", url);

        return "index";

    }

    public IndexController() {

        config = ConfigService.getAppConfig();

        config.addChangeListener(new ConfigChangeListener() {

            @Override

            public void onChange(ConfigChangeEvent changeEvent) {

                logger.info("Changes for namespace {}", changeEvent.getNamespace());

                for (String key : changeEvent.changedKeys()) {

                    ConfigChange change = changeEvent.getChange(key);

                    logger.info("Change - key: {}, oldValue: {}, newValue: {}, changeType: {}", change.getPropertyName(), change.getOldValue(), change.getNewValue(), change.getChangeType());

                    if (key.equals("url")) {

                        url = change.getNewValue();

                    }

                    if(key.equals("batch")) {

                        batch = Integer.valueOf(change.getNewValue());

                    }

                    if (key.equals("timeout")) {

                        timeout = Integer.valueOf(change.getNewValue());

                    }

                }

            }

        });

    }

}
说明:约定俗成,在@Value上获取值时记得增加默认值,以防止获取为空。
上面代码或许有些冗余,可以再提炼一下,因为config对象的值会实时更新,所以也不需要监听onChange事件,也不需要自己创建一个变量,最后代码实现如下:
package com.jsoft.springboottest.springboottest1.controller;

import org.slf4j.Logger;

import org.slf4j.LoggerFactory;

import org.springframework.beans.factory.annotation.Value;

import org.springframework.stereotype.Controller;

import org.springframework.ui.Model;

import org.springframework.web.bind.annotation.RequestMapping;

import org.springframework.web.bind.annotation.RequestMethod;

import com.ctrip.framework.apollo.Config;

import com.ctrip.framework.apollo.ConfigChangeListener;

import com.ctrip.framework.apollo.ConfigService;

import com.ctrip.framework.apollo.model.ConfigChange;

import com.ctrip.framework.apollo.model.ConfigChangeEvent;

import com.ctrip.framework.apollo.spring.annotation.EnableApolloConfig;

@Controller

public class IndexController2 {

    private static final Logger logger = LoggerFactory.getLogger(IndexController2.class);

    private Config config = ConfigService.getAppConfig();

    @RequestMapping(value = "/index2", method = RequestMethod.GET)

    public String index(Model model) {

        Entry entry = new Entry();

        entry.setText("Text");

        entry.setTitle("Title");

        model.addAttribute("entries", entry);

        model.addAttribute("entry", new Entry());

        model.addAttribute("url", config.getProperty("url", ""));

        model.addAttribute("timeout",config.getProperty("timeout", ""));

        model.addAttribute("batch",config.getProperty("batch", ""));

        logger.info("timeout:{}", config.getProperty("timeout", ""));

        logger.info("batch:{}", config.getProperty("batch", ""));

        logger.info("url:{}", config.getProperty("url", ""));

        return "index";

    }

}
5.2、通过注入Bean的方式
5.2.1、新建的Bean如下:
package com.jsoft.springboottest.springboottest1.controller;

import com.ctrip.framework.apollo.Config;

import com.ctrip.framework.apollo.model.ConfigChange;

import com.ctrip.framework.apollo.model.ConfigChangeEvent;

import com.ctrip.framework.apollo.spring.annotation.ApolloConfig;

import com.ctrip.framework.apollo.spring.annotation.ApolloConfigChangeListener;

import org.slf4j.Logger;

import org.slf4j.LoggerFactory;

import org.springframework.beans.factory.annotation.Value;

import javax.annotation.PostConstruct;

public class AnnotatedBean {

    private static final Logger logger = LoggerFactory.getLogger(AnnotatedBean.class);

    @Value("${timeout:200}")

    private int timeout;

    private int batch;

    @ApolloConfig

    private Config config;

    @ApolloConfig("FX.apollo")

    private Config anotherConfig;

    @PostConstruct

    void initialize() {

        logger.info("timeout is {}", timeout);

        logger.info("batch is {}", batch);

        logger.info("Keys for config: {}", config.getPropertyNames());

        logger.info("Keys for anotherConfig: {}", anotherConfig.getPropertyNames());

    }

    @Value("${batch:100}")

    public void setBatch(int batch) {

        this.batch = batch;

    }

    public int getBatch() {

        return batch;

    }

    public int getTimeout() {

        return timeout;

    }

    @ApolloConfigChangeListener("application")

    private void someChangeHandler(ConfigChangeEvent changeEvent) {

        logger.info("[someChangeHandler]Changes for namespace {}", changeEvent.getNamespace());

        if (changeEvent.isChanged("timeout")) {

            refreshTimeout();

        }

        if (changeEvent.isChanged("batch")) {

            setBatch(Integer.valueOf(changeEvent.getChange("batch").getNewValue()));

        }

    }

    @ApolloConfigChangeListener({ "application", "FX.apollo" })

    private void anotherChangeHandler(ConfigChangeEvent changeEvent) {

        logger.info("[anotherChangeHandler]Changes for namespace {}", changeEvent.getNamespace());

        for (String key : changeEvent.changedKeys()) {

            ConfigChange change = changeEvent.getChange(key);

            logger.info("[anotherChangeHandler]Change - key: {}, oldValue: {}, newValue: {}, changeType: {}", change.getPropertyName(), change.getOldValue(), change.getNewValue(), change.getChangeType());

        }

    }

    private void refreshTimeout() {

        // do some custom logic to update placeholder value

        timeout = config.getIntProperty("timeout", timeout);

        logger.info("Refreshing timeout to {}", timeout);

    }

}
5.2.2、通过@Configuration注入这个Bean,代码如下:
package com.jsoft.springboottest.springboottest1.controller;

import org.springframework.context.annotation.Bean;

import org.springframework.context.annotation.Configuration;

import com.ctrip.framework.apollo.spring.annotation.EnableApolloConfig;

@Configuration

@EnableApolloConfig

public class AnnotatedConfig {

    @Bean

    public AnnotatedBean annotatedBean() {

        return new AnnotatedBean();

    }

}
注意:要增加@EnableApolloConfig和@Configuration,不然不会生效。并且留意到@Bean的注解,如果没有这个时,@ApolloConfigChangeListener不会生效。这个是关键所在,@ApolloConfigChangeListener只能用于Bean注入上,这个和API的方式有明显区别。
在代码上使用:
package com.jsoft.springboottest.springboottest1.controller;

import org.slf4j.Logger;

import org.slf4j.LoggerFactory;

import org.springframework.beans.factory.annotation.Autowired;

import org.springframework.web.bind.annotation.RequestMapping;

import org.springframework.web.bind.annotation.RestController;

@RestController

public class TestController {

    private static final Logger logger = LoggerFactory.getLogger(TestController.class);

    @Autowired

    private AnnotatedBean annotatedBean;

    @RequestMapping("/show")

    public String show(){

        logger.info("batch:{}",annotatedBean.getBatch());

        logger.info("timeout:{}",annotatedBean.getTimeout());

        return "Hello World"+" batch:"+annotatedBean.getBatch()+" timeout:"+annotatedBean.getTimeout();

    }

}
说明:可以看出,只要@Autowired注入刚才的Bean就可以直接使用。
6、运行,一般只需要在/opt/settings/server.properties中配置了env=DEV就可以直接直接启动(因为Client在本地仓库的包上已经有了meta_server的信息),但是在IDE上也可以通过指定VM的参数,增加系统属性变量-D来实现调试,配置如下:
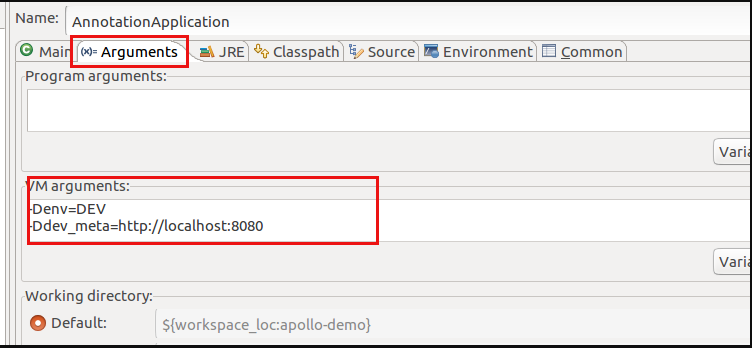
如果到处JAR运行,直接java -jar Spring-Boot-Demo.jar即可,不需要增加什么参数(但前提是配置了/opt/settings/server.properties的env的值)。
测试代码:https://github.com/easonjim/5_java_example/tree/master/apollotest/test1
携程Apollo(阿波罗)配置中心在Spring Boot项目快速集成的更多相关文章
- 携程Apollo(阿波罗)配置中心在.NET Core项目快速集成
.NET Core的支持文档大体上可以参考文档.Net客户端使用指南:https://github.com/ctripcorp/apollo/wiki/.Net%E5%AE%A2%E6%88%B7%E ...
- Apollo阿波罗配置中心docker
前言 在分布式系统中,要改个配置涉及到很多个系统,一个一个改效率低下,吃力不讨好.用配置中心可以解决这个问题.当然配置中心有不少,以下对比的表格是照搬Apollo Wiki的. 功能点 Apollo ...
- 阿里云服务器 配置 tomcat 发布spring boot项目 的具体操作 【使用公网ip】
1.前言 spring boot 转成war包 后用tomcat发布的具体操作在我另一篇随笔有详细记载,不论是window系统还是Linux系统,tomcat的发布配置都是一样的,所以这里不具体讲这个 ...
- 携程apollo系列-客户端集成
本文讲解如何在 Java 程序中集成 Apollo 配置, 主要涉及到一些基础用法. 对于一些高级用法, 比如如何加密/解密配置项 (可用于数据库密码配置), 如何动态切换数据源地址,如何动态切换日志 ...
- .NET Core微服务之基于Apollo实现统一配置中心
Tip: 此篇已加入.NET Core微服务基础系列文章索引 一.关于统一配置中心与Apollo 在微服务架构环境中,项目中配置文件比较繁杂,而且不同环境的不同配置修改相对频繁,每次发布都需要对应修改 ...
- .NET Core + K8S + Apollo 玩转配置中心
1.引言 Apollo(阿波罗)是携程框架部门研发的分布式配置中心,能够集中化管理应用不同环境.不同集群的配置,配置修改后能够实时推送到应用端,并且具备规范的权限.流程治理等特性,适用于微服务配置管理 ...
- spring boot rest 接口集成 spring security(2) - JWT配置
Spring Boot 集成教程 Spring Boot 介绍 Spring Boot 开发环境搭建(Eclipse) Spring Boot Hello World (restful接口)例子 sp ...
- spring boot rest 接口集成 spring security(1) - 最简配置
Spring Boot 集成教程 Spring Boot 介绍 Spring Boot 开发环境搭建(Eclipse) Spring Boot Hello World (restful接口)例子 sp ...
- 携程Apollo(阿波罗)配置中心Spring Boot迁移日志组件,使用配置中心进行管理的思路
说明: 1.Spring Boot项目默认使用logback进行日志管理 2.logback在启动时默认会自动检查是否有logback.xml文件,如果有时会有限加载这个文件. 3.那么如果是用配置中 ...
随机推荐
- CentOS 7 下配置 firewalld(firewall-cmd)实现 NAT 转发 软路由
如果配合 DHCP 服务或实现更多功能. ☼ NAT 转发软路由 开启 NAT 转发之后,只要本机可以上网,不论是单网卡还是多网卡,局域网内的其他机器可以将默认网关设置为已开启 NAT 转发的服务器 ...
- 掌握Spark机器学习库-01
第1章 初识机器学习 在本章中将带领大家概要了解什么是机器学习.机器学习在当前有哪些典型应用.机器学习的核心思想.常用的框架有哪些,该如何进行选型等相关问题. 1-1 导学 1-2 机器学习概述 1- ...
- iOS Programming UIWebView 2
iOS Programming UIWebView 1 Instances of UIWebView render web content. UIWebView可以显示web content. In ...
- Array和ArrayList之间的区别
. Array类型的变量在声明的同时必须进行实例化(至少得初始化数组的大小),而ArrayList可以只是先声明. . Array只能存储同构的对象,而ArrayList可以存储异构的对象. 同构的对 ...
- 【C++】异常简述(二):C++的异常处理机制
上文简述了在C语言中异常的处理机制,本文主要讲解C++中的异常处理. 一.异常的语法格式 在C++中,异常的抛出和处理主要使用了以下三个关键字:try. throw . catch.其格式如下: 当我 ...
- SQL 索引自动维护计划脚本
脚本功能: 1,查询数据库中,碎片率在5%以上(官方推荐),有一定数据里的表的索引. 2.如果碎片率在5%<碎片率<=30% 执行重新组织索引.如果在30%以上,执行重建索引 建议在执行 ...
- 原生 js 整理
常见的事件 window.event 代表着,事件的状态,只有在事件的过程中才有效.
- date - 打印或设置系统日期和时间
总览 date [选项]... [+格式] date [选项] [MMDDhhmm[[CC]YY][.ss]] 描述 根据指定格式显示当前时间或设置系统时间. -d, --date=STRING 显示 ...
- genymotion 双击打开后 图标只显示在任务栏 无法在电脑上显示
解决办法 删除 c:/users/user/AppData/local/Genymobile 例如:C:\Users\lenovo\AppData\Local\Genymobile 删除注册表:HK ...
- 外键,check,索引等,根据ID来检索详细信息
sql server OBJECTPROPERTY 函数 分类: Sql server2008-11-26 11:11 1562人阅读 评论(0) 收藏 举报 sql serverinsertdele ...