Spring Boot发布和调用RESTful web service
Spring Boot可以非常简单的发布和调用RESTful web service,下面参考官方指导体验一下
1.首先访问 http://start.spring.io/ 生成Spring Boot基础项目
或者使用git clone https://github.com/spring-guides/gs-rest-service.git
这里使用Maven导入IDEA如下:

此时项目已经可以启动,但是没有任何功能,可以看到启动日志中嵌入tomcat的信息:

2.添加代码:
@JsonIgnoreProperties(ignoreUnknown = true)

public class Greeting {

    private final long id;

    private final String content;

    public Greeting(long id, String content) {

        this.id = id;

        this.content = content;

    }

    public long getId() {

        return id;

    }

    public String getContent() {

        return content;

    }

}
---
@RestController

public class GreetingController {

    private static final String template = "Hello, %s!";

    private final AtomicLong counter = new AtomicLong();

    //@CrossOrigin(origins = "http://localhost:8081")

    @RequestMapping("/greeting")

    public Greeting greeting(@RequestParam(value="name", defaultValue="World") String name) {

        System.out.println("getName:"+name);

        return new Greeting(counter.incrementAndGet(),

                            String.format(template, name));

    }

}
---
此时再启动,然后使用浏览器访问 http://localhost:8080/greeting
浏览器显示
{"id":1,"content":"Hello, World!"}
可见Spring使用Jackson JSON自动将Greeting对象转为json
@RequestMapping注解将Http请求指向greeting()方法,可以通过@RequestMapping(method=GET)指定请求方式
@RequestParam注解将查询参数name绑定到greeting方法的name参数上,并指定了默认值。
@RestController注解相当于@Controller加@ResponseBody的效果。
接下来是调用WebService,通过Spring提供的RestTemplate类
添加代码:
public class Application {

    private static final Logger log = LoggerFactory.getLogger(Application.class);

    public static void main(String args[]) {

        RestTemplate restTemplate = new RestTemplate();

        for (int k = 0 ; k< 10;k++) {

            Greeting greeting = restTemplate.getForObject("http://localhost:8080/greeting?name=luangeng"+k, Greeting.class);

            System.out.println("getName "+greeting.toString());

        }

    }

}
---
使用AJAX调用WebService
写一个简单的Html页面:
<!DOCTYPE html>

<html>

    <head>

        <title>ws test</title>

        <script src="https://ajax.googleapis.com/ajax/libs/jquery/1.10.2/jquery.min.js"></script>

    </head>

    <body>

        <div>

            <p class="greeting-id">The ID is: </p>

            <p class="greeting-content">The content is: </p>

        </div>

    </body>

</html>

<script>

$().ready(function() {

    $.ajax({

        url: "http://localhost:8080/greeting?name=luangeng"

    }).then(function(data) {

       $('.greeting-id').append(data.id);

       $('.greeting-content').append(data.content);

    });

});

</script>
---
添加到jetty的webapp中,在8081端口启动jetty :java -jar ../start.jar jetty.http.port=8081 ,使用浏览器访问 http://localhost:8081/test.html 可看到浏览器控制台如下报错信息:

可知报错原因为8080拒绝访问,8080和8081端口不同源导致的。
打开跨域访问:在greeting方法上加@CrossOrigin(origins = "http://localhost:8081")注解即可
再次尝试即可看到浏览器界面显示如下:
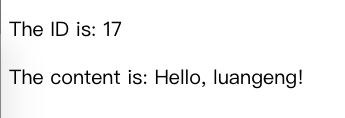
说明调用WS成功。
通过以上Spring官网的几个简单的例子可以看到使用SpringBoot发布和调用RESTful WebService是非常容易的。
常用注解:
@RestController :避免了每个方法都要添加@ResponseBody注解。@RestController 内部包含@ResponseBody注解,可以认为是 @Controller 和 @ResponseBody的组合。
@RequestBody : 如果方法参数被 @RequestBody注解,Spring将绑定HTTP请求体到那个参数上。Spring将根据请求中的ACCEPT或者 Content-Type header使用 HTTP Message converters 来将http请求体转化为domain对象。
@ResponseBody : 如果方法加上了@ResponseBody注解,Spring返回值到响应体。Spring将根据请求中的 Content-Type header(私下)使用 HTTP Message converters 来将domain对象转换为响应体。
ResponseEntity: HTTP响应(response)对象,可以指定状态码、头信息和响应体。包含要构建的HTTP Response 的全部信息。
@PathVariable: 参数注解,表示方法参数绑定到一个url变量中
end
Spring Boot发布和调用RESTful web service的更多相关文章
- 构建一个基于 Spring 的 RESTful Web Service
本文详细介绍了基于Spring创建一个“hello world” RESTful web service工程的步骤. 目标 构建一个service,接收如下HTTP GET请求: http://loc ...
- Building a RESTful Web Service Using Spring Boot In Eclipse
一.构建restful web service 创建Maven的java web工程,maven的pom文件加入依赖包 创建包hello Greeting.java package hello; pu ...
- Spring Boot 构建一个 RESTful Web Service
1 项目目标: 构建一个 web service,接收get 请求 http://localhost:8080/greeting 响应一个json 结果: {"id":1,&qu ...
- 翻译-使用Spring调用SOAP Web Service
原文链接: http://spring.io/guides/gs/consuming-web-service/ 调用SOAP web service 本指南将指导你使用Spring调用一个基于SOAP ...
- 用Spring Tools Suite(STS)开始一个RESTful Web Service
spring.io官方提供的例子Building a RESTful Web Service提供了用Maven.Gradle.STS构建一个RESTFul Web Service,实际上采用STS构建 ...
- 如何使用 JMeter 调用你的 Restful Web Service?进行简单的压力测试和自动化测试
表述性状态传输(REST)作为对基于 SOAP 和 Web 服务描述语言(WSDL)的 Web 服务的简单替代,在 Web 开发上得到了广泛的接受.能够充分证明这点的是主流 Web 2.0 服务提供商 ...
- Apache CXF实现Web Service(4)——Tomcat容器和Spring实现JAX-RS(RESTful) web service
准备 我们仍然使用 Apache CXF实现Web Service(2)——不借助重量级Web容器和Spring实现一个纯的JAX-RS(RESTful) web service 中的代码作为基础,并 ...
- Apache CXF实现Web Service(3)——Tomcat容器和不借助Spring的普通Servlet实现JAX-RS(RESTful) web service
起步 参照这一系列的另外一篇文章: Apache CXF实现Web Service(2)——不借助重量级Web容器和Spring实现一个纯的JAX-RS(RESTful) web service 首先 ...
- 【转】Spring 4.x实现Restful web service
http://my.oschina.net/yuyidi/blog/352909 首先我们还是跟之前一样,创建一个maven项目,不过因为Spring Restful web service是基于Sp ...
随机推荐
- Golang html encoding解析
自动解析html页面的编码格式: 需要依赖 golang.org/x/text 和 golang.org/x/net 这两个外部库 package main import ( "net/ht ...
- Go struct tag
struct成员变量标签(Tag)说明 要比较详细的了解这个,要先了解一下golang的基础,在golang中,命名都是推荐都是用驼峰方式,并且在首字母大小写有特殊的语法含义:包外无法引用.但是由经常 ...
- Asp.net 5 (MVC6) Areas 分区
1. Startup.cs 类的 Configure方法中, 加入Area路由设置代码: //app.UseMvcWithDefaultRoute(); app.UseMvc(routes=> ...
- 【P1369】矩形(贪心)
蒟蒻现在连DP都做不出来了,就只能做一些XJB贪心题,这个题题目向非常友好,100的数据范围一看就是让你跑O(n^4)的做法的,然而实际上并不是那么多,大约是,额,反正要快不少. 没什么好说的,直接枚 ...
- Hadoop的Docker镜像构建
1.Dockerfile ###Dockerfile -- beagin FROM ubuntu:trusty #MAINTAINER The Hue Team "https://githu ...
- 手动用maven安装jar的命令
手动用maven安装jar的命令: mvn install:install-file -DgroupId=com.oracle.jdbc -DartifactId=ojdbc5 -Dversion=1 ...
- Avoid RegionServer Hotspotting Despite Sequential Keys
n HBase world, RegionServer hotspotting is a common problem. We can describe this problem with a si ...
- JAVA学习前十天:小结、面向对象之”扑克牌“例子
2016年4月26号正式步入JAVA学习课堂,学习了第一节JAVA课程,由于以前有C语言基础,所以课程有点快! 第一天:学习了教材的第一部分,第一部分总共两章,分别是JAVA简介和JAVA基础语法. ...
- Spring boot 更改端口的几种方式
web服务的默认端口是8080,但有时候我们需要更改成其他端口,这里有几种端口修改方式: 在application.properties文件添加配置(最简单) server.port= 在applic ...
- SQL Server 性能优化之RML Utilities:快速入门(Quick Start)(1)
SQL Server 性能优化之RML Utilities:快速入门(Quick Start)(1) 安装Quick Start工具 RML(Replay Markup Language)是MS ...