java-mybaits-013-mybatis-Interceptor-拦截器执行顺序
一、概述
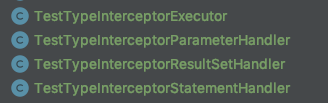
已知拦截器能够拦截四种类型:Executor、ParameterHandler、ResultSetHandler、StatementHandler。
1.1、不同类型拦截器的执行顺序
背景:不同类型
项目地址:https://github.com/bjlhx15/mybatis.git 中的mybatis-interceptor-001 基础项目
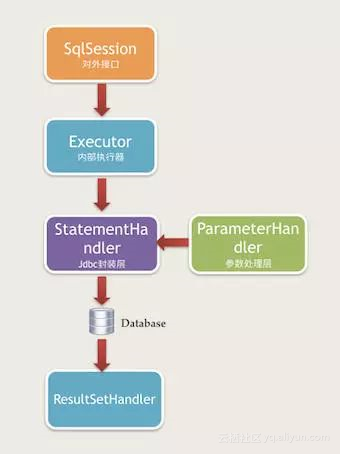
顺序【Executor→StatementHandler→ParameterHandler→ResultSetHandler】
1、编写拦截器代码
2、mybatis.xml配置
    <plugins>

        <!-- 拦截器配置 -->

        <plugin interceptor="com.github.bjlhx15.mybatis.readwrite.split.mybatisinterceptor.TestTypeInterceptorParameterHandler"/>

        <plugin interceptor="com.github.bjlhx15.mybatis.readwrite.split.mybatisinterceptor.TestTypeInterceptorResultSetHandler"/>

        <plugin interceptor="com.github.bjlhx15.mybatis.readwrite.split.mybatisinterceptor.TestTypeInterceptorStatementHandler"/>

        <plugin interceptor="com.github.bjlhx15.mybatis.readwrite.split.mybatisinterceptor.TestTypeInterceptorExecutor"/>

    </plugins>
3、执行测试输出
TestTypeInterceptorExecutor

[2019-07-29 10:37:25:540-http-nio-8080-exec-1] [INFO] - com.alibaba.druid.pool.DruidDataSource.init(DruidDataSource.java:930) - {dataSource-1} inited

TestTypeInterceptorStatementHandler

[2019-07-29 10:37:29:827-http-nio-8080-exec-1] [DEBUG] - org.apache.ibatis.logging.jdbc.BaseJdbcLogger.debug(BaseJdbcLogger.java:145) - ==>  Preparing: select 'true' as QUERYID, id, name, version, balance from accountbalance

TestTypeInterceptorParameterHandler

[2019-07-29 10:37:31:177-http-nio-8080-exec-1] [DEBUG] - org.apache.ibatis.logging.jdbc.BaseJdbcLogger.debug(BaseJdbcLogger.java:145) - ==> Parameters:

TestTypeInterceptorResultSetHandler
可以看到不论配置文件如何,执行顺序如下:【Executor→StatementHandler→ParameterHandler→ResultSetHandler】
1.2、同类型位置不同
背景:同类型位置不同
项目地址:https://github.com/bjlhx15/mybatis.git 中的mybatis-interceptor-002 基础项目
顺序:数组上下位置倒序【3拦截前处理 > 2拦截前处理 > 1拦截前处理 > executor.query() > 1拦截后处理 > 2拦截后处理 > 3拦截后处理】
1、编写拦截器

2、编写xml
    <plugins>

        <!-- 拦截器配置 -->

        <plugin interceptor="com.github.bjlhx15.mybatis.readwrite.split.mybatisinterceptor.Test1Interceptor"/>

        <plugin interceptor="com.github.bjlhx15.mybatis.readwrite.split.mybatisinterceptor.Test2Interceptor"/>

    </plugins>
3、执行测试输出
Test2Interceptor

Test1Interceptor
4、why
查看mybatis配置org.apache.ibatis.session.Configuration。中创建
    public Executor newExecutor(Transaction transaction, ExecutorType executorType) {

        executorType = executorType == null ? this.defaultExecutorType : executorType;

        executorType = executorType == null ? ExecutorType.SIMPLE : executorType;

        Object executor;

        if (ExecutorType.BATCH == executorType) {

            executor = new BatchExecutor(this, transaction);

        } else if (ExecutorType.REUSE == executorType) {

            executor = new ReuseExecutor(this, transaction);

        } else {

            executor = new SimpleExecutor(this, transaction);

        }

        if (this.cacheEnabled) {

            executor = new CachingExecutor((Executor)executor);

        }

        Executor executor = (Executor)this.interceptorChain.pluginAll(executor);

        return executor;

    }
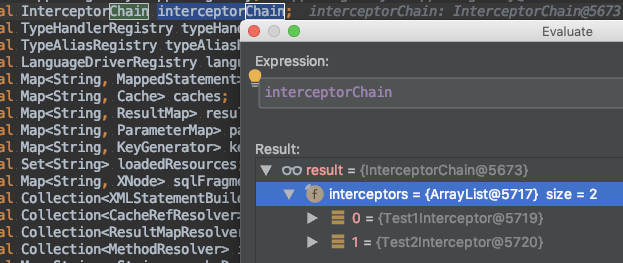
interceptorChain是在Configuration类中new出来的。它等价于mybatis-config中的<plugins></plugins>
查看 pluginAll添加顺序
    private final List<Interceptor> interceptors = new ArrayList();

    public InterceptorChain() {

    }

    public Object pluginAll(Object target) {

        Interceptor interceptor;

        for(Iterator i$ = this.interceptors.iterator(); i$.hasNext(); target = interceptor.plugin(target)) {

            interceptor = (Interceptor)i$.next();

        }

        return target;

    }
可以看到 interceptorChain 拦截器顺序就是 配置顺序
但是在经过代理后,

3拦截前处理 > 2拦截前处理 > 1拦截前处理 > executor.query() > 1拦截后处理 > 2拦截后处理 > 3拦截后处理
1.3、同类型不同配置位置
背景:有spring中配置,还有mybatis中配置
项目地址:https://github.com/bjlhx15/mybatis.git 中的mybatis-interceptor-002 基础项目
顺序:数组上下位置倒序【mybatis配置拦截器2 > mybatis配置拦截器1 > spring配置拦截器2 >spring配置拦截器1 > executor.query() > spring配置拦截器1 > spring配置拦截器2 > mybatis配置拦截器1 > mybatis配置拦截器2 】
1、编写拦截器

2、spring中xml配置
    <bean id="wrSqlSessionFactory" class="org.mybatis.spring.SqlSessionFactoryBean">

        <!-- 实例化sqlSessionFactory时需要使用上述配置好的数据源以及SQL映射文件 -->

        <property name="dataSource" ref="wrDataSource"/>

        <property name="mapperLocations" value="classpath:mapper/auto/**/*.xml"/>

        <!--    mybatis的全局配置文件 如没有特需 可以不配置    -->

        <property name="plugins">

            <array>

                <bean class="com.github.bjlhx15.mybatis.readwrite.split.mybatisinterceptor.TestnterceptorIString1"/>

                <bean class="com.github.bjlhx15.mybatis.readwrite.split.mybatisinterceptor.TestnterceptorIString2"/>

            </array>

        </property>

        <property name="configLocation" value="classpath:mybatis.xml"/>

    </bean>
mybatis中配置
<?xml version="1.0"  encoding="UTF-8"  ?>

<!DOCTYPE configuration PUBLIC  "-//mybatis.org//DTD Config 3.0//EN"

        "http://mybatis.org/dtd/mybatis-3-config.dtd">

<configuration>

    <plugins>

        <!-- 拦截器配置 -->

        <plugin interceptor="com.github.bjlhx15.mybatis.readwrite.split.mybatisinterceptor.TestInterceptorMybatis1"/>

        <plugin interceptor="com.github.bjlhx15.mybatis.readwrite.split.mybatisinterceptor.TestInterceptorMybatis2"/>

    </plugins>

</configuration>
3、输出
TestInterceptorMybatis2

TestInterceptorMybatis1

TestnterceptorIString2

TestnterceptorIString1
可以调整 spring中configLocation和plugins上下位置,输出一致
但是
java-mybaits-013-mybatis-Interceptor-拦截器执行顺序的更多相关文章
- Mybatis Interceptor 拦截器原理 源码分析
Mybatis采用责任链模式,通过动态代理组织多个拦截器(插件),通过这些拦截器可以改变Mybatis的默认行为(诸如SQL重写之类的),由于插件会深入到Mybatis的核心,因此在编写自己的插件前最 ...
- mybatis Interceptor拦截器代码详解
mybatis官方定义:MyBatis 是一款优秀的持久层框架,它支持定制化 SQL.存储过程以及高级映射.MyBatis 避免了几乎所有的 JDBC 代码和手动设置参数以及获取结果集.MyBatis ...
- SpringMVC自定义多个拦截器执行顺序
一.正常流程下的拦截器(全部放行) 1.springMVC中拦截器实现这个接口HandlerInterceptor 第一个拦截器 HandlerInterceptor1 public class ...
- Struts2的默认拦截器执行顺序
我们在写Struts2的时候package属性默认都是差不多这样吧 <package name="packageName" namespace="/" e ...
- Springmvc的拦截器执行顺序及各方法作用
实现HandlerInterceptor接口或者继承HandlerInterceptor的子类,比如Spring 已经提供的实现了HandlerInterceptor 接口的抽象类HandlerInt ...
- Mybatis拦截器执行过程解析
上一篇文章 Mybatis拦截器之数据加密解密 介绍了 Mybatis 拦截器的简单使用,这篇文章将透彻的分析 Mybatis 是怎样发现拦截器以及调用拦截器的 intercept 方法的 小伙伴先按 ...
- SpringMVC 中的Interceptor 拦截器
1.配置拦截器 在springMVC.xml配置文件增加: <mvc:interceptors> <!-- 日志拦截器 --> <mvc:interceptor> ...
- Mybatis之拦截器原理(jdk动态代理优化版本)
在介绍Mybatis拦截器代码之前,我们先研究下jdk自带的动态代理及优化 其实动态代理也是一种设计模式...优于静态代理,同时动态代理我知道的有两种,一种是面向接口的jdk的代理,第二种是基于第三方 ...
- MyBatis实现拦截器分页功能
1.原理 在mybatis使用拦截器(interceptor),截获所执行方法的sql语句与参数. (1)修改sql的查询结果:将原sql改为查询count(*) 也就是条数 (2)将语句sql进行拼 ...
- Spring中的Interceptor 拦截器 专题
spring-webmvc-4.3.14.RELEASE.jar org.springframework.web.servlet.DispatcherServlet#doDispatch /** * ...
随机推荐
- 运维开发笔记整理-QueryDict对象
运维开发笔记整理-QueryDict对象 作者:尹正杰 版权声明:原创作品,谢绝转载!否则将追究法律责任. 客户端发送数据请求有很多种,相信运维人员已经很清楚了,如果不太清楚的话可以参考我之前的学习笔 ...
- python_ joinablequeue详解
2019-5-20未命名文件 新建模板小书匠 欢迎使用 小书匠(xiaoshujiang)编辑器,您可以通过 小书匠主按钮>模板 里的模板管理来改变新建文章的内容. joinablequeue实 ...
- String字符串常量池简介
直接贴代码---> public class Test { public static void main(String[] args) { /** * 为了提升字符串的访问效率,在程序中使用了 ...
- vuex 随笔
vuex刷新数据消失问题: 在项目的入口页面(App.vue)里添加监听刷新事件: 或者使用插件:npm install vuex-persistedstate --save
- js实现发送验证码倒计时效果
<!doctype html> <html lang="en"> <head> <meta charset="UTF-8&quo ...
- [Dart] Manipulate Lists/Arrays in Dart
We will learn how to work with Lists using a variety of methods made available in the dart:core libr ...
- Oracle ORA-00600[2662] 解决
一.问题描述 1.数据库情况 1)数据库版本:11.2.0.4: 2)未开启归档: 3)没有备份:无RMAN备份.无DUMP备份: 4)数据库redo log 日志组,每组只有一个成员: 2.问题出现 ...
- 四十五.加密与解密 AIDE入侵检测系统 扫描与抓包
一.加密与解密 1.1 常见的加密算法 对称加密:怎么加密,就怎么解密 DES Date Encryption Standard AES Advance Encryption Standard 非对称 ...
- fdisk分区命令
fdisk是Linux系统中最常用的分区工具,通过这个命令也可以查看系统中所有可用的分区,但是这个命令只支持MBR的分区表(这句话应该只对某些系统,CentOS7-1810适用,Debian9.5和o ...
- [other] Div
https://www.luogu.org/problemnew/show/U16765 解法一 随机输出一组合法解. 复杂度 O(1) 预计得分 10~??? 解法二 看完题目基本能想到大力贪心,通 ...