
5 LAMP配置管理:模块(state、file、pkg、service)、jinja模板、job管理、redis主从
1. 配置管理:state和file
https://docs.saltstack.com/en/latest/topics/states/index.html
1.state状态模块
希望主机,apache ,启动状态,关闭状态,
写法1
[root@linux-node1 web]# pwd

/srv/salt/base/web

[root@linux-node1 web]# vim apache.sls

apache:

  pkg.installed:

    - name: httpd

  service.running:

    - name: httpd

  file.managed:

    - name: /etc/httpd/conf/httpd.conf

    - source: salt://apache/files/httpd.conf

    - usr: root

    - group: root

    - mode:
Id声明,全局(test,dev,base环境)唯一

Pkg 状态模块

. 引用方法

Installed 模块方法

Name: httpd 参数
2.file 文件管理模块
Name :管理文件的路径
在id,Apache下,每个模块只能用一次
写法2
[root@linux-node1 web]# vim apache.sls

apache-install:

  pkg.installed:

    - name: httpd

apache-service:

  service.running

    - name: httpd

apache-config:

  file.managed:

    - name: /etc/httpd/conf/httpd.conf

    - source: salt://apache/files/httpd.conf

    - usr: root

    - group: root

    - mode:
写法3
没有声明name,id就是name
 apache:

  pkg.installed:

    - name: httpd

  service.running:

    - name: httpd

  file.managed:

    - name: /etc/httpd/conf/httpd.conf

    - source: salt://apache/files/httpd.conf

    - usr: root

    - group: root

    - mode:

/etc/httpd/conf/php.conf

  file.managed:

    - source: salt://apache/files/php.conf

    - user: root

    - group: root

    - mode:

2.自动化安装LAMP:状态设计
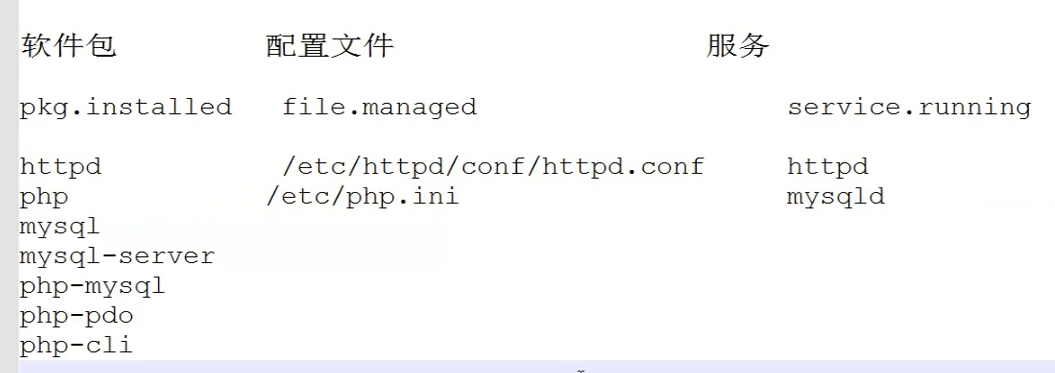
1. Pkg模块
指定版本
指定仓库
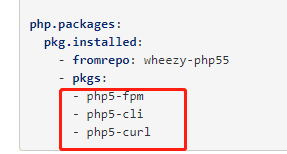
需要安装的软件包
[root@linux-node1 web]# yum install -y httpd php mysql-server php-mysql php-pdo php-cli
2. jinja模板
监控本地的mac ip
用模板的实现jinja
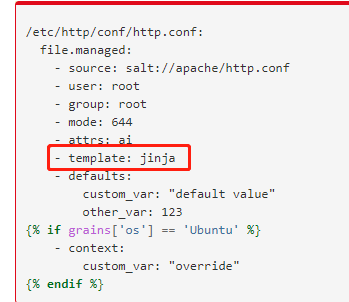
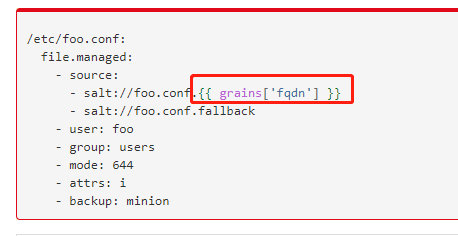
3.file模块
File可以使用grains
4.Service模块
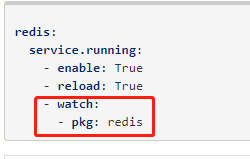
监控文件,文件更新,自动重载服务
3.LAMP的状态实现
学saltstack,学的是思路,三段式
前期版本:
学习状态,先把安装,配置写在一起
三段式: 安装 配置 启动
创建目录
[root@linux-node1 prod]# pwd
/srv/salt/prod
[root@linux-node1 prod]# mkdir apache
[root@linux-node1 prod]# mkdir php
[root@linux-node1 prod]# mkdir mysql
1.apache
# sls 配置文件
[root@linux-node1 prod]# cd apache/
[root@linux-node1 apache]# vim apache.sls
apache-install:

  pkg.installed:

    - name: httpd

apache-config:

  file.managed:

    - name: /etc/httpd/conf/httpd.conf

    - source: salt://apache/files/httpd.conf

    - user: root

    - group: root

    - mode:

apache-service:

  service.running:

    - name: httpd

    - enable: True
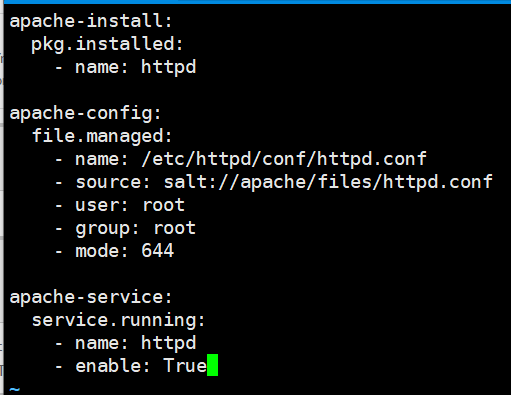
source :对应当前目录,相对路径
- source: salt://apache/files/httpd.conf
你这个环境的根路径 salt: /srv/salt/
# 配置文件,cp
[root@linux-node1 apache]# mkdir files
[root@linux-node1 apache]# cd files/
[root@linux-node1 files]# cp /etc/httpd/conf/httpd.conf .
# 执行命令
默认base目录

[root@linux-node1 files]# salt 'linux-node1*' state.sls apache.apache saltenv=prod
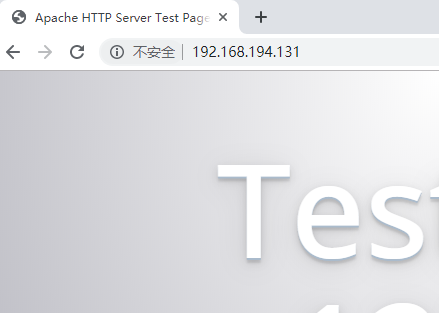
# test
# init.sls
[root@linux-node1 apache]# pwd
/srv/salt/prod/apache
[root@linux-node1 apache]# mv apache.sls init.sls
2.php
# php目录
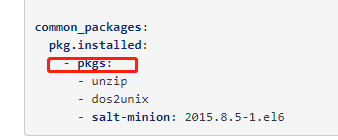
Php不需要启动服务,以模块的方式通信
安装多个,查看文档
[root@linux-node1 prod]# ls
apache mysql php
[root@linux-node1 prod]# cd php/
[root@linux-node1 php]# mkdir files
[root@linux-node1 php]# vim init.sls
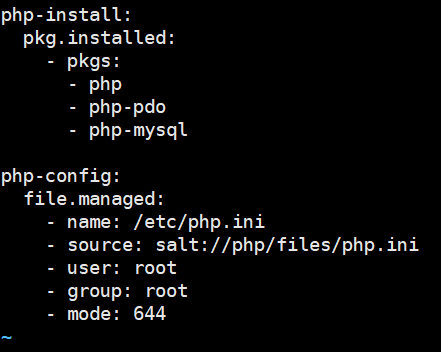
# cp php配置文件
[root@linux-node1 php]# cp /etc/php.ini files/
3.mysql
安装 配置 启动
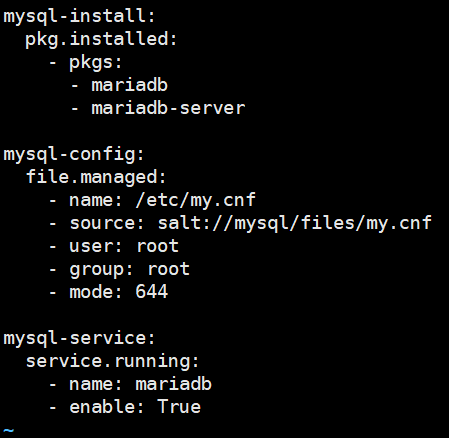
[root@linux-node1 prod]# vim mysql/init.sls
mysql-install:

  pkg.installed:

    - pkgs:

      - mariadb

      - mariadb-server

mysql-config:

  file.managed:

    - name: /etc/my.cnf

    - source: salt://mysql/files/my.cnf

    - user: root

    - group: root

    - mode:

mysql-service:

  service.running:

    - name: mariadb

    - enable: True
# 配置文件
[root@linux-node1 mysql]# mkdir files
[root@linux-node1 mysql]# cd files/
[root@linux-node1 files]# cp /etc/my.cnf .
4.执行state
文件目录
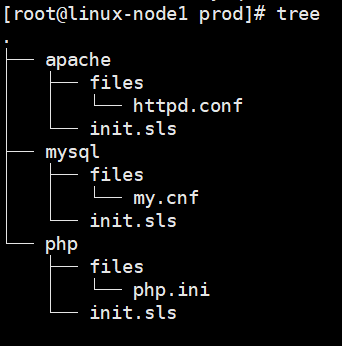
执行
[root@linux-node1 salt]# salt -S '192.168.194.131' state.sls php.init saltenv=prod
[root@linux-node1 salt]# salt -S '192.168.194.131' state.sls mysql.init saltenv=prod
5. 高级状态.
[root@linux-node1 base]# vim top.sls
[root@linux-node1 base]# pwd
/srv/salt/base
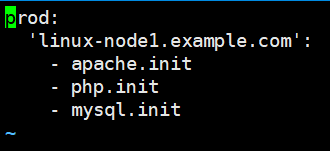
[root@linux-node1 base]# salt 'linux-node1*' state.highstate
4. 配置管理:状态间的关系
1. Include功能
https://docs.saltstack.com/en/latest/topics/tutorials/states_pt3.html
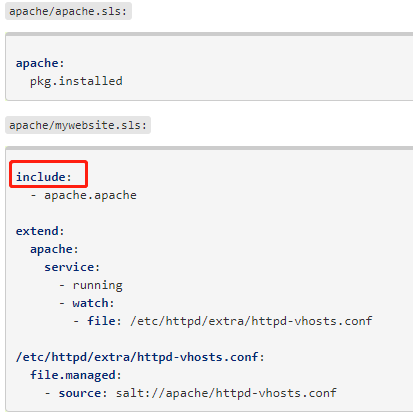
[root@linux-node1 prod]# pwd
/srv/salt/prod
[root@linux-node1 prod]# vim lamp.sls
include:

  - apache.init

  - php.init

  - mysql.init
[root@linux-node1 prod]# vim ../base/top.sls
prod:

  'linux-node1.example.com':

    - lamp
[root@linux-node1 prod]# salt -S '192.168.194.131' state.highstate
2.Extend扩展功能
- 增加其他功能,修改配置文件,到最终版本
- Extend 语法
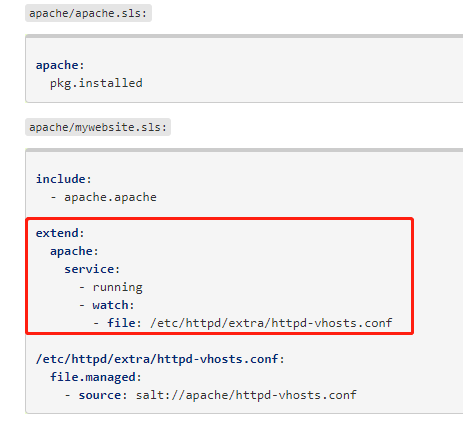
需求:只能在机器1上php-mbstring 包
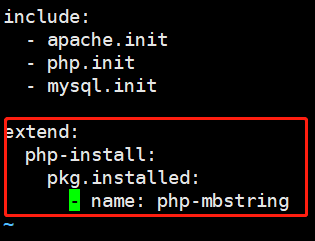
[root@linux-node1 prod]# vim lamp.sls

include:

  - apache.init

  - php.init

  - mysql.init

extend:

  php-install:

    pkg.installed:

      - name: php-mbstring

[root@linux-node1 prod]# salt -S '192.168.194.131' state.highstate
3.Require依赖
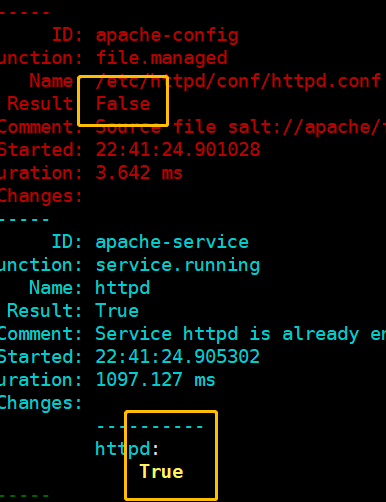
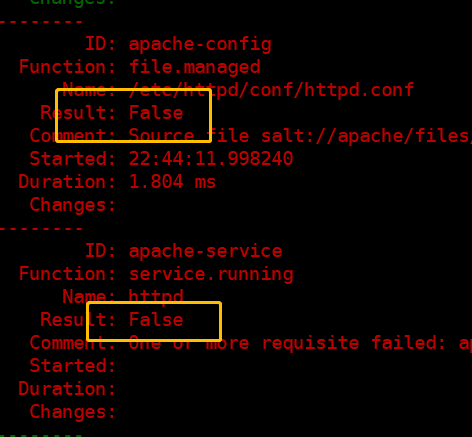
需求:if 上个操作,安装不成功或者配置不成功,下一个不执行
(1)反例子
[root@linux-node1 apache]# vim init.sls
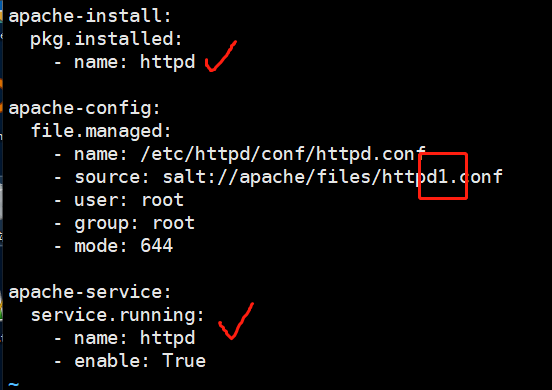
[root@linux-node1 apache]# salt -S '192.168.194.131' state.highstate
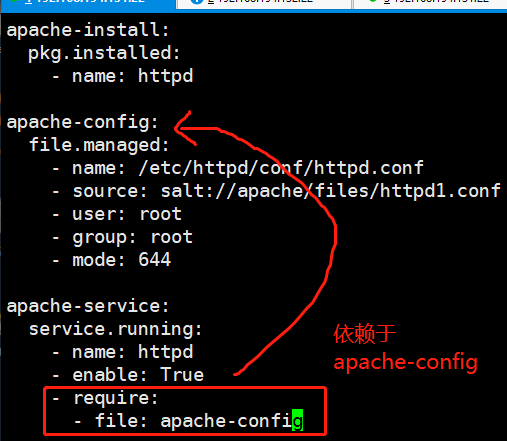
(2)依赖于上个操作
[root@linux-node1 apache]# systemctl stop httpd
apache-install:

  pkg.installed:

    - name: httpd

 apache-config:

  file.managed:

    - name: /etc/httpd/conf/httpd.conf

    - source: salt://apache/files/httpd1.conf

    - user: root

    - group: root

    - mode:

apache-service:

  service.running:

    - name: httpd

    - enable: True

    - require:

      - file: apache-config
[root@linux-node1 apache]# salt -S '192.168.194.131' state.highstate
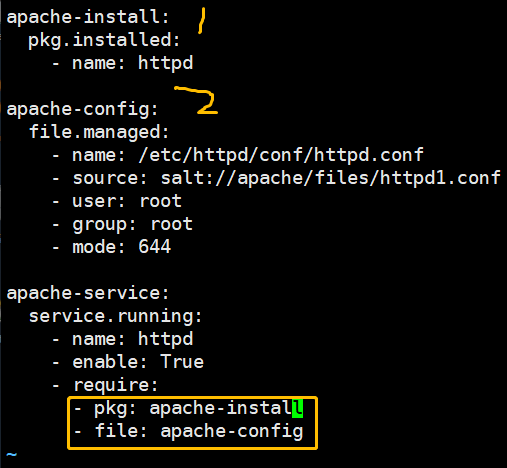
(3)最终版本:
启动 依赖于 安装,配置
[root@linux-node1 apache]# vim init.sls
[root@linux-node1 apache]# salt -S '192.168.194.131' state.highstate
apache-install:

  pkg.installed:

    - name: httpd

apache-config:

  file.managed:

    - name: /etc/httpd/conf/httpd.conf

    - source: salt://apache/files/httpd.conf

    - user: root

    - group: root

    - mode:

apache-service:

  service.running:

    - name: httpd

    - enable: True

    - require:

      - pkg: apache-install

      - file: apache-config
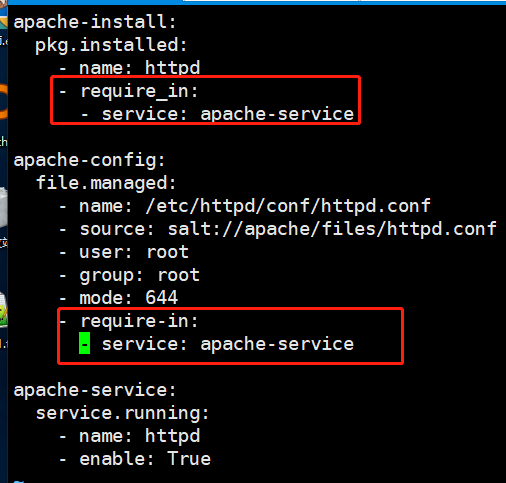
(4)Require 我依赖于谁
Require_in 我被谁依赖
[root@linux-node1 apache]# vim init.sls
apache-install:

  pkg.installed:

    - name: httpd

    - require_in:

      - service: apache-service

apache-config:

  file.managed:

    - name: /etc/httpd/conf/httpd.conf

    - source: salt://apache/files/httpd.conf

    - user: root

    - group: root

    - mode:

    - require-in:

      - service: apache-service

apache-service:

  service.running:

    - name: httpd

    - enable: True
4.Watch功能:同时有require功能
https://docs.saltstack.com/en/latest/ref/states/all/salt.states.service.html#salt.states.service.mod_watch
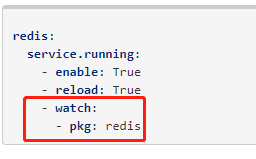
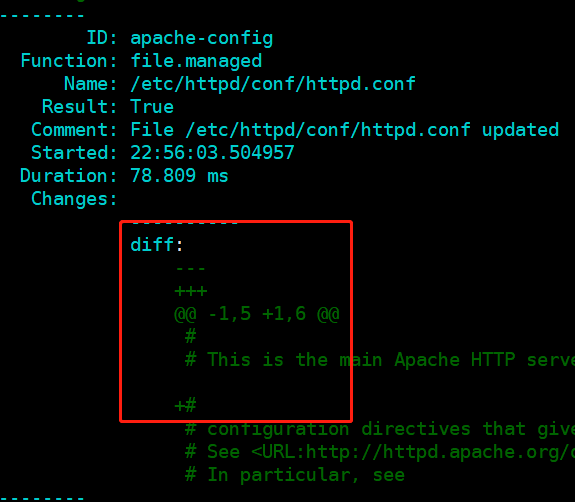
该配置文件变化,这个服务重启,重载
[root@linux-node1 apache]# vim files/httpd.conf
[root@linux-node1 apache]# salt -S '192.168.194.131' state.highstate
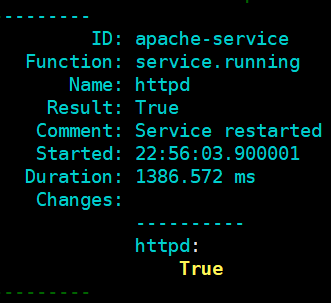
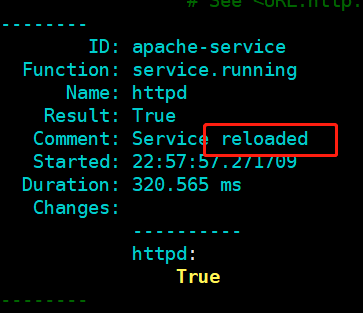
重载
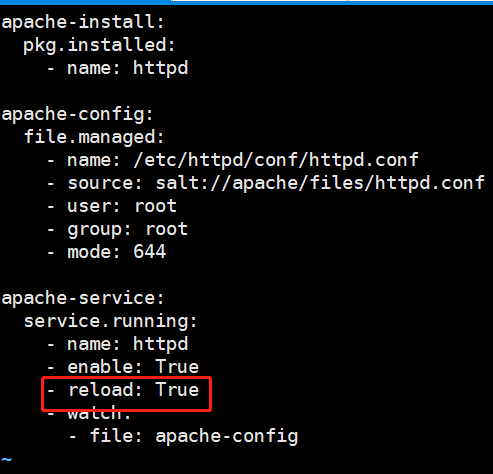
apache-install:

  pkg.installed:

    - name: httpd

apache-config:

  file.managed:

    - name: /etc/httpd/conf/httpd.conf

    - source: salt://apache/files/httpd.conf

    - user: root

    - group: root

    - mode:

apache-service:

  service.running:

    - name: httpd

    - enable: True

    - reload: True

    - watch:

      - file: apache-config
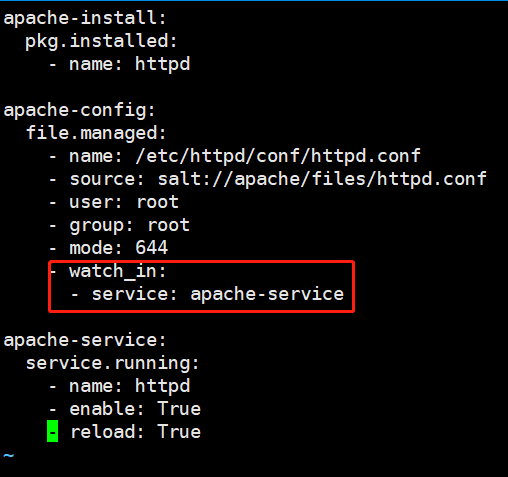
Watch_in
[root@linux-node1 apache]# cat init.sls
apache-install:

  pkg.installed:

    - name: httpd

apache-config:

  file.managed:

    - name: /etc/httpd/conf/httpd.conf

    - source: salt://apache/files/httpd.conf

    - user: root

    - group: root

    - mode:

    - watch_in:

      - service: apache-service

apache-service:

  service.running:

    - name: httpd

    - enable: True

    - reload: True
5. 配置管理,状态间的条件判断
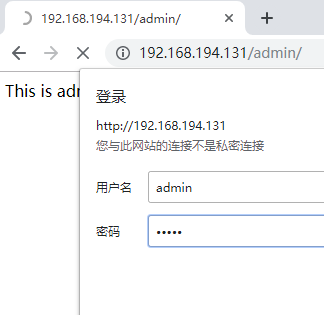
需求:Admin输入用户名,密码才能登陆
1.Apache认证登陆
https://blog.csdn.net/alexander_phper/article/details/52242474
- 修改配置
- 用户名密码文件
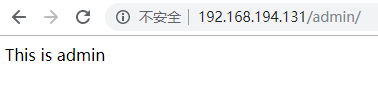
(1)配置admin页面
[root@linux-node1 apache]# cd /var/www/html/
[root@linux-node1 html]# mkdir admin
[root@linux-node1 html]# cd admin/
[root@linux-node1 admin]# vim index.html
This is admin
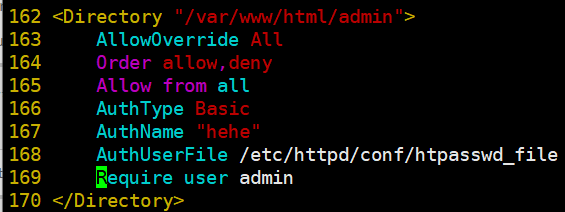
(2)配置
# 配置httpd
[root@linux-node1 files]# pwd
/srv/salt/prod/apache/files
[root@linux-node1 files]# vim httpd.conf
<Directory "/var/www/html/admin">

    AllowOverride All

    Order allow,deny

    Allow from all

    AuthType Basic

    AuthName "hehe"

    AuthUserFile /etc/httpd/conf/htpasswd_file

    Require user admin

</Directory>
[root@linux-node1 files]# whereis htpasswd
htpasswd: /usr/bin/htpasswd /usr/share/man/man1/htpasswd.1.gz
[root@linux-node1 files]# rpm -qf /usr/bin/htpasswd
httpd-tools-2.4.6-89.el7.centos.x86_64
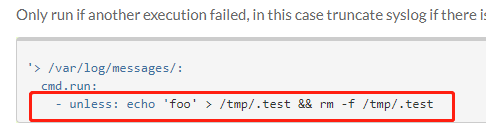
2. Cmd认证模块
Unless
https://docs.saltstack.com/en/latest/ref/states/all/salt.states.cmd.html
3.配置init.sls
[root@linux-node1 apache]# pwd
/srv/salt/prod/apache
[root@linux-node1 apache]# vim init.sls
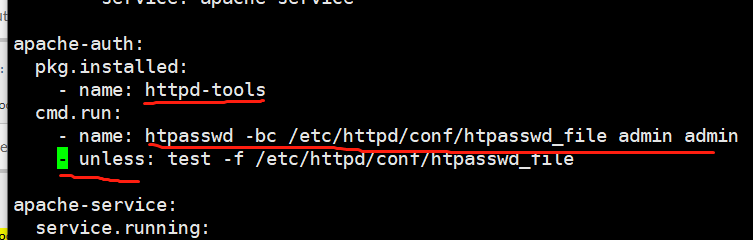
4 unless状态判断
If 文件存在:不执行
Else:不存在,执行

Unless
条件为假,执行
apache-install:

  pkg.installed:

    - name: httpd

apache-config:

  file.managed:

    - name: /etc/httpd/conf/httpd.conf

    - source: salt://apache/files/httpd.conf

    - user: root

    - group: root

    - mode:

    - watch_in:

      - service: apache-service

apache-auth:

  pkg.installed:

    - name: httpd-tools

  cmd.run:

    - name: htpasswd -bc /etc/httpd/conf/htpasswd_file admin admin

    - unless: test -f /etc/httpd/conf/htpasswd_file

apache-service:

  service.running:

    - name: httpd

    - enable: True

    - reload: True
test
6 配置管理 jinja模板
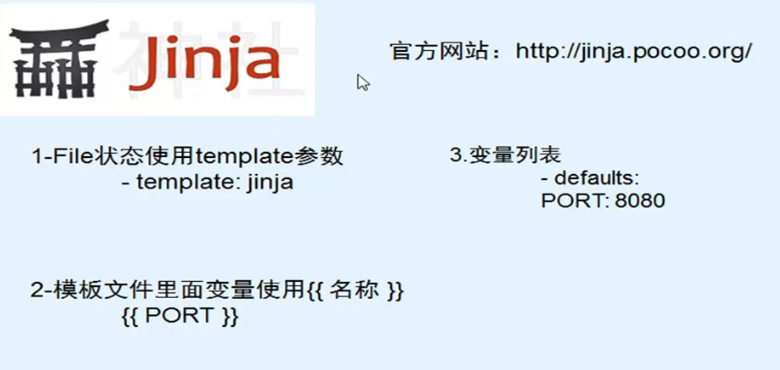
需求:配置文件,监听minion自己本地的ip地址
1.学习方法
1 官方文档
https://docs.saltstack.com/en/latest/contents.html
2 配置管理
https://docs.saltstack.com/en/latest/topics/states/index.html
3 file模块
https://docs.saltstack.com/en/latest/ref/states/all/index.html#all-salt-states
4 搜索jinja
https://docs.saltstack.com/en/latest/ref/states/all/salt.states.file.html#module-salt.states.file
2.jinja
Salt默认模板 jinja2
Jinja2 是一个现代的,设计者友好的,仿照 Django 模板的 Python 模板语言。
http://docs.jinkan.org/docs/jinja2/templates.html
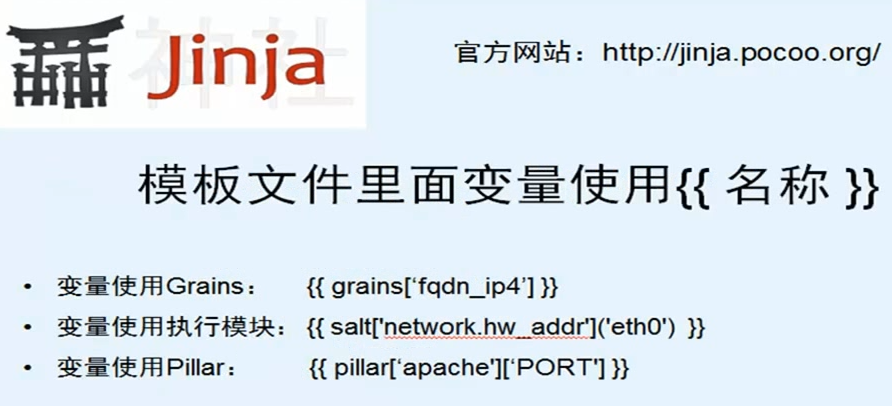
两种分隔符: {% ... %} 和 {{ ... }} 。
前者用于执行诸如 for 循环 或赋值的语句,
后者把表达式的结果打印到模板上
如何区分这是一个模板
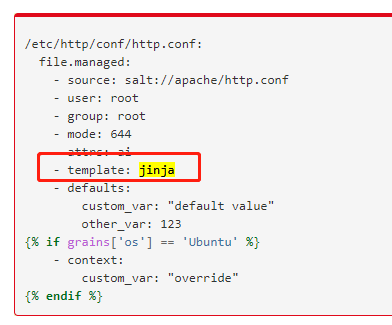
3. 如何配置jinja?
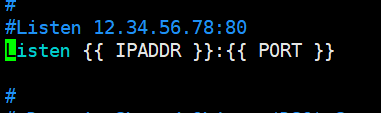
1. 修改模板配置文件
2 修改sls增加
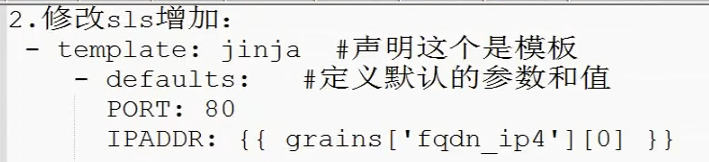
conf配置
[root@linux-node1 apache]# pwd

/srv/salt/prod/apache

[root@linux-node1 apache]# vim files/httpd.conf

Listen {{ IPADDR }}:{{ PORT }}
sls
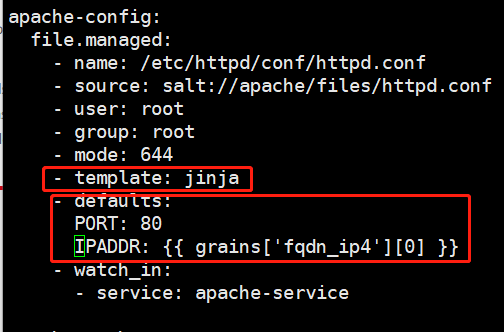
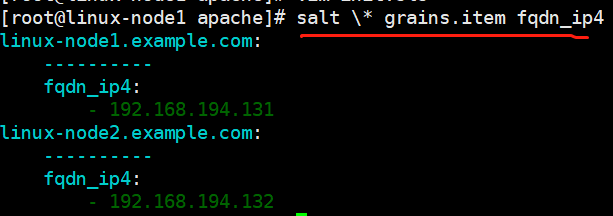
3.验证
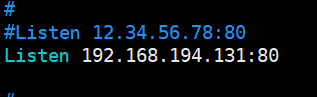
[root@linux-node1 apache]# salt -S '192.168.194.131' state.highstate
[root@linux-node1 apache]# vim /etc/httpd/conf/httpd.conf
另一个方法:(不推荐)

7. job管理
执行1次highstate,会产生1个任务
最近干了什么事
装某个东西,太慢了给我,停止
1.查看job
[root@linux-node1 ~]# cd /var/cache/salt/master/jobs/

[root@linux-node1 jobs]# ls

  0d            5a      7e  8d  9a  a5  b4  c0  cd  df  ea  f6

  0e  1a          5b        8e  9b  a7  b6  c2  cf  e0  eb  f8

  0f  1b          5c        8f  9d  a8  b8  c4  d2  e1  ec  f9

    1c  2a        5d          9e  a9  b9  c5  d3  e2  ee  fa

    1e  2b        5e          9f  aa  ba  c6  d4  e3  f0  fb

    1f  2c        5f  6a        a0  ab  bb  c7  d5  e4  f1  fc

      2e  3a  4a      6b        a1  ac  bc  c8  d7  e5  f2  fe

0a      2f  3b  4c      6c  7a      a2  ad  bd  c9  d9  e7  f3  ff

0b        3d  4d      6e  7b  8a    a3  ae  be  ca  da  e8  f4

0c        3f  4e        7c  8c    a4  b3  bf  cc  dd  e9  f5

[root@linux-node1 jobs]# cd 6c/

[root@linux-node1 6c]# ls

210bdfecd6c424d9d7e1c5bbe2f171  53117bf95a2bea7fbf2d81c8c471ce

[root@linux-node1 6c]# ll 210bdfecd6c424d9d7e1c5bbe2f171/

total

-rw-r--r--.  root root  Jul  : jid

drwxr-xr-x.  root root  Jul  : linux-node1.example.com

[root@linux-node1 6c]# cd 210bdfecd6c424d9d7e1c5bbe2f171/

[root@linux-node1 210bdfecd6c424d9d7e1c5bbe2f171]# cat jid

[root@linux-node1 210bdfecd6c424d9d7e1c5bbe2f171]# tree

.

├── jid

└── linux-node1.example.com

    ├── out.p

    └── return.p

 directory,  files
缓存时间默认24h
[root@linux-node1 ~]# vim /etc/salt/master

2.saltutil模块.job
远程执行
https://docs.saltstack.com/en/latest/topics/execution/index.html
执行模块
https://docs.saltstack.com/en/latest/ref/modules/all/index.html#all-salt-modules
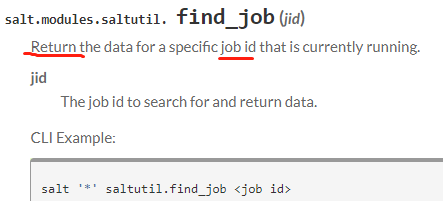
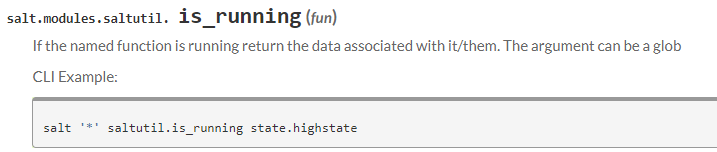
Saltutil
Test
[root@linux-node1 ~]# salt 'linux-node2*' cmd.run 'sleep 160'
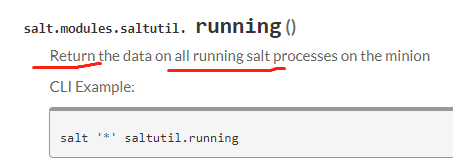
[root@linux-node1 ~]# salt \* saltutil.running
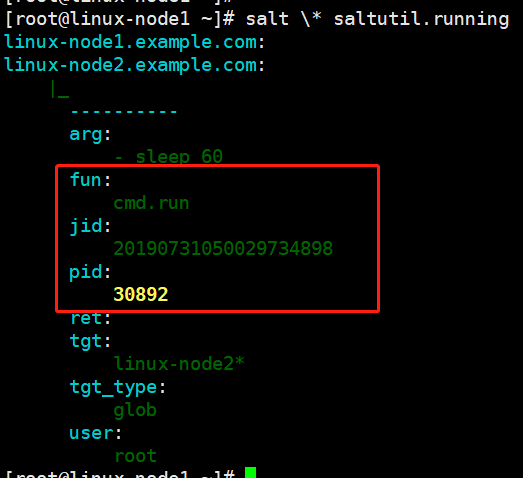
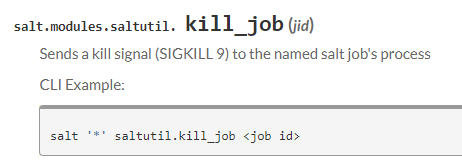
[root@linux-node1 ~]# salt 'linux-node2*' saltutil.kill_job 20190731050029734898
案例:每5分钟给所有机器跑一下状态
8.总结
1. 作业:saltstack部署redis主从配置
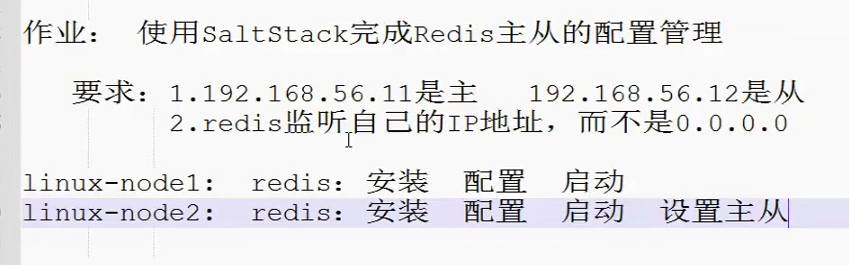
init.sls
[root@linux-node1 redis]# pwd

/srv/salt/prod/redis

[root@linux-node1 redis]# tree

.

├── files

│   └── redis.conf

├── init.sls

├── master.sls

└── slave.sls

1 directory, 4 files

[root@linux-node1 redis]# vim init.sls

redis-install:

  pkg.installed:

    - name: redis

redis-config:

  file.managed:

    - name: /etc/redis.conf

    - source: salt://redis/files/redis.conf

    - user: root

    - group: root

    - mode: 644

    - template: jinja

    - defaults:

      PORT: 6379

      IPADDR: {{ grains['fqdn_ip4'][0] }}

redis-service:

  service.running:

    - name: redis

    - enable: True

    - reload: True

    - watch:

      - file: redis-config
conf
[root@linux-node1 redis]# cp /etc/redis.conf files/

bind {{ IPADDR }}

port {{ PORT }}

daemonize yes
master
slave
[root@linux-node1 redis]# vim master.sls

include:

  - redis.init

[root@linux-node1 redis]# vim slave.sls

include:

  - redis.init

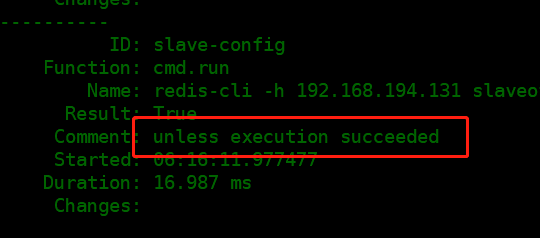
slave-config:

  cmd.run:

    - name: redis-cli -h 192.168.194.131 slaveof 192.168.194.132 6379
    - unless: redis-cli -h 192.168.194.132 info |grep role:slave

    - require:

      - service: redis-service
node2上实验命令
[root@linux-node2 modules]# redis-cli -h 192.168.194.132 info

[root@linux-node2 modules]# redis-cli -h 192.168.194.132 slaveof 192.168.194.131 6379

[root@linux-node2 modules]# redis-cli -h 192.168.194.132

192.168.194.132:6379> info [sectio
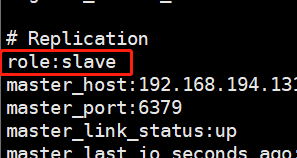
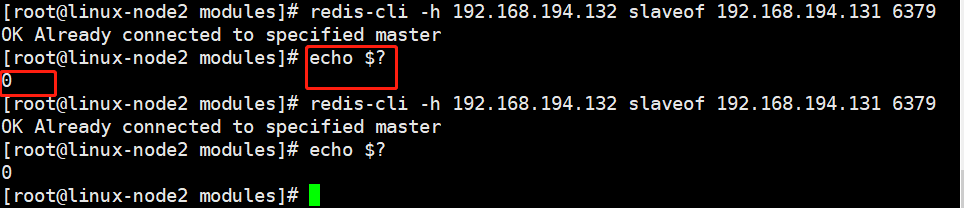
不需要unless
执行top
[root@linux-node1 base]# vim top.sls

prod:

'linux-node1.example.com':

- lamp

- redis.master

'linux-node2.example.com':

- lamp

- redis.slave

[root@linux-node1 base]# pwd

/srv/salt/base

[root@linux-node1 redis]# salt \* state.highstate
设置node2为主
[root@linux-node2 modules]# redis-cli -h 192.168.194.132

192.168.194.132:6379>

192.168.194.132:6379> slaveof no one

OK
unless应用
[root@linux-node2 modules]# redis-cli -h 192.168.194.132 info |grep role:slave

role:slave

[root@linux-node2 modules]# echo $?

0
Watch
生产不要watch
生产 test=True
不用* 用1个节点
1.学习saltstack思路:三段式
2.学习模块方法
1 官方文档
https://docs.saltstack.com/en/latest/contents.html
2 配置管理
https://docs.saltstack.com/en/latest/topics/states/index.html
3 file模块
https://docs.saltstack.com/en/latest/ref/states/all/index.html#all-salt-states
4 搜索jinja
https://docs.saltstack.com/en/latest/ref/states/all/salt.states.file.html#module-salt.states.file
5 LAMP配置管理:模块(state、file、pkg、service)、jinja模板、job管理、redis主从的更多相关文章
- 架构师成长之路5.3-Saltstack配置管理(State状态模块)
点击架构师成长之路 架构师成长之路5.3-Saltstack配置管理(State状态模块) 配置管理工具: Pupper:1. 采用ruby编程语言:2. 安装环境相对较复杂:3.不支持远程执行,需要 ...
- [ionic开源项目教程] - 第12讲 医疗模块的实现以及Service层loadMore和doRefresh的提取封装
关注微信订阅号:TongeBlog,可查看[ionic开源项目]全套教程. 这一讲主要实现tab2[医疗]模块,[医疗]模块跟tab1[健康]模块类似. [ionic开源项目教程] - 第12讲 医疗 ...
- Ansible笔记(7)---常用模块之系统类模块(cron、service)
一.cron模块 1.1作用: cron 模块可以帮助我们管理远程主机中的计划任务,功能相当于 crontab 命令. 在了解cron模块的参数之前,先写出一些计划任务的示例: # 示例1,每天的1点 ...
- Saltstack_使用指南12_配置管理-jinja模板
1. 说明 下文的案例是根据上一篇文章进行的修改.因此请优先读取上一章博文内容<Saltstack_使用指南11_配置管理-状态之间依赖关系> 2. 主机规划 salt 版本 [root@ ...
- 【重要】Nginx模块Lua-Nginx-Module学习笔记(三)Nginx + Lua + Redis 已安装成功(非openresty 方式安装)
源码地址:https://github.com/Tinywan/Lua-Nginx-Redis 一. 目标 使用Redis做分布式缓存:使用lua API来访问redis缓存:使用nginx向客户端提 ...
- 架构师成长之路5.6-Saltstack配置管理(jinja模板)
点击架构师成长之路 架构师成长之路5.6-Saltstack配置管理(jinja模板) 配置管理工具: Pupper:1. 采用ruby编程语言:2. 安装环境相对较复杂:3.不支持远程执行,需要FU ...
- 把编译安装的httpd 实现服务脚本,通过service和chkconfig 进行管理
把编译安装的httpd 实现服务脚本,通过service和chkconfig 进行管理 1 编译安装httpd 把httpd编译安装在/app/httpd/目录下. 2 在/etc/rc.d/init ...
- SaltStack配置管理-jinja模板
上一篇:SaltStack配置管理-状态间关系 需求:需要apache配置文件里面监听的端口是每个minion本地的地址 saltstack默认的模板是jinjia模板 参考文档:http://doc ...
- 为windows开启winrm service, 以便进行远程管理
为windows开启winrm service, 以便进行远程管理 是windows 一种方便远程管理的服务:开启winrm service,便于在日常工作中,远程管理服务器,或通过脚本,同时管理 ...
随机推荐
- [转帖]安装prometheus+grafana监控mysql redis kubernetes等
安装prometheus+grafana监控mysql redis kubernetes等 https://www.cnblogs.com/sfnz/p/6566951.html plug 的模式进行 ...
- windows下安装和配置SNMP
window snmp服务开启及测试 转自:https://blog.csdn.net/qq_33314107/article/details/80031446 一 安装 二 开启服务 Linux下安 ...
- python+requests 请求响应文本出错返回“登录超时”
Python+requests请求响应:"msg":"登录过时" 1.出错原代码: import requests import json#页面按条件搜索返回相 ...
- SpringBoot集成MybatisPlus报错
SpringBoot集成MybatisPlus报错 启动的时候总是报如下错误: java.lang.annotation.AnnotationFormatError: Invalid default: ...
- PAT B1024/A1073 科学计数法
书中AC代码 #include <cstdio> #include <cstring> #include <iostream> #include <cmath ...
- Lucky Sorting(CodeForces-109D)【思维】
题意:给出一组数,要求从小到大排序,并且排序的过程中,发生交换的两个数至少一个为幸运数(十进制位均为4或7),问能否在(2×n)次交换内完成排序,如果能,输出交换的方案(不要求步骤数最少). 思路:首 ...
- 新浪随机图片壁纸API接口 刷新网页换背景接口
刷新一次页面换一次图片,可以调用到你的网站背景里面去,多炫酷啊,刷新一下本页看下效果哦. 说明:随机图片壁纸api,调用的是新浪api,速度不用担心,图片资源也很多 电脑动漫图片:http://api ...
- JSONObject 的使用
1. 导入依赖 这里以 20180813 的 json 版本为例 <dependency> <groupId>org.json</groupId> <arti ...
- linux常用的bash指令
文本处理 awk sed grep sort uniq cat cut echo fmt tr nl egrep fgrep wc 进程监视 ps top htop atop lsof 网络 nmap ...
- Android获取网络时间的方法
一.通过免费或者收费的API接口获取 1.免费 QQ:http://cgi.im.qq.com/cgi-bin/cgi_svrtime 淘宝:http://api.m.taobao.com/rest/ ...