
Spring Boot集成MyBatis的2种方式

目录
写在前面
最近总是有同事和技术群的朋友提问在Spring Boot中使用MyBatis时遇到的问题,大多数问题总结起来就是对MyBatis和Spring框架不熟悉的原因导致的。实际上,在Spring Boot中使用MyBatis本质就是在Spring框架中集成MyBatis,并没有其他任何高级的东西。只不过在Spring Boot中使用时因为插件封装的关系使得相关的配置可以更简洁一些,但是这种封装对于不熟悉MyBatis的人来讲反而增加了理解的难度。因此,我想把如何在Spring Boot中使用MyBatis进行一个系统性的总结,希望能有一些参考价值。
准备工作
配置数据库驱动
使用任何数据库服务器,只要是使用JDBC方式连接,都需要添加数据库驱动,甚至还需要添加数据库连接池依赖,如下配置以添加MySQL驱动为例进行说明。
<!-- 添加MySQL数据库驱动 -->

<dependency>

    <groupId>mysql</groupId>

    <artifactId>mysql-connector-java</artifactId>

</dependency>

<!-- 添加数据库连接池 -->

<dependency>

    <groupId>com.alibaba</groupId>

    <artifactId>druid</artifactId>

    <version>${version.druid}</version>

</dependency>
配置数据源
在使用数据库之前先要在Spring Boot中配置数据源,如下所示:
spring:

    datasource:

        name: testDatasource

        driver-class-name: com.mysql.jdbc.Driver

        url: jdbc:mysql://127.0.0.1:3306/test_springboot

        username: root

        password:
当然,还可以配置数据库连接池:
#datasource

spring:

    datasource:

        name: testDatasource

        driver-class-name: com.mysql.jdbc.Driver

        url: jdbc:mysql://127.0.0.1:3306/test_springboot

        username: root

        password:

        # 使用druid连接池

        type: com.alibaba.druid.pool.DruidDataSource

        filters: stat

        maxActive: 20

        initialSize: 1

        maxWait: 60000

        minIdle: 1

        timeBetweenEvictionRunsMillis: 60000

        minEvictableIdleTimeMillis: 300000

        validationQuery: select 'x'

        testWhileIdle: true

        testOnBorrow: false

        testOnReturn: false

        poolPreparedStatements: true

        maxOpenPreparedStatements: 20
原生集成MyBatis
这种集成方式本质上就是在Spring框架中集成MyBatis的方式,所以在非Spring Boot框架下也可以使用。
依赖配置
首先,添加依赖配置。
<!-- mybatis -->

<dependency>

    <groupId>org.mybatis</groupId>

    <artifactId>mybatis</artifactId>

    <version>${version.mybatis}</version>

</dependency>

<dependency>

    <groupId>tk.mybatis</groupId>

    <artifactId>mapper</artifactId>

    <version>${version.mybatis.mapper}</version>

</dependency>

<dependency>

    <groupId>com.github.pagehelper</groupId>

    <artifactId>pagehelper</artifactId>

    <version>${version.pagehelper}</version>

</dependency>

<!-- mybatis-spring -->

<dependency>

    <groupId>org.mybatis</groupId>

    <artifactId>mybatis-spring</artifactId>

    <version>${version.mybatis.spring}</version>

</dependency>

<!-- spring事务 -->

<dependency>

    <groupId>org.springframework</groupId>

    <artifactId>spring-tx</artifactId>

</dependency>

<!-- spring jdbc -->

<dependency>

    <groupId>org.springframework</groupId>

    <artifactId>spring-jdbc</artifactId>

</dependency>
注册MyBatis核心组件
其次,通过Java方式在Spring框架中注册MyBatis的核心组件Bean,并且配置声明式事务管理。
(1)在Spring中注册MyBatis的核心组件Bean:SqlSessionFactory,SqlSession,以及Spring的事务管理器。另外,在构建SqlSessionFactory时还可以注册MyBatis的xml映射器。
@Configuration

@EnableTransactionManagement

public class MyBatisSpringConfig implements TransactionManagementConfigurer {

	@Autowired

	private DataSource dataSource;

	// 在Spring中注册SqlSessionFactory,在这里可以设置一下参数:

	// 1.设置分页参数

	// 2.配置MyBatis运行时参数

	// 3.注册xml映射器

	@Bean

	public SqlSessionFactory sqlSessionFactory() {

		SqlSessionFactoryBean sqlSessionFactoryBean = new SqlSessionFactoryBean();

		// 设置数据源

		sqlSessionFactoryBean.setDataSource(dataSource);

		// 设置映射POJO对象包名

		// sqlSessionFactoryBean.setTypeAliasesPackage("org.chench.test.springboot.model");

		// 分页插件

        /*PageHelper pageHelper = new PageHelper();

        Properties properties = new Properties();

        properties.setProperty("reasonable", "true");

        properties.setProperty("supportMethodsArguments", "true");

        properties.setProperty("returnPageInfo", "check");

        properties.setProperty("params", "count=countSql");

        pageHelper.setProperties(properties);*/

        //添加插件

        //sqlSessionFactoryBean.setPlugins(new Interceptor[]{pageHelper});

		// 配置mybatis运行时参数

		org.apache.ibatis.session.Configuration configuration = new org.apache.ibatis.session.Configuration();

		// 自动将数据库中的下划线转换为驼峰格式

		configuration.setMapUnderscoreToCamelCase(true);

		configuration.setDefaultFetchSize(100);

		configuration.setDefaultStatementTimeout(30);

		sqlSessionFactoryBean.setConfiguration(configuration);

		// 在构建SqlSessionFactory时注册xml映射器

        ResourcePatternResolver resolver = new PathMatchingResourcePatternResolver();

        try {

        	sqlSessionFactoryBean.setMapperLocations(resolver.getResources("classpath:mapper/*.xml"));

            return sqlSessionFactoryBean.getObject();

        } catch (Exception e) {

            e.printStackTrace();

            throw new RuntimeException(e);

        }

	}

	/**

	 * 注入sqlSession对象

	 * @param sqlSessionFactory

	 * @return

	 */

	@Bean(value = "sqlSession")

    public SqlSessionTemplate sqlSessionTemplate(SqlSessionFactory sqlSessionFactory) {

        return new SqlSessionTemplate(sqlSessionFactory);

    }

	// Spring事务管理器

	@Bean(value = "transactionManager")

	@Override

	public PlatformTransactionManager annotationDrivenTransactionManager() {

		return new DataSourceTransactionManager(dataSource);

	}

}
(2)注册MyBatis接口映射器
MyBatis 3支持2种映射器:xml映射器和接口映射器,其中xml映射器可以在构建SqlSessionFactory时进行注册。
@Configuration

@AutoConfigureAfter(MyBatisSpringConfig.class) //注意,由于MapperScannerConfigurer执行的比较早,所以必须有该注解

public class MyBatisMapperScannerConfig {

	@Bean

    public MapperScannerConfigurer mapperScannerConfigurer() {

        MapperScannerConfigurer mapperScannerConfigurer = new MapperScannerConfigurer();

        // 设置sqlSessionFactory名

        mapperScannerConfigurer.setSqlSessionFactoryBeanName("sqlSessionFactory");

        // 设置接口映射器基础包名

        mapperScannerConfigurer.setBasePackage("org.chench.test.springboot.mapper");

        Properties properties = new Properties();

        //properties.setProperty("mappers", "org.chench.test.springboot.mapper");

        properties.setProperty("notEmpty", "false");

        properties.setProperty("IDENTITY", "MYSQL");

        mapperScannerConfigurer.setProperties(properties);

        return mapperScannerConfigurer;

    }

}
定义并使用映射器
MyBatis支持2种类型的映射器:XML映射器和接口映射器,在这里以定义并使用接口映射器为例。
- 定义接口映射器
@Repository

public interface AccountMapper {

	@Select("select * from account where id = #{id}")

	public Account getAccountById(@Param("id") long id);

}
注意: 在这里可以使用Spring容器的注解@Repository声明MyBatis的接口映射器为一个Bean组件,这样在使用接口映射器时可以直接注入这个接口映射器Bean进行使用。
- 使用接口映射器
@Service

public class AccountService {

	// 直接注入接口映射器Bean进行使用

	@Autowired

	private AccountMapper accountMapper;

	public Account getAccountById(long id) {

		return accountMapper.getAccountById(id);

	}

}
通过MyBatis-Spring-Boot-Starter集成
通过插件MyBatis-Spring-Boot-Starter在Spring Boot中集成MyBatis时,可以不用再去关心原生配置方式里的细节,直接使用默认配置就能实现最基本的功能。当然,同样可以针对MyBatis的核心组件进行定制。所以,在这里分为2部分进行说明。第一部分说明最基础的默认集成方式,能实现在Spring Boot中使用MyBatis作为ORM插件的基本功能;第二部分说明如何在Spring Boot中对MyBatis进行高级定制。在这之前,需要先添加插件MyBatis-Spring-Boot-Starter的依赖配置。
<!-- 在Spring Boot中集成MyBatis -->

<dependency>

    <groupId>org.mybatis.spring.boot</groupId>

    <artifactId>mybatis-spring-boot-starter</artifactId>

    <version>1.3.2</version>

</dependency>
默认配置
默认情况下,插件MyBatis-Spring-Boot-Starter将进行如下配置:
- 自动检查Spring Boot的数据源配置并构建DataSource对象
- 通过SqlSessionFactoryBean使用数据源构建并注册SqlSessionFactory对象
- 从SqlSessionFactory中创建并注册一个SqlSessionTemplate实例,其实就是构建一个SqlSession对象
- 自动扫描接口映射器,并将这些映射器与SqlSessionTemplate实例进行关联,同时将它们注册到Spring容器中
其实上述这些默认配置就是我们在原生集成MyBatis方式中做的事情,只不过在Spring Boot中通过插件MyBatis-Spring-Boot-Starter自动完成了。只要理解了这一点,就会明白如何在Spring Boot中灵活使用MyBatis组件了。
既然MyBatis的配置已经完成了,那么下一步的工作就是如何编写和使用接口映射器。
1.定义接口映射器
@Mapper

public interface AccMapper {

    @Select("select * from account where id = #{id}")

    Account getAccount(@Param("id") long id);

}
插件MyBatis-Spring-Boot-Starter会自动搜索使用了注解@Mapper的接口映射器并将其注册到Spring容器中,因此在这里不能使用@Repository注解标记MyBatis的映射器接口,这与原生方式集成MyBatis有所不同。
2.使用接口映射器
@RestController

@RequestMapping("/acc")

public class AccController {

	// 直接通过自动注入的方式使用接口映射器

    @Autowired

    AccMapper accMapper;

    @GetMapping("/{id}")

    @ResponseBody

    public Object acc(@PathVariable("id") long id) {

        return accMapper.getAccount(id);

    }

}
至此可以看到,在Spring Boot中通过插件MyBatis-Spring-Boot-Starter集成MyBatis时非常方便,只需要添加基本的数据源配置就可以使用了。当然,如果需要使用MyBatis更加高级的功能(如:使用xml映射器,定制MyBatis运行时参数),使用默认配置是无法实现的,必须在此基础上对MyBatis进行高级的定制。
高级定制
- 定制MyBatis运行时参数
在Spring Boot中对MyBatis进行定制主要是指在Spring Boot的配置文件中(如:application.yaml)对MyBatis运行参数进行自定义配置(使用mybatis作为配置参数前缀):
mybatis:

    check-config-location: true                             # 是否检测MyBatis运行参数配置文件

    config-location: classpath:/mybatis-config.xml          # 指定MyBatis运行参数配置文件位置

    mapper-locations: classpath:/mapper/**/*.xml            # 注册XML映射器

    type-aliases-package: test.springboot.model             # 配置Java类型包名

    type-handlers-package: test.springboot.handlers         # 配置类型处理器包名

    executor-type: SIMPLE                                   # 指定执行器类型

    configuration:

        default-fetch-size: 20

        default-statement-timeout: 30
上述配置参数最终是通过mybatis-spring-boot-autoconfigure.jar加载和配置的。
另外,上述配置参数只是一个配置示例,详细的配置参数列表请参考MyBatis配置官网:http://www.mybatis.org/mybatis-3/zh/configuration.html 。
- 注册并使用XML映射器
从定制MyBatis的运行时参数中可以看到,可以通过参数mybatis.mapper-locations指定XML映射器所在位置。
另外,可以直接通过插件MyBatis-Spring-Boot-Starter在Spring容器中注册SqlSession实例调用XML映射器,如下所示:
@RestController

@RequestMapping("/acc")

public class AccController {

	// 直接注入SqlSession对象

	@Autowired

    SqlSession sqlSession;

    @GetMapping("/{id}")

    @ResponseBody

    public Object getById(@PathVariable("id") long id) {

        return sqlSession.selectOne("test.springboot.mybatis.mapper.getAccount", 1);

    }

}
- Java方式配置MyBatis运行时参数
MyBatis的运行时参数除了可以在Spring Boot的配置文件中指定,还可以通过Java编码方式设置。实际上就是在Spring容器中注册一个实现了ConfigurationCustomizer接口的Bean。
@org.springframework.context.annotation.Configuration

public class MyBatisConfigByJava {

    @Bean

    ConfigurationCustomizer mybatisConfigurationCustomizer() {

        return new ConfigurationCustomizer() {

            @Override

            public void customize(org.apache.ibatis.session.Configuration configuration) {

                // 在Spring Boot中以Java编码方式配置MyBatis运行时参数

                configuration.setMapUnderscoreToCamelCase(true);

                configuration.addMappers("org.chench.test.springboot.mapper");

            }

        };

    }

}
更加高级的定制详见:http://www.mybatis.org/spring-boot-starter/mybatis-spring-boot-autoconfigure/ 。
总结与比较
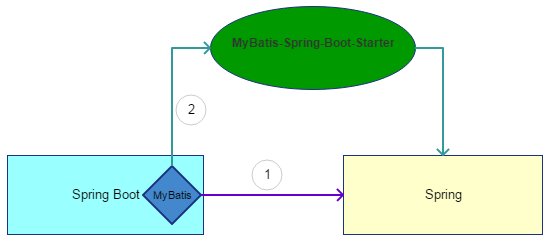
总结起来,在Spring Boot中使用MyBatis可以使用2种方式:
- 使用在Spring框架中集成MyBatis的原生集成方式
- 使用插件MyBatis-Spring-Boot-Starter集成MyBatis
上述两种方式都可以实现对MyBatis的定制化配置,可以根据个人喜好进行选择。无论如何,要想在Spring Boot中灵活使用好MyBatis,最基础的还是MyBatis和Spring框架本身。
Spring Boot集成MyBatis的2种方式的更多相关文章
- 【websocket】spring boot 集成 websocket 的四种方式
集成 websocket 的四种方案 1. 原生注解 pom.xml <dependency> <groupId>org.springframework.boot</gr ...
- spring boot 集成 Filter 的两种方式
两种方式:(两种方式同时存在时,@Bean优先@ServletComponentScan实例化,生成两个对象) 1)@ServletComponentScan注解+@WebFilter注解 2)@Be ...
- spring boot 集成 Listener 的两种方式
1)@ServletComponentScan注解+@WebListener注解 2)@Bean注解+ServletListenerRegistrationBean类
- 【spring boot】14.spring boot集成mybatis,注解方式OR映射文件方式AND pagehelper分页插件【Mybatis】pagehelper分页插件分页查询无效解决方法
spring boot集成mybatis,集成使用mybatis拖沓了好久,今天终于可以补起来了. 本篇源码中,同时使用了Spring data JPA 和 Mybatis两种方式. 在使用的过程中一 ...
- spring boot集成mybatis(2) - 使用pagehelper实现分页
Spring Boot 集成教程 Spring Boot 介绍 Spring Boot 开发环境搭建(Eclipse) Spring Boot Hello World (restful接口)例子 sp ...
- Spring Boot集成MyBatis开发Web项目
1.Maven构建Spring Boot 创建Maven Web工程,引入spring-boot-starter-parent依赖 <project xmlns="http://mav ...
- Spring Boot配置过滤器的两种方式
过滤器(Filter)是Servlet中常用的技术,可以实现用户在访问某个目标资源之前,对访问的请求和响应进行拦截,常用的场景有登录校验.权限控制.敏感词过滤等,下面介绍下Spring Boot配置过 ...
- 详解Spring Boot集成MyBatis的开发流程
MyBatis是支持定制化SQL.存储过程以及高级映射的优秀的持久层框架,避免了几乎所有的JDBC代码和手动设置参数以及获取结果集. spring Boot是能支持快速创建Spring应用的Java框 ...
- Spring Boot 整合 Shiro ,两种方式全总结!
在 Spring Boot 中做权限管理,一般来说,主流的方案是 Spring Security ,但是,仅仅从技术角度来说,也可以使用 Shiro. 今天松哥就来和大家聊聊 Spring Boot ...
随机推荐
- LNMP构建动态网站WordPress
LNMP构建动态网站wordpress 一.部署LNMP架构 1.安装nginx #配置nginx源 cat>/etc/yum.repos.d/nginx.repo<<-EOF [N ...
- 全民抵制“辱华”品牌秀,D&G神回复:呵呵~ 那不是我!
### 补发一下,前写天写的: 就在今天下午,有网友爆出知名品牌 Dolce&Gabbana(杜嘉班纳)的设计师兼创始人Stefano Gabbana在ins上公然发表辱华言论. 下面截图 可 ...
- CSS---文档流布局 | 脱标-postion-zindex | 脱标-浮动
一.css文档流布局概念 1.1,什么是标准文档流 1.2,标准文档流下有哪些微观现象 二.CSS---position属性 2.1,position:relative 2.2,position:fi ...
- 【Python使用】使用pip安装卸载Python包(含离线安装Python包)未完成???
pip 是 Python 包管理工具,该工具提供了对Python包的查找.下载.安装.卸载的功能.Python 2.7.9 + 或 Python 3.4+ 以上版本都自带 pip 工具. pip使用( ...
- JS检测浏览器是否最大化
function isFullScreen (){ if( window.outerHeight === screen.availHeight ){ i ...
- 关于wxpython多线程研究包括(import Publisher等错误研究)
作为一个自动化测试人员,开发基本的应用桌面程序是必须的!最近在研究wxpython相关知识,目前看到多线程一块,发现官方文档介绍说:"在线程中不能修改修改窗口属性!",但是实际情况 ...
- 使用sz/rz基于串口传输文件
关键词:lrzsz.minicom.ZMODEM.MD5sum等. 在环境受限的嵌入式系统上,往往只有串口可以使用. 此时如果需要传输文件,需要借助rz/sz工具,可以使用的传输协议有ZMODEM.Y ...
- SpringBoot整合Sqlite数据库流程
1.创建项目 方式一: 通过网站https://start.spring.io/ 方式二: 通过开发工具(IDEA或者Eclipse自行百度) 2.修改pom.xml配置文件,添加必要的驱动包 < ...
- YCD 软件更新方法
备份Messenger的数据库和Player的Chainmail数据 Upgrade process in Cnario is quite simple, uninstall old version ...
- Web并发页面访问量统计实现
Web并发页面访问量统计实现 - huangshulang1234的博客 - CSDN博客https://blog.csdn.net/huangshulang1234/article/details/ ...