Netty源码解读(二)-服务端源码讲解
简单Echo案例
注释版代码地址:netty
代码是netty的源码,我添加了自己理解的中文注释。
了解了Netty的线程模型和组件之后,我们先看看如何写一个简单的Echo案例,后续的源码讲解都基于此案例。以下是服务端的代码:
public final class MyEchoServer {

    static final int PORT = Integer.parseInt(System.getProperty("port", "8007"));

    public static void main(String[] args) throws Exception {

        EventLoopGroup bossGroup = new NioEventLoopGroup(1);

        EventLoopGroup workerGroup = new NioEventLoopGroup();

        final MyEchoServerHandler serverHandler = new MyEchoServerHandler();

        try {

            ServerBootstrap b = new ServerBootstrap();

            b.group(bossGroup, workerGroup)

                    // 说明服务器端通道的实现类(便于 Netty 做反射处理)

                    .channel(NioServerSocketChannel.class)

                    .option(ChannelOption.SO_BACKLOG, 100)

                    // 对服务端的 NioServerSocketChannel 添加 Handler

                    // LoggingHandler 是 netty 内置的一种 ChannelDuplexHandler,

                    // 既可以处理出站事件,又可以处理入站事件,即 LoggingHandler

                    // 既记录出站日志又记录入站日志。

                    .handler(new LoggingHandler(LogLevel.INFO))

                    // 对服务端接收到的、与客户端之间建立的 SocketChannel 添加 Handler

                    .childHandler(new ChannelInitializer<SocketChannel>() {

                        @Override

                        public void initChannel(SocketChannel ch) throws Exception {

                            ChannelPipeline p = ch.pipeline();

                            p.addLast(serverHandler);

                        }

                    });

            // Start the server.

            ChannelFuture f = b.bind(PORT).sync();

            // Wait until the server socket is closed.

            f.channel().closeFuture().sync();

        } finally {

            // Shut down all event loops to terminate all threads.

            bossGroup.shutdownGracefully();

            workerGroup.shutdownGracefully();

        }

    }

}
EventLoopGroup的创建与初始化
对应代码
EventLoopGroup bossGroup = new NioEventLoopGroup();
默认线程数
跟踪NioEventLoopGroup的无参构造
NioEventLoopGroup()

-->

NioEventLoopGroup(int nThreads)

-->

NioEventLoopGroup(int nThreads, Executor executor)

-->

NioEventLoopGroup(int nThreads, Executor executor, final SelectorProvider selectorProvider)

-->

NioEventLoopGroup(int nThreads, Executor executor, final SelectorProvider selectorProvider,final SelectStrategyFactory selectStrategyFactory)

-->

protected MultithreadEventLoopGroup(int nThreads, Executor executor, Object... args) {

    super(nThreads == 0 ? DEFAULT_EVENT_LOOP_THREADS : nThreads, executor, args);

}
这里能看到,如果构造传入的线程数为0,则使用DEFAULT_EVENT_LOOP_THREADS
值为系统变量io.netty.eventLoopThreads,没有环境变量就取cpu逻辑线程数*2
例如我的电脑为8核16线程,nThreads = 16 * 2
EventLoop的创建
继续跟踪代码,以下代码有部分省略
protected MultithreadEventExecutorGroup(int nThreads, Executor executor,

                                        EventExecutorChooserFactory chooserFactory, Object... args) {

    // 检查线程数量不能小于1

    checkPositive(nThreads, "nThreads");

    // 这里的 ThreadPerTaskExecutor 实例是下文用于创建 EventExecutor 实例的参数

    if (executor == null) {

        executor = new ThreadPerTaskExecutor(newDefaultThreadFactory());

    }

    children = new EventExecutor[nThreads];

    for (int i = 0; i < nThreads; i ++) {

        boolean success = false;

        try {

            // 创建EventLoop(重点)

            children[i] = newChild(executor, args);

            success = true;

        } catch (Exception e) {

            // TODO: Think about if this is a good exception type

            throw new IllegalStateException("failed to create a child event loop", e);

        } finally {

            。。。。。。

        }

    }

    // chooser 的作用是为了实现 next()方法,即从 EventLoopGroup 中挑选

    // 一个 NioEventLoop 来处理连接上 IO 事件的方法

    chooser = chooserFactory.newChooser(children);

    。。。。。。

}
ThreadPerTaskExecutor很简单,实现了Executor接口
public final class ThreadPerTaskExecutor implements Executor {

    。。。。。。

    @Override

    public void execute(Runnable command) {

        threadFactory.newThread(command).start();

    }

}
这意味着每次执行executor.execute方法,都会开启一个线程。
EventLoop的创建是在newChild中
// 类NioEventLoopGroup

protected EventLoop newChild(Executor executor, Object... args) throws Exception {

    // selector工厂

    SelectorProvider selectorProvider = (SelectorProvider) args[0];

    // 选择策略工厂

    SelectStrategyFactory selectStrategyFactory = (SelectStrategyFactory) args[1];

    // 拒绝执行处理器(任务添加到队列中失败时调用)

    RejectedExecutionHandler rejectedExecutionHandler = (RejectedExecutionHandler) args[2];

    EventLoopTaskQueueFactory taskQueueFactory = null;

    EventLoopTaskQueueFactory tailTaskQueueFactory = null;

    int argsLength = args.length;

    if (argsLength > 3) {

        taskQueueFactory = (EventLoopTaskQueueFactory) args[3];

    }

    if (argsLength > 4) {

        tailTaskQueueFactory = (EventLoopTaskQueueFactory) args[4];

    }

    // 创建NioEventLoop并返回

    return new NioEventLoop(this, executor, selectorProvider,

            selectStrategyFactory.newSelectStrategy(),

            rejectedExecutionHandler, taskQueueFactory, tailTaskQueueFactory);

}
小结
NioEventLoopGroup的创建,初始化了selector工厂,选择策略,拒绝执行处理器等。
并创建了同样线程数的NioEventLoop
服务端引导类ServerBootstrap的创建与设置
对应代码
ServerBootstrap b = new ServerBootstrap();

b.group(bossGroup, workerGroup)......
group的设置
public ServerBootstrap group(EventLoopGroup group) {

    return group(group, group);

}

public ServerBootstrap group(EventLoopGroup parentGroup, EventLoopGroup childGroup) {

    super.group(parentGroup);

    if (this.childGroup != null) {

        throw new IllegalStateException("childGroup set already");

    }

    this.childGroup = ObjectUtil.checkNotNull(childGroup, "childGroup");

    return this;

}
提供了两个设置EventLoopGroup的方法,也就是parentGroup和childGroup可以是同一个group,
而parentGroup对应线程图中的bossGroup,childGroup对应线程图中的workerGroup
channel的设置
public B channel(Class<? extends C> channelClass) {

    return channelFactory(new <C>(

            ObjectUtil.checkNotNull(channelClass, "channelClass")

    ));

}
这里设置的是channel反射工厂,该工厂会使用反射生成NioServerSocketChannel对象。
创建并绑定channel
对应代码
ChannelFuture f = b.bind(PORT).sync();
channel的创建
准确点说,是负责创建连接(ACCEPT)的channel的创建
AbstractBootstrap#bind(int inetPort) -->

AbstractBootstrap#bind(SocketAddress localAddress) -->

private ChannelFuture doBind(final SocketAddress localAddress) {

    // 初始化 NioServerSocketChannel 的实例,并且将其注册到

    // bossGroup 中的 EvenLoop 中的 Selector 中,initAndRegister()

    // 实例的初始化和注册(此方法是异步的):

    // (1) 初始化:将handler注册进通道,并执行handler的handlerAdded、channelRegistered方法

    // (2) 将channel注册进selector

    final ChannelFuture regFuture = initAndRegister();

    final Channel channel = regFuture.channel();

    if (regFuture.cause() != null) {

        return regFuture;

    }

    if (regFuture.isDone()) {

        // At this point we know that the registration was complete and successful.

        // 若异步过程 initAndRegister()已经执行完毕,则进入该分支

        ChannelPromise promise = channel.newPromise();

        doBind0(regFuture, channel, localAddress, promise);

        return promise;

    } else {

        // Registration future is almost always fulfilled already, but just in case it's not.

        // 若异步过程 initAndRegister()还未执行完毕,则进入该分支

        final PendingRegistrationPromise promise = new PendingRegistrationPromise(channel);

        regFuture.addListener(new ChannelFutureListener() {

            // 监听 regFuture 的完成事件,完成之后再调用

            // doBind0(regFuture, channel, localAddress, promise);

            @Override

            public void operationComplete(ChannelFuture future) throws Exception {

                Throwable cause = future.cause();

                if (cause != null) {

                    // Registration on the EventLoop failed so fail the ChannelPromise directly to not cause an

                    // IllegalStateException once we try to access the EventLoop of the Channel.

                    promise.setFailure(cause);

                } else {

                    // Registration was successful, so set the correct executor to use.

                    // See https://github.com/netty/netty/issues/2586

                    promise.registered();

                    doBind0(regFuture, channel, localAddress, promise);

                }

            }

        });

        return promise;

    }

}
initAndRegister方法中主要做了3个操作,channel的创建、初始化以及将channel注册到EventLoop中
final ChannelFuture initAndRegister() {

    Channel channel = null;

    try {

        // 无参构造会创建pipelile

        // NioServerSocketChannel

        channel = channelFactory.newChannel();

        // 初始化相关属性

        // 如果是ServerBoottrap,还会设置bossGroup的handler,

        // 其中包括ServerBootstrap.handler设置的handler,以及最后添加ServerBootstrapAcceptor

        // ServerBootstrapAcceptor就是将channel注册到workerGroup的类

        init(channel);

    } catch (Throwable t) {

        。。。。。。

    }

    // 将channel注册进selector(监听ACCEPT事件)

    // 依然是通过开启eventLoop线程的方式进行注册

    // MultithreadEventLoopGroup

    ChannelFuture regFuture = config().group().register(channel);

    if (regFuture.cause() != null) {

        if (channel.isRegistered()) {

            channel.close();

        } else {

            channel.unsafe().closeForcibly();

        }

    }

    return regFuture;

}
创建
请查看前面channel的设置一节,使用ReflectiveChannelFactory反射调用
NioServerSocketChannel的无参构造器,创建channelNioServerSocketChannel() -->
NioServerSocketChannel(SelectorProvider provider) -->
public NioServerSocketChannel(SelectorProvider provider, InternetProtocolFamily family) {
// newChannel(provider, family)生成Java NIO中的ServerSocketChannel
this(newChannel(provider, family));
}
-->
public NioServerSocketChannel(ServerSocketChannel channel) {
// SelectionKey.OP_ACCEPT表示当前channel监听的是accept事件
super(null, channel, SelectionKey.OP_ACCEPT);
config = new NioServerSocketChannelConfig(this, javaChannel().socket());
}
-->
AbstractNioMessageChannel(Channel parent, SelectableChannel ch, int readInterestOp)
-->
AbstractNioChannel(Channel parent, SelectableChannel ch, int readInterestOp)
-->
protected AbstractChannel(Channel parent) {
this.parent = parent;
id = newId();
unsafe = newUnsafe();
// 创建管道,同时创建头尾的handlerContext
pipeline = newChannelPipeline();
}
我们看看管道的创建做了啥
protected DefaultChannelPipeline(Channel channel) {

    this.channel = ObjectUtil.checkNotNull(channel, "channel");

    succeededFuture = new SucceededChannelFuture(channel, null);

    voidPromise =  new VoidChannelPromise(channel, true);

    // 创建尾部HandlerContext

    tail = new TailContext(this);

    // 创建头部HandlerContext

    head = new HeadContext(this);

    // 初始化链条关系

    head.next = tail;

    tail.prev = head;

}
Pipeline的addLast实际上是插入,而不是在尾部添加。会将对应的handler封装成HandlerContext,插入到TailContext之前
图片来源:netty源码分析之pipeline(一) - 简书 (jianshu.com)
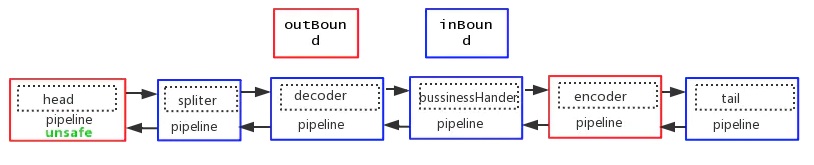
而在此案例中,pipeline长这样

初始化
初始化调用的是init方法
// ServerBootstrap类

void init(Channel channel) {

    // 初始化相关属性

    setChannelOptions(channel, newOptionsArray(), logger);

    setAttributes(channel, newAttributesArray());

    ChannelPipeline p = channel.pipeline();

    final EventLoopGroup currentChildGroup = childGroup;

    final ChannelHandler currentChildHandler = childHandler;

    final Entry<ChannelOption<?>, Object>[] currentChildOptions = newOptionsArray(childOptions);

    final Entry<AttributeKey<?>, Object>[] currentChildAttrs = newAttributesArray(childAttrs);

    p.addLast(new ChannelInitializer<Channel>() {

        // 这里会在channel被注册进selector后执行

        @Override

        public void initChannel(final Channel ch) {

            final ChannelPipeline pipeline = ch.pipeline();

            ChannelHandler handler = config.handler();

            // ServerBootstrap.handler(new LoggingHandler(LogLevel.INFO))

            // 就是在这里被设置进管道

            if (handler != null) {

                pipeline.addLast(handler);

            }

            ch.eventLoop().execute(new Runnable() {

                @Override

                public void run() {

                    // 负责监听READ的channel就是在这个handler中注册的

                    pipeline.addLast(new ServerBootstrapAcceptor(

                            ch, currentChildGroup, currentChildHandler, currentChildOptions, currentChildAttrs));

                }

            });

        }

    });

}
初始化方法就是将
ServerBootstrap一开始设置的相关属性初始化,以及往管道中添加handler,ServerBootstrapAcceptor这个handler是重点,我们在下面讲。注册
channel已经创建和初始化了,接下来就是将channel注册到EventLoop中
// ChannelFuture regFuture = config().group().register(channel);

// 类MultithreadEventLoopGroup

public ChannelFuture register(Channel channel) {

    // next():从EventLoopGroup中选择一个EventLoop

    return next().register(channel);

}

-->

SingleThreadEventLoop#register(Channel channel)

-->

SingleThreadEventLoop#register(final ChannelPromise promise)

-->

// 类AbstractChannel

public final void register(EventLoop eventLoop, final ChannelPromise promise) {

    。。。。。。

    AbstractChannel.this.eventLoop = eventLoop;

    // 判断如果当前线程是EventLoop的线程,则直接执行

    if (eventLoop.inEventLoop()) {

        register0(promise);

    } else {

        // 否则添加进EventLoop的任务队列,由EventLoop的线程去执行

        try {

            eventLoop.execute(new Runnable() {

                @Override

                public void run() {

                    register0(promise);

                }

            });

        } catch (Throwable t) {

            。。。。。。

        }

    }

}
register0方法就是注册方法了,至于为什么会有eventLoop.execute,这个方法很有意思,等会讲。
先看看register0
private void register0(ChannelPromise promise) {

    try {

        。。。。。。

        boolean firstRegistration = neverRegistered;

        // 将当前channel注册到selector中

        doRegister();

        neverRegistered = false;

        registered = true;

        // Ensure we call handlerAdded(...) before we actually notify the promise. This is needed as the

        // user may already fire events through the pipeline in the ChannelFutureListener.

        // 触发channel的handlerAdded方法

        // 如果是ChannelInitializer的话,会在handlerAdded中触发initChannel方法

        pipeline.invokeHandlerAddedIfNeeded();

        safeSetSuccess(promise);

        // 触发channel的channelRegistered方法

        pipeline.fireChannelRegistered();

        // Only fire a channelActive if the channel has never been registered. This prevents firing

        // multiple channel actives if the channel is deregistered and re-registered.

        if (isActive()) {

            if (firstRegistration) {

                pipeline.fireChannelActive();

            } else if (config().isAutoRead()) {

                // This channel was registered before and autoRead() is set. This means we need to begin read

                // again so that we process inbound data.

                //

                // See https://github.com/netty/netty/issues/4805

                beginRead();

            }

        }

    } catch (Throwable t) {

        。。。。。。

    }

}
doRegister():将当前channel注册到selector中,里面会调用到Java NIO的一些API
pipeline.invokeHandlerAddedIfNeeded():触发channel的handlerAdded方法
pipeline.fireChannelRegistered():触发channel的channelRegistered方法从这里可以看到,全部handler中的handlerAdded执行完,才会执行channelRegistered方法
绑定端口
重新回到AbstractBootstrap#doBind方法中
// 如果上面的initAndRegister方法执行完毕(异步执行的),则执行doBind0

if (regFuture.isDone()) {

    // At this point we know that the registration was complete and successful.

    // 若异步过程 initAndRegister()已经执行完毕,则进入该分支

    ChannelPromise promise = channel.newPromise();

    doBind0(regFuture, channel, localAddress, promise);

    return promise;

} else {

    // Registration future is almost always fulfilled already, but just in case it's not.

    // 若异步过程 initAndRegister()还未执行完毕,则进入该分支

    final PendingRegistrationPromise promise = new PendingRegistrationPromise(channel);

    regFuture.addListener(new ChannelFutureListener() {

        // 监听 regFuture 的完成事件,完成之后再调用

        // doBind0(regFuture, channel, localAddress, promise);

        @Override

        public void operationComplete(ChannelFuture future) throws Exception {

            Throwable cause = future.cause();

            if (cause != null) {

                // Registration on the EventLoop failed so fail the ChannelPromise directly to not cause an

                // IllegalStateException once we try to access the EventLoop of the Channel.

                promise.setFailure(cause);

            } else {

                // Registration was successful, so set the correct executor to use.

                // See https://github.com/netty/netty/issues/2586

                promise.registered();

                doBind0(regFuture, channel, localAddress, promise);

            }

        }

    });

    return promise;

}
上面这段if/esle做了同一件是,就是自行doBind0方法,区别在于如果initAndRegister执行完毕,则执行调用doBind0,否则添加监听器,等执行完成触发调用doBind0
继续看doBind0
// 类AbstractBootstrap

private static void doBind0(

        final ChannelFuture regFuture, final Channel channel,

        final SocketAddress localAddress, final ChannelPromise promise) {

    // This method is invoked before channelRegistered() is triggered.  Give user handlers a chance to set up

    // the pipeline in its channelRegistered() implementation.

    // execute方法会将这个Runnable加入到taskQueue中,并开线程执行EventLoop的run方法(死循环)

    channel.eventLoop().execute(new Runnable() {

        @Override

        public void run() {

            if (regFuture.isSuccess()) {

                channel.bind(localAddress, promise).addListener(ChannelFutureListener.CLOSE_ON_FAILURE);

            } else {

                promise.setFailure(regFuture.cause());

            }

        }

    });

}
channel.eventLoop().execute这个后面再说,可以看到,里面的逻辑是调用channel.bind在实现绑定的,继续跟踪
AbstractChannel#bind(SocketAddress localAddress, ChannelPromise promise)

-->

// 类AbstractChannel

public final ChannelFuture bind(SocketAddress localAddress, ChannelPromise promise) {

    // tail就是TailContext

    return tail.bind(localAddress, promise);

}

-->

// 类AbstractChannel

public ChannelFuture bind(final SocketAddress localAddress, final ChannelPromise promise) {

    ObjectUtil.checkNotNull(localAddress, "localAddress");

    if (isNotValidPromise(promise, false)) {

        // cancelled

        return promise;

    }

    // 在管道中从当前handlerContext往前查找实现了bind方法的handlerContext

    final AbstractChannelHandlerContext next = findContextOutbound(MASK_BIND);

    EventExecutor executor = next.executor();

    if (executor.inEventLoop()) {

        // 执行handlerContext的bind方法

        next.invokeBind(localAddress, promise);

    } else {

        safeExecute(executor, new Runnable() {

            @Override

            public void run() {

                next.invokeBind(localAddress, promise);

            }

        }, promise, null, false);

    }

    return promise;

}

-->

// 类AbstractChannel

private void invokeBind(SocketAddress localAddress, ChannelPromise promise) {

    if (invokeHandler()) {

        try {

            ((ChannelOutboundHandler) handler()).bind(this, localAddress, promise);

        } catch (Throwable t) {

            notifyOutboundHandlerException(t, promise);

        }

    } else {

        bind(localAddress, promise);

    }

}
从上面可以看到,最终会执行handler的bind方法,拿LoggingHandler的bind方法举例
// 类LoggingHandler

public void bind(ChannelHandlerContext ctx, SocketAddress localAddress, ChannelPromise promise) throws Exception {

    if (logger.isEnabled(internalLevel)) {

        logger.log(internalLevel, format(ctx, "BIND", localAddress));

    }

    ctx.bind(localAddress, promise);

}
ctx.bind(localAddress, promise)是不是很眼熟,没错,就是AbstractChannel#bind(final SocketAddress localAddress, final ChannelPromise promise)
就像一个循环,每一次都在当前handlerContext往前找有实现了bind方法的handlerContext,执行bind,然后继续往前找。
最终找到管道中的第一个handler,也就是HeadContext,看看它实现的bind方法
// 类HeadContext

public void bind(

        ChannelHandlerContext ctx, SocketAddress localAddress, ChannelPromise promise) {

    unsafe.bind(localAddress, promise);

}

-->

AbstractChannel#bind(final SocketAddress localAddress, final ChannelPromise promise)

-->

NioServerSocketChannel#doBind(SocketAddress localAddress)
最后,还是Java NIO的API来绑定
参考资料:
《Netty in Action》,Norman Maurer
《Scalable IO in Java》,Doug Lea
45 张图深度解析 Netty 架构与原理 (qq.com)
Netty源码解读(二)-服务端源码讲解的更多相关文章
- muduo库源码剖析(二) 服务端
一. TcpServer类: 管理所有的TCP客户连接,TcpServer供用户直接使用,生命期由用户直接控制.用户只需设置好相应的回调函数(如消息处理messageCallback)然后TcpSer ...
- Netty 4源码解析:服务端启动
Netty 4源码解析:服务端启动 1.基础知识 1.1 Netty 4示例 因为Netty 5还处于测试版,所以选择了目前比较稳定的Netty 4作为学习对象.而且5.0的变化也不像4.0这么大,好 ...
- Zookeeper 源码(四)Zookeeper 服务端源码
Zookeeper 源码(四)Zookeeper 服务端源码 Zookeeper 服务端的启动入口为 QuorumPeerMain public static void main(String[] a ...
- zookeeper源码分析之四服务端(单机)处理请求流程
上文: zookeeper源码分析之一服务端启动过程 中,我们介绍了zookeeper服务器的启动过程,其中单机是ZookeeperServer启动,集群使用QuorumPeer启动,那么这次我们分析 ...
- Spring Cloud系列(三):Eureka源码解析之服务端
一.自动装配 1.根据自动装配原理(详见:Spring Boot系列(二):Spring Boot自动装配原理解析),找到spring-cloud-starter-netflix-eureka-ser ...
- zookeeper源码分析之五服务端(集群leader)处理请求流程
leader的实现类为LeaderZooKeeperServer,它间接继承自标准ZookeeperServer.它规定了请求到达leader时需要经历的路径: PrepRequestProcesso ...
- vs2008编译FileZilla服务端源码
vs2008编译FileZilla服务端源码 FileZilla服务端下载地址:https://download.filezilla-project.org/server/.FileZilla服务端源 ...
- Netty入门之客户端与服务端通信(二)
Netty入门之客户端与服务端通信(二) 一.简介 在上一篇博文中笔者写了关于Netty入门级的Hello World程序.书接上回,本博文是关于客户端与服务端的通信,感觉也没什么好说的了,直接上代码 ...
- Photon Server 实现注册与登录(二) --- 服务端代码整理
一.有的代码前端和后端都会用到.比如一些请求的Code.使用需要新建项目存放公共代码. 新建项目Common存放公共代码: EventCode :存放服务端自动发送信息给客户端的code Operat ...
- 小D课堂 - 新版本微服务springcloud+Docker教程_4-06 Feign核心源码解读和服务调用方式ribbon和Feign选择
笔记 6.Feign核心源码解读和服务调用方式ribbon和Feign选择 简介: 讲解Feign核心源码解读和 服务间的调用方式ribbon.feign选择 ...
随机推荐
- HTML语言的简要学习
什么是HTML? HTML 是用来描述网页的一种语言. l HTML 指的是超文本标记语言 (Hyper Text Markup Language) l HTML 不是一种编程语言,而是一种标记语 ...
- 电机噪声之谐波分析(内附simulink中FFT分析的相关参数配置与解析)
电机噪声之谐波分析(内附simulink中FFT分析的相关参数配置与解析) 目录 电机噪声之谐波分析(内附simulink中FFT分析的相关参数配置与解析) 写在前面 正文 电机噪声 谐波的产生 什么 ...
- 三、单redis升级redis集群+哨兵
针对假如已经是安装了redis,只是是单部署,需要把他切换成redis集群+哨兵模式,我因为偷懒,就写了个脚本来执行,各位看官,请品~你品~你细品~ 首先准备个升级包,放到任意路径,内容如下: 第一个 ...
- Python数据分析--Numpy常用函数介绍(2)
摘要:本篇我们将以分析历史股价为例,介绍怎样从文件中载入数据,以及怎样使用NumPy的基本数学和统计分析函数.学习读写文件的方法,并尝试函数式编程和NumPy线性代数运算,来学习NumPy的常用函数. ...
- Probabilistic two-stage detection
- fpn(feature-Pyramid-network)学习笔记
FPN(特征金字塔网络)学习笔记 论文 在物体检测里面,有限计算量情况下,网络的深度(对应到感受野)与 stride 通常是一对矛盾的东西,常用的网络结构对应的 stride 一般会比较大(如 32) ...
- LC T668笔记 & 有关二分查找、第K小数、BFPRT算法
LC T668笔记 [涉及知识:二分查找.第K小数.BFPRT算法] [以下内容仅为本人在做题学习中的所感所想,本人水平有限目前尚处学习阶段,如有错误及不妥之处还请各位大佬指正,请谅解,谢谢!] !! ...
- nginx 代理请求导出功能bug解决方法
问题描述: nginx代理的ip直接访问可以直接下载文件,但是通过nginx访问就报502,nginx错误日志:upstream sent invalid chunked response while ...
- Python3 filter()函数和map()函数
filter(function or None,iterable) 函数用于过滤序列,过滤掉不符合条件的元素,返回一个迭代器对象,如果要转换为列表,可以使用 list() 来转换. 该接收两个参数,第 ...
- Python Socket Sever
1. Server code 1 # !/usr/bin/env python 2 # coding:utf-8 3 import multiprocessing 4 import socket 5 ...